基于ssd的手势识别模型(object detection api方式)
【Tensorflow】Object Detection API-训练自己的手势识别模型
1. 安装tensorflow以及下载object detection api
1.安装tensorflow:
对于CPU版本:pip install tensorflow
对于GPU版本:pip install tensorflow-gpu
升级tensorflow到最新版1.4.0:pip install --upgrade tensorflow-gpu
2.安装必须库:
sudo pip install pillow
sudo pip install lxml
sudo pip install jupyter
sudo pip install matplotlib
3.下载object detection api:
t clone https://github.com/tensorflow/models.git
4.protobuf编译:在tensorflow/models/research/目录下
protoc object_detection/protos/*.proto --python_out=.
5.添加pythonpath,在tensorflow/models/research/目录下
export PYTHONPATH=$PYTHONPATH:`pwd`:`pwd`/slim
6.测试安装:
python object_detection/builders/model_builder_test.py
2.训练数据集准备
1.在model下新建文件夹dataset/VOCdevkit/VOC2007目录,VOC2007目录机构如下图所示: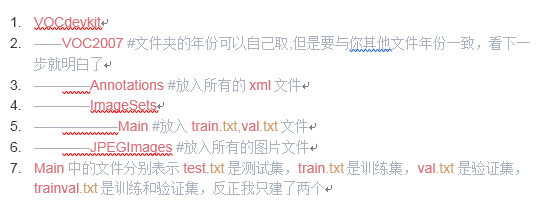
2.在VOC2007目录下运行generate_txt.py程序,划分数据集,我的训练集和验证集比例为7:3,总量为1557
import os

import random

train_percent = 0.70

xmlfilepath = 'Annotations'

txtsavepath = 'ImageSets\Main'

total_xml = os.listdir(xmlfilepath)

num=len(total_xml)

list=range(num)

tr=int(num*train_percent)

train=random.sample(list,tr)

ftrain = open('ImageSets/Main/train.txt', 'w')

fval = open('ImageSets/Main/val.txt', 'w')

for i  in list:

    name=total_xml[i][:-4]+'\n'

    if i in train:

        ftrain.write(name)

    else:

        fval.write(name)

ftrain.close()

fval.close()

print ("finished")
3.将models/research/object_detection/dataset_tools目录下的create_pascal_tf_record.py文件复制到dataset文件夹下,做如下修改:
(1)修改第85行:img_path = os.path.join(data['folder'], image_subdirectory, data['filename'])
改为:img_path = os.path.join("VOC2007", image_subdirectory, data['filename'])
原因:因为我的数据标注的xml文件中的folder项是"hand_2",但是我本地并没有该目录,所以直接改为"VOC2007"。
(2)修改第163行:examples_path = os.path.join(data_dir, year, 'ImageSets', 'Main','aeroplane_' + FLAGS.set + '.txt')
改为:examples_path = os.path.join(data_dir, year, 'ImageSets', 'Main',FLAGS.set + '.txt')
原因:我的Main中的txt文件中没有aeroplane_前缀
(3)根据自己的标签创建pascal_label_map.pbtxt 文件,内容如下: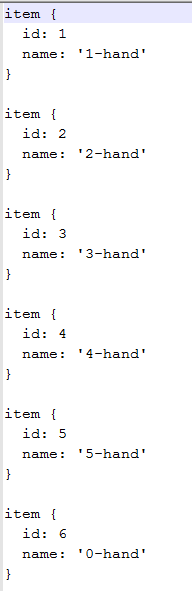
(4)运行以下命令,就可以得到用于训练和验证的tf_record文件:
python create_pascal_tf_record.py
--data_dir=./VOCdevkit
--label_map_path=./pascal_label_map.pbtxt
--year=VOC2007
--set=train
--output_path=./pascal_train.record
python create_pascal_tf_record.py
--data_dir=./VOCdevkit
--label_map_path=./pascal_label_map.pbtxt
--year=VOC2007
--set=val
--output_path=./pascal_val.record
此处写的是相对路径,若有需要可改为绝对路径。 运行完成后将会在 目录下得到pascal_train.record和pascal_val.record两个文件,训练集和验证集的二进制文件。
3.解压SSDMobilenet模型
tar -xvf ssd_mobilenet_v1_coco_2018_01_28.tar得到如下文件: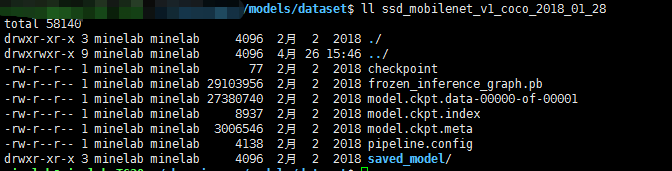
将文件夹里面的model.ckpt.*的三个文件copy到dataset文件夹。
4.修改config文件
将文件models/research/object_detection/samples/configs/ssd_mobilenet_v1_pets.config复制到dataset.修改:
(1)num_classes修改为自己的类别数目,我的是6
(2)修改路径。(5处)
fine_tune_checkpoint: "./models/dataset/model.ckpt"
input_path: "./models/dataset/pascal_train.record"
label_map_path: ".models/dataset/pascal_label_map.pbtxt"
input_path: "./models/dataset/pascal_val.record"
label_map_path: "./models/dataset/pascal_label_map.pbtxt"
此处建议写为绝对路径
保存config文件,重命名为ssd_mobilenet_v1_pascal.config。
5.开始训练
将models/research/object_detection/model_main.py文件复制到dataset路径下:
在model_main.py文件中加三行代码:
import os

os.environ['CUDA_VISIBLE_DEVICES'] = ''     # 修改为当前能用的GPU

tf.logging.set_verbosity(tf.logging.INFO)     # 打印日志
执行训练命令
python model_main.py
--./ssd_mobilenet_v1_pascal.config
--model_dir=./output
--num_train_steps=50000
--sample_1_of_n_eval_examples=1 --alsologtostderr
6.评估模型
暂时还没找到评估模型的文件
7.查看结果
tensorboard --logdir=./models/dataset/output --port=6006
可以在浏览器打开http://服务器IP:6005/ 页面观察训练过程
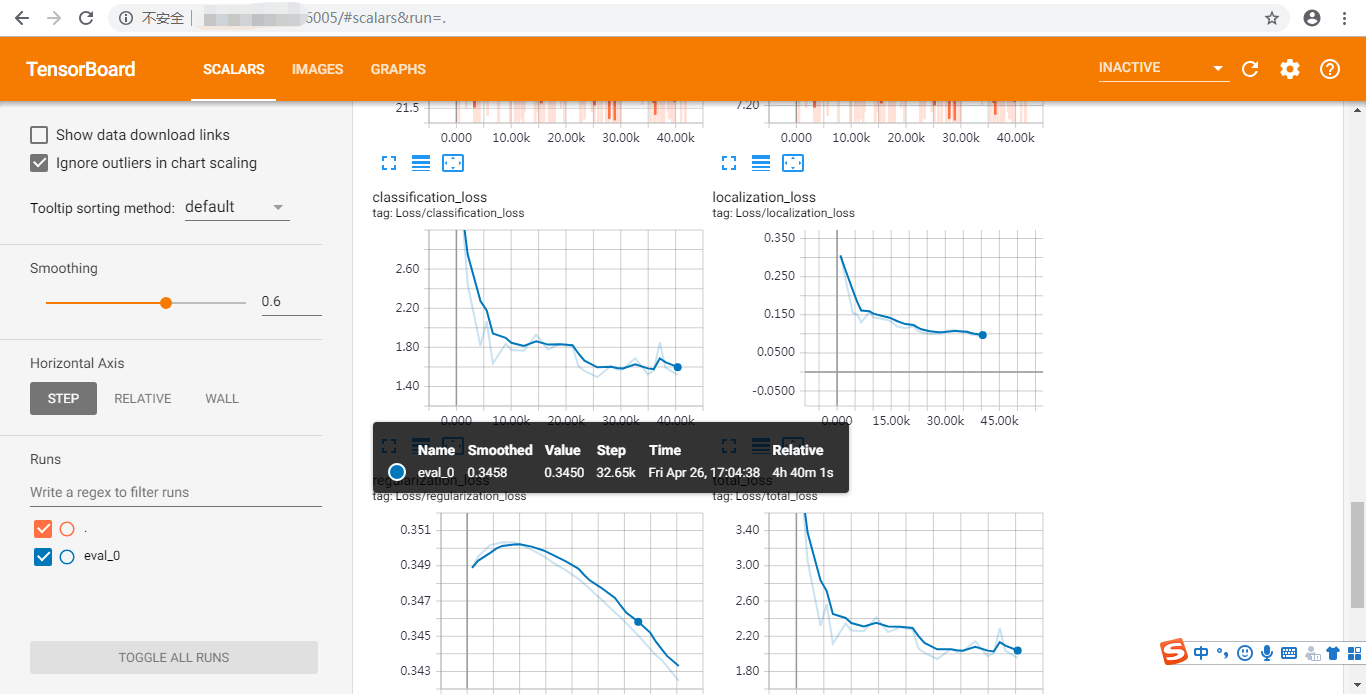
主要是观察loss和mAP@.50IOU
8.生成可以被调用的模型
将models/research/object_detection目录下的export_inference_graph.py文件复制到dataset路径下
python export_inference_graph.py
--input_type=image_tensor
--pipeline_config_path=./ssd_mobilenet_v1_pascal.config
--trained_checkpoint_prefix=./output/model.ckpt-10000
--output_directory=./savedModelcd
生成的模型如图所示:
9.调用生成的模型
在dataset目录下创建object_detection_test.py,并将其复制到models/research/object_detection目录下,因为要调用该目录下的utils.py文件
可以在dataset下创建你自己的测试文件夹,然后更改object_detection_test.py的相应的路径
import numpy as np

import os

import six.moves.urllib as urllib

import sys

import tarfile

import tensorflow as tf

import zipfile

from collections import defaultdict

from io import StringIO

from matplotlib import pyplot as plt

from PIL import Image

## This is needed to display the images.

#%matplotlib inline

# This is needed since the notebook is stored in the object_detection folder.

sys.path.append("..")

from utils import label_map_util

from utils import visualization_utils as vis_util

# What model to download.

#MODEL_NAME = 'ssd_mobilenet_v1_coco_2017_11_17'

#MODEL_FILE = MODEL_NAME + '.tar.gz'

#DOWNLOAD_BASE = #'http://download.tensorflow.org/models/object_detection/'

MODEL_NAME = '/home/minelab/chenqingyun/models/dataset/savedModelcd'

# Path to frozen detection graph. This is the actual model that is used for the object detection.

PATH_TO_CKPT = MODEL_NAME + '/frozen_inference_graph.pb'

# List of the strings that is used to add correct label for each box.

PATH_TO_LABELS = "/home/minelab/chenqingyun/models/dataset/pascal_label_map.pbtxt"

NUM_CLASSES = 6

#download model

#opener = urllib.request.URLopener()

#opener.retrieve(DOWNLOAD_BASE + MODEL_FILE, MODEL_FILE)

#tar_file = tarfile.open(MODEL_FILE)

#for file in tar_file.getmembers():

#  file_name = os.path.basename(file.name)

#  if 'frozen_inference_graph.pb' in file_name:

#    tar_file.extract(file, os.getcwd())

#Load a (frozen) Tensorflow model into memory.

detection_graph = tf.Graph()

with detection_graph.as_default():

  od_graph_def = tf.GraphDef()

  with tf.gfile.GFile(PATH_TO_CKPT, 'rb') as fid:

    serialized_graph = fid.read()

    od_graph_def.ParseFromString(serialized_graph)

    tf.import_graph_def(od_graph_def, name='')

#Loading label map

label_map = label_map_util.load_labelmap(PATH_TO_LABELS)

categories = label_map_util.convert_label_map_to_categories(label_map, max_num_classes=NUM_CLASSES, use_display_name=True)

category_index = label_map_util.create_category_index(categories)

#Helper code

def load_image_into_numpy_array(image):

  (im_width, im_height) = image.size

  return np.array(image.getdata()).reshape(

      (im_height, im_width, 3)).astype(np.uint8)

# For the sake of simplicity we will use only 2 images:

# image1.jpg

# image2.jpg

# If you want to test the code with your images, just add path to the images to the TEST_IMAGE_PATHS.

PATH_TO_TEST_IMAGES_DIR = '/home/minelab/chenqingyun/models/dataset/1'

#TEST_IMAGE_PATHS = [ os.path.join(PATH_TO_TEST_IMAGES_DIR, 'image{}.jpg'.format(i)) for i in range(1, 3) ]

TEST_IMAGE = "2.jpeg"

#print('the test image is:', TEST_IMAGE)

TEST_IMAGE = os.path.join(PATH_TO_TEST_IMAGES_DIR,TEST_IMAGE)

# Size, in inches, of the output images.

IMAGE_SIZE = (224, 224)

IMGES_LIST = os.listdir(PATH_TO_TEST_IMAGES_DIR)

with detection_graph.as_default():

    with tf.Session(graph=detection_graph) as sess:

        for IMG_NAME in IMGES_LIST:

            TEST_IMAGE = os.path.join(PATH_TO_TEST_IMAGES_DIR,IMG_NAME)

            # Definite input and output Tensors for detection_graph

            image_tensor = detection_graph.get_tensor_by_name('image_tensor:0')

            # Each box represents a part of the image where a particular object was detected.

            detection_boxes = detection_graph.get_tensor_by_name('detection_boxes:0')

            # Each score represent how level of confidence for each of the objects.

            # Score is shown on the result image, together with the class label.

            detection_scores = detection_graph.get_tensor_by_name('detection_scores:0')

            detection_classes = detection_graph.get_tensor_by_name('detection_classes:0')

            num_detections = detection_graph.get_tensor_by_name('num_detections:0')

            #for image_path in TEST_IMAGE_PATHS:

            image = Image.open(TEST_IMAGE)

            # the array based representation of the image will be used later in order to prepare the

            # result image with boxes and labels on it.

            image_np = load_image_into_numpy_array(image)

            # Expand dimensions since the model expects images to have shape: [1, None, None, 3]

            image_np_expanded = np.expand_dims(image_np, axis=0)

            image_tensor = detection_graph.get_tensor_by_name('image_tensor:0')

            # Each box represents a part of the image where a particular object was detected.

            boxes = detection_graph.get_tensor_by_name('detection_boxes:0')

            # Each score represent how level of confidence for each of the objects.

            # Score is shown on the result image, together with the class label.

            scores = detection_graph.get_tensor_by_name('detection_scores:0')

            classes = detection_graph.get_tensor_by_name('detection_classes:0')

            num_detections = detection_graph.get_tensor_by_name('num_detections:0')

            # Actual detection.

            (boxes, scores, classes, num_detections) = sess.run(

                [boxes, scores, classes, num_detections],

                feed_dict={image_tensor: image_np_expanded})

            # Visualization of the results of a detection.

            vis_util.visualize_boxes_and_labels_on_image_array(

                image_np,

                np.squeeze(boxes),

                np.squeeze(classes).astype(np.int32),

                np.squeeze(scores),

                category_index,

                use_normalized_coordinates=True,

                line_thickness=8)

            # print(scores)

            # print(classes)

            # print(category_index)

            final_score = np.squeeze(scores)

            count = 0

            for i in range(100):

                if scores is None or final_score[i] > 0.5:

                    count = count + 1

                    print(IMG_NAME,classes[0][i],scores[0][i])

            #print ('the count of objects is: ', count)

            # plt.figure(figsize=IMAGE_SIZE)

            # plt.imshow(image_np)

            # plt.show()
基于ssd的手势识别模型(object detection api方式)的更多相关文章
- 基于谷歌开源的TensorFlow Object Detection API视频物体识别系统搭建自己的应用(四)
本章主要内容是利用mqtt.多线程.队列实现模型一次加载,批量图片识别分类功能 目录结构如下: mqtt连接及多线程队列管理 MqttManager.py # -*- coding:utf8 -*- ...
- 基于TensorFlow Object Detection API进行迁移学习训练自己的人脸检测模型(二)
前言 已完成数据预处理工作,具体参照: 基于TensorFlow Object Detection API进行迁移学习训练自己的人脸检测模型(一) 设置配置文件 新建目录face_faster_rcn ...
- TensorFlow Object Detection API中的Faster R-CNN /SSD模型参数调整
关于TensorFlow Object Detection API配置,可以参考之前的文章https://becominghuman.ai/tensorflow-object-detection-ap ...
- 第三十二节,使用谷歌Object Detection API进行目标检测、训练新的模型(使用VOC 2012数据集)
前面已经介绍了几种经典的目标检测算法,光学习理论不实践的效果并不大,这里我们使用谷歌的开源框架来实现目标检测.至于为什么不去自己实现呢?主要是因为自己实现比较麻烦,而且调参比较麻烦,我们直接利用别人的 ...
- Tensorflow object detection API 搭建属于自己的物体识别模型
一.下载Tensorflow object detection API工程源码 网址:https://github.com/tensorflow/models,可通过Git下载,打开Git Bash, ...
- object detection api调参详解(兼SSD算法参数详解)
一.引言 使用谷歌提供的object detection api图像识别框架,我们可以很方便地重新训练一个预训练模型,用于自己的具体业务.以我所使用的ssd_mobilenet_v1预训练模型为例,训 ...
- Tensorflow object detection API 搭建物体识别模型(四)
四.模型测试 1)下载文件 在已经阅读并且实践过前3篇文章的情况下,读者会有一些文件夹.因为每个读者的实际操作不同,则文件夹中的内容不同.为了保持本篇文章的独立性,制作了可以独立运行的文件夹目标检测. ...
- Tensorflow object detection API 搭建物体识别模型(三)
三.模型训练 1)错误一: 在桌面的目标检测文件夹中打开cmd,即在路径中输入cmd后按Enter键运行.在cmd中运行命令: python /your_path/models-master/rese ...
- Tensorflow object detection API 搭建物体识别模型(一)
一.开发环境 1)python3.5 2)tensorflow1.12.0 3)Tensorflow object detection API :https://github.com/tensorfl ...
随机推荐
- Delphi编程之爬取贴吧帖子图片
大家如果经常在逛贴吧的时候,会看到很多帖子里有很多好看的图片,都想下载下来留存的话,常规的方法只能一张一张点击右键,然后图片另存为,这样的方法对于图片少的来说没什么,要是图片超过100张,200张,那 ...
- Python_文件处理
1.Python 文件处理 打开文件---->读取内容---->获得内容 读取文件方式: r 只读文件 w 只写模式 a 追加模式 r+b 读写模式 w+b 写读模式 a+b ...
- 自动化测试-17.selenium数据的分离之txt文本的写入与读取
前言 数据量偏小时,用txt文本保存数据比较合适,以-进行区分,为什么不用:呢?原因是,我们在使用数据时,会存在url地址的情况,里面宝行:所以用-进行替代 此处附上代码 #encoding=utf- ...
- CnPack组件包的安装与使用
如果你用过Eclipse.NotePad++等等工具,再试试用刚装好Delphi写代码会很痛苦,你是否觉得Delphi的代码编辑器很不友好? 那就去了解一下CnPack吧,给你的Delphi装上它绝对 ...
- ElasticSearch CPU和内存占用高的优化记录
公司最近使用ElasticSearch作为数据报表汇总引擎.上线三个月累计数据800万,但是今天突然大面积出现查询超时,上服务器查看服务运行情况,发现cpu使用率高达300% mem 使用率也到了90 ...
- matlab中特殊符号如希腊字符
使用legend 'Best' 图标标识放在图框内不与图冲突的最佳位置'BestOutside' 图标标识放在图框外使用最小空间的最佳位置 legend('sin','cos','location', ...
- 什么是BFC
对css有了解的朋友肯定都知道盒式模型这个概念,对一个元素设置css,首先需要知道这个元素是block还是inline类型.而BFC就是用来格式化块级盒子,同样管理inline类型的盒子还有IFC,以 ...
- springboot启动的时候日志缺少Mapping日志等
发现启动springboot日志不全 缺失启动日志如: 正常启动日志 解决办法: 更换较低版本的spring boot父级依赖. <parent> <groupId>org.s ...
- JSF相关介绍
About JavaServer Faces technology simplifies building user interfaces for JavaServer applications. D ...
- 前端自定义format函数,做字符串格式化功能
<!DOCTYPE html> <html lang="en"> <head> <meta charset="UTF-8&quo ...