OSPFv3与OSPF的配置
IPv6 路由-OSPFv3
实验目的
1. 掌握 OSPFv3 的配置方法
2. 掌握在帧中继环境下 OSPFv3 的配置方法
3. 掌握 OSPFv3 NSSA 的配置方法
4. 掌握外部路由汇总的配置
5. 掌握区域间路由的汇总配置
实验拓扑图
IPv4地址表
|
Device |
Interface |
IP Address |
|
R1 |
F 0/0 |
10.1.99.1 |
|
S 0/0 |
192.168.99.1 |
|
|
R3 |
S 0/0 |
192.168.99.3 |
|
R4 |
S 0/0 |
192.168.99.4 |
|
R5 |
F 0/0 |
10.1.99.5 |
|
S 0/0 |
12.1.99.5 |
|
|
R6 |
F 0/0 |
10.1.99.6 |
|
F 0/1 |
11.1.99.6 |
|
|
R8 |
F 0/1 |
11.1.99.8 |
|
S 0/0 |
12.1.99.8 |
R2(config)#frame-relay switching
R2(config)#int s 0/0
R2(config-if)#no shutdown
R2(config-if)#clock rate 128000
R2(config-if)#encapsulation frame-relay
R2(config)#int s 0/1
R2(config-if)#no shutdown
R2(config-if)#clock rate 128000
R2(config-if)#encapsulation frame-relay
R2(config)#int s 0/2
R2(config-if)#no shutdown
R2(config-if)#clock rate 128000
R2(config-if)#encapsulation frame-relay
R2(config)#int s 0/0
R2(config-if)#frame-relay lmi-type cisco
R2(config-if)#frame-relay intf-type dce
R2(config)#int s 0/1
R2(config-if)#frame-relay lmi-type cisco
R2(config-if)#frame-relay intf-type dce
R2(config)#int s 0/2
R2(config-if)#frame-relay lmi-type cisco
R2(config-if)#frame-relay intf-type dce
R2(config)#int s 0/0
R2(config-if)#frame-relay route 103 interface s 0/1 301
R2(config-if)#frame-relay route 104 interface s 0/2 401
R2(config)#int s 0/1
R2(config-if)#frame-relay route 301 interface Serial0/0 103
R2(config)#int s 0/2
R2(config-if)#frame-relay route 401 interface Serial0/0 104
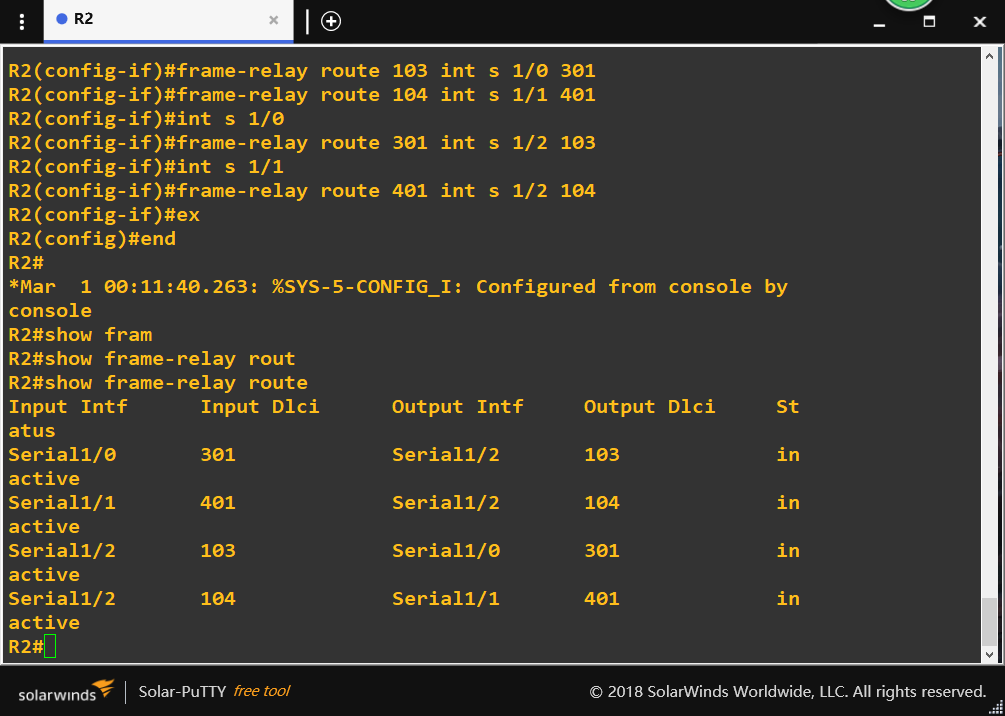
show frame-relay route检查帧中继交换机是否正常
R1(config)#int s 0/0
R1(config-if)#ip address 192.168.99.1 255.255.255.0
R1(config-if)#no shutdown
R1(config-if)#encapsulation frame-relay
R1(config-if)#frame-relay lmi-type cisco
R1(config-if)#no frame-relay inverse-arp
R1(config-if)#frame-relay map ip 192.168.99.3 103 broadcast
R1(config-if)#frame-relay map ip 192.168.99.4 104 broadcast
R3(config)#int s 0/0
R3(config-if)#ip address 192.168.99.3 255.255.255.0
R3(config-if)#no shutdown
R3(config-if)#encapsulation frame-relay
R3(config-if)#no frame-relay inverse-arp
R3(config-if)#frame-relay map ip 192.168.99.1 301 broadcast
R4(config)#int s 0/0
R4(config-if)#ip address 192.168.99.4 255.255.255.0
R4(config-if)#no shutdown
R4(config-if)#encapsulation frame-relay
R4(config-if)#no frame-relay inverse-arp
R4(config-if)#frame-relay map ip 192.168.99.1 401 broadcast
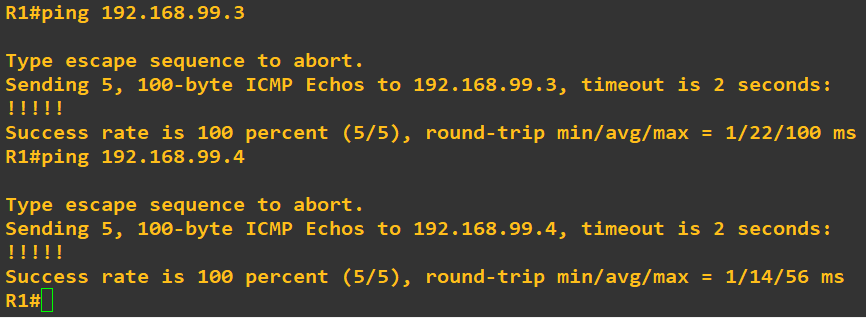
进行ping命令测试
从R1ping到R3与R4
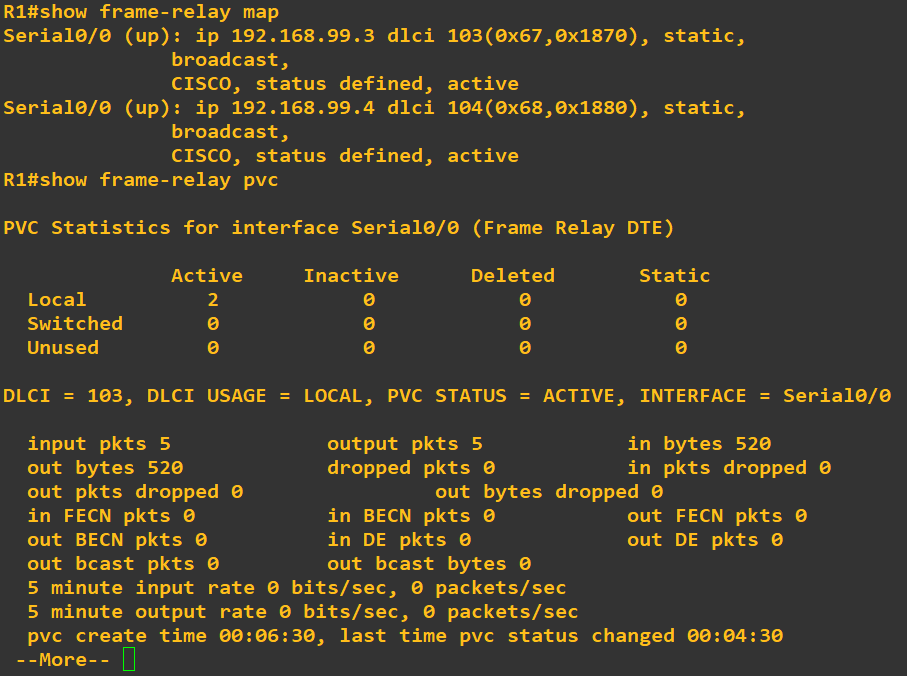
R1#show frame-relay map
配置ospf
先配置外部路由器ospf (R5.R8)
R6(config)#router ospf 1
R6(config-router)#router-id 6.6.6.6
R6 (config-router)#area 1 nssa――配置区域 1 为 NSSA 区域
R6(config)#interface loopback 0
R6(config-if)#ip add 6.6.6.6 255.255.255.255
R6(config)#int f 0/0
R6(config-if)#ip add 10.1.99.6 255.255.255.0
R6(config-if)#no shut
R6(config-if)#ip ospf 1 area 0
R6(config-if)#int f 0/1
R6(config-if)#ip add 11.1.99.6 255.255.255.0
R6(config-if)#no shut
R6(config-if)#ip ospf 1 area 1
R6(config-if)#exit
R6(config)#router ospf 1
R6(config-router)#network 6.6.6.6 0.0.0.0 area 0
R6(config-router)#network 10.1.99.0 0.0.0.255 area 0
R6(config-router)#network 11.1.99.0 0.0.0.255 area 1
R1(config)#router ospf 1
R1(config-router)#router-id 1.1.1.1
R1(config)#interface loopback 0
R1(config-if)#ip add 1.1.1.1 255.255.255.255
R1(config)#int f 0/0
R1(config-if)#ip add 10.1.99.1 255.255.255.0
R1(config-if)#no shut
R1(config-if)#ip ospf 1 area 0
R1(config-if)#int s 0/0
R1(config-if)#ip ospf 1 area 0
R1(config-if)#exit
R1(config)#router ospf 1
R1(config-router)#network 1.1.1.1 0.0.0.0 area 0
R1(config-router)#network 10.1.99.0 0.0.0.255 area 0
R1(config-router)#network 192.168.99.0 0.0.0.255 area 0
R1(config-router)#neighbor 192.168.99.3
R1(config-router)#neighbor 192.168.99.4
配置帧中继中路由器的ospf (R4)
R3(config)#router ospf 1
R3(config-router)#router-id 3.3.3.3
R3(config-router)#exit
R3(config)#int loopback 0
R3(config-if)#ip add 3.3.3.3 255.255.255.255
R3(config-if)#ip ospf 1 area 2
R3(config-if)#int s 0/0
R3(config-if)# ip ospf 1 area 2
R3(config-if)# ip ospf priority 0
R3(config)#router ospf 1
R3(config-router)#network 3.3.3.3 0.0.0.0 area 2
R3(config-router)#network 192.168.99.0 0.0.0.255 area 2
已完成OSPFv2配置,在R1上查ospf邻居关系
R1#show ipv6 ospf neighbor

测试路由通断情况
在R5上测试得出结果如下(从内部到外部皆ping 通,实验完成)

IPV6地址规划
|
Device |
Interface |
IP Address |
|
R4 |
S0/0 |
2001:DB8:99:1::2/64 |
|
R3 |
S0/0 |
2001:DB8:99:1::1/64 |
|
R2 |
S0/0 |
2001:DB8:99:1::3/64 |
|
F0/0 |
2001:DB8:99:2::1/64 |
|
|
R6 |
F0/0 |
2001:DB8:99:2::2/64 |
|
F0/1 |
2001:DB8:99:3::1/64 |
|
|
R7 |
F0/0 |
2001:DB8:99:2::3/64 |
|
F0/1 |
2001:DB8:99:4::1/64 |
|
|
R8 |
F0/0 |
2001:DB8:99:3::2/64 |
|
F0/1 |
2001:DB8:99:4::2/64 |
|
|
F1/0 |
2001:DB8:99:5::2/64 |
|
|
R5 |
F0/0 |
2001:DB8:99:5::1/64 |
在R1,R2,R3,R4,上配置帧中继,R1作为帧中继交换机
R1:
R1(config)#frame-relay switching
R1(config)#int s0/0
R1(config-if)#encapsulation frame-relay
R1(config-if)#frame-relay intf-type dce
R1(config-if)#clock rate 64000
R1(config-if)#frame-relay route 102 interface serial 0/1 201
R1(config-if)#frame-relay route 103 interface serial 0/2 301
R1(config-if)#no shutdown
R1(config)#int s0/1
R1(config-if)#encapsulation frame-relay
R1(config-if)#frame-relay intf-type dce
R1(config-if)#clock rate 64000
R1(config-if)#frame-relay route 201 interface serial 0/0 102
R1(config-if)#frame-relay route 104 interface serial 0/2 401
R1(config-if)#no shutdown
R1(config)#int s0/2
R1(config-if)#encapsulation frame-relay
R1(config-if)#frame-relay intf-type dce
R1(config-if)#clock rate 64000
R1(config-if)#frame-relay route 301 interface serial 0/0 103
R1(config-if)#frame-relay route 401 interface serial 0/1 104
R1(config-if)#no shutdown
R3:
R3(config)#ipv6 unicast-routing
R3(config)#ipv6 router ospf 1
R3(config-rtr)#router-id 1.1.1.5
R3(config-rtr)#int s0/0
R3(config-if)#ipv6 ospf 1 area 2
R3(config-if)#ipv6 enable
R3(config-if)#ipv6 address 2001:db8:99:1::1/64
R3(config-if)#encapsulation frame-relay
R3(config-if)#frame-relay map ipv6 2001:db8:99:1::2 102 broadcast
R3(config-if)#frame-relay map ipv6 2001:db8:99:1::3 103 broadcast
R3(config-if)#frame-relay map ipv6 FE80::C604:7FF:FE83:0 102 broadcast
R3(config-if)#frame-relay map ipv6 FE80::C602:7FF:FE65:0 103 broadcast
R3(config-if)#no shutdown
R4:
R4(config)#ipv6 unicast-routing
R4(config)#ipv6 router ospf 1
R4(config-rtr)#router-id 1.1.1.6
R4(config-rtr)#int s0/0
R4(config-if)#ipv6 ospf 1 area 2
R4(config-if)#ipv6 enable
R4(config-if)#ipv6 address 2001:db8:99:1::2/64
R4(config-if)#encapsulation frame-relay
R4(config-if)#frame-relay map ipv6 2001:db8:99:1::1 201 broadcast
R4(config-if)#frame-relay map ipv6 2001:db8:99:1::3 104 broadcast
R4(config-if)#frame-relay map ipv6 FE80::C603:7FF:FE74:0 201 broadcast
R4(config-if)#frame-relay map ipv6 FE80::C602:7FF:FE65:0 104 broadcast
R4(config-if)#no shutdown
R2:
R2(config)#ipv6 unicast-routing
R2(config)#ipv6 router ospf 1
R2(config-rtr)#router-id 1.1.1.1
R2(config)#int serial 0/0
R2(config-if)#ipv6 ospf 1 area 2
R2(config-if)#ipv6 enable
R2(config-if)#ipv6 address 2001:db8:99:4::3/64
R2(config-if)#encapsulation frame-relay
R2(config-if)#frame-relay map ipv6 2001:db8:99:1::1 301 broadcast
R2(config-if)#frame-relay map ipv6 2001:db8:99:1::2 401 broadcast
R2(config-if)#frame-relay map ipv6 FE80::C603:7FF:FE74:0 301 broadcast
R2(config-if)#frame-relay map ipv6 FE80::C604:7FF:FE83:0 401 broadcast
R2(config-if)#ipv6 ospf neighbor FE80::C603:7FF:FE74:0 priority 0
R2(config-if)#ipv6 ospf neighbor FE80::C604:7FF:FE83:0 priority 0
R2(config-if)#no shutdown
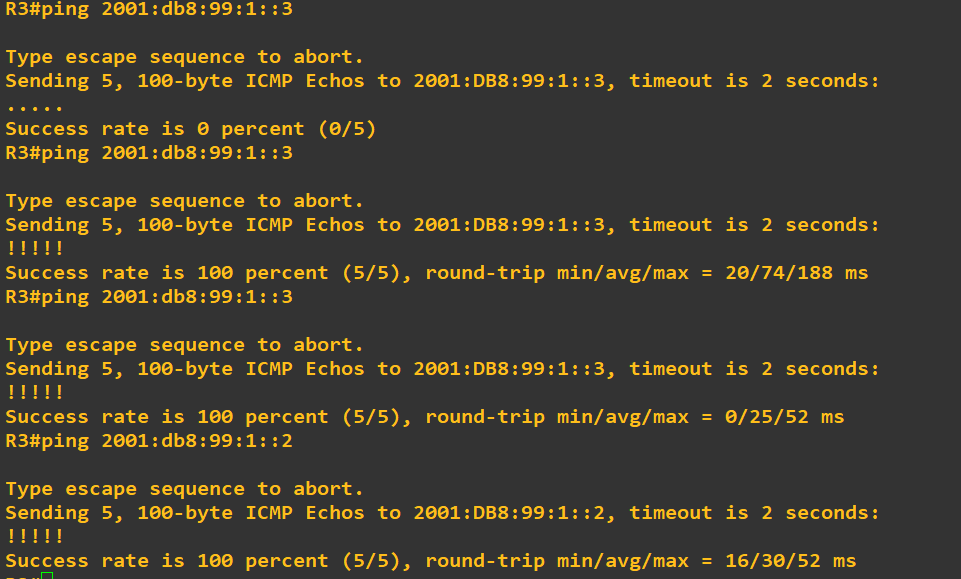
帧中继网络部分配置完成,R3 pingR2,R4测试结果如下:
配置R2,R6,R7的ospfv3,为area0。
R2:
R2(config)#int fastEthernet 0/0
R2(config-if)#ipv6 enable
R2(config-if)#ipv6 address 2001:db8:99:2::1/64
R2(config-if)#ipv6 ospf 1 area 0
R2(config-if)#no shutdown
R6:
R6(config)#ipv6 unicast-routing
R6(config)#ipv6 router ospf 1
R6(config-rtr)#router-id 1.1.1.2
R6(config-rtr)#exit
R6(config)#int fastEthernet 0/0
R6(config-if)#ipv6 enable
R6(config-if)#ipv6 address 2001:db8:99:2::2/64
R6(config-if)#ipv6 ospf 1 area 0
R6(config-if)#no shutdown
R7:
R7(config)#ipv6 unicast-routing
R7(config)#ipv6 router ospf 1
R7(config-rtr)#router-id 1.1.1.3
R7(config-rtr)#exit
R7(config)#int fastEthernet 0/0
R7(config-if)#ipv6 enable
R7(config-if)#ipv6 address 2001:db8:99:2::3/64
R7(config-if)#ipv6 ospf 1 area 0
R7(config-if)#no shutdown
然后查看R7在area0的ospf的邻居关系
R7#show ipv6 ospf neighbor

配置R6 F0/1,R7 F0/1,R8 F0/0 F0/1ospf area1为nssa 区域
R6:
R6(config)#ipv6 router ospf 1
R6(config-rtr)#area 1 nssa
R6(config-rtr)#int f0/1
R6(config-if)#ipv6 enable
R6(config-if)#ipv6 address 2001:db8:99:3::1/64
R6(config-if)#ipv6 ospf 1 area 1
R6(config-if)#no shutdown
R7:
R7(config)#ipv6 router ospf 1
R7(config-rtr)#area 1 nssa
R7(config-rtr)#int f0/1
R7(config-if)#ipv6 enable
R7(config-if)#ipv6 address 2001:db8:99:4::1/64
R7(config-if)#ipv6 ospf 1 area 1
R7(config-if)#no shutdown
R8:
R8(config)#ipv6 unicast-routing
R8(config)#ipv6 router ospf 1
R8(config-rtr)#router-id 1.1.1.4
R8(config-rtr)#area 1 nssa
R8(config-rtr)#int f0/0
R8(config-if)#ipv6 enable
R8(config-if)#ipv6 address 2001:db8:99:3::2/64
R8(config-if)#ipv6 ospf 1 area 1
R8(config-if)#no shutdown
R8(config-rtr)#int f0/1
R8(config-if)#ipv6 enable
R8(config-if)#ipv6 address 2001:db8:99:4::2/64
R8(config-if)#ipv6 ospf 1 area 1
R8(config-if)#no shutdown
查看R8 ospfv3路由表

到此ipv6 ospfv3部分配置完成,测试R4 ping R8成功

配置R5到R8 RIPng部分并且重分布到ospfv3
R5:
R5(config)#ipv6 unicast-routing
R5(config)#ipv6 router rip 1
R5(config)#int fastEthernet 0/0
R5(config-if)#ipv6 enable
R5(config-if)#ipv6 address 2001:Db8:99:5::1/64
R5(config-if)#ipv6 rip 1 enable
R5(config-if)#no shutdown
R8:
R8(config)#ipv6 router rip 1
R8(config)#int fastEthernet 1/0
R8(config-if)#ipv6 enable
R8(config-if)#ipv6 address 2001:Db8:99:5::2/64
R8(config-if)#ipv6 rip 1 enable
R8(config-if)#no shutdown
R8(config-if)#exit
R8(config)#ipv6 router ospf 1
R8(config-rtr)#redistribute rip 1
R8(config-rtr)#redistribute connected
R8(config-rtr)#exit
R8(config)#ipv6 router rip 1
R8(config-rtr)#redistribute ospf 1
R8(config-rtr)#redistribute connected
查看R5路由表,可获取area1,无法获取area 0和area2,可ping通R8
Ipv6的部分也做了一晚上,需要配置的地方很多很复杂,一个不小心就会配置出错,不是打错地址就是漏打什么,十分的考验耐心。配置已经到了最后的阶段,仅剩的几行代码,最后的实验结果就要出来了,可是正好十一点到了,电脑断网导致Vmware桥接模式的GNS3虚拟机IP失效了,GNS3也找不到服务器IP崩溃,我沉默了很久,放弃了再一次的配置。
OSPFv3与OSPF的配置的更多相关文章
- ospf基本配置协议
OSPF(开放最短路径优先)协议是链路状态路由协议类.对于 IPv4 的 OSPF 当前版本号 OSPFv2,的版本号 John Moy 在 RFC 1247 中引入,并在 RFC 2328 中 ...
- 路由器基础配置之ospf基础配置
我们将以上面的拓扑图进行本次ospf的实验,目的是能当三台pc机互通 先配置好pc机的IP地址,注意一定要给pc机设置好网关,接下来配置路由器的IP地址 router4 enable 进入特权模式 c ...
- H3C TE老版本OSPF正确配置
R1配置: ---------------------------------------------------- # sysname RT1# super password level 3 cip ...
- OSPF Sham-Link配置示例
在MPLS/VPN环境中,如果PE-CE之间使用OSPF交换路由信息,OSPF route将作为VPNv4 route(携带OSPF domain ID,OSPF Router ID,OSPF Rou ...
- 小结ospf基本配置的三个参数
实例:<华为路由器学习指南>P712 OSPF基本功能配置示例拓扑结构 配置思路:以E为例子 [E]ospf 100 router-id 5.5.5.5[E-ospf-100]area 1 ...
- OSPF 高级配置
这是一个综合的实验,包含了静态路由.默认路由.RIP.OSPF四种路由.通过配置,最终实现全网互通. 实验拓扑 如图所示连接,地址规划如下: 名称 接口 IP地址 R1 f0/0 192.168.10 ...
- H3C OSPF可选配置命令
- H3C OSPF基本配置命令
- OSPFv3实验配置(GNS3)
实验目的 1. 掌握 OSPFv3(v2) 的配置方法 2. 掌握在帧中继环境下 OSPFv3 (v2)的配置方法 3. 掌握 OSPFv3(v2) NSSA 的配置方法 4. 掌握外部路由汇总的配置 ...
随机推荐
- mvc partialView+kendo window
在写mvc项目时,一个列表查询页面含有多个操作按钮及弹框操作.原本写在了一个view中,导致代码繁多复杂,难以维护,还有表单赋值清空.验证等麻烦. 因此改用kendo window +partialV ...
- 软件工程实践助教每周小结 < 福州大学 | 傅明建 >
第一周助教小结 1. 助教博客链接: http://www.cnblogs.com/sinceway/ 2. 本周点评的作业数量:约22份,有多次交互 3. 本周点评有困难的作业链接: https:/ ...
- Log4j2 HelloWorld
Log4j2 使用教程 Log4j2 的好处就不在这里一一列举了,如果你搜了2,说明你对它一定有兴趣,并且想了解它,使用它. 一.下载log4j2 ,基本上你只需要导入下面两个jar包即可: log4 ...
- Python 递归计算分数数列
C语言的课后习题 求数列:2/1,3/2,5/3,8/5,13/8,21/13,...前50项的和 数列规律: 第二项的分母是[前一项分子] 第二项的分子是[前一项分子与分母的和] from frac ...
- python中split()的用法
Python split() 通过指定分隔符对字符串进行切片,如果参数 num 有指定值,则仅分隔 num 个子字符串. 语法: str.split(str="", num=str ...
- 2018-2019-2 20165215《网络攻防技术》Exp6 信息搜集与漏洞扫描
目录 实验目的 实验内容 基础知识 实验步骤 (一)各种搜索技巧的应用 Google Hacking 搜索网址目录结构 搜索特定类型的文件 路由侦查 (二)DNS IP注册信息的查询 whois域名注 ...
- Load data local infile 实验报告
1.实验内容: 利用SQL语句“load data local infile”将“pet.txt”文本文件中的数据导入到mysql中 (pet表在数据库menagerie中) 2.实验过程及结果: ( ...
- IP通信基础学习第七周(上)
局域网的优点:具有广播功能,从一个站点可以方便的访问全网,局域网上的主机可共享连接在局域网上的各种资源:便于系统的扩展和逐渐地演变,各设备的位置可灵活调整和改变:提高了系统的可靠性.可用性和生存性. ...
- Appium(二)---启动App+模拟滑动
环境搭建好了,就可以实现基本的操作,比如启动App和模拟滑动.这里我实现的是在真机(乐视1s)上启动抖音App,并滑动抖音的视频列表,代码如下: from appium import webdrive ...
- 如何在Linux 中获取硬盘分区或文件系统的UUID?
作为一个 Linux 系统管理员,你应该知道如何去查看分区的 UUID 或文件系统的 UUID.因为现在大多数的 Linux 系统都使用 UUID 挂载分区.你可以在 /etc/fstab 文件中可以 ...