
在Windows系统下搭建Redis集群
准备工作
需要4个部件:Redis、Ruby语言运行环境、Redis的Ruby驱动redis-xxxx.gem、创建Redis集群的工具redis-trib.rb。使用redis-trib.rb工具来创建Redis集群,由于该文件是用ruby语言写的,所以需要安装Ruby开发环境,以及驱动redis-xxxx.gem。
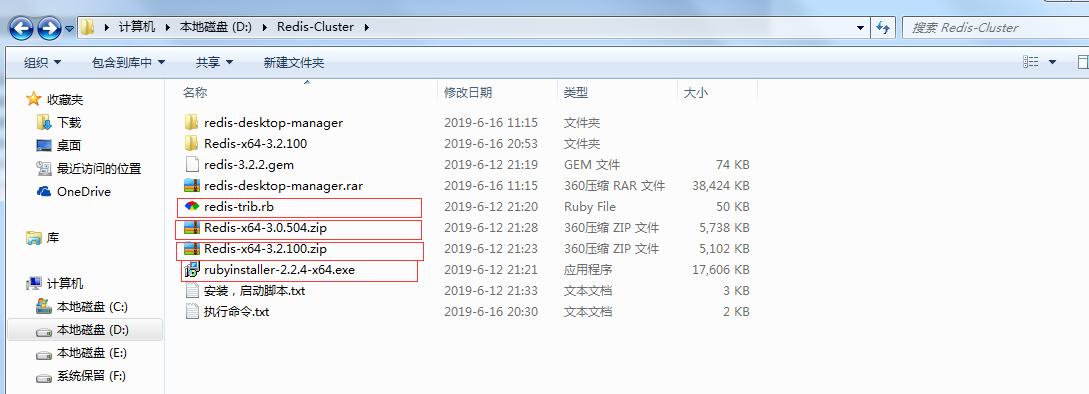
1)下载Redis安装文件:https://github.com/MSOpenTech/redis/releases/,Redis提供msi和zip格式的下载文件,这里下载zip格式Redis-x64-3.2.100版本。
2)下载Ruby安装文件:http://dl.bintray.com/oneclick/rubyinstaller/rubyinstaller-2.2.4-x64.exe
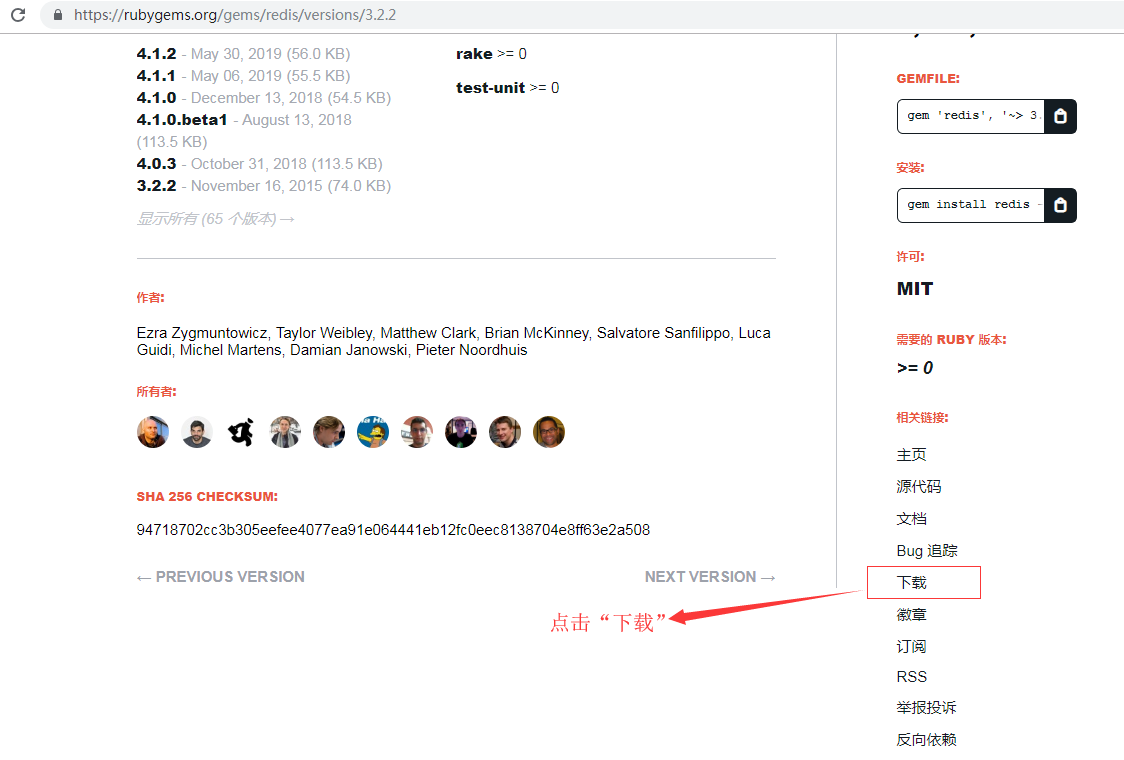
3)下载Ruby环境下Redis的驱动:https://rubygems.org/gems/redis/versions/3.2.2,考虑到兼容性,这里下载的是3.2.2版本
注意:下载在页面右下角相关连接一项中
4)下载Redis官方提供的创建Redis集群的ruby脚本文件redis-trib.rb,路径如下:https://raw.githubusercontent.com/MSOpenTech/redis/3.0/src/redis-trib.rb
安装Redis
将下载到的Redis-x64-3.2.100.zip解压即可,为了方便使用,建议放在盘符根目录下,如:D:\Redis-Cluster\Redis-x64-3.2.100。
安装Redis,并运行3个实例(Redis集群需要至少3个以上节点,低于3个无法创建);
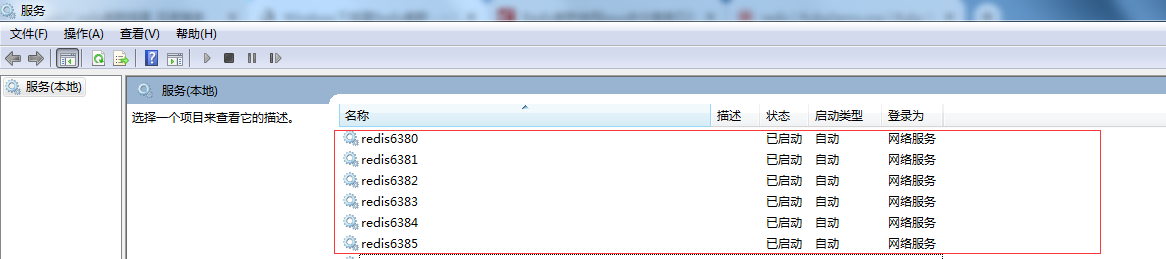
通过配置文件来启动6个不同的Redis实例,由于Redis默认端口为6379,所以这里使用了6380、6381、6382、6383、6384、6385来运行6个Redis实例。
注意:
1)为了避免不必要的错误,配置文件尽量保存为utf8格式,并且不要包含注释;
2)配置文件中以下两种保存日志的方式(保存在文件中、保存到System Log中)请根据需求选择其中一种即可:
loglevel notice                                                     #日志的记录级别,notice是适合生产环境的

logfile "D:/Redis-Cluster/Redis-x64-3.2.100/Logs/redis6380_log.txt" #指定log的保持路径,默认是创建在Redis安装目录下,如果有子目录需要手动创建,如此处的Logs目录

syslog-enabled yes                                                  #是否使用系统日志

syslog-ident redis6380                                              #在系统日志的标识名
这里使用了保存在文件中的方式,所以先在Redis目录D:\Redis-Cluster\Redis-x64-3.2.100下新建Logs文件夹。
在Redis安装根目录下,创建编码格式为utf-8的配置文件:redis.6380.conf、redis.6381.conf、redis.6382.conf、redis.6383.conf、redis.6384.conf、redis.6385.conf。
redis.6380.conf、
port

loglevel notice

logfile "D:/Redis-Cluster/Redis-x64-3.2.100/Logs/redis6380_log.txt"

appendonly yes

appendfilename "appendonly.6380.aof"

cluster-enabled yes

cluster-config-file nodes..conf

cluster-node-timeout

cluster-slave-validity-factor

cluster-migration-barrier

cluster-require-full-coverage yes
redis.6381.conf、
port

loglevel notice

logfile "D:/Redis-Cluster/Redis-x64-3.2.100/Logs/redis6381_log.txt"

appendonly yes

appendfilename "appendonly.6381.aof"

cluster-enabled yes

cluster-config-file nodes..conf

cluster-node-timeout

cluster-slave-validity-factor

cluster-migration-barrier

cluster-require-full-coverage yes
redis.6382.conf、
port

loglevel notice

logfile "D:/Redis-Cluster/Redis-x64-3.2.100/Logs/redis6382_log.txt"

appendonly yes

appendfilename "appendonly.6382.aof"

cluster-enabled yes

cluster-config-file nodes..conf

cluster-node-timeout

cluster-slave-validity-factor

cluster-migration-barrier

cluster-require-full-coverage yes
redis.6383.conf、
port

loglevel notice

logfile "D:/Redis-Cluster/Redis-x64-3.2.100/Logs/redis6383_log.txt"

appendonly yes

appendfilename "appendonly.6383.aof"

cluster-enabled yes

cluster-config-file nodes..conf

cluster-node-timeout

cluster-slave-validity-factor

cluster-migration-barrier

cluster-require-full-coverage yes
redis.6384.conf、
port

loglevel notice

logfile "D:/Redis-Cluster/Redis-x64-3.2.100/Logs/redis6384_log.txt"

appendonly yes

appendfilename "appendonly.6384.aof"

cluster-enabled yes

cluster-config-file nodes..conf

cluster-node-timeout

cluster-slave-validity-factor

cluster-migration-barrier

cluster-require-full-coverage yes
redis.6385.conf
port

loglevel notice

logfile "D:/Redis-Cluster/Redis-x64-3.2.100/Logs/redis6385_log.txt"

appendonly yes

appendfilename "appendonly.6385.aof"

cluster-enabled yes

cluster-config-file nodes..conf

cluster-node-timeout

cluster-slave-validity-factor

cluster-migration-barrier

cluster-require-full-coverage yes
配置解释如下:
 port                                  #端口号

 loglevel notice                           #日志的记录级别,notice是适合生产环境的

 logfile "Logs/redis6380_log.txt"          #指定log的保持路径,默认是创建在Redis安装目录下,如果有子目录需要手动创建,如此处的Logs目录

 syslog-enabled yes                        #是否使用系统日志

 syslog-ident redis6380                    #在系统日志的标识名

 appendonly yes                            #数据的保存为aof格式

 appendfilename "appendonly.6380.aof"      #数据保存文件

 cluster-enabled yes                       #是否开启集群

 cluster-config-file nodes..conf

 cluster-node-timeout

 cluster-slave-validity-factor

 cluster-migration-barrier

 cluster-require-full-coverage yes
将上述配置文件保存到Redis目录下,并使用这些配置文件安装6个redis服务,命令如下:
D:/Redis-Cluster/Redis-x64-3.2.100/redis-server.exe --service-install D:/Redis-Cluster/Redis-x64-3.2.100/redis.6380.conf --service-name redis6380

D:/Redis-Cluster/Redis-x64-3.2.100/redis-server.exe --service-install D:/Redis-Cluster/Redis-x64-3.2.100/redis.6381.conf --service-name redis6381

D:/Redis-Cluster/Redis-x64-3.2.100/redis-server.exe --service-install D:/Redis-Cluster/Redis-x64-3.2.100/redis.6382.conf --service-name redis6382

D:/Redis-Cluster/Redis-x64-3.2.100/redis-server.exe --service-install D:/Redis-Cluster/Redis-x64-3.2.100/redis.6383.conf --service-name redis6383

D:/Redis-Cluster/Redis-x64-3.2.100/redis-server.exe --service-install D:/Redis-Cluster/Redis-x64-3.2.100/redis.6384.conf --service-name redis6384

D:/Redis-Cluster/Redis-x64-3.2.100/redis-server.exe --service-install D:/Redis-Cluster/Redis-x64-3.2.100/redis.6385.conf --service-name redis6385
注意:
1)redis.6380.conf等配置文件最好使用完整路径,避免重启Redis集群出现问题
2)卸载命令为:
D:/Redis-Cluster/Redis-x64-3.2.100/redis-server.exe --service-uninstall D:/Redis-Cluster/Redis-x64-3.2.100/redis.6380.conf --service-name redis6380

D:/Redis-Cluster/Redis-x64-3.2.100/redis-server.exe --service-uninstall D:/Redis-Cluster/Redis-x64-3.2.100/redis.6381.conf --service-name redis6381

D:/Redis-Cluster/Redis-x64-3.2.100/redis-server.exe --service-uninstall D:/Redis-Cluster/Redis-x64-3.2.100/redis.6382.conf --service-name redis6382

D:/Redis-Cluster/Redis-x64-3.2.100/redis-server.exe --service-uninstall D:/Redis-Cluster/Redis-x64-3.2.100/redis.6383.conf --service-name redis6383

D:/Redis-Cluster/Redis-x64-3.2.100/redis-server.exe --service-uninstall D:/Redis-Cluster/Redis-x64-3.2.100/redis.6384.conf --service-name redis6384

D:/Redis-Cluster/Redis-x64-3.2.100/redis-server.exe --service-uninstall D:/Redis-Cluster/Redis-x64-3.2.100/redis.6385.conf --service-name redis6385
启动这6个服务,命令如下:
D:/Redis-Cluster/Redis-x64-3.2.100/redis-server.exe --service-start --service-name redis6380

D:/Redis-Cluster/Redis-x64-3.2.100/redis-server.exe --service-start --service-name redis6381

D:/Redis-Cluster/Redis-x64-3.2.100/redis-server.exe --service-start --service-name redis6382

D:/Redis-Cluster/Redis-x64-3.2.100/redis-server.exe --service-start --service-name redis6383

D:/Redis-Cluster/Redis-x64-3.2.100/redis-server.exe --service-start --service-name redis6384

D:/Redis-Cluster/Redis-x64-3.2.100/redis-server.exe --service-start --service-name redis6385
执行结果:
安装ruby
1)Ruby环境安装。
双击下载的“rubyinstaller-2.2.4-x64.exe”安装即可,同样,为了操作方便,也是建议安装在盘符根目录下,如: C:\Ruby22-x64 ,安装时这里选中后两个选项,
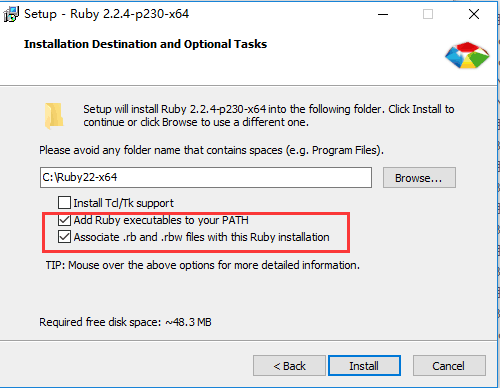
意思是将ruby添加到系统的环境变量中,在cmd命令中能直接使用ruby的命令
2)安装Ruby环境下Redis的驱动
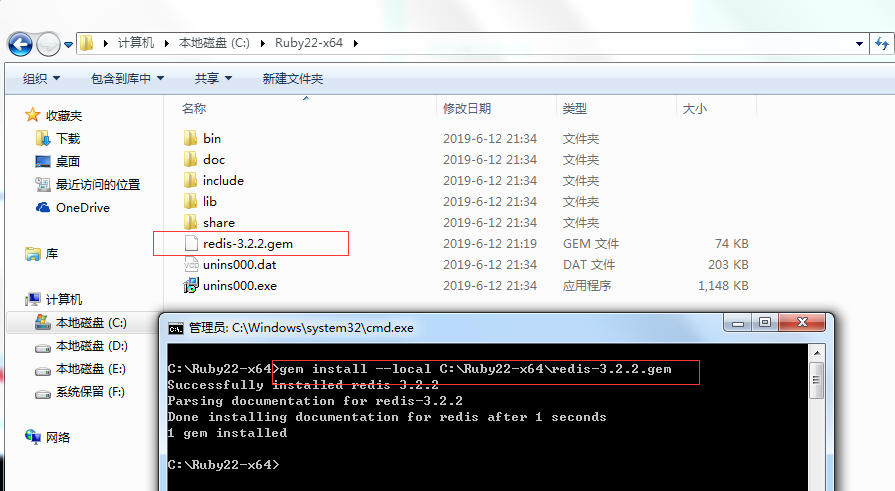
将下载的"Ruby环境下Redis的驱动文件(redis-3.2.2.gem)"拷贝到Ruby安装根目录(C:\Ruby22-x64)下。
然后执行安装命令如下:
gem install --local path_to_gem/filename.gem
创建Redis集群
将下载的“创建Redis集群的ruby脚本文件redis-trib.rb”文件拷贝到Redis安装根目录(D:\Redis-Cluster\Redis-x64-3.2.100)下。
1)使用redis-trib.rb来创建Redis集群
MD下切换到Redis目录(D:\Redis-Cluster\Redis-x64-3.2.100)
D:/Redis-Cluster/Redis-x64-3.2.100/redis-trib.rb create --replicas 1 127.0.0.1:6380 127.0.0.1:6381 127.0.0.1:6382 127.0.0.1:6383 127.0.0.1:6384 127.0.0.1:6385
D:\Redis-Cluster\Redis-x64-3.2.100>redis-trib.rb create --replicas 1 127.0.0.1:6380 127.0.0.1:6381 127.0.0.1:6382 127.0.0.1:6383 127.0.0.1:6384 127.0.0.1:6385

>>> Creating cluster

Connecting to node 127.0.0.1:6380: OK

Connecting to node 127.0.0.1:6381: OK

Connecting to node 127.0.0.1:6382: OK

Connecting to node 127.0.0.1:6383: OK

Connecting to node 127.0.0.1:6384: OK

Connecting to node 127.0.0.1:6385: OK

>>> Performing hash slots allocation on 6 nodes...

Using 3 masters:

127.0.0.1:6380

127.0.0.1:6381

127.0.0.1:6382

Adding replica 127.0.0.1:6383 to 127.0.0.1:6380

Adding replica 127.0.0.1:6384 to 127.0.0.1:6381

Adding replica 127.0.0.1:6385 to 127.0.0.1:6382

M: bb6ef615bb0ae13275943caec0db9d30b9f35c5e 127.0.0.1:6380   slots:0-5460      (5461 slots) master

M: b4d120f2983ad683f7b68992e1ba414722238db7 127.0.0.1:6381   slots:5461-10922  (5462 slots) master

M: 837779b3965e2c9d4dd4385750aaaaf9a9039fb0 127.0.0.1:6382   slots:10923-16383 (5461 slots) master

S: 5d154137180284d926ef51a91fc75f9438249ef8 127.0.0.1:6383   replicates bb6ef615bb0ae13275943caec0db9d30b9f35c5e

S: ad151680a3e36cf2083ef822be0bdb075a7d36de 127.0.0.1:6384   replicates b4d120f2983ad683f7b68992e1ba414722238db7

S: 9a2260a5a6a2add84b622a453a6a7b86a29d180d 127.0.0.1:6385   replicates 837779b3965e2c9d4dd4385750aaaaf9a9039fb0

Can I set the above configuration? (type 'yes' to accept): yes

>>> Nodes configuration updated

>>> Assign a different config epoch to each node

>>> Sending CLUSTER MEET messages to join the cluster

Waiting for the cluster to join...

>>> Performing Cluster Check (using node 127.0.0.1:6380)
M: bb6ef615bb0ae13275943caec0db9d30b9f35c5e 127.0.0.1:6380   slots:0-5460      (5461 slots) master

M: b4d120f2983ad683f7b68992e1ba414722238db7 127.0.0.1:6381   slots:5461-10922  (5462 slots) master

M: 837779b3965e2c9d4dd4385750aaaaf9a9039fb0 127.0.0.1:6382   slots:10923-16383 (5461 slots) master

M: 5d154137180284d926ef51a91fc75f9438249ef8 127.0.0.1:6383   slots:            (0 slots)    master   replicates bb6ef615bb0ae13275943caec0db9d30b9f35c5e

M: ad151680a3e36cf2083ef822be0bdb075a7d36de 127.0.0.1:6384   slots:            (0 slots)    master   replicates b4d120f2983ad683f7b68992e1ba414722238db7

M: 9a2260a5a6a2add84b622a453a6a7b86a29d180d 127.0.0.1:6385   slots:            (0 slots)    master   replicates 837779b3965e2c9d4dd4385750aaaaf9a9039fb0

[OK] All nodes agree about slots configuration.

>>> Check for open slots...

>>> Check slots coverage...

[OK] All 16384 slots covered.
备注:
1)--replicas #指定集群中每个主节点配备几个从节点,这里设置为1。
2) redis-trib.rb工具的使用
1、create:创建集群

2、check:检查集群

3、info:查看集群信息

4、fix:修复集群

5、reshard:在线迁移slot

6、rebalance:平衡集群节点slot数量

7、add-node:将新节点加入集群

8、del-node:从集群中删除节点

9、set-timeout:设置集群节点间心跳连接的超时时间

10、call:在集群全部节点上执行命令

11、import:将外部redis数据导入集群
2)检验是否真的创建成功
输入以下命令:
redis-trib.rb check 127.0.0.1:6380
如果现实信息如下,则说明创建的Redis集群是没问题。
D:\Redis-Cluster\Redis-x64-3.2.100>redis-trib.rb check 127.0.0.1:6380

Connecting to node 127.0.0.1:6380: OK

Connecting to node 127.0.0.1:6383: OK

Connecting to node 127.0.0.1:6382: OK

Connecting to node 127.0.0.1:6384: OK

Connecting to node 127.0.0.1:6385: OK

Connecting to node 127.0.0.1:6381: OK

>>> Performing Cluster Check (using node 127.0.0.1:6380)

M: bb6ef615bb0ae13275943caec0db9d30b9f35c5e 127.0.0.1:6380   slots:0-5460      (5461 slots) master   1 additional replica(s)

S: 5d154137180284d926ef51a91fc75f9438249ef8 127.0.0.1:6383   slots:            (0 slots)    slave    replicates bb6ef615bb0ae13275943caec0db9d30b9f35c5e

M: 837779b3965e2c9d4dd4385750aaaaf9a9039fb0 127.0.0.1:6382   slots:10923-16383 (5461 slots) master   1 additional replica(s)

S: ad151680a3e36cf2083ef822be0bdb075a7d36de 127.0.0.1:6384   slots:            (0 slots)    slave    replicates b4d120f2983ad683f7b68992e1ba414722238db7

S: 9a2260a5a6a2add84b622a453a6a7b86a29d180d 127.0.0.1:6385   slots:            (0 slots)    slave    replicates 837779b3965e2c9d4dd4385750aaaaf9a9039fb0

M: b4d120f2983ad683f7b68992e1ba414722238db7 127.0.0.1:6381   slots:5461-10922  (5462 slots) master   1 additional replica(s)

[OK] All nodes agree about slots configuration.

>>> Check for open slots...

>>> Check slots coverage...

[OK] All 16384 slots covered.

D:\Redis-Cluster\Redis-x64-3.2.100>
3)信息查询
使用Redis客户端Redis-cli.exe来查看数据记录数,以及集群相关信息
D:\Redis-Cluster\Redis-x64-3.2.100>redis-cli.exe -h 127.0.0.1 -p 6380
127.0.0.1:6380> cluster nodes
5d154137180284d926ef51a91fc75f9438249ef8 127.0.0.1:6383 slave bb6ef615bb0ae13275943caec0db9d30b9f35c5e 0 1560690706115 4 connected
bb6ef615bb0ae13275943caec0db9d30b9f35c5e 127.0.0.1:6380 myself,master - 0 0 1 connected 0-5460
837779b3965e2c9d4dd4385750aaaaf9a9039fb0 127.0.0.1:6382 master - 0 15606907021143 connected 10923-16383
ad151680a3e36cf2083ef822be0bdb075a7d36de 127.0.0.1:6384 slave b4d120f2983ad683f7b68992e1ba414722238db7 0 1560690705116 5 connected
9a2260a5a6a2add84b622a453a6a7b86a29d180d 127.0.0.1:6385 slave 837779b3965e2c9d4dd4385750aaaaf9a9039fb0 0 1560690703615 6 connected
b4d120f2983ad683f7b68992e1ba414722238db7 127.0.0.1:6381 master - 0 15606907071152 connected 5461-10922
127.0.0.1:6380> dbsize
(integer) 0
127.0.0.1:6380>
在Windows系统下搭建Redis集群的更多相关文章
- windows环境下搭建Redis集群
转载请注明出处,原文章地址: https://www.cnblogs.com/tommy-huang/p/6240083.html Redis集群: 如果部署到多台电脑,就跟普通的集群一样:因为Red ...
- Windows环境下搭建Redis集群(Redis-x64-3.2.100)
一 .前期准备Redis.Ruby语言运行环境.Redis的Ruby驱动redis-xxxx.gem.创建Redis集群的工具redis-trib.rb 二.安装配置redisredis下载地址 ht ...
- windows系统上搭建redis集群哨兵及主从复制
搭建master 修改redis配置redis.windows.conf: 修改监听端口: port 26379 修改绑定IP: bind 127.0.0.1 添加redis日志:logfile & ...
- Windows下搭建Redis集群
Redis集群: 如果部署到多台电脑,就跟普通的集群一样:因为Redis是单线程处理的,多核CPU也只能使用一个核, 所以部署在同一台电脑上,通过运行多个Redis实例组成集群,然后能提高CPU的利用 ...
- Redis集群搭建(转自一菲聪天的“Windows下搭建Redis集群”)
配置Redis参考:http://blog.csdn.net/zsg88/article/details/73715947 使用Ruby配置集群参考:https://www.cnblogs.com/t ...
- Windows下搭建REDIS集群
Redis集群: 如果部署到多台电脑,就跟普通的集群一样:因为Redis是单线程处理的,多核CPU也只能使用一个核, 所以部署在同一台电脑上,通过运行多个Redis实例组成集群,然后能提高CPU的利用 ...
- Windows下 搭建redis集群
Windows下搭建redis集群教程 一,redis集群介绍 Redis cluster(redis集群)是在版本3.0后才支持的架构,和其他集群一样,都是为了解决单台服务器不够用的情况,也防止了主 ...
- linux系统centOS7下搭建redis集群中ruby版本过低问题的解决方法
问题描述: 在Centos7中,通过yum安装ruby的版本是2.0.0,但是如果有些应用需要高版本的ruby环境,比如2.2,2.3,2.4... 那就有点麻烦了,譬如:我准备使用redis官方给的 ...
- Redis → Windows下搭建redis集群
一,redis集群介绍 Redis cluster(redis集群)是在版本3.0后才支持的架构,和其他集群一样,都是为了解决单台服务器不够用的情况,也防止了主服务器宕机无备用服务器,多个节点网络互联 ...
随机推荐
- LaTeX soul包
本系列文章由 @yhl_leo 出品,转载请注明出处. 文章链接: http://blog.csdn.net/yhl_leo/article/details/50774955 详细的soul包的官方P ...
- python 在爬虫中timeout设置超时有什么作用
是为了防止url不可访问,或者响应速度太慢而造成的时间浪费. 比如,你要爬取1000个网站,如果有100个需要30s才能返回数据,你等待他们返回的话就需要3000s了,如果你设置10s超时,那么就能知 ...
- js/jquery 判断支持touchstart
if ('ontouchstart' in document.documentElement) { //... }
- idea常用方便的快捷键
Ctrl+D 复制行Ctrl+F 查找文本Ctrl+G 定位到某行Ctrl+H 显示类结构图(类的继承层次)Ctrl+I 实现方法ctrl+J 显示所有快捷键模板ctrl+k 提交代码到SVNCrtl ...
- 关于excel导入、导出(POI)
当前B/S模式已成为应用开发的主流,而在企业办公系统中,常常有客户这样子要求:你要把我们的报表直接用Excel打开(电信系统.银行系统).或者是:我们已经习惯用Excel打印.这样在我们实际的开发中, ...
- cogs 106. [NOIP2003] 加分二叉树(区间DP)
106. [NOIP2003] 加分二叉树 ★☆ 输入文件:jfecs.in 输出文件:jfecs.out 简单对比时间限制:1 s 内存限制:128 MB [问题描述] 设 一个 n ...
- 一起写RPC
http://blog.csdn.net/linuu?viewmode=contents
- 我的Android进阶之旅------> Android为TextView组件中显示的文本加入背景色
通过上一篇文章 我的Android进阶之旅------> Android在TextView中显示图片方法 (地址:http://blog.csdn.net/ouyang_peng/article ...
- thrift java示例
thrift java示例 使用IntelliJ IDEA作为开发工具: 增加proto文件夹,里面写上sayHello.proto syntax = "proto3"; opti ...
- APNs推送
消息推送是可以指定声音的.譬如你可以对正面的反馈使用欢快的声音,对负面的反馈使用低沉一点的声音,都可以达到别出心裁让人眼前一亮的目的.你需要先放一些aiff.wav或者caf音频文件到app的资源文件 ...