ASP.NET Core IdentityServer4 新手上路
OAuth2.0资料
今天看到一篇博主写了该系列文章,贴图和过程都比较详细,俗话说实践是检验真理的唯一标准(如果是按照参考文章复制粘贴,应该不会出现踩坑,但是我喜欢自己手动敲一遍),发现几个坑,因而总结下经验,让其他小白同学少走弯路
参考第一篇:https://www.cnblogs.com/cby-love/p/9281955.html
参考第二篇:https://www.cnblogs.com/wyt007/p/8284482.html
博客园晓晨的关于identityServer4的中文文档地址: http://www.cnblogs.com/stulzq/p/8119928.html
Docker中文文档 https://yeasy.gitbooks.io/docker_practice/content/
OAuth2.0(Open Authorization)是一个开放授权协议;第三方应用不需要接触到用户的账户信息(如用户名密码),通过用户的授权访问用户资源
OAuth的步骤一般如下:
1、客户端要求用户给予授权
2、用户同意给予授权
3、根据上一步获得的授权,向认证服务器请求令牌(token)
4、认证服务器对授权进行认证,确认无误后发放令牌
5、客户端使用令牌向资源服务器请求资源
6、资源服务器使用令牌向认证服务器确认令牌的正确性,确认无误后提供资源
服务端代码实现
第一步:新建一个webapi空项目
第二步:添加Nuget包:IdentityServer4
第三步:新建一个帮助类(类名自定义即可),用来创建IdentityServer4.Model生成授权token
    public class Config

    {

        /// <summary>

        /// 所有可以访问的Resource

        /// </summary>

        /// <returns></returns>

        public static IEnumerable<ApiResource> GetResources()

        {

            return new List<ApiResource>

            {
          //第一个参数需要与下面标记红色字体保持一致,可以随意命名,但是请注意大小写,第二个参数 我干了,你随意。

                new ApiResource("api","My Api")

            };

        }

        /// <summary>

        /// 客户端

        /// </summary>

        /// <returns></returns>

        public static IEnumerable<Client> GetClients()

        {

            return new List<Client>

            {

                new Client()

                {

                    ClientId="client",

                    ////模式:最简单的模式

                    AllowedGrantTypes=GrantTypes.ClientCredentials,

                    ClientSecrets=

                    {

                        new Secret("secret".Sha256())

                    },

                    AllowedScopes={ "api"}

                }

            };

        }

    }
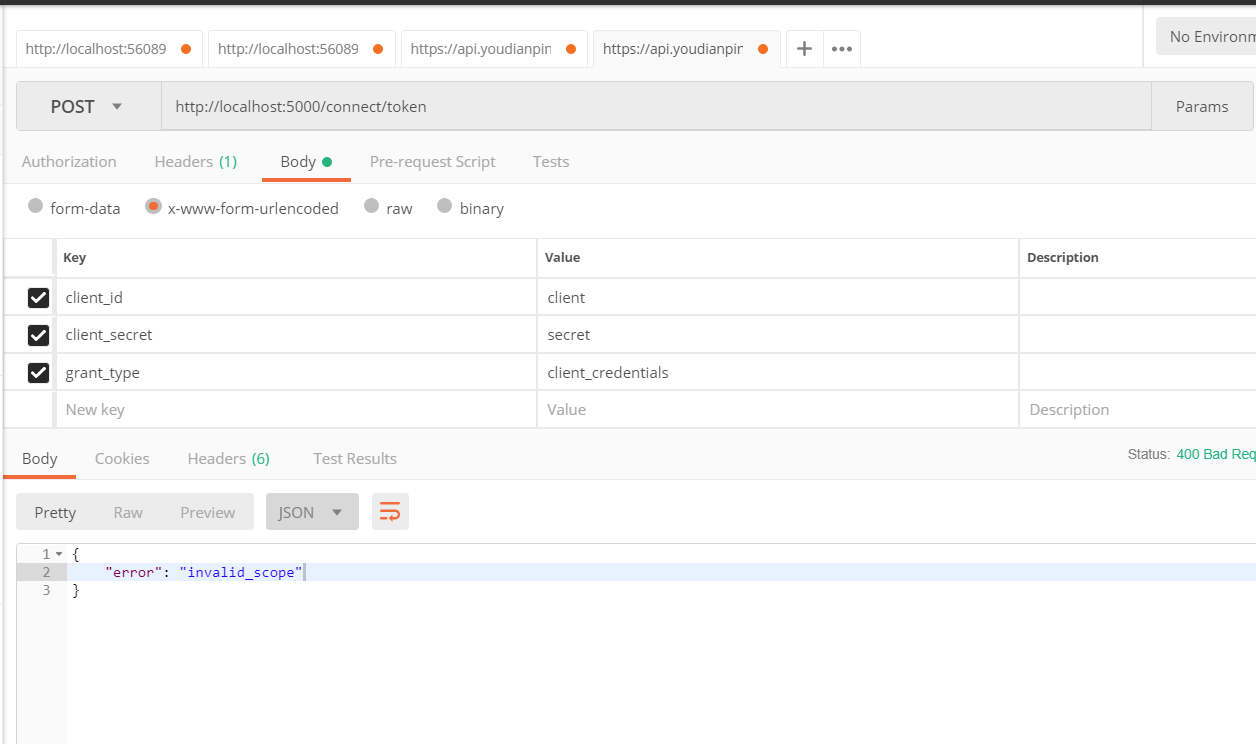
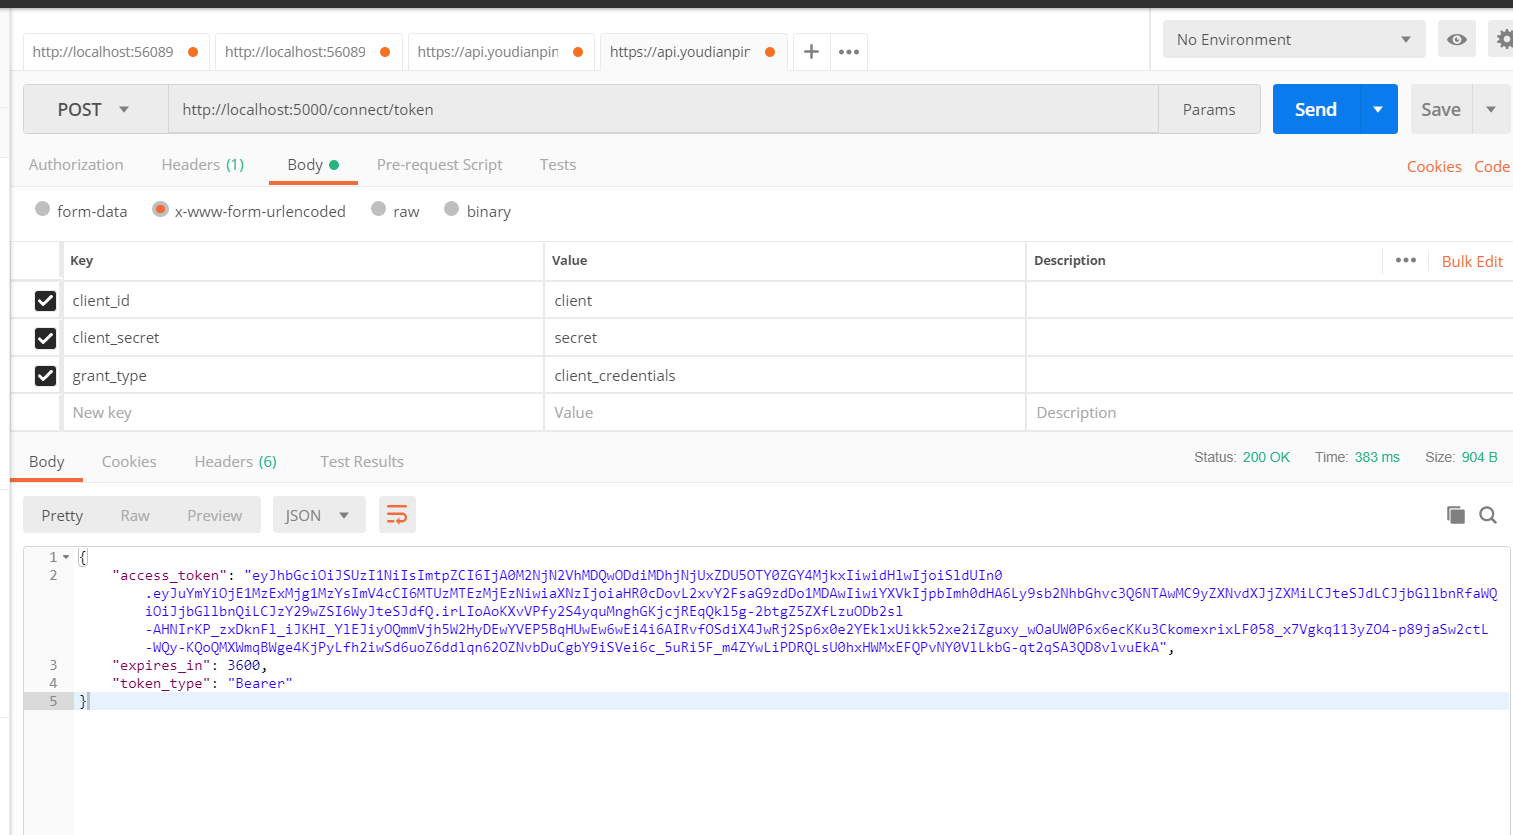
第一处坑讲解:上面代码红色标记,请注意大小写,如果一个大写,一个小写。当你授权的时候会提示错误
第四步:修改Startup.cs 红色字体是需要加的方法和中间件
public class Startup

    {

        public Startup(IConfiguration configuration)

        {

            Configuration = configuration;

        }

        public IConfiguration Configuration { get; }

        // This method gets called by the runtime. Use this method to add services to the container.

        public void ConfigureServices(IServiceCollection services)

        {

            services.AddIdentityServer()

            .AddDeveloperSigningCredential()//添加开发人员签名凭据

            .AddInMemoryApiResources(Config.GetResources())//添加内存apiresource

            .AddInMemoryClients(Config.GetClients());//添加内存client

            services.AddMvc().SetCompatibilityVersion(CompatibilityVersion.Version_2_1);

        }

        // This method gets called by the runtime. Use this method to configure the HTTP request pipeline.

        public void Configure(IApplicationBuilder app, IHostingEnvironment env)

        {

            if (env.IsDevelopment())

            {

                app.UseDeveloperExceptionPage();

            }

            app.UseIdentityServer();//使用IdentityServer

            app.UseMvc();

        }

    }
第五步:修改Program.cs 其实这一步可以省略掉,因为这一部将api不托管在IIS Express上,通过控制台程序启动。 自定义路径配置如下
public class Program

    {

        public static void Main(string[] args)

        {

            CreateWebHostBuilder(args).Build().Run();

        }

        public static IWebHostBuilder CreateWebHostBuilder(string[] args) =>

            WebHost.CreateDefaultBuilder(args)

                .UseStartup<Startup>()
          //该处端口可以自定义  只要不与你其他端口冲突就好

                .UseUrls("http://localhost:5000");

    }
第二处坑讲解:生成token的服务端已经全部设置完成,如果你按照以前习惯,启动F5---会发现自定义端口未起作用。你需要设置一下才行

http://localhost:5000/.well-known/openid-configuration访问 ;可以看到是一个restful的api
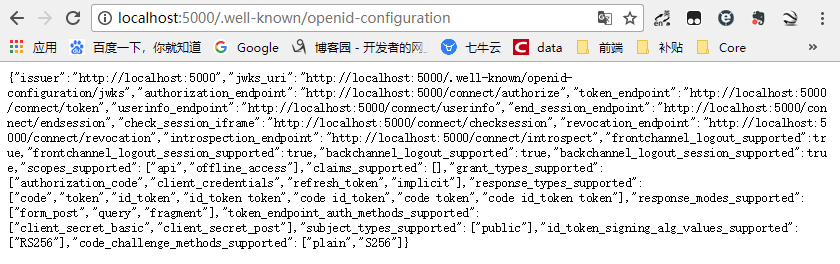
然后用postman神器 服务端成功,咱们开始用客户端
客户端代码实现
第一步:新建一个webapi空项目
第二步:添加Nuget包:IdentityServer4.AccessTokenValidation
第三步:修改Startup.cs 红色字体是需要加的方法和中间件
public class Startup

    {

        public Startup(IConfiguration configuration)

        {

            Configuration = configuration;

        }

        public IConfiguration Configuration { get; }

        // This method gets called by the runtime. Use this method to add services to the container.

        public void ConfigureServices(IServiceCollection services)

        {

            services.AddAuthentication("Bearer")//添加授权模式

            .AddIdentityServerAuthentication(Options =>

            {

                Options.Authority = "http://localhost:5000";//授权服务器地址

                Options.RequireHttpsMetadata = false;//是否是https

                Options.ApiName = "api";

            });

            services.AddMvc().SetCompatibilityVersion(CompatibilityVersion.Version_2_1);

        }

        // This method gets called by the runtime. Use this method to configure the HTTP request pipeline.

        public void Configure(IApplicationBuilder app, IHostingEnvironment env)

        {

            if (env.IsDevelopment())

            {

                app.UseDeveloperExceptionPage();

            }

            app.UseAuthentication();//使用授权中间件

            app.UseMvc();

        }

    }
第三处坑讲解:
1.授权服务地址端口号,请按照服务端配置的端口号来,如果用IIS Express,请右键项目属性->调试查看。
2.Options.ApiName = "api"; 请看上述踩坑一配置的名称,大小写需要统一
第四步:修改Program.cs 其实这一步可以省略掉,因为这一部将api不托管在IIS Express上,通过控制台程序启动。与上述服务端配置一样。记得将端口号修改
第四处需要注意的地方
需要将服务端运行起来,然后再运行客户端(顺序不重要,重要的是必须两个程序都启动起来。可以将服务端发布到IIS上,客户端通过vs运行。我比较懒,分别打开两个,一个设置为启动服务端,一个设置为启动客户端)
第五步:添加授权标签 可以在action和controller上添加
        [HttpGet]

        [Authorize]

        public ActionResult<IEnumerable<string>> Get()

        {

            return new string[] { "value1", "value2" };

        }
添加在action上,表示这个方法需要授权才能访问,否则访问不了
添加在controller上,表示整个controller下的所有action方法都需要授权后才能访问
下图是成功,如果空白表示授权失败(你可以打个断点)。
出现一些错误码html(<title>Internal Server Error</title>)在里面,是因为服务端没启动成功

需要注意的地方:授权码 前面必须加Bearer 然后空格
在客户端配置第三步中 services.AddAuthentication("Bearer")//添加授权模式 有的同学可能会想 那我将这个改掉 然后保持一致应该可以
恭喜这位同学想法非常棒,但是你可以试一试。这个格式是固定规范
ASP.NET Core IdentityServer4 新手上路的更多相关文章
- Asp.net Core IdentityServer4 入门教程(一):概念解析
目录 1.IdentityServer4 是什么 2.什么是OpenID和OAuth 2.0协议 3.IdentityServer4 可以用来做什么 其他 1.IdentityServer4 是什么 ...
- asp.net core IdentityServer4 概述
概览 现代应用程序看上去大都是这样的: 最常见的交互是: 浏览器与Web应用程序通信 Web应用程序与Web API通信(有时是独立的,有时是代表用户的) 基于浏览器的应用程序与Web API通信 本 ...
- Asp.Net Core IdentityServer4 管理面板集成
前言 IdentityServer4(以下简称 Id4) 是 Asp.Net Core 中一个非常流行的 OpenId Connect 和 OAuth 2.0 框架,可以轻松集成到 Asp.Net C ...
- Asp.Net Core IdentityServer4 中的基本概念
一.前言 这篇文章可能大家会觉得很空洞,没有实际的实战东西,主要是自己整理出来的IdentityServer4 的一些概念性的东西:如果你对IdentityServer4有过一定的实战经验,可以跳过不 ...
- Asp.net core IdentityServer4与传统基于角色的权限系统的集成
写在前面 因为最近在忙别的,好久没水文了 今天来水一篇: 在学习或者做权限系统技术选型的过程中,经常有朋友有这样的疑问 : "IdentityServer4的能不能做到与传统基于角色的权限系 ...
- asp.net core IdentityServer4 实现 Client credentials(客户端凭证)
前言 OAuth 2.0默认四种授权模式(GrantType) 授权码模式(authorization_code) 简化模式(implicit) 密码模式(resource owner passwor ...
- asp.net core IdentityServer4 实现 resource owner password credentials(密码凭证)
前言 OAuth 2.0默认四种授权模式(GrantType) 授权码模式(authorization_code) 简化模式(implicit) 密码模式(resource owner passwor ...
- asp.net core IdentityServer4 实现 implicit(隐式许可)实现第三方登录
前言 OAuth 2.0默认四种授权模式(GrantType) 授权码模式(authorization_code) 简化模式(implicit) 密码模式(resource owner passwor ...
- Asp.Net Core 中IdentityServer4 授权中心之应用实战
一.前言 查阅了大多数相关资料,查阅到的IdentityServer4 的相关文章大多是比较简单并且多是翻译官网的文档编写的,我这里在 Asp.Net Core 中IdentityServer4 的应 ...
随机推荐
- Django之路 - 实现登录随机验证码
登录验证码是每个网站登录时的基本标配,网上也有很多相应的文章, 但是从生成验证码到 应用到自己的网站上的全步骤,并没有看到很多, 为了节约大家的时间,我把整体步骤写下来, 即拿即用哈 1. 生成随机验 ...
- 如何连接并处理 sdf 数据库文件(便捷数据库处理)
如何连接并处理 sdf 数据库文件 SqlCeConnection cc = new SqlCeConnection(); DataTable dt = new DataTable(); ...
- MVC中@Html.Action的用法
MVC项目中如果有公共部分的代码就可以单独拿出来作为控件来用(比如头部和底部代码).跟ASP.NET中的ASCX实现的效果一样,但MVC比它方便的多. 想要实现该效果,需要知道@Html.Action ...
- leetcode257
/** * Definition for a binary tree node. * public class TreeNode { * public int val; * public TreeNo ...
- AES 加密算法 跨语言
aes加密算法 delphi .java.c# .网页在线工具 4个相同 AES/ECB/PKCS5Padding 与网页在线工具加密结果相同 http://tool.chacuo.net/crypt ...
- 一步一步学习Android开发
一步步踏入Android的阵营. 疑惑篇: gravity和layout_gravity的区别
- MyBatis ehcache二级缓存
ehcache二级缓存的开启步骤: 1.导入jar 2.在映射文件中指定用的哪个缓存 3.加一个配置文件,这个配置文件在ehcache jar包中就有 使增删改对二级缓存不刷新: 对一级缓存没有用的, ...
- Oracle的服务端_默认_启动的服务
- 二硫化铼(ReS2)的电子输运特性及逻辑器件研究进展
南京大学物理学院.固体微结构物理国家重点实验室.微结构科学与技术协同创新中心的缪峰教授课题组和王伯根教授课题组在新型二维材料二硫化铼(ReS2)的电子输运特性及逻辑器件研究领域取得重要进展,相关论文于 ...
- 温(Xue)习排序算法
最近忙着找工作,虽然排序算法用得到的情况不多,但不熟悉的话心里始终还是感觉没底. 于是今天给温习了其中的四个排序算法(与其说是温习,不如说是学习...因为感觉自己好像从来木有掌握过它们...) 一.选 ...