为ASP.NET WEB API生成人性化说明文档
一、为什么要生成说明文档
我们大家都知道,自己写的API要供他人调用,就需要用文字的方式将调用方法和注意事项等写成一个文档以更好的展示我们设计时的想法和思路,便于调用者更加高效的使用我们的API。
当然,您可以不借助任何工具,自己手工写文档,然后做成chm或者html的形式交给客户,就是效率有点低,并且在API更改后有需要手工更改说明文档。
那有没有一种既方便,又能在API发生改变时,自动更新说明文档呢?答案是肯定的。
二、自动生成说明文档的具体实现
我们这里主要是将GlobalConfiguration.Configuration.Services的描述的实现换一种实现,具体是实现IDocumentationProvider这个接口,然后在调用Replace方法替换实现。
百度搜XmlCommentDocumentationProvider,有很多结果哦。这些都源于微软官方的大牛这篇文章:
下面是XmlCommentDocumentationProvider的实现:
using System.Linq;

using System.Reflection;

using System.Text.RegularExpressions;

using System.Web.Http;

using System.Web.Http.Controllers;

using System.Web.Http.Description;

using System.Web.Mvc;

using System.Xml.XPath;

namespace Deepleo.API

{

    /// <summary>

    /// XmlCommentDocumentationProvider

    /// </summary>

    public class XmlCommentDocumentationProvider : IDocumentationProvider

    {

        readonly XPathNavigator _documentNavigator;

        private const string _methodExpression = "/doc/members/member[@name='M:{0}']";

        private static readonly Regex _nullableTypeNameRegex = new Regex(@"(.*\.Nullable)" + Regex.Escape("`1[[") + "([^,]*),.*");

        /// <summary>

        /// ctor

        /// </summary>

        /// <param name="documentPath">document path</param>

        public XmlCommentDocumentationProvider(string documentPath)

        {

            XPathDocument xpath = new XPathDocument(documentPath);

            _documentNavigator = xpath.CreateNavigator();

        }

        public virtual string GetDocumentation(HttpActionDescriptor actionDescriptor)

        {

            XPathNavigator memberNode = GetMemberNode(actionDescriptor);

            if (memberNode != null)

            {

                XPathNavigator summaryNode = memberNode.SelectSingleNode("summary");

                if (summaryNode != null)

                {

                    return summaryNode.Value.Trim();

                }

            }

            return "";

        }

        public virtual string GetDocumentation(HttpParameterDescriptor parameterDescriptor)

        {

            ReflectedHttpParameterDescriptor reflectedParameterDescriptor = parameterDescriptor as ReflectedHttpParameterDescriptor;

            if (reflectedParameterDescriptor != null)

            {

                XPathNavigator memberNode = GetMemberNode(reflectedParameterDescriptor.ActionDescriptor);

                if (memberNode != null)

                {

                    string parameterName = reflectedParameterDescriptor.ParameterInfo.Name;

                    XPathNavigator parameterNode = memberNode.SelectSingleNode(string.Format("param[@name='{0}']", parameterName));

                    if (parameterNode != null)

                    {

                        return parameterNode.Value.Trim();

                    }

                }

            }

            return "";

        }

        private XPathNavigator GetMemberNode(HttpActionDescriptor actionDescriptor)

        {

            ReflectedHttpActionDescriptor reflectedActionDescriptor = actionDescriptor as ReflectedHttpActionDescriptor;

            if (reflectedActionDescriptor != null)

            {

                string selectExpression = string.Format(_methodExpression, GetMemberName(reflectedActionDescriptor.MethodInfo));

                XPathNavigator node = _documentNavigator.SelectSingleNode(selectExpression);

                if (node != null)

                {

                    return node;

                }

            }

            return null;

        }

        private static string GetMemberName(MethodInfo method)

        {

            if (method.DeclaringType == null)

                return string.Empty;

            string name = string.Format("{0}.{1}", method.DeclaringType.FullName, method.Name);

            var parameters = method.GetParameters();

            if (parameters.Length != )

            {

                string[] parameterTypeNames = parameters.Select(param => ProcessTypeName(param.ParameterType.FullName)).ToArray();

                name += string.Format("({0})", string.Join(",", parameterTypeNames));

            }

            return name;

        }

        private static string ProcessTypeName(string typeName)

        {

            //handle nullable

            var result = _nullableTypeNameRegex.Match(typeName);

            if (result.Success)

            {

                return string.Format("{0}{{{1}}}", result.Groups[].Value, result.Groups[].Value);

            }

            return typeName;

        }

    }

}
这个代码是通用的,直接copy过去就ok了。
这篇博客园大牛张善友老师的博客有更详细的说明:http://www.cnblogs.com/shanyou/archive/2012/06/02/2532370.html
我主要说说后面的怎么实现:
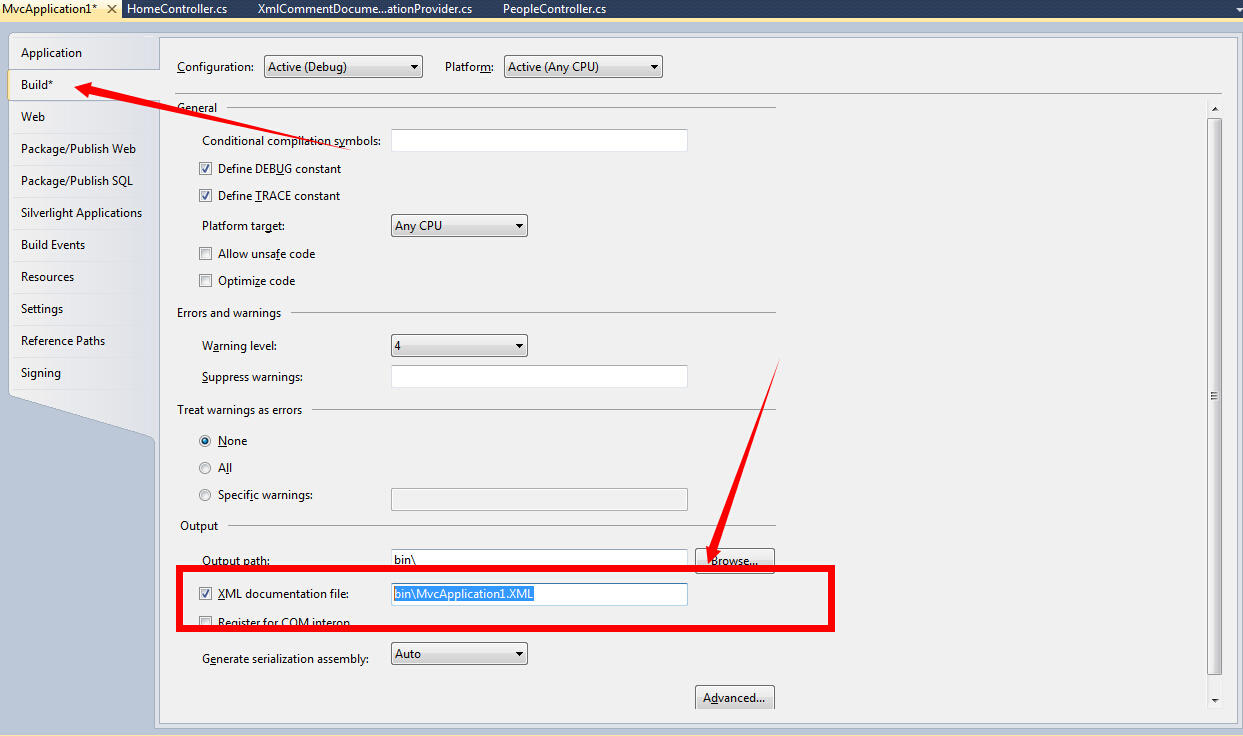
第一步:需要在Project的Build里面打开生成xml注释文件选项,如下图所示:
第二步:改造HomeController.
using System;

using System.Collections.Generic;

using System.Linq;

using System.Web;

using System.Web.Mvc;

using System.Web.Http.Description;

using System.Web.Http;

namespace MvcApplication1.Controllers

{

    public class HomeController : Controller

    {

        public ActionResult Index()

        {

            var config = GlobalConfiguration.Configuration;

            config.Services.Replace(typeof(IDocumentationProvider),

                                    new XmlCommentDocumentationProvider(HttpContext.Server.MapPath("~/bin/MvcApplication1.XML")));

            var apiExplorer = config.Services.GetApiExplorer();

            return View(apiExplorer);

        }

    }

}
代码的大意就是读取那个xml文件,然后替换掉以前的实现,换成我们的XmlCommentDocumentationProvider。
下面最后一步,修改View.
@model System.Web.Http.Description.IApiExplorer

@{

    ViewBag.Title = "API说明文档";

}

<div id="body">

    <section class="featured">

        <div class="content-wrapper">

            <hgroup class="title">

                <h1>API说明文档</h1>

            </hgroup>

        </div>

    </section>

    <section class="content-wrapper main-content clear-fix">

        <ul>

        @foreach (var api in Model.ApiDescriptions)

        {

            <li>

                <p>@api.HttpMethod : <b>@ViewBag.Domain@api.RelativePath</b></p>

                <blockquote>

                    <b>Description:</b>@api.Documentation<br />

                    @if (api.ParameterDescriptions.Count > )

                    {

                        <b>Parameters</b>

                        <ul>

                            @foreach (var parameter in api.ParameterDescriptions)

                            {

                                <li>@parameter.Name: @parameter.Documentation {@parameter.Source}</li>

                            }

                        </ul>

                    }

                </blockquote>

            </li>

            <hr/>

        }

        <li>

          <small>来源:http://www.cnblogs.com/deepleo/p/XmlCommentDocumentationProvider.html</small>

        </li>

        </ul>

    </section>

</div>
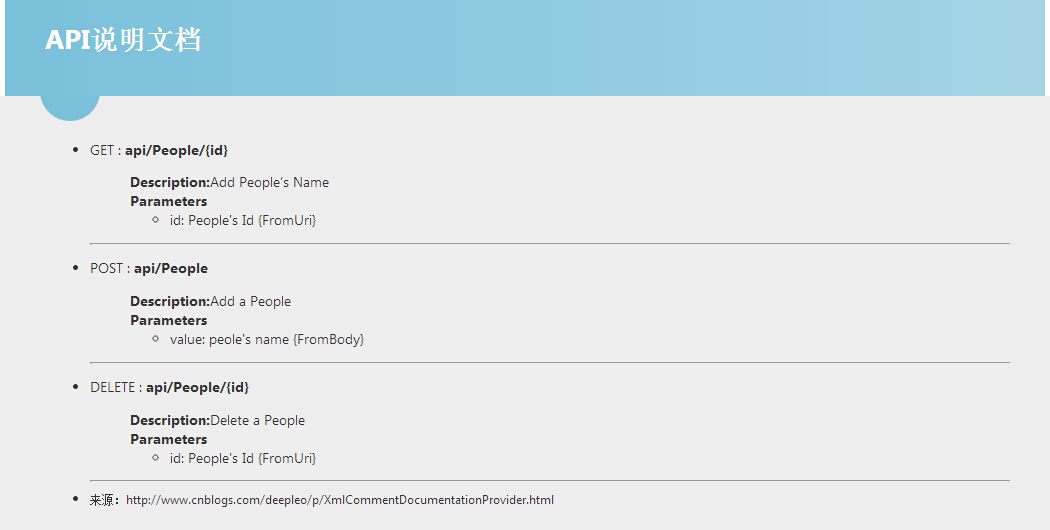
大功告成,在线浏览效果:http://weishangapi.deepleo.com
演示代码下载:http://files.cnblogs.com/deepleo/WebApplication1.rar
可以看到,你在代码里面的注释,会自动显示到说明文档里面,这样你就可以专注于你的API设计和实现了,无需要手工更改说明文档。
为ASP.NET WEB API生成人性化说明文档的更多相关文章
- asp.net core web api 生成 swagger 文档
asp.net core web api 生成 swagger 文档 Intro 在前后端分离的开发模式下,文档就显得比较重要,哪个接口要传哪些参数,如果一两个接口还好,口头上直接沟通好就可以了,如果 ...
- 关于ASP.NET Web Api的HelpPage文档注释问题
关于ASP.NET Web Api的HelpPage文档注释问题 以前我用微软的HelpPage来自动生成的webAPI帮助文档.在使用了一段时间后发现只能显示Controller上面写的注释文档内容 ...
- ASP.NET Core 中文文档 第二章 指南 (09) 使用 Swagger 生成 ASP.NET Web API 在线帮助测试文档
原文:ASP.NET Web API Help Pages using Swagger 作者:Shayne Boyer 翻译:谢炀(kiler) 翻译:许登洋(Seay) 对于开发人员来说,构建一个消 ...
- Swagger 生成 ASP.NET Web API
使用 Swagger 生成 ASP.NET Web API 在线帮助测试文档 原文:ASP.NET Web API Help Pages using Swagger作者:Shayne Boyer翻译: ...
- 使用ASP.NET Web API和Web API Client Gen使Angular 2应用程序的开发更加高效
本文介绍“ 为ASP.NET Web API生成TypeScript客户端API ”,重点介绍Angular 2+代码示例和各自的SDLC.如果您正在开发.NET Core Web API后端,则可能 ...
- 第二十节:Asp.Net Core WebApi生成在线文档
一. 基本概念 1.背景 使用 Web API 时,了解其各种方法对开发人员来说可能是一项挑战. Swagger 也称为OpenAPI,解决了为 Web API 生成有用文档和帮助页的问题. 它具有诸 ...
- 使用 Swagger 自动生成 ASP.NET Core Web API 的文档、在线帮助测试文档(ASP.NET Core Web API 自动生成文档)
对于开发人员来说,构建一个消费应用程序时去了解各种各样的 API 是一个巨大的挑战.在你的 Web API 项目中使用 Swagger 的 .NET Core 封装 Swashbuckle 可以帮助你 ...
- ASP.NET Web API从注释生成帮助文档
默认情况下,ASP.NET Web API不从Controller的注释中生成帮助文档.如果要将注释作为Web API帮助文档的一部分,比如在帮助文档的Description栏目中显示方法注释中的su ...
- ASP.NET Web API根据代码注释生成Help文档
使用Visual Studio新建一个ASP.NET Web API项目,直接运行,查看Help文档可以看到如下的API帮助说明 如何在Description中显示描述. 1. 打开Controlle ...
随机推荐
- vue遇到的坑(一)——数组更新
最近在项目中遇到个问题,数组已经更新了,但是页面中的DOM并没有触发变化.我一直以来的想法就是: 既然vue实现的实时数据双向绑定,那么在model层发生了变化之后为什么就没有在view层更新呢? 在 ...
- 《vue.js实战》练习---数字输入框组件
html: <!DOCTYPE html> <html lang="en"> <head> <meta charset="UTF ...
- jsp中的一些细节和注意要点。。。。。简记
一: <html xmlns="http://www.w3.org/1999/xhtml" xml:lang="en" lang="en&quo ...
- HDU 1877 又一版 A+B(进制转换)
看了http://lovnet.iteye.com/blog/1690276的答案 好巧妙的方法 递归实现十进制向m进制转换 #include "stdio.h" int m; v ...
- MAC电脑密码破解
[第一个方法] 开机,启动时按cmd+S,进入Single User Mode,出现像DOS一样的提示符#root> 在#root>下输入(注意空格,大小写) fsck -y moun ...
- centos 防火墙关闭/开启
从配置菜单关闭防火墙是不起作用的,索性在安装的时候就不要装防火墙查看防火墙状态:/etc/init.d/iptables status暂时关闭防火墙:/etc/init.d/iptables stop ...
- 【HDU】6146 Pokémon GO
[题意]一个2*n的网格,再保证步数最少的情况下,求从任意格出发遍历完所有格的方案数,格子八连通.n<=10000,T<=100. [算法]递推,DP [题解]原题链接:蓝桥杯 格子刷油漆 ...
- 【洛谷 P4555】 [国家集训队]最长双回文串 (Manacher)
题目链接 \(|S|<=10^5\),时间还是很宽松的. 允许我们使用线性/\(N\log N\)/甚至\(N \sqrt N\)的算法. 设\(l[i]\)表示以\(a[i]\)结尾的最长回文 ...
- MYSQL学习心得 优化
这一篇主要介绍MYSQL的优化,优化MYSQL数据库是DBA和开发人员的必备技能 MYSQL优化一方面是找出系统瓶颈,提高MYSQL数据库整体性能:另一方面需要合理的结构设计和参数调整,以提高 用户操 ...
- V-Hyper安装ubuntu-13.10-server-amd64
1.在windws8上的V_Hyper虚拟机上安装Ubuntu虚拟机服务器版.遇到的问题和解决方案 2.正确的在V-Hyper配置方法参考文章:在Hyper-V中安装和配置Ubuntu Server ...