Elasticsearch之client源码简要分析
问题
让我们带着问题去学习,效率会更高
1 es集群只配置一个节点,client是否能够自动发现集群中的所有节点?是如何发现的?
2 es client如何做到负载均衡?
3 一个es node挂掉之后,es client如何摘掉该节点?
4 es client node检测分为两种模式(SimpleNodeSampler和SniffNodesSampler),有什么不同?
核心类
- TransportClient es client对外API类
- TransportClientNodesService 维护node节点的类
- ScheduledNodeSampler 定期维护正常节点类
- NettyTransport 进行数据传输
- NodeSampler 节点嗅探器
Client初始化过程
初始化代码
1  Settings.Builder builder = Settings.settingsBuilder()

                                   .put("cluster.name", clusterName)

                                   .put("client.transport.sniff", true);

Settings settings = builder.build();

2  TransportClient client = TransportClient.builder().settings(settings).build();

3  for (TransportAddress transportAddress : transportAddresses) {

    client.addTransportAddress(transportAddress);

}
1 ES 通过builder模式构造了基础的配置参数;
2 通过build构造了client,这个时候包括构造client、初始化ThreadPool、构造TransportClientNodesService、启动定时任务、定制化嗅探类型;
3 添加集群可用地址,比如我只配了集群中的一个节点;
构建client
调用build API
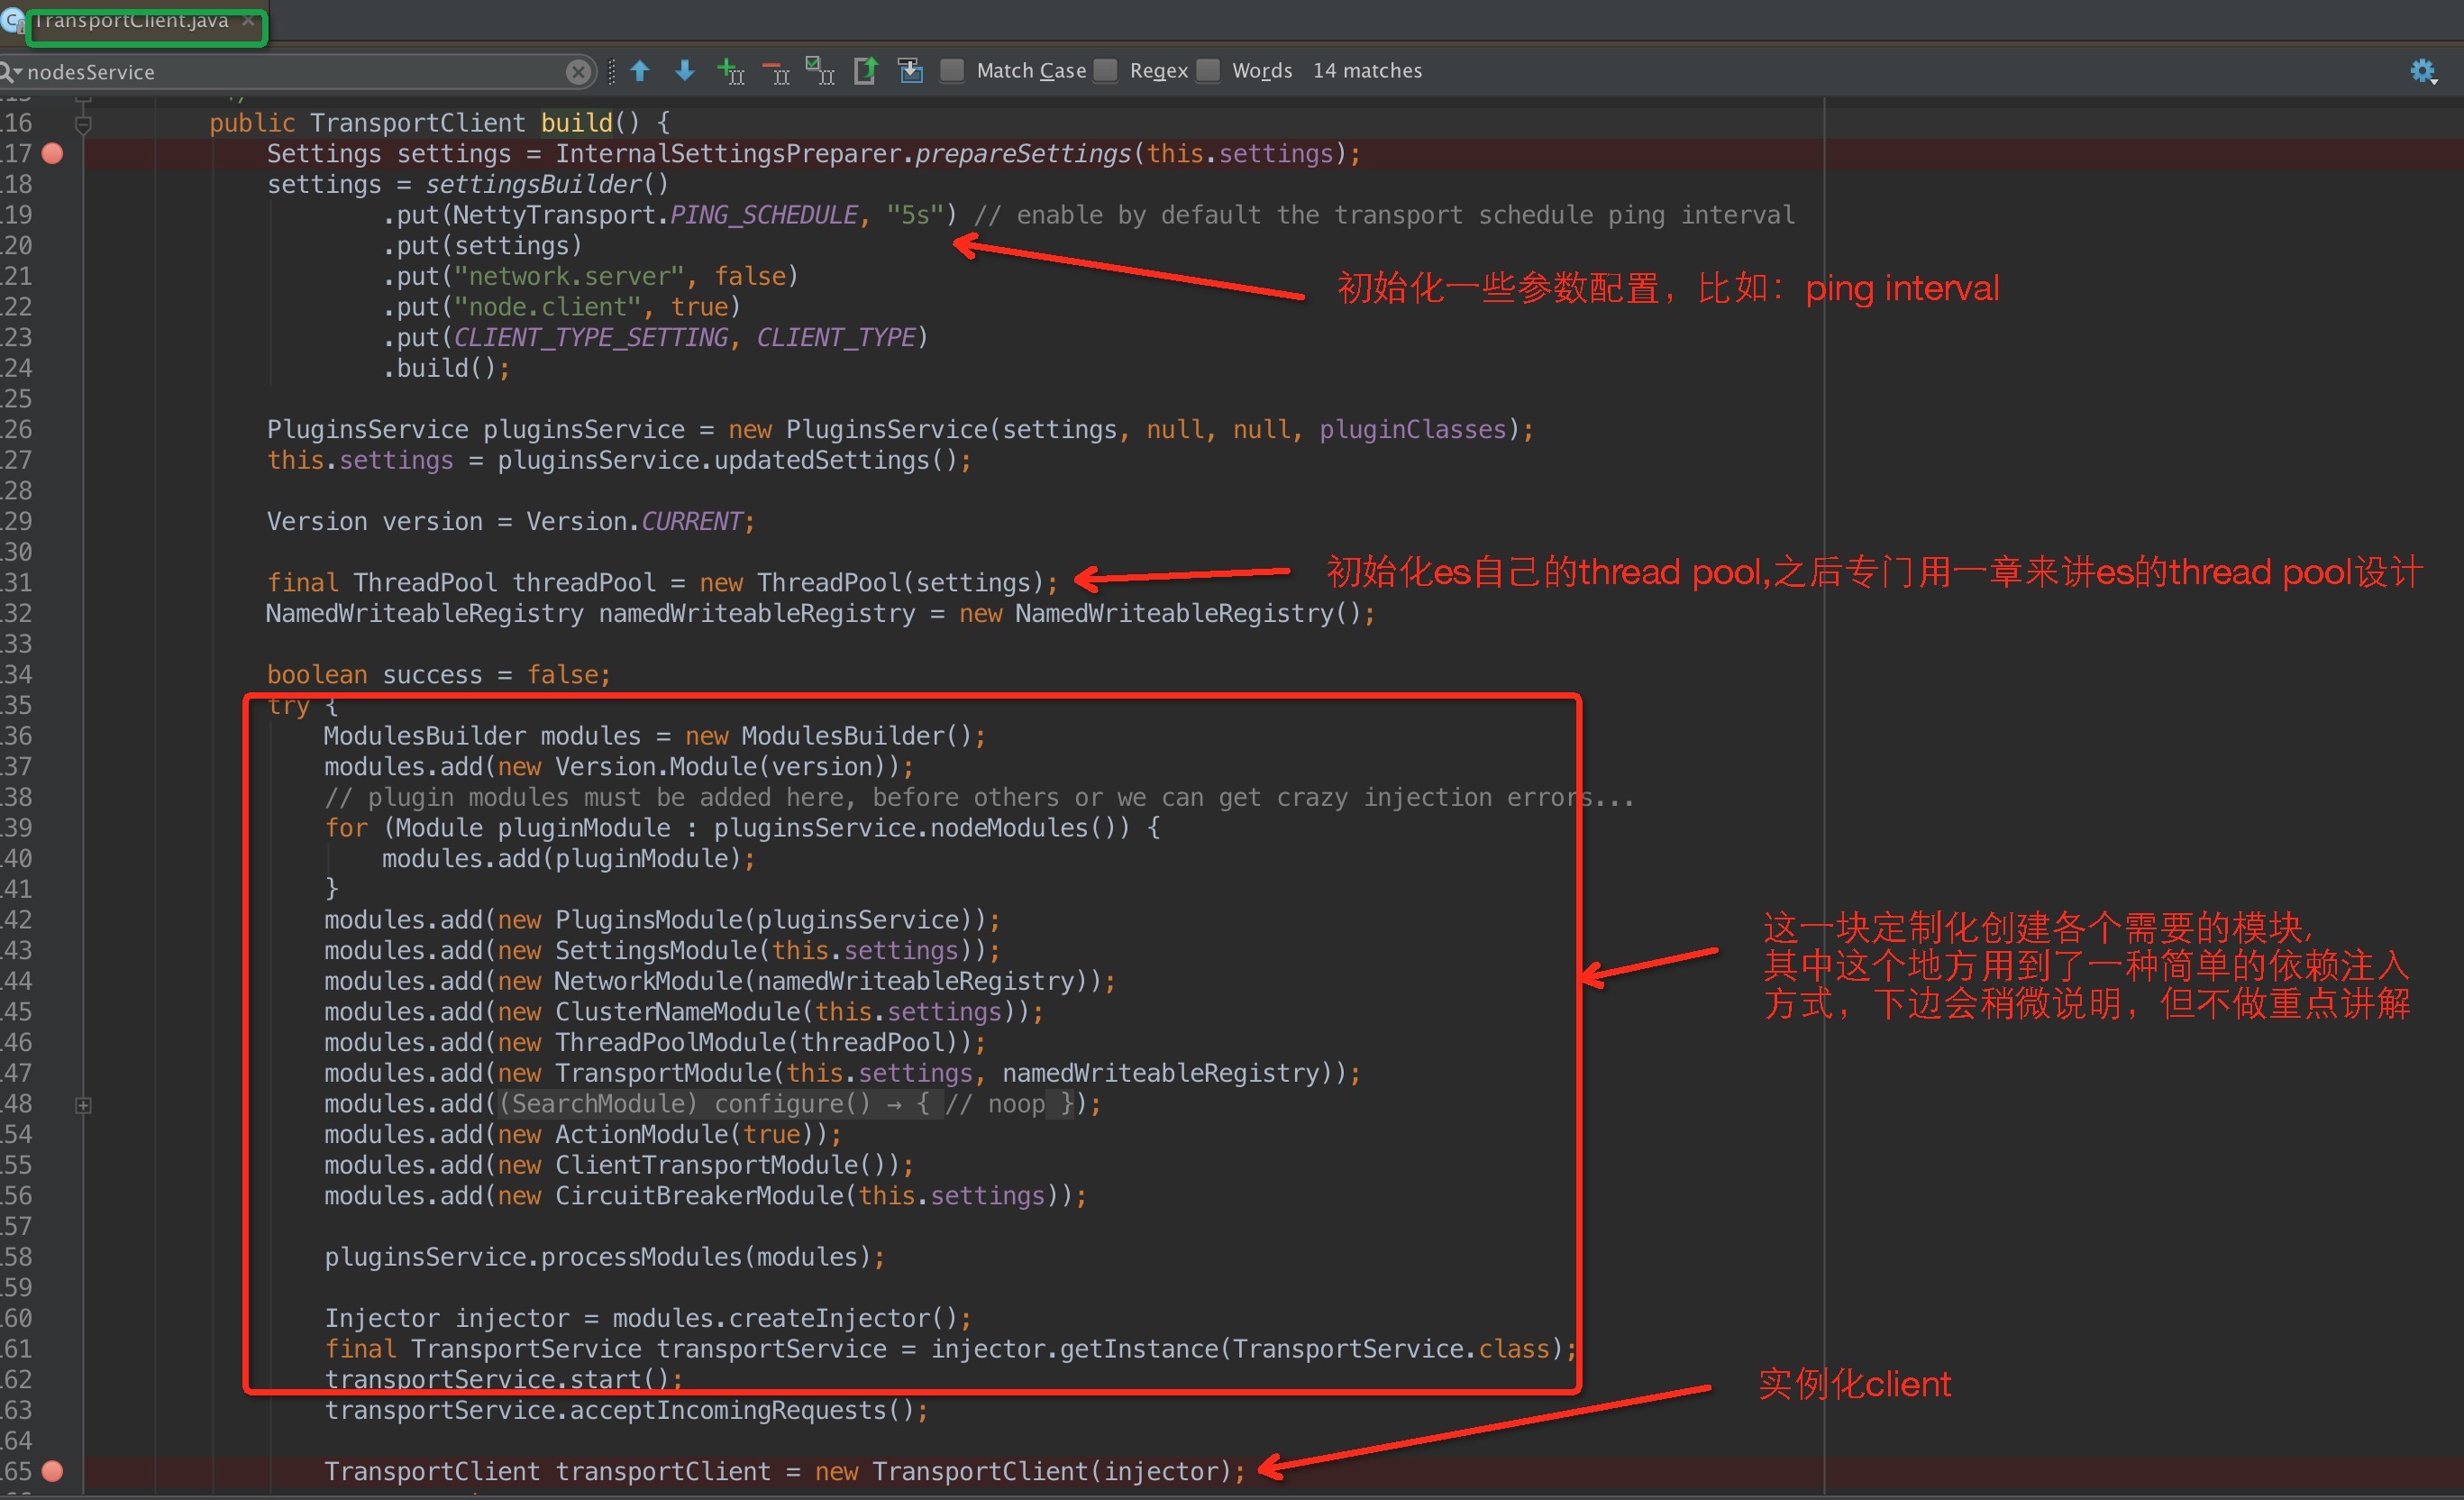
其中,关于依赖注入的简单说明:Guice 是 Google 用于 Java™ 开发的开放源码依赖项注入框架(感兴趣的可以了解下,这里不做重点讲解),具体可参考下边链接:
- https://github.com/google/guice/wiki/GettingStarted
- http://www.cnblogs.com/whitewolf/p/4185908.html
- http://www.ibm.com/developerworks/cn/java/j-guice.html
初始化TransportClientNodesService
在上一幅图的 modules.createInjector对TransportClientNodesService进行实例化,在TransportClient进行注入,可以看到TransportClient里边的绝大部分API都是通过TransportClientNodesService进行代理的

Guice通过注解进行注入
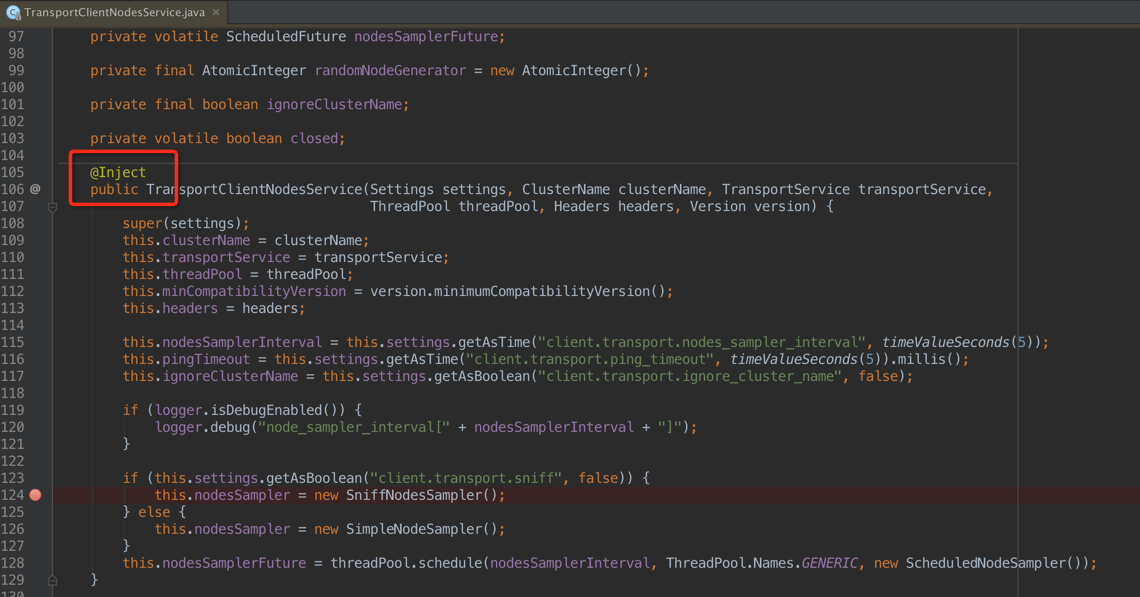
在上图中:注入了集群名称、线程池等,重点是如下代码:该段代码选择了节点嗅探器的类型 嗅探同一集群中的所有节点(SniffNodesSampler)或者是只关注配置文件配置的节点(SimpleNodeSampler)
if (this.settings.getAsBoolean("client.transport.sniff", false)) {

    this.nodesSampler = new SniffNodesSampler();

} else {

    this.nodesSampler = new SimpleNodeSampler();

}
特点:
SniffNodesSampler:client会主动发现集群里的其他节点,会创建fully connect(什么叫fully connect?后边说)
SimpleNodeSampler:ping listedNodes中的所有node,区别在于这里创建的都是light connect;
其中TransportClientNodesService维护了三个节点存储数据结构:
// nodes that are added to be discovered
1 private volatile List<DiscoveryNode> listedNodes = Collections.emptyList();
2 private volatile List<DiscoveryNode> nodes = Collections.emptyList();
3 private volatile List<DiscoveryNode> filteredNodes = Collections.emptyList();
1 代表配置文件中主动加入的节点;
2 代表参与请求的节点;
3 过滤掉的不能进行请求处理的节点;
Client如何做到负载均衡

如上图,我们发现每次 execute 的时候,是从 nodes 这个数据结构中获取节点,然后通过简单的 rouund-robbin 获取节点服务器;核心代码如下:
private final AtomicInteger randomNodeGenerator = new AtomicInteger();

......

private int getNodeNumber() {

    int index = randomNodeGenerator.incrementAndGet();

    if (index < 0) {

        index = 0;

        randomNodeGenerator.set(0);

    }

    return index;

}
然后通过netty的channel将数据写入,核心代码如下:
public void sendRequest(final DiscoveryNode node, final long requestId, final String action, final TransportRequest request, TransportRequestOptions options) throws IOException, TransportException {

1    Channel targetChannel = nodeChannel(node, options);

    if (compress) {

        options = TransportRequestOptions.builder(options).withCompress(true).build();

    }

    byte status = 0;

    status = TransportStatus.setRequest(status);

    ReleasableBytesStreamOutput bStream = new ReleasableBytesStreamOutput(bigArrays);

    boolean addedReleaseListener = false;

    try {

        bStream.skip(NettyHeader.HEADER_SIZE);

        StreamOutput stream = bStream;

        // only compress if asked, and, the request is not bytes, since then only

        // the header part is compressed, and the "body" can't be extracted as compressed

        if (options.compress() && (!(request instanceof BytesTransportRequest))) {

            status = TransportStatus.setCompress(status);

            stream = CompressorFactory.defaultCompressor().streamOutput(stream);

        }

        // we pick the smallest of the 2, to support both backward and forward compatibility

        // note, this is the only place we need to do this, since from here on, we use the serialized version

        // as the version to use also when the node receiving this request will send the response with

        Version version = Version.smallest(this.version, node.version());

        stream.setVersion(version);

        stream.writeString(action);

        ReleasablePagedBytesReference bytes;

        ChannelBuffer buffer;

        // it might be nice to somehow generalize this optimization, maybe a smart "paged" bytes output

        // that create paged channel buffers, but its tricky to know when to do it (where this option is

        // more explicit).

        if (request instanceof BytesTransportRequest) {

            BytesTransportRequest bRequest = (BytesTransportRequest) request;

            assert node.version().equals(bRequest.version());

            bRequest.writeThin(stream);

            stream.close();

            bytes = bStream.bytes();

            ChannelBuffer headerBuffer = bytes.toChannelBuffer();

            ChannelBuffer contentBuffer = bRequest.bytes().toChannelBuffer();

            buffer = ChannelBuffers.wrappedBuffer(NettyUtils.DEFAULT_GATHERING, headerBuffer, contentBuffer);

        } else {

            request.writeTo(stream);

            stream.close();

            bytes = bStream.bytes();

            buffer = bytes.toChannelBuffer();

        }

        NettyHeader.writeHeader(buffer, requestId, status, version);

2        ChannelFuture future = targetChannel.write(buffer);

        ReleaseChannelFutureListener listener = new ReleaseChannelFutureListener(bytes);

        future.addListener(listener);

        addedReleaseListener = true;

        transportServiceAdapter.onRequestSent(node, requestId, action, request, options);

    } finally {

        if (!addedReleaseListener) {

            Releasables.close(bStream.bytes());

        }

    }

}
其中最重要的就是1和2,中间一段是处理数据和进行一些必要的步骤
1代表拿到一个连接;
2代表通过拿到的连接写数据;
这时候就会有新的问题
1 nodes的数据是何时写入的?
2 连接是什么时候创建的?
Nodes数据何时写入
核心是调用doSampler,代码如下:
protected void doSample() {

    // the nodes we are going to ping include the core listed nodes that were added

    // and the last round of discovered nodes

    Set<DiscoveryNode> nodesToPing = Sets.newHashSet();

    for (DiscoveryNode node : listedNodes) {

        nodesToPing.add(node);

    }

    for (DiscoveryNode node : nodes) {

        nodesToPing.add(node);

    }

    final CountDownLatch latch = new CountDownLatch(nodesToPing.size());

    final ConcurrentMap<DiscoveryNode, ClusterStateResponse> clusterStateResponses = ConcurrentCollections.newConcurrentMap();

    for (final DiscoveryNode listedNode : nodesToPing) {

        threadPool.executor(ThreadPool.Names.MANAGEMENT).execute(new Runnable() {

            @Override

            public void run() {

                try {

                    if (!transportService.nodeConnected(listedNode)) {

                        try {

                            // if its one of the actual nodes we will talk to, not to listed nodes, fully connect

                            if (nodes.contains(listedNode)) {

                                logger.trace("connecting to cluster node [{}]", listedNode);

                                transportService.connectToNode(listedNode);

                            } else {

                                // its a listed node, light connect to it...

                                logger.trace("connecting to listed node (light) [{}]", listedNode);

                                transportService.connectToNodeLight(listedNode);

                            }

                        } catch (Exception e) {

                            logger.debug("failed to connect to node [{}], ignoring...", e, listedNode);

                            latch.countDown();

                            return;

                        }

                    }

                    //核心是在这里,刚刚开始初始化的时候,可能只有配置的一个节点,这个时候会通过这个地址发送一个state状态监测

                    //"cluster:monitor/state"

                    transportService.sendRequest(listedNode, ClusterStateAction.NAME,

                            headers.applyTo(Requests.clusterStateRequest().clear().nodes(true).local(true)),

                            TransportRequestOptions.builder().withType(TransportRequestOptions.Type.STATE).withTimeout(pingTimeout).build(),

                            new BaseTransportResponseHandler<ClusterStateResponse>() {

                                @Override

                                public ClusterStateResponse newInstance() {

                                    return new ClusterStateResponse();

                                }

                                @Override

                                public String executor() {

                                    return ThreadPool.Names.SAME;

                                }

                                @Override

                                public void handleResponse(ClusterStateResponse response) {

/*通过回调,会在这个地方返回集群中类似下边所有节点的信息

{

  "version" : 27,

  "state_uuid" : "YSI9d_HiQJ-FFAtGFCVOlw",

  "master_node" : "TXHHx-XRQaiXAxtP1EzXMw",

  "blocks" : { },

  "nodes" : {

    "7" : {

      "name" : "es03",

      "transport_address" : "1.1.1.1:9300",

      "attributes" : {

        "data" : "false",

        "master" : "true"

      }

    },

    "6" : {

      "name" : "common02",

      "transport_address" : "1.1.1.2:9300",

      "attributes" : {

        "master" : "false"

      }

    },

    "5" : {

      "name" : "es02",

      "transport_address" : "1.1.1.3:9300",

      "attributes" : {

        "data" : "false",

        "master" : "true"

      }

    },

    "4" : {

      "name" : "common01",

      "transport_address" : "1.1.1.4:9300",

      "attributes" : {

        "master" : "false"

      }

    },

    "3" : {

      "name" : "common03",

      "transport_address" : "1.1.1.5:9300",

      "attributes" : {

        "master" : "false"

      }

    },

    "2" : {

      "name" : "es01",

      "transport_address" : "1.1.1.6:9300",

      "attributes" : {

        "data" : "false",

        "master" : "true"

      }

    },

    "1" : {

      "name" : "common04",

      "transport_address" : "1.1.1.7:9300",

      "attributes" : {

        "master" : "false"

      }

    }

  },

  "metadata" : {

    "cluster_uuid" : "_na1x_",

    "templates" : { },

    "indices" : { }

  },

  "routing_table" : {

    "indices" : { }

  },

  "routing_nodes" : {

    "unassigned" : [ ],

  }

}

*/

                                    clusterStateResponses.put(listedNode, response);

                                    latch.countDown();

                                }

                                @Override

                                public void handleException(TransportException e) {

                                    logger.info("failed to get local cluster state for {}, disconnecting...", e, listedNode);

                                    transportService.disconnectFromNode(listedNode);

                                    latch.countDown();

                                }

                            });

                } catch (Throwable e) {

                    logger.info("failed to get local cluster state info for {}, disconnecting...", e, listedNode);

                    transportService.disconnectFromNode(listedNode);

                    latch.countDown();

                }

            }

        });

    }

    try {

        latch.await();

    } catch (InterruptedException e) {

        return;

    }

    HashSet<DiscoveryNode> newNodes = new HashSet<>();

    HashSet<DiscoveryNode> newFilteredNodes = new HashSet<>();

    for (Map.Entry<DiscoveryNode, ClusterStateResponse> entry : clusterStateResponses.entrySet()) {

        if (!ignoreClusterName && !clusterName.equals(entry.getValue().getClusterName())) {

            logger.warn("node {} not part of the cluster {}, ignoring...", entry.getValue().getState().nodes().localNode(), clusterName);

            newFilteredNodes.add(entry.getKey());

            continue;

        }

//接下来在这个地方拿到所有的data nodes 写入到nodes节点里边

        for (ObjectCursor<DiscoveryNode> cursor : entry.getValue().getState().nodes().dataNodes().values()) {

            newNodes.add(cursor.value);

        }

    }

    nodes = validateNewNodes(newNodes);

    filteredNodes = Collections.unmodifiableList(new ArrayList<>(newFilteredNodes));

}
其中调用时机分为两部分:
1 client.addTransportAddress(transportAddress);
2 ScheduledNodeSampler,默认每隔5s会进行一次对各个节点的请求操作;
连接是何时创建的呢
也是在doSampler调用,最终由NettryTransport创建
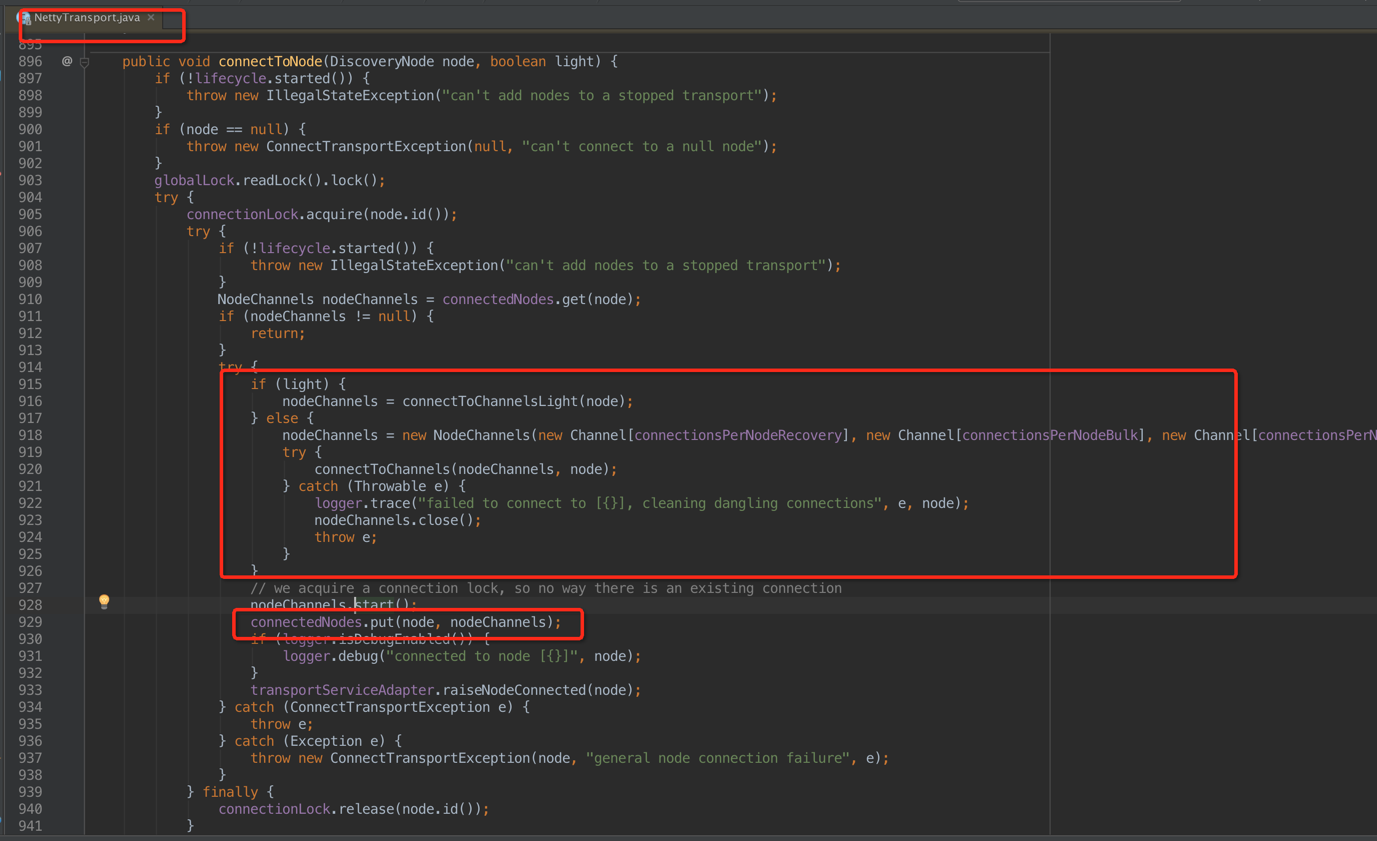
这个时候发现,如果是light则创建轻连接,也就是,否则创建fully connect,其中包括
- recovery:做数据恢复recovery,默认个数2个;
- bulk:用于bulk请求,默认个数3个;
- med/reg:典型的搜索和单doc索引,默认个数6个;
- high:如集群state的发送等,默认个数1个;
- ping:就是node之间的ping咯。默认个数1个;
对应的代码为:
public void start() {

    List<Channel> newAllChannels = new ArrayList<>();

    newAllChannels.addAll(Arrays.asList(recovery));

    newAllChannels.addAll(Arrays.asList(bulk));

    newAllChannels.addAll(Arrays.asList(reg));

    newAllChannels.addAll(Arrays.asList(state));

    newAllChannels.addAll(Arrays.asList(ping));

    this.allChannels = Collections.unmodifiableList(newAllChannels);

}
Elasticsearch之client源码简要分析的更多相关文章
- Activity源码简要分析总结
Activity源码简要分析总结 摘自参考书籍,只列一下结论: 1. Activity的顶层View是DecorView,而我们在onCreate()方法中通过setContentView()设置的V ...
- [Java] LinkedHashMap 源码简要分析
特点 * 各个元素不仅仅按照HashMap的结构存储,而且每个元素包含了before/after指针,通过一个头元素header,形成一个双向循环链表.使用循环链表,保存了元素插入的顺序. * 可设置 ...
- [Java] HashMap 源码简要分析
特性 * 允许null作为key/value. * 不保证按照插入的顺序输出.使用hash构造的映射一般来讲是无序的. * 非线程安全. * 内部原理与Hashtable类似. 源码简要分析 pu ...
- [Java] Hashtable 源码简要分析
Hashtable /HashMap / LinkedHashMap 概述 * Hashtable比较早,是线程安全的哈希映射表.内部采用Entry[]数组,每个Entry均可作为链表的头,用来解决冲 ...
- RxJava && Agera 从源码简要分析基本调用流程(2)
版权声明:本文由晋中望原创文章,转载请注明出处: 文章原文链接:https://www.qcloud.com/community/article/124 来源:腾云阁 https://www.qclo ...
- RxJava && Agera 从源码简要分析基本调用流程(1)
版权声明:本文由晋中望原创文章,转载请注明出处: 文章原文链接:https://www.qcloud.com/community/article/123 来源:腾云阁 https://www.qclo ...
- Redis源码简要分析
转载请注明来源:https://www.cnblogs.com/hookjc/ 把所有服务端文件列出来,并且标示出其作用:adlist.c //双向链表ae.c //事件驱动ae_epoll.c // ...
- spring mvc 源码简要分析
关于web项目,运用比较多的是过滤器和拦截器 过滤器基于责任链设计模式 创建过滤器链 / Create the filter chain for this requestApplicationFilt ...
- ElasticSearch Index操作源码分析
ElasticSearch Index操作源码分析 本文记录ElasticSearch创建索引执行源码流程.从执行流程角度看一下创建索引会涉及到哪些服务(比如AllocationService.Mas ...
随机推荐
- [leetcode] 题型整理之动态规划
动态规划属于技巧性比较强的题目,如果看到过原题的话,对解题很有帮助 55. Jump Game Given an array of non-negative integers, you are ini ...
- HTML 表
表格: <table></table> 插入一个表格 <tr></tr> 代表一行 其中插入<td></td>单元格 ...
- asp.net c# 网上搜集面试题目大全(附答案)
1.String str=new String("a")和String str = "a"有什么区别? String str = "a"; ...
- 归一化交叉相关Normalization cross correlation (NCC)
归一化交叉相关Normalization cross correlation (NCC) 相关系数,图像匹配 NCC正如其名字,是用来描述两个目标的相关程度的,也就是说可以用来刻画目标间的相似性.一般 ...
- hibernate模糊查询
hibernate模糊查询-Restrictions.ilike & Expression.like Criteria criteria = session.createCriteria(Ta ...
- Salt安装(yum不可用时)
salt-master安装 [salt-master]# yum install salt-master 或者 curl -L http://bootstrap.saltstack.o ...
- Android 进程常驻(使用第三方MarsDaemon)(虽然不可用,但是还是保留下。)
github地址: https://github.com/Marswin/MarsDaemon 原理分析: Android 进程常驻(0)----MarsDaemon使用说明 Android 进程常驻 ...
- C语言_第一章
1. 计算机能直接识别和接受的二进制代码称为 机器指令——>(集合) 机器语言. 2. 输出C #include<stdio.h> int main(){ printf(&q ...
- MongoDB各种查询操作详解
这篇文章主要介绍了MongoDB各种查询操作详解,包括比较查询.关联查询.数组查询等,需要的朋友可以参考下 一.find操作 MongoDB中使用find来进行查询,通过指定find的第一个参数可 ...
- Reg于Wire的不同点
Reg 比喻为“相机” Reg型,是always中被赋值的信号,往往代表触发器,但不一定是触发器 Wire 比喻为“镜子” Wrie型,assign指定的组合逻辑的信号 好好想想 ,还是能有个大致的概 ...