⑤SpringBoot之定时任务
本文介绍SpringBoot定时任务的使用,springboot默认已经帮我们实行了,只需要添加相应的注解就可以实现。
1.pom配置文件
pom包里面只需要引入springboot starter包即可。
<dependencies>

    <dependency>

        <groupId>org.springframework.boot</groupId>

        <artifactId>spring-boot-starter</artifactId>

    </dependency>

    <dependency>

        <groupId>org.springframework.boot</groupId>

        <artifactId>spring-boot-starter-test</artifactId>

        <scope>test</scope>

    </dependency>

    <dependency>

        <groupId>org.springframework.boot</groupId>

        <artifactId>spring-boot-devtools</artifactId>

        <optional>true</optional>

    </dependency>

</dependencies>
2、启动类启用定时
在启动类上面加上@EnableScheduling即可开启定时。
@SpringBootApplication

@EnableScheduling

public class SpringbootApplication {

    public static void main(String[] args) {

        SpringApplication.run(SpringbootApplication.class, args);

    }

}
3、创建定时任务实现类
import java.text.SimpleDateFormat;
import java.util.Date; import org.springframework.scheduling.annotation.Scheduled;
import org.springframework.stereotype.Component; @Component
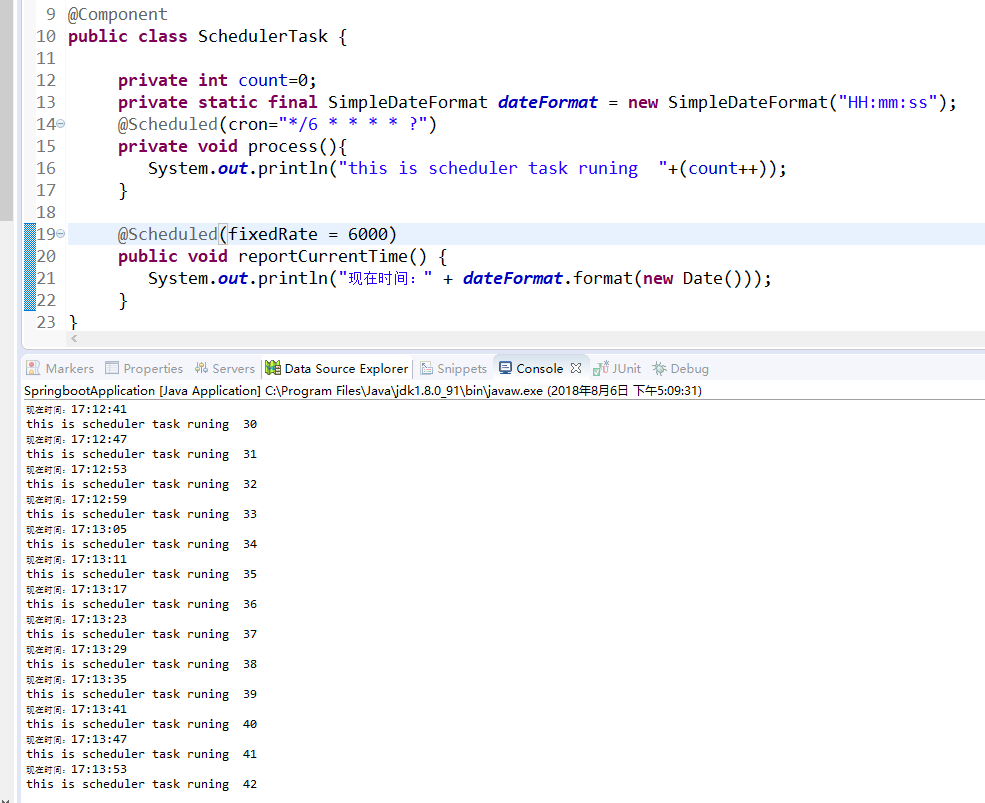
public class SchedulerTask { private int count=;
private static final SimpleDateFormat dateFormat = new SimpleDateFormat("HH:mm:ss");
@Scheduled(cron="*/6 * * * * ?")
private void process(){
System.out.println("this is scheduler task runing "+(count++));
} @Scheduled(fixedRate = )
public void reportCurrentTime() {
System.out.println("现在时间:" + dateFormat.format(new Date()));
}
}
参数说明:
@Scheduled 参数可以接受两种定时的设置,一种是我们常用的cron=”*/6 * * * * ?”,一种是 fixedRate = 6000,两种都表示每隔六秒打印一下内容。
fixedRate 说明
@Scheduled(fixedRate = 6000) :上一次开始执行时间点之后6秒再执行;
@Scheduled(fixedDelay = 6000) :上一次执行完毕时间点之后6秒再执行;
@Scheduled(initialDelay=1000, fixedRate=6000) :第一次延迟1秒后执行,之后按fixedRate的规则每6秒执行一次。
控制台输出:
如果使用static变量,假设 private static boolean isStop=false;
在定时器的方法中首行加一行代码:if(isStop) return;
如果需要停止定时器,你写个页面,控制isStop的值就可以开关定时器了。
⑤SpringBoot之定时任务的更多相关文章
- 玩转SpringBoot之定时任务详解
序言 使用SpringBoot创建定时任务非常简单,目前主要有以下三种创建方式: 一.基于注解(@Scheduled) 二.基于接口(SchedulingConfigurer) 前者相信大家都很熟悉, ...
- SpringBoot 配置定时任务
SpringBoot启用定时任务,其内部集成了成熟的框架,因此我们可以很简单的使用它. 开启定时任务 @SpringBootApplication //设置扫描的组件的包 @ComponentScan ...
- SpringBoot - 添加定时任务
SpringBoot 添加定时任务 EXample1: import org.slf4j.Logger; import org.slf4j.LoggerFactory; import org.spri ...
- springboot之定时任务
定时线程 说到定时任务,通常会想到JDK自带的定时线程来执行,定时任务. 回顾一下定时线程池. public static ScheduledExecutorService newScheduledT ...
- SpringBoot整合定时任务和异步任务处理 3节课
1.SpringBoot定时任务schedule讲解 定时任务应用场景: 简介:讲解什么是定时任务和常见定时任务区别 1.常见定时任务 Java自带的java.util.Timer类 ...
- 十三、springboot集成定时任务(Scheduling Tasks)
定时任务(Scheduling Tasks) 在springboot创建定时任务比较简单,只需2步: 1.在程序的入口加上@EnableScheduling注解. 2.在定时方法上加@Schedule ...
- SpringBoot创建定时任务
之前总结过spring+quartz实现定时任务的整合http://www.cnblogs.com/gdpuzxs/p/6663725.html,而springboot创建定时任务则是相当简单. (1 ...
- springboot开启定时任务 添加定时任务 推送
最近在自学Java的springboot框架,要用到定时推送消息.参考了网上的教程,自己调试,终于调好了.下面将网上的教程归纳下,总结复习下. springboot开启定时任务 在SpringBo ...
- (入门SpringBoot)SpringBoot结合定时任务task(十)
SpringBoot整合定时任务task 使用注解EnableScheduling在启动类上. 定义@Component作为组件被容器扫描. 表达式生成地址:http://cron.qqe2.com ...
- SpringBoot整合定时任务和异步任务处理
SpringBoot定时任务schedule讲解 简介:讲解什么是定时任务和常见定时任务区别 1.常见定时任务 Java自带的java.util.Timer类 timer:配置比较麻烦,时间延后问题, ...
随机推荐
- CentOS6、7优化脚本完美版
#!/bin/bash SysVer=`cat /etc/redhat-release | awk -F'release' '{print $2}' | awk -F'[ .]+' '{print $ ...
- JS中函数之外不能写return
JS中return有时会遇到这种情况,具体表现为:google浏览器等浏览器可以继续执行,IE浏览器不能执行return,并且google浏览器:执行时会显示SyntaxError: Illegal ...
- shell printf命令:格式化输出语句
printf 命令用于格式化输出, 是echo命令的增强版.它是C语言printf()库函数的一个有限的变形,并且在语法上有些不同. 注意:printf 由 POSIX 标准所定义,移植性要比 ech ...
- 在 CentOS 7.0 上安装配置 Ceph 存储
来自: https://linux.cn/article-6624-1.html Ceph 是一个将数据存储在单一分布式计算机集群上的开源软件平台.当你计划构建一个云时,你首先需要决定如何实现你的存储 ...
- Logstash过滤器修改数据
数据修改(Mutate) filters/mutate 插件是 Logstash 另一个重要插件.它提供了丰富的基础类型数据处理能力.包括类型转换,字符串处理和字段处理等. 类型转换 类型转换是 fi ...
- java socket - 半关闭
通常,使用关闭输出流来表示输出已经结束.但在进行网络通信时则不能这样做.因为我们关闭输出流时,该输出流对应的Socket也将随之关闭,这样程序将无法再从该socket中读取数据. 为了应付这种情况,s ...
- CNI:容器网络接口
CNI 简介 不管是 docker 还是 kubernetes,在网络方面目前都没有一个完美的.终极的.普适性的解决方案,不同的用户和企业因为各种原因会使用不同的网络方案.目前存在网络方案 flann ...
- 用JS判断IE版本的代码
方法一: 复制代码代码如下: <script language="javascript"> function getIE() { if(navigator.appNam ...
- layer弹出层 获取index
function closelayer(){ var index = parent.layer.getFrameIndex(window.name); parent.layer.close(index ...
- AS3中以post和get方式提交数据
这里主要介绍在as3中用URLRequest对像来post或get数据到服务器. post用于大数据量的提交,get用于小数据量的提交. as3中提交数据: POST方式: 1.新建一个test.fl ...