使用 Docker 部署 LNMP 并搭建 wordpress
准备
系统版本:CentOS Linux release 7.4.1708 (Core) 内核版本:3.10.0-693.el7.x86_64 IP:192.168.31.43 可访问外网。
[root@docker ~]# cat /etc/redhat-release

CentOS Linux release 7.4.1708 (Core)

[root@docker ~]# hostname

docker.mage.com

[root@docker ~]# uname -r

3.10.0-693.el7.x86_64
关闭系统防火墙,SELinux,开启iptables防火墙
[root@docker /]# systemctl stop firewalld

[root@docker /]# systemctl disable firewalld

Removed symlink /etc/systemd/system/multi-user.target.wants/firewalld.service.

Removed symlink /etc/systemd/system/dbus-org.fedoraproject.FirewallD1.service.

[root@docker /]# sed -i 's/SELINUX=enforcing/SELINUX=disabled/g' /etc/selinux/config

[root@docker /]# sed -i 's/SELINUXTYPE=targeted/#SELINUXTYPE=targeted/g' /etc/selinux/config

[root@docker /]# grep '^SELINUX'  /etc/selinux/config

SELINUX=disabled

[root@docker /]# setenforce 0

[root@docker /]# getenforce

Permissive

[root@docker /]# yum -y install iptables-services

[root@docker /]# vim /etc/sysconfig/iptables

# sample configuration for iptables service

# you can edit this manually or use system-config-firewall

# please do not ask us to add additional ports/services to this default configuration

*filter

:INPUT ACCEPT [0:0]

:FORWARD ACCEPT [0:0]

:OUTPUT ACCEPT [0:0]

-A INPUT -m state --state RELATED,ESTABLISHED -j ACCEPT

-A INPUT -p icmp -j ACCEPT

-A INPUT -i lo -j ACCEPT

-A INPUT -p tcp -m state --state NEW -m tcp --dport 22 -j ACCEPT

-A INPUT -p tcp -m state --state NEW -m tcp --dport 80 -j ACCEPT

-A INPUT -p tcp -m state --state NEW -m tcp --dport 3306 -j ACCEPT

-A INPUT -j REJECT --reject-with icmp-host-prohibited

-A FORWARD -j REJECT --reject-with icmp-host-prohibited

COMMIT

:wq! #保存退出

[root@docker /]# systemctl restart iptables.service

[root@docker /]# systemctl enable iptables.service

Created symlink from /etc/systemd/system/basic.target.wants/iptables.service to /usr/lib/systemd/system/iptables.service.

[root@docker /]# /usr/libexec/iptables/iptables.init restart

iptables: Setting chains to policy ACCEPT: filter nat      [  OK  ]

iptables: Flushing firewall rules:                     [  OK  ]

iptables: Unloading modules:                           [  OK  ]

iptables: Applying firewall rules:                     [  OK  ]
1、安装Docker 服务
[root@docker ~]# yum -y install docker

[root@docker ~]# systemctl start docker

[root@docker ~]# systemctl enable docker

Created symlink from /etc/systemd/system/multi-user.target.wants/docker.service to /usr/lib/systemd/system/docker.service.
创建目录,分别用于Nginx、php、Mysql 各种服务对应的Dockerfile 如下所示:
[root@docker docker]# tree  -L 2  --charset ASCII

.

|-- mysql

|   `-- Dockerfile

|-- nginx

|   |-- Dockerfile

|   `-- wordpress

`-- php

    |-- Dockerfile

    `-- wordpress

5 directories, 3 files
2、构建Nginx-dockerfile
FROM docker.io/centos:latest

RUN   yum -y update

RUN   yum -y install gcc gcc-c++ openssl-devel openssl automake autoconf zlib zlib-devel libtool pcre pcre-devl wget net-tools make

RUN   groupadd  -g 900 nginx && useradd nginx -g nginx -s /sbin/nologin

RUN   wget -c http://nginx.org/download/nginx-1.12.2.tar.gz && tar xf nginx-1.12.2.tar.gz

RUN   cd /nginx-1.12.2/ && ./configure --prefix=/usr/local/nginx --with-http_dav_module  --with-http_stub_status_module --with-http_addition_module --with-http_sub_module --with-http_flv_module --with-http_mp4_module --with-http_ssl_module --with-http_gzip_static_module --user=nginx --group=nginx

RUN   cd /nginx-1.12.2/ && make && make install

RUN  ln -s /usr/local/nginx/sbin/nginx  /usr/local/sbin/

RUN  mkdir /wwwroot && chown -R nginx:nginx /wwwroot

ADD  wordpress /wwwroot/wordpress

RUN  sed -i '1afastcgi_param  SCRIPT_FILENAME    $document_root$fastcgi_script_name;' /usr/local/nginx/conf/fastcgi_params

RUN  sed -i 's/index  index.html index.htm;/index  index.php index.html index.htm;/g' /usr/local/nginx/conf/nginx.conf

RUN  sed -i 's*root  html;*root /wwwroot/wordpress;*g' /usr/local/nginx/conf/nginx.conf

RUN  sed -i 's*#    root           html;*    root           /wwwroot/wordpress;*g' /usr/local/nginx/conf/nginx.conf

RUN  sed -i 's/#    fastcgi_pass   127.0.0.1:9000;/    fastcgi_pass   172.17.0.3:9000;/g' /usr/local/nginx/conf/nginx.conf

RUN  sed -i  's/#    fastcgi_index  index.php;/    fastcgi_index  index.php;/g' /usr/local/nginx/conf/nginx.conf

RUN  sed -i 's*#    fastcgi_param  SCRIPT_FILENAME  /scripts$fastcgi_script_name;*  fastcgi_param  SCRIPT_FILENAME  /scripts$fastcgi_script_name;*g' /usr/local/nginx/conf/nginx.conf

RUN  sed -i 's/#    include        fastcgi_params;/    include        fastcgi_params;/g' /usr/local/nginx/conf/nginx.conf

RUN  sed -i  '71d' /usr/local/nginx/conf/nginx.conf && sed -i 'N;70a}' /usr/local/nginx/conf/nginx.conf

RUN  sed -i  '65d' /usr/local/nginx/conf/nginx.conf && sed -i 'N;64alocation ~ \\.php$ {' /usr/local/nginx/conf/nginx.conf

EXPOSE   80

CMD  ["nginx"]
执行构建
[root@docker nginx]#docker build -t="centos:nginx-1.12" .
构建过程如下 部分过程省略......
 ---> 40b504923c0f

Removing intermediate container b8de3a47769a

Step 19/22 : RUN sed -i  '71d' /usr/local/nginx/conf/nginx.conf && sed -i 'N;70a}' /usr/local/nginx/conf/nginx.conf

 ---> Running in 72be0a234bc1

 ---> 203a1c1130e1

Removing intermediate container 72be0a234bc1

Step 20/22 : RUN sed -i  '65d' /usr/local/nginx/conf/nginx.conf && sed -i 'N;64alocation ~ \\.php$ {' /usr/local/nginx/conf/nginx.conf

 ---> Running in f886679bdbf1

 ---> f63ace5988f4

Removing intermediate container f886679bdbf1

Step 21/22 : EXPOSE 80

 ---> Running in fe29884c1d11

 ---> 190ce789e86d

Removing intermediate container fe29884c1d11

Step 22/22 : CMD nginx

 ---> Running in 3da09bd3f883

 ---> 47de3f75d63b

Removing intermediate container 3da09bd3f883

Successfully built 47de3f75d63b
查看nginx镜像是否构建成功
[root@docker nginx]# docker images

REPOSITORY          TAG                 IMAGE ID            CREATED             SIZE

centos              nginx-1.12          47de3f75d63b        2 minutes ago       624 MB

docker.io/centos    latest              9f38484d220f        3 weeks ago         202 MB
3、构建PHP-Dockerfile
[root@docker php]# vim Dockerfile

FROM docker.io/centos:latest

RUN  yum -y install gcc gcc-c++ libxml2-devel libcurl-devel openssl-devel bzip2-devel  openssl automake make autoconf libtool zlib-devel make pcre-devel wget net-tools

RUN  wget -c ftp://mcrypt.hellug.gr/pub/crypto/mcrypt/libmcrypt/libmcrypt-2.5.7.tar.gz && tar xf  libmcrypt-2.5.7.tar.gz

RUN  cd libmcrypt-2.5.7/&& ./configure --prefix=/usr/local/libmcrypt && make && make install

RUN  wget -c http://cn2.php.net/distributions/php-5.6.27.tar.gz && tar xf  php-5.6.27.tar.gz

RUN  cd php-5.6.27/ && ./configure --prefix=/usr/local/php5.6 --with-mysql=mysqlnd --with-pdo-mysql=mysqlnd --with-mysqli=mysqlnd --with-openssl --enable-fpm --enable-sockets --enable-sysvshm --enable-mbstring --with-freetype-dir --with-jpeg-dir --with-png-dir --with-zlib --with-libxml-dir=/usr --enable-xml --with-mhash --with-mcrypt=/usr/local/libmcrypt --with-config-file-path=/etc --with-config-file-scan-dir=/etc/php.d --with-bz2 --enable-maintainer-zts && make && make install

RUN  groupadd -g 1001 nginx  && useradd -u 900 nginx -g nginx -s /sbin/nologin

RUN  mkdir /wwwroot && chown -R nginx.nginx /wwwroot

ADD  wordpress  /wwwroot/wordpress

RUN  cd php-5.6.27 && cp php.ini-production /etc/php.ini

RUN  cd /php-5.6.27 && cp sapi/fpm/init.d.php-fpm /etc/init.d/php-fpm

RUN  chmod +x /etc/init.d/php-fpm && chkconfig --add php-fpm && chkconfig php-fpm on

RUN  cp /usr/local/php5.6/etc/php-fpm.conf.default  /usr/local/php5.6/etc/php-fpm.conf

RUN sed -i 's*;pid = run/php-fpm.pid*pid = run/php-fpm.pid*g' /usr/local/php5.6/etc/php-fpm.conf

RUN sed -i 's/user = nobody/user = nginx/g' /usr/local/php5.6/etc/php-fpm.conf

RUN sed -i 's/group = nobody/group = nginx/g' /usr/local/php5.6/etc/php-fpm.conf

RUN sed -i 's/listen = 127.0.0.1:9000/listen = 172.17.0.3:9000/g' /usr/local/php5.6/etc/php-fpm.conf

RUN sed -i 's/pm.max_children = 5/pm.max_children = 50/g' /usr/local/php5.6/etc/php-fpm.conf

RUN sed -i 's/pm.start_servers = 2/pm.start_servers = 5/g' /usr/local/php5.6/etc/php-fpm.conf

RUN sed -i 's/pm.min_spare_servers = 1/pm.min_spare_servers = 5/g' /usr/local/php5.6/etc/php-fpm.conf

RUN sed -i 's/pm.max_spare_servers = 3/pm.max_spare_servers = 30/g' /usr/local/php5.6/etc/php-fpm.conf

EXPOSE 9000
执行构建
[root@docker php]# docker build -t="centos:php-5.6" .
构建过程如下 部分过程省略.......
 ---> 636c0ea1c7d7

Removing intermediate container c64254513a05

Step 17/22 : RUN sed -i 's/listen = 127.0.0.1:9000/listen = 172.17.0.3:9000/g' /usr/local/php5.6/etc/php-fpm.conf

 ---> Running in 697d4ffc958d

 ---> dcd89180efa4

Removing intermediate container 697d4ffc958d

Step 18/22 : RUN sed -i 's/pm.max_children = 5/pm.max_children = 50/g' /usr/local/php5.6/etc/php-fpm.conf

 ---> Running in fd24eda7506d

 ---> 7c8c6b14f08f

Removing intermediate container fd24eda7506d

Step 19/22 : RUN sed -i 's/pm.start_servers = 2/pm.start_servers = 5/g' /usr/local/php5.6/etc/php-fpm.conf

 ---> Running in d15e65943b4b

 ---> bea387e8e124

Removing intermediate container d15e65943b4b

Step 20/22 : RUN sed -i 's/pm.min_spare_servers = 1/pm.min_spare_servers = 5/g' /usr/local/php5.6/etc/php-fpm.conf

 ---> Running in ef4de3f777ec

 ---> bdfbe85b6819

Removing intermediate container ef4de3f777ec

Step 21/22 : RUN sed -i 's/pm.max_spare_servers = 3/pm.max_spare_servers = 30/g' /usr/local/php5.6/etc/php-fpm.conf

 ---> Running in 0e88418605ab

 ---> f82a9371039f

Removing intermediate container 0e88418605ab

Step 22/22 : EXPOSE 9000

 ---> Running in d9eaa397f048

 ---> 181e4905ddcc

Removing intermediate container d9eaa397f048

Successfully built 181e4905ddcc
查看php镜像是否构建成功
[root@docker ~]# docker images

REPOSITORY          TAG                 IMAGE ID            CREATED              SIZE

centos              php-5.6             181e4905ddcc        About a minute ago   1.07 GB

centos              nginx-1.12          47de3f75d63b        27 hours ago         624 MB

docker.io/centos    latest              9f38484d220f        3 weeks ago          202 MB
4、构建Mysql-Dockerfile
[root@docker mysql]# vim Dockerfile

FROM docker.io/centos:latest

RUN yum -y install gcc gcc-c++ make automake cmake wget

RUN groupadd mysql; useradd -r -M -u 3306 -s /sbin/nologin -g mysql mysql

RUN mkdir /usr/local/mysql; mkdir /data/mysql -pv

RUN yum install gcc gcc-c++ ncurses-devel bison bison-devel -y

RUN wget -c http://dev.mysql.com/get/Downloads/MySQL-5.6/mysql-5.6.29.tar.gz

RUN tar xf mysql-5.6.29.tar.gz -C /usr/local/src/

WORKDIR /usr/local/src/mysql-5.6.29

RUN cmake . -DCMAKE_INSTALL_PREFIX=/usr/local/mysql -DMYSQL_DATADIR=/data/mysql -DSYSCONFDIR=/etc -DMYSQL_TCP_PORT=3306 -DMYSQL_UNIX_ADDR=/var/lib/mysql/mysql.sock -DWITH_INNOBASE_STORAGE_ENGINE=1 -DWITH_MYISAM_STORAGE_ENGINE=1 -DENABLED_LOCAL_INFILE=1 -DWITH_PARTITION_STORAGE_ENGINE=1 -DDEFAULT_CHARSET=utf8 -DEXTRA_CHARSETS=all -DDEFAULT_COLLATION=utf8_general_ci -DWITH-MYSQLD-LDFLAGS=-all-static -DWITH-CLIENT-LD-FLAGS=-all-static -DWITH_DEBUG=0 && gmake && gmake install

RUN chown -R root:mysql /usr/local/mysql/ && chown -R mysql:mysql /data/mysql

RUN chmod 755 /usr/local/src/mysql-5.6.29/scripts/mysql_install_db.sh

RUN /usr/local/src/mysql-5.6.29/scripts/mysql_install_db.sh --basedir=/usr/local/mysql --datadir=/data/mysql --no-defaults --user=mysql

RUN cp /usr/local/src/mysql-5.6.29/support-files/my-default.cnf  /etc/my.cnf

RUN cp /usr/local/src/mysql-5.6.29/support-files/mysql.server  /etc/init.d/mysqld

RUN chmod 775 /etc/init.d/mysqld && /etc/init.d/mysqld start

RUN echo -e '#!/bin/bash\nexport PATH=$PATH:/usr/local/mysql/bin' >/etc/profile.d/mysql.sh

RUN source /etc/profile

EXPOSE 3306
执行构建:
[root@docker mysql]# docker build -t="centos:mysql-5.6" .
构建过程如下 部分过程省略.....
You can test the MySQL daemon with mysql-test-run.pl

cd /usr/local/mysql/mysql-test ; perl mysql-test-run.pl

Please report any problems at http://bugs.mysql.com/

 ---> 606cfa962cc6

Removing intermediate container bb6a99e76974

Step 13/18 : RUN cp /usr/local/src/mysql-5.6.29/support-files/my-default.cnf  /etc/my.cnf

 ---> Running in e2e5225e4170

 ---> d8fe0c377f37

Removing intermediate container e2e5225e4170

Step 14/18 : RUN cp /usr/local/src/mysql-5.6.29/support-files/mysql.server  /etc/init.d/mysqld

 ---> Running in 77cfbc9e72a0

 ---> 3f519a998871

Removing intermediate container 77cfbc9e72a0

Step 15/18 : RUN chmod 775 /etc/init.d/mysqld && /etc/init.d/mysqld start

 ---> Running in 102a4655911d

Starting MySQL... SUCCESS!

 ---> 2bb4c829741d

Removing intermediate container 102a4655911d

Step 16/18 : RUN echo -e '#!/bin/bash\nexport PATH=$PATH:/usr/local/mysql/bin' >/etc/profile.d/mysql.sh

 ---> Running in 7b165abf6700

 ---> 6681e46bfc70

Removing intermediate container 7b165abf6700

Step 17/18 : RUN source /etc/profile

 ---> Running in 09441e8887cc

 ---> e670d8afe1c0

Removing intermediate container 09441e8887cc

Step 18/18 : EXPOSE 3306

 ---> Running in 7b442f366b38

 ---> 82082b1e3011

Removing intermediate container 7b442f366b38

Successfully built 82082b1e3011
查看Mysql镜像是否构建成功
[root@docker mysql]# docker images

REPOSITORY          TAG                 IMAGE ID            CREATED             SIZE

centos              mysql-5.6           82082b1e3011        7 minutes ago       5.14 GB

centos              php-5.6             181e4905ddcc        28 minutes ago      1.07 GB

centos              nginx-1.12          47de3f75d63b        27 hours ago        624 MB

docker.io/centos    latest              9f38484d220f        3 weeks ago         202 MB
5、启动各容器并映射主机端口
通过第4步查看 Nginx、PHP、MySQL 均已经构建成功,现启动容器并映射主机端口
[root@docker /]# docker run  -dit -p 80:80 centos:nginx-1.12 /bin/bash

e5c0b1ce22789b4430a5cf4c2f63485dd7d5924808ceba6272d1e35036969a5d

[root@docker /]# docker run -dit  -p 9000:9000 centos:php-5.6 /bin/bash

74bc8730a63e993c23b84a6230028245c7589da034096f06014ea189411f3255

[root@docker /]# docker run -dit -p 3306:3306 centos:mysql-5.6 /bin/bash

41bd4f2d06205e10a26401f4e92a38095ab9b24ffd41ad5d5569b4a91596830e
6、查看容器的运行情况
[root@docker /]# docker ps

CONTAINER ID        IMAGE               COMMAND             CREATED              STATUS              PORTS                    NAMES

41bd4f2d0620        centos:mysql-5.6    "/bin/bash"         About a minute ago   Up About a minute   0.0.0.0:3306->3306/tcp   blissful_borg

74bc8730a63e        centos:php-5.6      "/bin/bash"         About a minute ago   Up About a minute   0.0.0.0:9000->9000/tcp   happy_bassi

e5c0b1ce2278        centos:nginx-1.12   "/bin/bash"         About a minute ago   Up About a minute   0.0.0.0:80->80/tcp       focused_morse
7、后台进入容器开启相关的服务,MySQL添加授权用户,访问测试.
[root@docker /]# docker exec -it 41bd4f2d0620 /bin/bash

[root@41bd4f2d0620 mysql-5.6.29]# mysql

Welcome to the MySQL monitor.  Commands end with ; or \g.

Your MySQL connection id is 1

Server version: 5.6.29 Source distribution

Copyright (c) 2000, 2016, Oracle and/or its affiliates. All rights reserved.

Oracle is a registered trademark of Oracle Corporation and/or its

affiliates. Other names may be trademarks of their respective

owners.

Type 'help;' or '\h' for help. Type '\c' to clear the current input statement.

mysql> show databases;

+--------------------+

| Database           |

+--------------------+

| information_schema |

| mysql              |

| performance_schema |

| test               |

+--------------------+

4 rows in set (0.02 sec)

mysql> create database wordpress default charset utf8 COLLATE utf8_general_ci;

Query OK, 1 row affected (0.00 sec)

mysql> grant all privileges on wordpress.*  to 'wordpress'@'%' identified by '123456' with grant option;

Query OK, 0 rows affected (0.01 sec)

mysql> show databases;

+--------------------+

| Database           |

+--------------------+

| information_schema |

| mysql              |

| performance_schema |

| test               |

| wordpress          |

+--------------------+

5 rows in set (0.00 sec)
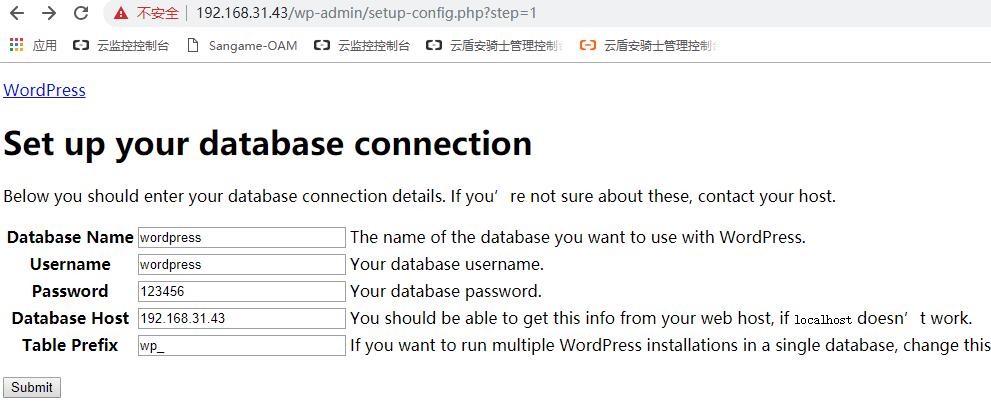
8、安装wordpress程序
浏览器访问 http://192.168.31.43/index.php
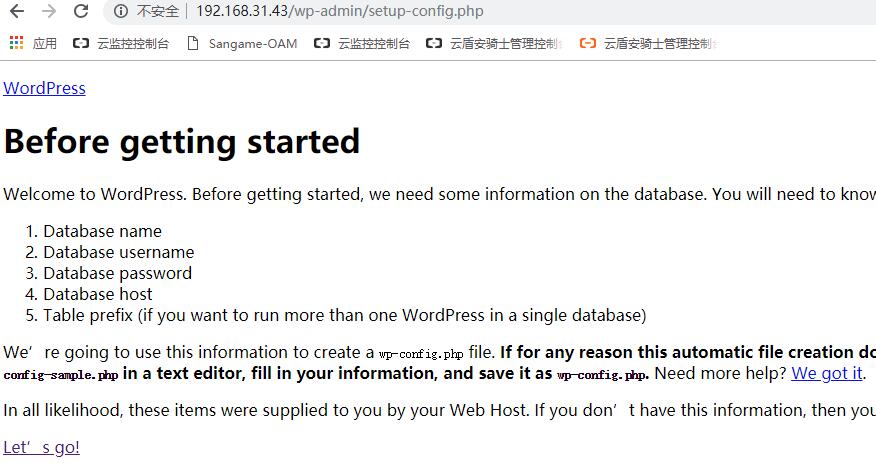
填写数据库配置信息
Welcome.....

安装成功
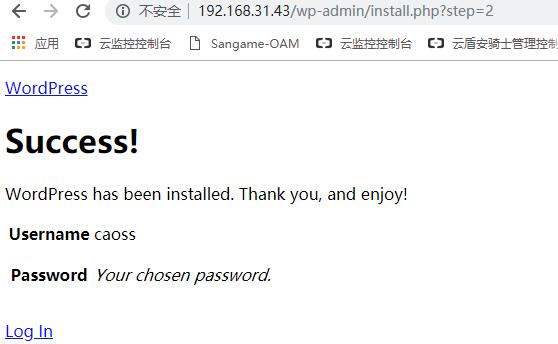
登录后台:http://192.168.31.43/wp-admin/index.php 账号caoss 密码:xxxxx
访问效果如下:

浏览器输入http://192.168.31.43/index.php 查看前台访问效果

使用Docker 部署LNMP并搭建wordpress 完成。
使用 Docker 部署 LNMP 并搭建 wordpress的更多相关文章
- Docker部署lnmp 实战 (多注意配置文件,不管访问试试换个浏览器)
Docker部署LNMP环境 关闭防火墙,设置自定义网络 systemctl stop firewalld systemctl disable firewalld setenforce 0 docke ...
- 基于LNMP架构搭建wordpress博客之安装架构说明
架构情况 架构情况:基于LNMP架构搭建wordpress系统 软件包版本说明: 系统要求 : CentOS-6.9-x86_64-bin-DVD1.iso PHP版本 : php-7.2.29 ...
- Centos7搭建Docker部署LNMP
1.首先呢先更新yum源 yum update 2.1.安装docker存储库 yum install -y yum-utils \ device-mapper-persistent-data \ l ...
- LNMP环境搭建Wordpress博客
目录 LNMP架构工作原理 yum源安装 网站源包安装 LNMP是Linux Nginx MySQL/MariaDB Php/perl/python 的简称,是近些年才逐渐发展起来的构架,发展非常迅 ...
- 阿里云Linux CentOS 7 Docker部署使用gogs搭建自己的git服务器
一.前言 Git是目前优秀和流行的源代码管理工具.而GitHub是一个面向开源及私有软件项目的托管云平台,但开源免费,私有收费.而公司出于商业化等目的需要搭建自己的源代码托管服务器.通过网上了解Gog ...
- LNMP环境搭建wordpress博客及伪静态
WordPress是使用PHP语言开发的博客平台,是一款开源的软件,用户可以在支持PHP和MySQL数据库的服务器上架设属于自己的网站.也可以把 WordPress当作一个内容管理系统(CMS)来使用 ...
- Docker部署LNMP完整教程
在Docker中部署LNMP环境可以分为以下几个步骤: 安装Docker 创建镜像 创建Dockerfile build Docerfile 复制/修改配置文件 运行镜像,并映射端口 为了方便分布式部 ...
- CentOS 7 yum安装LAMP,LNMP并搭建WordPress个人博客网站
本次实验要进行的是在CentOS7.2,内核版本3.10.0-327.el7.x86_64的环境下搭建LAMP和LNMP,并在此之上做一个WordPress博客网站. [root@Shining ~] ...
- 基于LNMP架构搭建wordpress个人博客
搭建过程 注意防火墙和selinux的影响可以先关闭. 一.安装nginx # 1.更改nginx源安装nginx [root@web01 ~]# vi /etc/yum.repos.d/nginx. ...
随机推荐
- serverless入门介绍
1.什么是serverless Serverless 架构作为一种新型的云计算范式,是云原生时代一种革命性的架构,颠覆了传统意义上对软件应用部署和运营的认识.本节对 Serverless 架构的基本概 ...
- C# 在PDF中添加墨迹注释Ink Annotation
PDF中的墨迹注释(Ink Annotation),表现为徒手涂鸦式的形状:该类型的注释,可任意指定形状顶点的位置及个数,通过指定的顶点,程序将连接各点绘制成平滑的曲线.下面,通过C#程序代码介绍如何 ...
- 字符集编码(上):Unicode 之前
计算机起初是设计用来做数学计算的,Computer 一词英文原意是"计算员"--在计算机发明之前,计算员是一个独立的职业,专门做各种数学用表的计算,如测量和天文领域的三角函数表.对 ...
- windows 使用自带的cmd终端进行文件MD5校验
1.使用快捷键win+r,调用运行界面,输入cmd后回车 2.输入certutil -hashfile <文件名称> MD5,回车后,即可校验文件的MD5了(注意写绝对路径)
- 我们一起来学Shell - shell的并发及并发控制
文章目录 bash的并发 未使用并发的脚本 简单修改 使用wait命令 控制并发进程的数量 文件描述符 查看当前进程打开的文件 自定义当前进程用描述符号操作文件 管道 我们一起来学Shell - 初识 ...
- 【axios三部曲】一、使用axios
axios作为一个基于promise的网络请求库,它同时支持浏览器和node环境,是我们开发中常用的一个库 它的一些特性: 从浏览器发出XMLHttpRequests 从node.js发出http ...
- Linux系列——配置SSH免密登录
在进行配置之前需要先关闭防火墙.配置hosts映射. 具体参见:Linux系列--常规基础操作 下面重点说明如何配置SSH: 1.编辑sshd服务配置文件,开启免密验证, vi /etc/ssh/ ...
- CobaltStrike逆向学习系列(1):CS 登陆通信流程分析
这是[信安成长计划]的第 1 篇文章 关注微信公众号[信安成长计划][SecSource] 0x00 目录 0x01 密码校验 0x02 aggressor.authenticate 0x03 agg ...
- Windows系统散列值获取分析与防范
LM Hash && NTLM Hash Windows操作系统通常使用两种方法对用户的明文进行加密处理,在域环境中,用户信息存储在ntds.dit中,加密后为散列值.Windows操 ...
- BI系统:发挥大数据的价值
大数据是指大数据集,这些数据集经过计算分析以揭示与数据的某个方面相关的模式和趋势.首先,还是要重新审视大数据的定义.行业里对大数据的定义有很多,有广义的定义,也有狭义的定义. 大数据的分析与挖掘,把 ...