Netty源码解读(三)-NioEventLoop
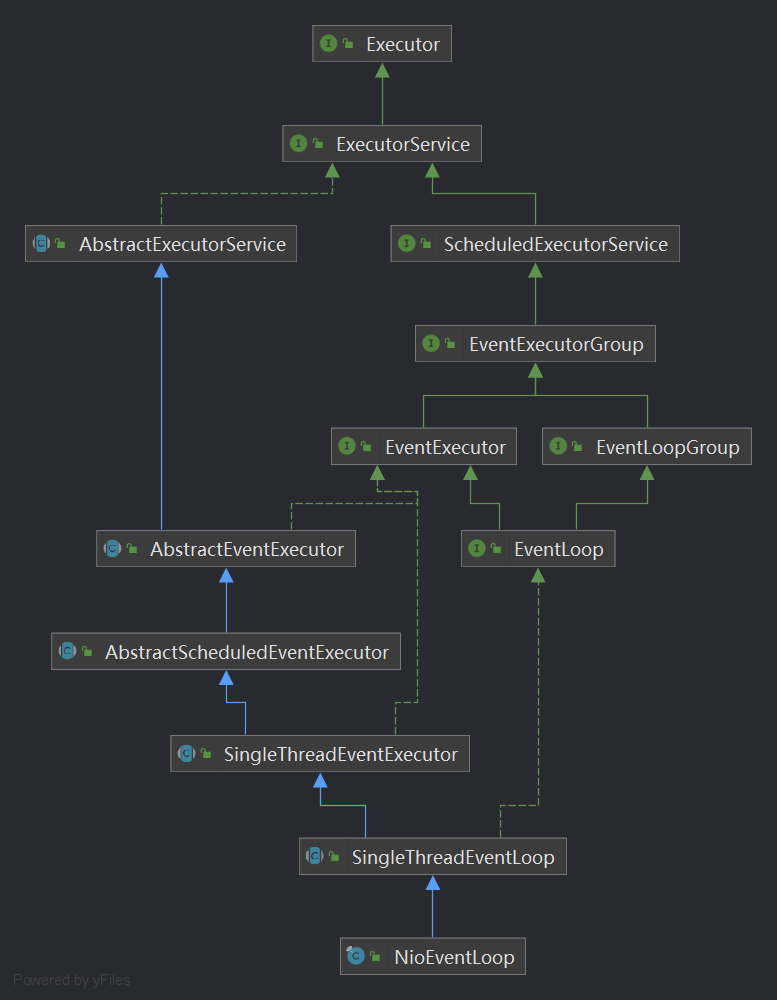
先看看EventLoop类图
我们在Netty第二篇文章中的代码中,看到有多次用到eventLoop.execute()方法,这个方法就是EventLoop开启线程执行任务的关键,跟踪进去看看
// 类SingleThreadEventExecutor

SingleThreadEventExecutor#execute(Runnable task)

-->

SingleThreadEventExecutor#execute0(@Schedule Runnable task)

-->

private void execute(Runnable task, boolean immediate) {

    // 判断当前线程是否为eventLoop的线程

    boolean inEventLoop = inEventLoop();

    // 将任务添加进taskQueue

    addTask(task);

    if (!inEventLoop) {

        // 开启eventLoop的线程

        startThread();

        if (isShutdown()) {

            boolean reject = false;

            try {

                if (removeTask(task)) {

                    reject = true;

                }

            } catch (UnsupportedOperationException e) {

                // The task queue does not support removal so the best thing we can do is to just move on and

                // hope we will be able to pick-up the task before its completely terminated.

                // In worst case we will log on termination.

            }

            if (reject) {

                reject();

            }

        }

    }

    if (!addTaskWakesUp && immediate) {

        wakeup(inEventLoop);

    }

}
这段代码,我们分3部分解读
添加任务
将任务添加进队列,等待调用
对应代码
// addTask(task);

// 类SingleThreadEventExecutor

protected void addTask(Runnable task) {

    ObjectUtil.checkNotNull(task, "task");

    // 添加任务

    if (!offerTask(task)) {

        // 如果添加失败,执行拒绝执行处理器

        reject(task);

    }

}
SingleThreadEventExecutor有一个类变量来存储task
private final Queue<Runnable> taskQueue;
开启线程
开启线程是以下这段逻辑
// 判断当前线程是否eventLoop的线程

// 如果不是,则开启EventLoop的线程

if (!inEventLoop) {

    // 开启eventLoop的线程

    startThread();

    。。。。。。

}

-->

// 类SingleThreadEventExecutor

private void startThread() {

    // 一些状态判断,保证doStartThread只会被执行一次

    if (state == ST_NOT_STARTED) {

        // cas修改状态

        if (STATE_UPDATER.compareAndSet(this, ST_NOT_STARTED, ST_STARTED)) {

            boolean success = false;

            try {

                // 实际开启线程的方法

                doStartThread();

                success = true;

            } finally {

                if (!success) {

                    STATE_UPDATER.compareAndSet(this, ST_STARTED, ST_NOT_STARTED);

                }

            }

        }

    }

}

-->

// 类SingleThreadEventExecutor

private void doStartThread() {

    assert thread == null;

    // 这个Executor在EventLoopGroup构造时,就已经注入

    // MultithreadEventExecutorGroup

    // executor = new ThreadPerTaskExecutor(newDefaultThreadFactory());

    executor.execute(new Runnable() {

        @Override

        public void run() {

            thread = Thread.currentThread();

            if (interrupted) {

                thread.interrupt();

            }

            boolean success = false;

            updateLastExecutionTime();

            try {

                // 这个整个NioEventLoop的核心,里面是个死循环

                SingleThreadEventExecutor.this.run();

                success = true;

            } catch (Throwable t) {

                logger.warn("Unexpected exception from an event executor: ", t);

            } finally {

                。。。。。。

            }

        }

    });

}
在前面EventLoopGroup的创建与初始化一节有说到,executor的实例化
executor = new ThreadPerTaskExecutor(newDefaultThreadFactory());

executor.execute(new Runnable() {...});

// 不深究细节的话,上面两行代码效果类比下面两行

Thread thread = new Thread(new Runnable() {...});

thread.start();
所以,executor.execute这里,就开了一个新的线程。
而这个线程,主要处理的是SingleThreadEventExecutor.**this**.run();,也就是NioEventLoop#run()
那这个run方法是干嘛的,看下图红框部分

因为run方法比较重要,此处不做代码省略,看注释
protected void run() {

    int selectCnt = 0;

    for (;;) {

        try {

            int strategy;

            try {

                // 如果没有任务,则返回SELECT

                // 有任务,则获取io事件的个数。此时如果strategy >= 0

                // 如果有io任务,优先io任务,然后才执行普通任务

                strategy = selectStrategy.calculateStrategy(selectNowSupplier, hasTasks());

                switch (strategy) {

                case SelectStrategy.CONTINUE:

                    continue;

                case SelectStrategy.BUSY_WAIT:

                    // fall-through to SELECT since the busy-wait is not supported with NIO

                case SelectStrategy.SELECT:

                    // 下一次定时任务触发截止时间

                    long curDeadlineNanos = nextScheduledTaskDeadlineNanos();

                    if (curDeadlineNanos == -1L) {

                        curDeadlineNanos = NONE; // nothing on the calendar

                    }

                    nextWakeupNanos.set(curDeadlineNanos);

                    try {

                        // 再次判断没有任务

                        if (!hasTasks()) {

                            strategy = select(curDeadlineNanos);

                        }

                    } finally {

                        // This update is just to help block unnecessary selector wakeups

                        // so use of lazySet is ok (no race condition)

                        // 阻止不必要的唤醒

                        nextWakeupNanos.lazySet(AWAKE);

                    }

                    // fall through

                default:

                }

            } catch (IOException e) {

                // If we receive an IOException here its because the Selector is messed up. Let's rebuild

                // the selector and retry. https://github.com/netty/netty/issues/8566

                rebuildSelector0();

                selectCnt = 0;

                handleLoopException(e);

                continue;

            }

            selectCnt++;

            cancelledKeys = 0;

            needsToSelectAgain = false;

            // 控制处理io事件的事件占用比例,默认是百分之50,一半时间用来处理io事件,一半时间用来处理任务

            final int ioRatio = this.ioRatio;

            boolean ranTasks;

            // 100%表示执行完全部任务,才进入下一轮循环

            if (ioRatio == 100) {

                try {

                    if (strategy > 0) {

                        // 在对应的 Channel 上处理 IO 事件

                        processSelectedKeys();

                    }

                } finally {

                    // Ensure we always run tasks.

                    // 执行queueTask中全部的任务

                    ranTasks = runAllTasks();

                }

            } else if (strategy > 0) {

                final long ioStartTime = System.nanoTime();

                try {

                    // 在对应的 Channel 上处理 IO 事件

                    processSelectedKeys();

                } finally {

                    // Ensure we always run tasks.

                    final long ioTime = System.nanoTime() - ioStartTime;

                    ranTasks = runAllTasks(ioTime * (100 - ioRatio) / ioRatio);

                }

            } else {

                // 0表示运行运行最小数量的任务,即63个

                ranTasks = runAllTasks(0); // This will run the minimum number of tasks

            }

            if (ranTasks || strategy > 0) {

                if (selectCnt > MIN_PREMATURE_SELECTOR_RETURNS && logger.isDebugEnabled()) {

                    logger.debug("Selector.select() returned prematurely {} times in a row for Selector {}.",

                            selectCnt - 1, selector);

                }

                selectCnt = 0;

            } else if (unexpectedSelectorWakeup(selectCnt)) { // Unexpected wakeup (unusual case)

                selectCnt = 0;

            }

        } catch (CancelledKeyException e) {

            // Harmless exception - log anyway

            if (logger.isDebugEnabled()) {

                logger.debug(CancelledKeyException.class.getSimpleName() + " raised by a Selector {} - JDK bug?",

                        selector, e);

            }

        } catch (Error e) {

            throw e;

        } catch (Throwable t) {

            handleLoopException(t);

        } finally {

            // Always handle shutdown even if the loop processing threw an exception.

            try {

                if (isShuttingDown()) {

                    closeAll();

                    if (confirmShutdown()) {

                        return;

                    }

                }

            } catch (Error e) {

                throw e;

            } catch (Throwable t) {

                handleLoopException(t);

            }

        }

    }

}
run里面是个死循环,关键方法有select、processSelectedKeys、runAllTasks
select
select方法很简单,就是选择合适的阻塞时间,等待IO事件触发
private int select(long deadlineNanos) throws IOException {

    if (deadlineNanos == NONE) {

        return selector.select();

    }

    // Timeout will only be 0 if deadline is within 5 microsecs

    // 如果deadlineNanos小于5纳秒,则为0,,否则取整为1毫秒

    // 这段操作是为了向上取整,转成毫秒

    long timeoutMillis = deadlineToDelayNanos(deadlineNanos + 995000L) / 1000000L;

    // 如果timeoutMillis大于0,就阻塞selector同样的时间

    // 这段是为了获取最近的延时任务

    return timeoutMillis <= 0 ? selector.selectNow() : selector.select(timeoutMillis);

}
runAllTasks
此方法会取出可执行的任务,并执行。
上一节添加任务讲的addTask,放入的任务就是在这里被执行的。
processSelectedKeys
此方法在有IO事件时才触发,这个下面细讲
小结一下,run的死循环中主要判断有无IO事件,有则处理,处理完IO事件,再处理队列中的任务。
如果没有IO事件,也没有待处理的任务,则阻塞等待。
唤醒线程
对应代码
// wakeup(inEventLoop);

// 类NioEventLoop

protected void wakeup(boolean inEventLoop) {

    // 不是当前EventLoop在执行的时候,才需要唤醒

    // nextWakeupNanos放入AWAKE是阻止不必要的唤醒

    if (!inEventLoop && nextWakeupNanos.getAndSet(AWAKE) != AWAKE) {

        selector.wakeup();

    }

}
阻塞是selecto.select,那么唤醒就是selector.wakeup
Netty源码解读(三)-NioEventLoop的更多相关文章
- Netty源码分析之NioEventLoop(三)—NioEventLoop的执行
前面两篇文章Netty源码分析之NioEventLoop(一)—NioEventLoop的创建与Netty源码分析之NioEventLoop(二)—NioEventLoop的启动中我们对NioEven ...
- 【Netty源码解析】NioEventLoop
上一篇博客[Netty源码学习]EventLoopGroup中我们介绍了EventLoopGroup,实际说来EventLoopGroup是EventLoop的一个集合,EventLoop是一个单线程 ...
- go语言 nsq源码解读三 nsqlookupd源码nsqlookupd.go
从本节开始,将逐步阅读nsq各模块的代码. 读一份代码,我的思路一般是: 1.了解用法,知道了怎么使用,对理解代码有宏观上有很大帮助. 2.了解各大模块的功能特点,同时再想想,如果让自己来实现这些模块 ...
- Netty源码解读(二)-服务端源码讲解
简单Echo案例 注释版代码地址:netty 代码是netty的源码,我添加了自己理解的中文注释. 了解了Netty的线程模型和组件之后,我们先看看如何写一个简单的Echo案例,后续的源码讲解都基于此 ...
- Netty源码分析之NioEventLoop(二)—NioEventLoop的启动
上篇文章中我们对Netty中NioEventLoop创建流程与源码进行了跟踪分析.本篇文章中我们接着分析NioEventLoop的启动流程: Netty中会在服务端启动和新连接接入时通过chooser ...
- Netty源码解读(四)-读写数据
读写Channel(READ)的创建和注册 在NioEventLoop#run中提到,当有IO事件时,会调用processSelectedKeys方法来处理. 当客户端连接服务端,会触发服务端的ACC ...
- Netty源码解读(一)-前置准备
前置条件 源码版本netty4.1 了解Java NIO.Reactor模型和Netty的基本使用. 解释一下: Java NIO:了解BIO和NIO的区别以及Java NIO基础API的使用 Rea ...
- jQuery源码解读三选择器
直接上jQuery源码截取代码 // Map over jQuery in case of overwrite _jQuery = window.jQuery, // Map over the $ i ...
- Python Web Flask源码解读(三)——模板渲染过程
关于我 一个有思想的程序猿,终身学习实践者,目前在一个创业团队任team lead,技术栈涉及Android.Python.Java和Go,这个也是我们团队的主要技术栈. Github:https:/ ...
随机推荐
- ajax、axios、fetch
XMLHttpRequest: XHR中文解释为: 可扩展超文本传输请求:XML可扩展标记语言,Http超文本传输协议,Request请求: XHR对象用于与服务器交换数据,所有现代游览器都支持XHR ...
- 万字长文深度剖析 RocketMQ 设计原理
幸福的烦恼 张大胖最近是又喜又忧,喜的是业务量发展猛增,忧的是由于业务量猛增,一些原来不是问题的问题变成了大问题,比如说新会员注册吧,原来注册成功只要发个短信就行了,但随着业务的发展,现在注册成功也需 ...
- KeyDB重量发布6.3.0开源版
摘要:5月12日 KeyDB 社区隆重发布了 6.3.0开源版本,将与华为加拿大研究院DCS团队2021-2022年合作的成果,深度优化的企业版的能力贡献给了开源社区. KeyDB是目前Redis 分 ...
- .netcore6.0自己配置swagger
环境:.net core6.0 一.安装依赖包:Swashbuckle.AspNetCore 二.右击项目->属性->生成->输出,勾选文档文件,然后配置文件生成路径,注意是相对路径 ...
- ElasticSearch7.3学习(二十六)----搜索(Search)参数总结、结果跳跃(bouncing results)问题解析
1.preference 首先引入一个bouncing results问题,两个document排序,field值相同:不同的shard上,可能排序不同:每次请求轮询打到不同的replica shar ...
- Tenseal库
在此记录Tenseal的学习笔记 介绍 在张量上进行同态计算的库,是对Seal的python版实现,给开发者提供简单的python接口,无需深究底层密码实现. 当前最新版本:3.11 位置:A lib ...
- 抽象数据类型(ADT)
抽象数据类型(Abstract Data Type,ADT)是指一个数学模型以及定义在这个模型上的一组操作.抽象数据类型的定义仅仅取决于它的一组逻辑特性,而与它在计算机中的表示和实现无关. 例如,in ...
- Springmvc基础及应用
SpringMVC简介和环境搭建 SpringMVC简介 Spring 为展现层提供的基于 MVC 设计理念的优秀的Web 框架,是目前最主流的 MVC 框架之一.在Spring3.0 后全面超越 S ...
- antdVue问题
antdVue框架问题 #(1)slot/slot-scope插槽问题 一般用于表格数据渲染 eg: <span slot="user" slot-scope="t ...
- python函数学习的总结
python函数 part1 函数的作用: 函数以功能(完成一件事)为导向 随调随用减少代码重复性 增强代码可读性 函数的结构: def 函数名(): 函数体 函数的返回值 return:在函数中遇到 ...