数栈技术分享:前端小姐姐和你聊聊IOC中依赖注入那些事 (Dependency inject)


Part1: What is Dependency injection
依赖注入定义为组件之间依赖关系由容器在运行期决定,形象的说即由容器动态的将某个依赖关系注入到组件之中在面向对象编程中,我们经常处理的问题就是解耦,控制反转(IoC)就是常用的面向对象编程的设计原则,其中依赖注入是控制反转最常用的实现。目标解决当前类不负责被依赖类实例的创建和初始化。
Part2: What is Dependency
依赖是程序中常见的现象,假设有 A和B都被C耦合依赖着,在 OOP 编程中依赖无处不在。依赖形式有多种表现形式,比如一个类向另一个类发消息,一个类是另一个类的成员,一个类是另一个类的参数。
class A {}

class B {

  classA: A;

  constructor() {

    this.classA = new A();

  }

}

class C {

  classA: A;

  classB: B;

  constructor() {

    this.classA = new A();

    this.classB = new B();

  }

}
Part3: When is use Dependency injection
eg: 以用户调用 API 层打印日志来说明
- LoggerService被ApiService和UserService所依赖
- ApiService被UserService所依赖
class LoggerService {

    constructor() {

    }

    log(args) {

        console.log(args)

    }

}

class ApiService {

    constructor (

        private readonly logger: LoggerService

) {

        this.logger.log('api constructor')

    }

    public async getMydata () {

        return { name: 'mumiao', hobby: 'focusing in web'}

    }

}

class UserService {

    constructor (

        private readonly api: ApiService,

        private readonly logger: LoggerService

) {

        this.logger.log('user constructor')

    }

    async getMyhobby () {

        const { hobby } = await this.api.getMydata()

        return hobby

    }

}

async function Main {

    const loggerService = new LoggerService()

    const apiService = new ApiService(loggerService)

    const userService = new UserService(loggerService, userService)

    console.log('my hobby is', await userService.getMyhobby())

}

Main()
1、存在的问题
- Unit tests 很难写
- 组件不易复用和维护,可扩展性比较低
- UserService 不应该承载ApiService和LoggerService实例的创建。
2、如何解决
采用依赖注入,UserService不负责被依赖类的创建和销毁,而是通过外部传入api和logger对象的方式注入。常见依赖注入方式有三种,本文主要以构造器注入为例解释。
const apiService = Injector.resolve < ApiService > ApiService;

const userService = Injector.resolve < UserService > UserService;

// returns an instance of , with all injected dependencies
Part4: Implement simply Dependency injection
1、预备知识
- ES6 的平时业务中相对使用较少的特性:Reflect、Proxy、Decorator、Map、Symbol
- 了解 Dependency injection,ES/TS 装饰器
- 深入理解 TypeScript - Reflect Metadata
1)Reflect
简介
Proxy 与 Reflect 是 ES6 为了操作对象引入的 API,Reflect 的 API 和 Proxy 的 API 一一对应,并且可以函数式的实现一些对象操作。
另外,使用 reflect-metadata 可以让 Reflect 支持元编程
类型获取
- 类型元数据:design:type
- 参数类型元数据:design:paramtypes
- 函数返回值类型元数据:design:returntype
Reflect.defineMetaData(metadataKey, metadataValue, target) // 在类上定义元数据

Reflect.getMetaData("design:type", target, propertyKey); //返回类被装饰属性类型

Reflect.getMetaData("design:paramtypes", target, propertyKey); //返回类被装饰参数类型

Reflect.getMetaData("design:returntype", target, propertyKey); // 返回类被装饰函数返回值类型
2)Decorators
function funcDecorator(target, name, descriptor) {

  // target 指 类的prototype name是函数名 descriptor是属性描述符

  let originalMethod = descriptor.value;

  descriptor.value = function () {

    console.log("我是Func的装饰器逻辑");

    return originalMethod.apply(this, arguments);

  };

  return descriptor;

}

class Button {

  @funcDecorator

  onClick() {

    console.log("我是Func的原有逻辑");

  }

}

Reflect and Decorators

const Injector = (): ClassDecorator => {

  // es7 decorator

  return (target, key, descriptor) => {

    console.log(Reflect.getMetadata("design:paramtypes", target));

    // [apiService, loggerService]

  };

};

@Injector()

class userService {

  constructor(api: ApiService, logger: LoggerService) {}

}
3)Implement simply Dependency injection
// interface.ts

type Type<T = any> = new (...args: any[]) => T;

export type GenericClassDecorator<T> = (target: T) => void;

// ServiceDecorator.ts

const Service = (): GenericClassDecorator<Type<object>> => {

  return (target: Type<object>) => {};

};

// Injector.ts

export const Injector = {

  // resolving instances

  resolve<T>(target: Type<any>): T {

    // resolved injections from the Injector

    let injections = Reflect.getMetadata("design:paramtypes", target) || [],

      injections = injections.map((inject) => Injector.resolve<any>(inject));

    return new target(...injections);

  },

};
只实现了依赖提取的核心部分,依赖注入还有一个部分是Container容器存储相关。
Resolve Dependency
@Service()
class LoggerService {
//...
}
@Service()
class ApiService {
constructor (
private readonly logger: LoggerService
) {
}
}
@Service
class UserService {
constructor (
private readonly api: ApiService,
private readonly logger: LoggerService
) {
}
}
async function Main {
// jnject dependencies
const apiService = Injector.resolve<ApiService>(ApiService);
const userService = Injector.resolve<UserService>(UserService);
console.log('my hobby is', await userService.getMyhobby())
}
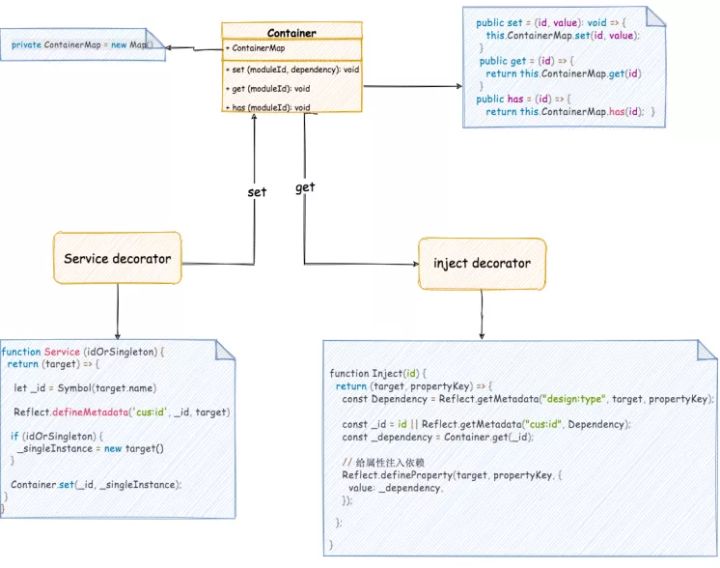
Main()4)Implement simply Dependency injection with container
Part5: APIs of InversifyJS with TypeScript
1、使用步骤
- Step 1: 声明接口及类型
- Step 2: 声明依赖使用@injectable & @inject decorators
- Step 3: 创建并配置一个 Container
- Step 4: 解析并提取依赖
2、示例
声明接口及类型:
export interface ILoggerService {}

export interface IApiService {}

export interface IUserService {}

export default TYPES = {

  // 唯一依赖标识,建议使用Symbol.for替换类作为标识符

  ILoggerService: Symbol.for("ILoggerService"),

  IApiService: Symbol.for("IApiService"),

  IUserService: Symbol.for("IUserService"),

};
声明依赖:
import 'reflect-metadata'

import { injectable, inject } from 'inversify'

@injectable()

export class LoggerService implements ILoggerService{

//...

}

@injectable()

export class ApiService implements IApiService{

    protected _logger: LoggerService

    constructor (

        private @inject(TYPES.ILoggerService) logger: LoggerService

) {

        this._logger = logger

    }

}
也可以使用 property injection 代替 constructor injection ,这样就不用声明构造函数。
@injectable()

export class ApiService implements IApiService {

  @inject(TYPES.ILoggerService) private _logger: LoggerService;

}
@injectable()
export class UserService implements IUserService {
protected _api: ApiService;
protected _logger: LoggerService;
constructor (
private readonly @inject(TYPES.IApiService) api: ApiService,
private readonly @inject(TYPES.ILoggerService) logger: LoggerService
) {
this._api = api
this._logger = logger
}
}创建并配置一个 Container
...

const DIContainer = new container()

DIContainer.bind<ApiService>(TYPES.IApiService).toSelf()

DIContainer.bind<LoggerService>(TYPES.ILoggerService).toSelf()
解析依赖
import "reflect-matadata";

import { UserService } from "./services";

import DIContainer from "./container";

async function Main() {

  const userService: UserService = DIContainer.resolve<UserService>(

    UserService

  );

  console.log("my hobby is", await userService.getMyhobby());

}

Main();
Classes as identifiers and circular dependencies
An exception:
Error: Missing required @Inject or @multiinject annotation in: argument 0 in import "reflect-metadata";
import { injectable } from "inversify";
@injectable()
class Dom {
public _domUi: DomUi;
constructor(@inject(DomUi) domUi: DomUi) {
this._domUi = domUi;
}
}
@injectable()
class DomUi {
public _dom;
constructor(@inject(Dom) dom: Dom) {
this._dom = dom;
}
}
@injectable()
class Test {
public _dom;
constructor(@inject(Dom) dom: Dom) {
this._dom = dom;
}
}
container.bind<Dom>(Dom).toSelf();
container.bind<DomUi>(DomUi).toSelf();
const dom = container.resolve(Test); // Error!主要原因:decorator被调用时,类还没有声明,导致inject(undefined),InversifyJS 推荐使用 Symboy.for 生成依赖唯一标识符。
Part6: FrameWorks
依赖注入一般都借助第三方框架来实现,实现需要考虑循环依赖,错误处理,容器存储等。
- tsyringe:https://github.com/microsoft/tsyringe
- 实践:https://github.com/DTStack/molecule
- InversifyJS:https://github.com/inversify/InversifyJS
- 实践: https://codesandbox.io/s/github/inversify/inversify-express-example/tree/master/?file=/BindingDecorators/controller/user.ts
数栈是云原生—站式数据中台PaaS,我们在github和gitee上有一个有趣的开源项目:FlinkX,FlinkX是一个基于Flink的批流统一的数据同步工具,既可以采集静态的数据,也可以采集实时变化的数据,是全域、异构、批流一体的数据同步引擎。大家喜欢的话请给我们点个star!star!star!
github开源项目:https://github.com/DTStack/flinkx
gitee开源项目:https://gitee.com/dtstack_dev_0/flinkx
数栈技术分享:前端小姐姐和你聊聊IOC中依赖注入那些事 (Dependency inject)的更多相关文章
- Molecule实现数栈至简前端开发新体验
Keep It Simple, Stupid. 这是开发人耳熟能详的 KISS 原则,也像是一句有调侃意味的善意提醒,提醒每个前端人,简洁易懂的用户体验和删繁就简的搭建逻辑就是前端开发的至简大道. 这 ...
- 【小家Spring】聊聊Spring中的数据绑定 --- BeanWrapper以及内省Introspector和PropertyDescriptor
#### 每篇一句 > 千古以来要饭的没有要早饭的,知道为什么吗? #### 相关阅读 [[小家Spring]聊聊Spring中的数据转换:Converter.ConversionService ...
- 【小家Spring】聊聊Spring中的数据绑定 --- DataBinder本尊(源码分析)
每篇一句 唯有热爱和坚持,才能让你在程序人生中屹立不倒,切忌跟风什么语言或就学什么去~ 相关阅读 [小家Spring]聊聊Spring中的数据绑定 --- 属性访问器PropertyAccessor和 ...
- 【技术分享】小乖乖的 Linux/Ubuntu 历险记
本文将同步发布于 WHU-TD 的博客. 这是一篇自带故事背景的博客. 总所周知,写的多,错的多,更何况一个刚刚接触 Linux 的小白.虽然只是介绍一些非常基础的内容,还是希望大家在发现错误时可以及 ...
- 前端小姐姐学PHP之(二)
上次了我们配置好开发环境了,本小节主要讲述内容点: phpStrom的运行环境配置 创建数据库.数据表 连接数据库 一.phpStrom的运行环境配置(windows版) 注:MAC版原文地址 htt ...
- 新来的前端小姐姐问:Vue路由history模式刷新页面出现404问题
摘要:vue-router 默认 hash 模式 -- 使用 URL 的 hash 来模拟一个完整的 URL,于是当 URL 改变时,页面不会重新加载. 本文分享自华为云社区<学习Vue Rou ...
- 前端小姐姐学PHP之(一)
作为一个前端不懂后台那是不对的,嘻嘻,来走一波... 一.安装 **我这里用的是phpStudy和phpStrom** 1.安装phpStudy 链接:https://pan.baidu.com/s/ ...
- UWA 技术分享连载 转载
技术分享连载1 Q1:Texture占用内存总是双倍,这个是我们自己的问题,还是Unity引擎的机制? Q2:我现在发现两个因素直接影响Overhead,一个是Shader的复杂度,一个是空Updat ...
- Coding for Speed 技术分享
上周和公司技术同事们作了次<Coding for Speed>技术分享,本来这只是再普通不过的技术探讨和交流(虽然挂了个颇有噱头的名称),但分享的时候逻辑没理好,语速很快,时间也太紧,因此 ...
- 【小家Spring】Spring IoC是如何使用BeanWrapper和Java内省结合起来给Bean属性赋值的
#### 每篇一句 > 具备了技术深度,遇到问题可以快速定位并从根本上解决.有了技术深度之后,学习其它技术可以更快,再深入其它技术也就不会害怕 #### 相关阅读 [[小家Spring]聊聊Sp ...
随机推荐
- Ollama本地部署大模型总结
日拱一卒,功不唐捐 今天计划对之前ollama系列做个回顾,从如何部署到API使用,整理到一篇内容中,提供给大家参考. 安装指南 第一步:安装ollama 我们可以从官网下载ollama,此步骤支持w ...
- Visual Studio 2017 导出 ASP.NET Core 项目模版项目文件为空
问题重现 VS 2017 针对 ASP.NET Core 导出模版功能有问题 解决办法 visual-studio-2017-templates-and-the-missing-content 目前官 ...
- Web前端入门第 23 问:CSS 选择器的优先级
任何地方都存在阶级,CSS 选择器也不例外,也会讲一个三六九等. 选择器类别 通配符选择器 标签选择器 类选择器 ID选择器 属性选择器 伪类选择器 伪元素选择器 关系选择器 流传已久的阶级划分 选择 ...
- Jmeter参数化总结
参数化步骤: 1.连接数据库 2.获取account表手机号数据 3.获取手机号个数 4.增加For Each控制器 5.将请求添加至循环控制器里面 脚本:循环登录.jmx 页面如下: 下面主要说明F ...
- rabbitmq学习与总结
一.rabbitmq的使用场景 1.高并发的流量削峰 举个例子,假设某订单系统每秒最多能处理一万次订单,也就是最多承受的10000qps,这个处理能力应付正常时段的下单时绰绰有余,正常时段我们下单一秒 ...
- Avalnoia跨平台实战记录(一),Avalonia初始化
前言: 记录一下小菜鸟程序员从WPF一知半解转向Avalonia跨平台桌面端开发的一点记录和感想,我个人是比较喜欢用.NET来开发的,当然,这也和我的技术栈有很大关系,本人只是从大专出来的,在学校里学 ...
- 🎀杜伽Durgod K610W蓝牙连接问题解决
简介 杜伽Durgod K610W键盘支持三模连接,在配对成功蓝牙后切换连接通道后,再次连接蓝牙通道时无法正常自动连接已配对的蓝牙,需取消配对再重新配对后才能正常连接.这种问题可以通过升级键盘固件解决 ...
- ESP32S3播放音频文件
ESP32S3播放音频文件 硬件基于立创实战派esp32s3 软件代码基于立创实战派教程修改,分析 播放PCM格式音频 原理图分析 音频芯片ES8311 ES8311_I2C_ADD:0x18 音频功 ...
- AI提示词:一个通用C++ ECS系统实现(事件条件动作系统)
AI提示词 using eca_cond = bool(*)(...); using eca_action = void(*)(...); class eca_info { public: eca_c ...
- HTML用JS导出Excel的五种方法,无需js-xlsx库
原文地址:https://blog.csdn.net/aa122273328/article/details/50388673 这五种方法前四种方法只支持IE浏览器,最后一个方法支持当前主流的浏览器( ...