双显卡笔记本安装CUDA+theano、tensorflow环境
原文出处:http://www.cnblogs.com/jacklu/p/6377820.html
个人知乎主页欢迎关注:https://www.zhihu.com/people/jack_lu,相信我会提供高质量的timeline。
“站在岸上学不会游泳。”看了各种深度学习的新闻、有意思的paper,要开始搭建深度学习环境入坑了。昨天看到一视频展现了tensorflow在Android平台上的应用,感觉潜力巨大,所以选择了tensorflow。
结合几篇安装博客总结了安装方法,可能是最简便的一种了~
笔记本Y430p 显卡GTX850M
操作系统Ubuntu 16.04(经本人测试 14.04 14.10 15.04 15.10 对双显卡的支持都不是特别好)安装好后建议关掉所有更新选项。
python版本 2.7
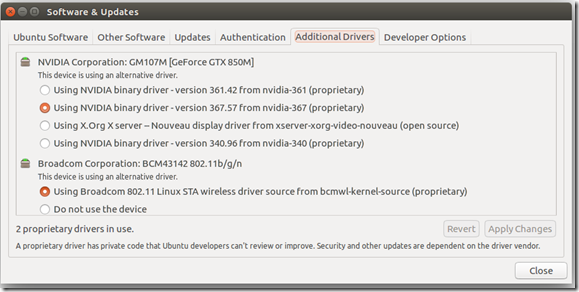
1、首先保证安装好NVIDIA驱动。如下图所示:
2、安装CUDA
sudo apt-get update

sudo apt-get install nvidia-cuda-toolkit
默认安装cuda 7.5.18 安装之后,是没有/usr/local/cuda*这个文件夹,也没有sample的
3、由于Ubuntu16.04的gcc和g++都是5.0版的,不兼容CUDA7.5版本,需要降级
sudo apt-get install gcc-4.9 g++-4.9

cd /usr/bin

sudo rm gcc

sudo rm g++

sudo ln -s gcc-4.9 gcc

sudo ln -s g++-4.9 g++
4、安装cudnn
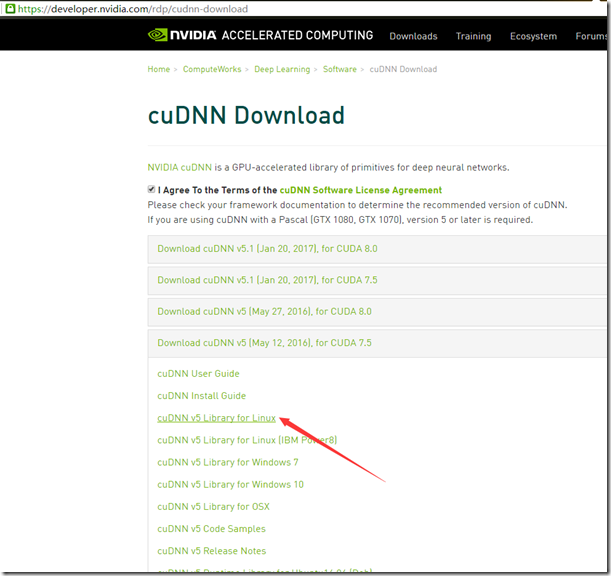
下载cudnn 5.0 for cuda7.5 需要nvidia的开发者帐号登录
解压
tar -zxf cudnn-7.5-linux-x64-v5.-ga.tgz

cd cuda
复制头文件到/usr/local/include
sudo cp include/cudnn.h /usr/local/include/
复制lib文件到/usr/local/lib
sudo cp lib64/* /usr/local/lib/
并编辑~/.bashrc 添加环境变量
export LD_LIBRARY_PATH=/usr/local/lib
5、安装theano
sudo apt-get install python-numpy python-scipy python-dev python-pip python-nose python-mock python-wheel g++ libopenblas-dev git

sudo pip install Theano
编辑配置文件
sudo gedit ~/.theanorc
加入
[global]

device = gpu

floatX = float32

[nvcc]

flags=-D_FORCE_INLINES
注意有符号-
测试,注意cuDNN版本5005

6、安装tensorflow
根据自己的实际情况参照官网的这张表选择适合的下载链接。
# Ubuntu/Linux -bit, CPU only, Python 2.7

 export TF_BINARY_URL=https://storage.googleapis.com/tensorflow/linux/cpu/tensorflow-0.9.0-cp27-none-linux_x86_64.whl

# Ubuntu/Linux -bit, GPU enabled, Python 2.7

# Requires CUDA toolkit 7.5 and CuDNN v4. For other versions, see "Install from sources" below.

 export TF_BINARY_URL=https://storage.googleapis.com/tensorflow/linux/gpu/tensorflow-0.9.0-cp27-none-linux_x86_64.whl

# Mac OS X, CPU only, Python 2.7:

 export TF_BINARY_URL=https://storage.googleapis.com/tensorflow/mac/tensorflow-0.9.0-py2-none-any.whl

# Ubuntu/Linux -bit, CPU only, Python 3.4

 export TF_BINARY_URL=https://storage.googleapis.com/tensorflow/linux/cpu/tensorflow-0.9.0-cp34-cp34m-linux_x86_64.whl

# Ubuntu/Linux -bit, GPU enabled, Python 3.4

# Requires CUDA toolkit 7.5 and CuDNN v4. For other versions, see "Install from sources" below.

 export TF_BINARY_URL=https://storage.googleapis.com/tensorflow/linux/gpu/tensorflow-0.9.0-cp34-cp34m-linux_x86_64.whl

# Ubuntu/Linux -bit, CPU only, Python 3.5

 export TF_BINARY_URL=https://storage.googleapis.com/tensorflow/linux/cpu/tensorflow-0.9.0-cp35-cp35m-linux_x86_64.whl

# Ubuntu/Linux -bit, GPU enabled, Python 3.5

# Requires CUDA toolkit 7.5 and CuDNN v4. For other versions, see "Install from sources" below.

 export TF_BINARY_URL=https://storage.googleapis.com/tensorflow/linux/gpu/tensorflow-0.9.0-cp35-cp35m-linux_x86_64.whl

# Mac OS X, CPU only, Python 3.4 or 3.5:

 export TF_BINARY_URL=https://storage.googleapis.com/tensorflow/mac/tensorflow-0.9.0-py3-none-any.whl
我在这里选择 64-bit GPU Python 2.7
export TF_BINARY_URL=https://storage.googleapis.com/tensorflow/linux/gpu/tensorflow-0.9.0-cp27-none-linux_x86_64.whl
然后根据自己情况选择
# Python

 pip install --upgrade $TF_BINARY_URL

# Python

 pip3 install --upgrade $TF_BINARY_URL
我在这里选择Python 2
pip install --upgrade $TF_BINARY_URL
测试Tensorflow是否安装成功并使用了CUDA,依次执行以下python代码
import tensorflow as tf

a = tf.constant([1.0, 2.0, 3.0, 4.0, 5.0, 6.0], shape=[2, 3], name='a')

b = tf.constant([1.0, 2.0, 3.0, 4.0, 5.0, 6.0], shape=[3, 2], name='b')

c = tf.matmul(a, b)

sess = tf.Session(config=tf.ConfigProto(log_device_placement=True))

print sess.run(c)
实验结果如下,表示安装成功!可以开始新的征程啦~

remark:
cudnn version should be 5.1
export LD_LIBRARY_PATH="$LD_LIBRARY_PATH:/usr/local/cuda/lib64"
export CUDA_HOME=/usr/local/cuda
参考资料:
https://zhuanlan.zhihu.com/p/23042536?refer=tomasen
https://www.zhihu.com/question/48027732?from=profile_question_card
http://www.ifcoder.us/2003
双显卡笔记本安装CUDA+theano、tensorflow环境的更多相关文章
- 【原】Ubuntu ATI/Intel双显卡 驱动安装
本文只针对含有AMD双显卡的部分机型,已经测试过的包括DELL Vostro 3550/DELL Inspiron 14R (AMD 6630 和 Intel HD 3000).整个安装过程需要使用命 ...
- win10使用笔记本自带显卡GUP安装CUDA,版本问题
1.GPU算力问题 查询:win+r, GPU:GeForce GTX 850m,算力5.0,还可以跑得起来深度项目 2.我们需要查看NVIDIA驱动版本,才能安装合适的CUDA版本. 在C:\Pro ...
- NVIDIA显卡笔记本安装ubuntu驱动以及分辨率之详解
随着对ubuntu的了解,突然想在自己的笔记本上装一个双系统.在网上查了安装方法之后,发现因为nvidia显卡的原因会出现一些问题,结果在我自己装了之后发现问题要比看到的多,再看了无数个帖子之后,最终 ...
- Ubuntu16.04 安装Tensorflow1.7过程记录二:安装CUDA及Tensorflow
参考 How to install Tensorflow 1.7.0 using official pip package 其中的CUDNN应该改为7.05for CUDA9.0 后面安装的spyde ...
- 【tensorflow使用笔记一】:安装linux下tensorflow环境的问题
首先安装Python Python2.7 使用pip安装Python-numpy发现有老版本影响import直接手动删除: 安装default-jdk顺利: 安装matplotlib发现没有tkint ...
- Ubuntu Gnome16.04下安装cuda、theano和opencv
1. 安装显卡驱动 ~$ lspci | grep controller00:02.0 VGA compatible controller: Intel Corporation Sky Lake In ...
- 【视频开发】【计算机视觉】doppia编译之一:前言及安装CUDA
最近做一个"高清视频人流量检测"的项目,由于对实时性要求较高,我们需要较快的检测速度.在搜索茫茫"论"海后,我在"The Fastest Deform ...
- 解决Ubuntu16的风扇高速旋转问题(双显卡)
问题描述 自从我的双显卡的笔记本装上Ubuntu 14 后,风扇狂转.发热巨大.网上一搜索估计是显卡驱动不太行.最近英伟达的Nvidia Prime可以完美地切换双显卡,安装这个软件后,风扇就不会狂转 ...
- 在 Ubuntu16.04上安装anaconda+Spyder+TensorFlow(支持GPU)
TensorFlow 官方文档中文版 http://www.tensorfly.cn/tfdoc/get_started/introduction.html https://zhyack.github ...
随机推荐
- NOIP2016DAY1题解
https://www.luogu.org/problem/lists?name=&orderitem=pid&tag=33%2C83 T1:玩具谜题 题解: 沙茶模拟 #includ ...
- Unity 3d中Shader是什么,可以吃吗?
众所周知,Unity3d是一款跨平台非常广的游戏引擎,上手容易,界面友好,集成功能众多,是目前开发手游的主流引擎.本人有幸使用Unity 3d进行开发已一年多时间,已领略了这歀引擎的强大之处. 编写s ...
- /bin/sh 与 /bin/bash 的区别
/bin/sh 与 /bin/bash 的区别,用 : 截取字符串不是POSIX 标准的. 区别 sh 一般设成 bash 的软链 (symlink) ls -l /bin/sh lrwxrwxrwx ...
- (简单) POJ 3667 Hotel,线段树+区间合并。
Description The cows are journeying north to Thunder Bay in Canada to gain cultural enrichment and e ...
- Mapreduce TopK
思想比较简单,就是每个通过map来获取当前的数据块中的的topk个数据,然后将他们以相同的key值放到reduce中,最后通过reduce来对这n*k个数据排序并获得topk个数据.具体的就是建立 ...
- 【HNOI2013】题解 bzoj3139~bzoj3144
比赛 题目: http://www.lydsy.com/JudgeOnline/problem.php?id=3139 题解: 3$\le$N$\le$10,比较明显是一个搜索题,一开始我是直接搜了 ...
- leetcode-006 detect cycle
package leetcode; public class DetectCycle { public ListNode detectCycle(ListNode head) { ListNode s ...
- 程序员需要有多懒 ?- cocos2d-x 数学函数、常用宏粗整理 - by Glede
最近我们的cocos2d-x游戏项目已经进入了正式开发的阶段了,几个dev都辛苦码代码.cocos2d-x还是一套比较方便的api的,什么action啊.director啊.ccpoint啊都蛮便捷的 ...
- SpringBoot JPA实现增删改查、分页、排序、事务操作等功能
今天给大家介绍一下SpringBoot中JPA的一些常用操作,例如:增删改查.分页.排序.事务操作等功能.下面先来介绍一下JPA中一些常用的查询操作: //And --- 等价于 SQL 中的 and ...
- xcode调试
reference:http://www.cnblogs.com/ylkk_925/p/3238171.html 1.添加异常断点,快速定位抛出异常的代码位置,帮助快速解决Bug.(PS:可以在LLD ...