spring boot通过Jedis来操作redis
idea中新建spring boot项目,引入jedis依赖

<!-- https://mvnrepository.com/artifact/redis.clients/jedis -->

<dependency>

    <groupId>redis.clients</groupId>

    <artifactId>jedis</artifactId>

    <version>3.1.0</version>

</dependency>
application.properties中自定义redis配置
#自定义redis配置

myredis.host=localhost

myredis.port=6379

myredis.timeout=10

myredis.pool-max-total=1000

myredis.pool-max-idle=500

myredis.pool-max-wait=500
自定义配置类MyRedisConfig.java读取redis配置文件信息,生成JedisPool类型的bean
package com.example.jedisredis.config;

import org.springframework.boot.context.properties.ConfigurationProperties;

import org.springframework.context.annotation.Bean;

import org.springframework.context.annotation.Configuration;

import redis.clients.jedis.JedisPool;

import redis.clients.jedis.JedisPoolConfig;

@Configuration

@ConfigurationProperties(prefix = "myredis")

public class MyRedisConfig {

    private String host;

    private Integer port;

    private Integer timeout;

    private Integer poolMaxTotal;

    private Integer poolMaxIdle;

    private Integer poolMaxWait;

    @Bean

    public JedisPool jedisPoolFactory(){

        JedisPoolConfig jedisPoolConfig = new JedisPoolConfig();

        jedisPoolConfig.setMaxTotal(poolMaxTotal);

        jedisPoolConfig.setMaxIdle(poolMaxIdle);

        jedisPoolConfig.setMaxWaitMillis(poolMaxWait * 1000);

        JedisPool jedisPool = new JedisPool(jedisPoolConfig, host, port, timeout*1000);

        return jedisPool;

    }

    @Override

    public String toString() {

        return "MyRedisConfig{" +

                "host='" + host + '\'' +

                ", port=" + port +

                ", timeout=" + timeout +

                ", poolMaxTotal=" + poolMaxTotal +

                ", poolMaxIdle=" + poolMaxIdle +

                ", poolMaxWait=" + poolMaxWait +

                '}';

    }

    public String getHost() {

        return host;

    }

    public void setHost(String host) {

        this.host = host;

    }

    public Integer getPort() {

        return port;

    }

    public void setPort(Integer port) {

        this.port = port;

    }

    public Integer getTimeout() {

        return timeout;

    }

    public void setTimeout(Integer timeout) {

        this.timeout = timeout;

    }

    public Integer getPoolMaxTotal() {

        return poolMaxTotal;

    }

    public void setPoolMaxTotal(Integer poolMaxTotal) {

        this.poolMaxTotal = poolMaxTotal;

    }

    public Integer getPoolMaxIdle() {

        return poolMaxIdle;

    }

    public void setPoolMaxIdle(Integer poolMaxIdle) {

        this.poolMaxIdle = poolMaxIdle;

    }

    public Integer getPoolMaxWait() {

        return poolMaxWait;

    }

    public void setPoolMaxWait(Integer poolMaxWait) {

        this.poolMaxWait = poolMaxWait;

    }

}
自定义工具类MyReidsUtil.java,注入MyReidsConfig.java中的JedisPool,通过JedisPool生成Jedis,从而构建操作redis的方法
package com.example.jedisredis.util;

import com.example.jedisredis.config.MyRedisConfig;

import org.springframework.beans.factory.annotation.Autowired;

import org.springframework.stereotype.Component;

import redis.clients.jedis.Jedis;

import redis.clients.jedis.JedisPool;

@Component

public class MyRedisUtil {

    @Autowired

    JedisPool jedisPool;

    public String get(String key){

        Jedis jedis = jedisPool.getResource();

        String value = jedis.get(key);

        return value;

    }

    public void set(String key, String value){

        Jedis jedis = jedisPool.getResource();

        jedis.set(key, value);

    }

}
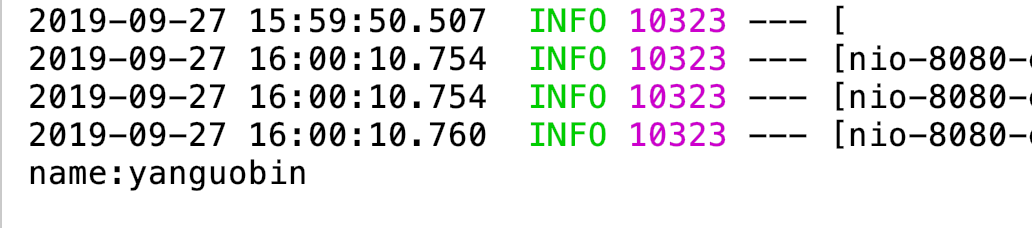
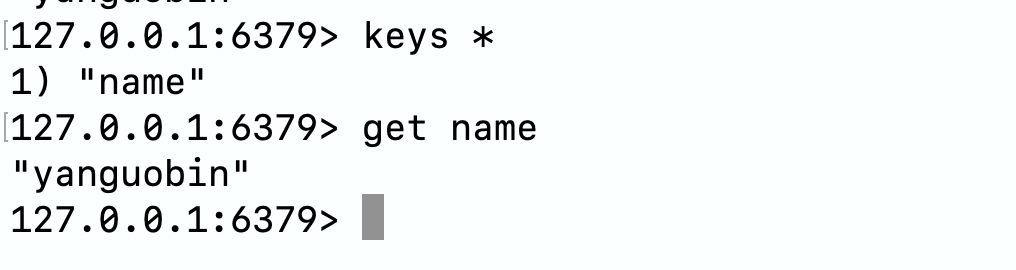
测试
package com.example.jedisredis.controller;

import com.example.jedisredis.util.MyRedisUtil;

import org.springframework.beans.factory.annotation.Autowired;

import org.springframework.stereotype.Controller;

import org.springframework.web.bind.annotation.RequestMapping;

import org.springframework.web.bind.annotation.ResponseBody;

@Controller

@RequestMapping("/user")

public class UserController {

    @Autowired

    MyRedisUtil myRedisUtil;

    @RequestMapping("/setname")

    @ResponseBody

    public String setName(){

        myRedisUtil.set("name", "yanguobin");

        return "setName";

    }

    @RequestMapping("/getname")

    @ResponseBody

    public String getName(){

        String name = myRedisUtil.get("name");

        System.out.println("name:" + name);

        return "getName";

    }

}
最后,MyRedisUtil.java中的各种自定义的操作redis的方法可以写的丰满些,以方便使用,此处仅简单举例
spring boot通过Jedis来操作redis的更多相关文章
- Spring Boot 2.x 缓存应用 Redis注解与非注解方式入门教程
Redis 在 Spring Boot 2.x 中相比 1.5.x 版本,有一些改变.redis 默认链接池,1.5.x 使用了 jedis,而2.x 使用了 lettuce Redis 接入 Spr ...
- 阿里P7级教你如何在Spring Boot应用程序中使用Redis
在Spring Boot应用程序中使用Redis缓存的步骤: 1.要获得Redis连接,我们可以使用Lettuce或Jedis客户端库,Spring Boot 2.0启动程序spring-boot-s ...
- Spring Boot(二):数据库操作
本文主要讲解如何通过spring boot来访问数据库,本文会演示三种方式来访问数据库,第一种是JdbcTemplate,第二种是JPA,第三种是Mybatis.之前已经提到过,本系列会以一个博客系统 ...
- Jedis API操作redis数据库
1.配置文件 classpath路径下,新建redis.properties配置文件 配置文件内容 # Redis settings redis.host=127.0.0.1 redis.port=6 ...
- Spring Boot 1.5.4集成Redis
本文示例源码,请看这里: 如何安装与配置Redis,请看这里 首先添加起步依赖: <dependency> <groupId>org.springframework.boot& ...
- 【Spring Boot&&Spring Cloud系列】Spring Boot中使用NoSql数据库Redis
github地址:https://github.com/AndyFlower/Spring-Boot-Learn/tree/master/spring-boot-nosql-redis 一.加入依赖到 ...
- Spring Boot (五): Redis缓存使用姿势盘点
1. Redis 简介 Redis 是目前业界使用最广泛的内存数据存储.相比 Memcached,Redis 支持更丰富的数据结构,例如 hashes, lists, sets 等,同时支持数据持久化 ...
- spring boot下JedisCluster方式连接Redis集群的配置
最近在使用springboot做项目,使用redis做缓存.在外网开发的时候redis服务器没有使用集群配置,所有就是用了RedisTemplate的方式进行连接redis服务器.但是项目代码挪到内网 ...
- spring boot 学习(十四)SpringBoot+Redis+SpringSession缓存之实战
SpringBoot + Redis +SpringSession 缓存之实战 前言 前几天,从师兄那儿了解到EhCache是进程内的缓存框架,虽然它已经提供了集群环境下的缓存同步策略,这种同步仍然需 ...
随机推荐
- java中自定义注解的应用
要想深刻的理解注解,我们必须能实现自己的注解,然后应用自己的注解去实现特定的业务,使用注解可以更优雅的做到某些事情. 有这样一个场景,在需要文件导出时,我们需要将一个model中的一些重要字段导出到c ...
- docker 搭建自己的github
github 搭建: 自己搭建一个github网站(仓库) daocloud:公共hub搜索git下载github镜像 docker pull gitlab/gitlab-ce:8.7.0-r ...
- EditPlus5.0破解激活
永久激活用户名激活码: 用户名:Vovan注册码:3AG46-JJ48E-CEACC-8E6EW-ECUAW 然后重启软件即可
- 聊聊 Python 的单元测试框架(二):nose 和它的继任者 nose2
作者:HelloGitHub-Prodesire HelloGitHub 的<讲解开源项目>系列,项目地址:https://github.com/HelloGitHub-Team/Arti ...
- idea报错 Error creating bean with name 'requestMappingHandlerMapping' defined in class path resource
核对一下控制器是不是写了相同的路径...org.springframework.beans.factory.BeanCreationException: Error creating bean wit ...
- Elastic Stack 笔记(七)Elasticsearch5.6 聚合分析
博客地址:http://www.moonxy.com 一.前言 Elasticsearch 是一个分布式的全文搜索引擎,索引和搜索是 Elasticsarch 的基本功能.同时,Elasticsear ...
- 探索form组件和cookie,session组件
一. 实现注册功能 后端代码: from django.shortcuts import render,HttpResponse,redirect from app01 import models C ...
- .NET Conf 2019日程(北京时间)
一年一度的 .NET Conf马上就要开始了,我将日程简易的翻译了一下,并且时间全部转换为北京时间,以方便国内.NETer. 日程 第1天 (北京时间9月24日) .NET Conf 2019 基调 ...
- 阿里云CentOS7.3服务器通过Docker安装Nginx
前言 小编环境: 阿里云CentOS7.3服务器 docker 下面分享一次小编在自己的阿里云CentOS7.3服务器上使用Docker来安装Nginx的一次全过程 温馨小提示: 如果只是希望单纯使用 ...
- C++ const 引用 指针
先简单回忆一下常量的性质: int main() { const int buffSize = 512; buffsize = 512; //× buffSize是常量 } 初始化时: const i ...