Tensorflow简单实践系列(三):图和会话
当执行一个 TensorFlow 函数的时候,并不会马上执行运算,而是把运算存储到一个称为“图”(graph)的数据结构里面。
图存储的各种运算,只有在会话(session)里执行图,才会真正地执行。
图的构建
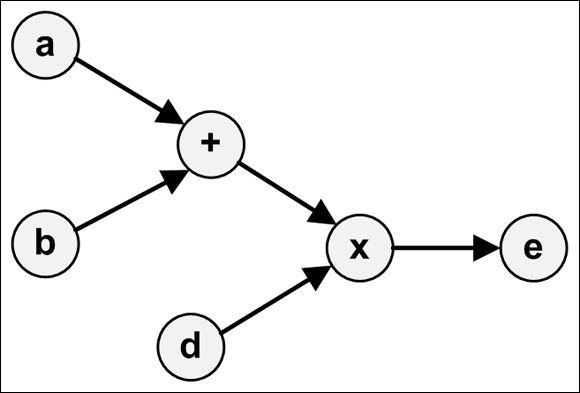
对于
 c = tf.add(a, b)

 e = tf.multiply(c, d)
它们所形成的图就是:
TensorFlow 用 Graph 这个容器数据结构来表示图。图的方法可以分为两类:
- 访问图中的数据
- 创建 GraphDef
访问图中的数据
有这么一些访问图数据的方法:
- get_tensor_by_name(name):根据 name 返回张量。
- get_operation_by_name(name):根据 name 返回运算。
- get_operations():返回运算的列表。
- get_all_collection_keys():返回集合的列表。
- get_collection(name, scope=None):返回给定集合的值列表。
- add_to_collection(name, value):添加值。
- add_to_collections(name, value):添加值。
示例代码:
 # 访问图中的数据

 x1 = tf.constant(2, name='x1')

 x2 = tf.constant(3, name='x2')

 my_sum = x1 + x2

 print(tf.get_default_graph().get_operations())

 print(tf.get_default_graph().get_tensor_by_name('x1:0'))
[<tf.Operation 'x1' type=Const>, <tf.Operation 'x2' type=Const>, <tf.Operation 'add' type=Add>]

Tensor("x1:0", shape=(), dtype=int32)
其中 'x1:0' 表示的是 'name:index',0 表示的是这个张量的索引。
创建 GraphDef
GraphDef 是序列化之后的 Graph。
GraphDef 以一种特殊的格式(protocol buffer 或 protobuf)存储图中的数据。protobuf 可以是二进制格式或者文本格式(长得像 JSON)。
在 GraphDef 中,所有的张量和运算都用节点来表示。每个节点都有 name/op/attr 这些字段。它的样子就像:
node {

    name: { ... }

    op: { ... }

    attr { ... }

    attr { ... }

    ...

    versions { ... }

}
再通过一段代码来熟悉,as_graph_def 可以访问 TensorFlow 应用中的图:
 a = tf.constant(666)

 b = tf.constant(777)

 sum1 = a + b

 print(tf.get_default_graph().as_graph_def())
node {

  name: "Const"

  op: "Const"

  attr {

    key: "dtype"

    value {

      type: DT_INT32

    }

  }

  attr {

    key: "value"

    value {

      tensor {

        dtype: DT_INT32

        tensor_shape {

        }

        int_val:

      }

    }

  }

}

node {

  name: "Const_1"

  op: "Const"

  attr {

    key: "dtype"

    value {

      type: DT_INT32

    }

  }

  attr {

    key: "value"

    value {

      tensor {

        dtype: DT_INT32

        tensor_shape {

        }

        int_val:

      }

    }

  }

}

node {

  name: "add"

  op: "Add"

  input: "Const"

  input: "Const_1"

  attr {

    key: "T"

    value {

      type: DT_INT32

    }

  }

}

versions {

  producer:

}
tf.train 中的 write_graph 可以把图输出到文件。
函数签名如下:
write_graph(graph/graph_def, logdir, name, as_text=True)
代码示例:
print(tf.train.write_graph(tf.get_default_graph(), os.getcwd(), 'graph.dat', as_text=True))
此时会输出:
/your/path/graph.dat
即新生成了这个文件。
创建并运行会话
在 TensorFlow 里,都是先构建好 Graph,然后再在会话(session)中执行。
会话的创建
会话必须显式地创建,通过 tf.Session,它有 3 个参数:
- target:执行引擎(execution engine)的名称
- graph:启动的图实例
- config:配置
一般我们使用默认参数,那就是:
 with tf.Session() as sess:

     pass
会话的执行
session 最重要的方法就是 run(),它接收 4 个方法:
- fetches: 指定若干个需要执行的张量或运算
- feed_dict: 需要喂给张量的数据
- options: 配置参数
- run_metadata: 会话的输出数据
如果 fetches 是一个张量,run 会返回一个和张量等值的 ndarray。
 t = tf.constant([6, 66, 666])

 with tf.Session() as sess:

     res = sess.run(t)

     print(res)
[ ]
如果 fetches 是一个运算,run 会返回一个运算之后的 ndarray 值。
 t1 = tf.constant(6)

 t2 = tf.constant(66)

 my_multiply = t1 * t2

 with tf.Session() as sess:

     res = sess.run(my_multiply)

     print(res)
如果 fetches 是元素的集合,run 也会返回一个相应的集合。
 t1 = tf.constant(6)

 t2 = tf.constant(66)

 with tf.Session() as sess:

     res1, res2 = sess.run([t1, t2])

     print(res1)

     print(res2)
输出到日志
TensorFlow 的日志是通过 tf.logging 实现的。示例代码:
 import tensorflow.compat.v1 as tf

 tf.logging.set_verbosity(tf.logging.INFO)

 t = tf.constant(6)

 with tf.Session() as sess:

     res = sess.run(t)

     tf.logging.info('Output: %f', res)
I0713 ::02.146098 <ipython-input--3ef84fc83efc>:] Output: 6.000000
Tensorflow简单实践系列(三):图和会话的更多相关文章
- Tensorflow简单实践系列(二):张量
在上一节中,我们安装 TensorFlow 并运行了最简单的应用,这节我们熟悉 TensorFlow 中的张量. 张量是 TensorFlow 的核心数据类型.数学里面也有张量的概念,但是 Tenso ...
- Tensorflow简单实践系列(一):安装和运行
TensorFlow 是谷歌开发的机器学习框架. 安装 TensorFlow 直接使用 pip 安装即可,添加豆瓣镜像可以加快速度: pip install tensorflow -i https:/ ...
- 【原创 深度学习与TensorFlow 动手实践系列 - 3】第三课:卷积神经网络 - 基础篇
[原创 深度学习与TensorFlow 动手实践系列 - 3]第三课:卷积神经网络 - 基础篇 提纲: 1. 链式反向梯度传到 2. 卷积神经网络 - 卷积层 3. 卷积神经网络 - 功能层 4. 实 ...
- 【原创 深度学习与TensorFlow 动手实践系列 - 4】第四课:卷积神经网络 - 高级篇
[原创 深度学习与TensorFlow 动手实践系列 - 4]第四课:卷积神经网络 - 高级篇 提纲: 1. AlexNet:现代神经网络起源 2. VGG:AlexNet增强版 3. GoogleN ...
- [ 搭建Redis本地服务器实践系列三 ] :图解Redis客户端工具连接Redis服务器
上一章 [ 搭建Redis本地服务器实践系列二 ] :图解CentOS7配置Redis 介绍了Redis的初始化脚本文件及启动配置文件,并图解如何以服务的形式来启动.终止Redis服务,可以说我们的 ...
- TensorFlow 中的张量,图,会话
tensor的含义是张量,张量是什么,听起来很高深的样子,其实我们对于张量一点都不陌生,因为像标量,向量,矩阵这些都可以被认为是特殊的张量.如下图所示: 在TensorFlow中,tensor实际上就 ...
- TensorFlow进阶(五)---图与会话
图与会话 图 tf.Graph TensorFlow计算,表示为数据流图.一个图包含一组表示 tf.Operation计算单位的对象和tf.Tensor表示操作之间流动的数据单元的对象.默认Graph ...
- Echarts 简单报表系列三:饼状图
代码如下: <!DOCTYPE html> <html lang="en"> <head> <meta charset="UTF ...
- 【原创 深度学习与TensorFlow 动手实践系列 - 1】第一课:深度学习总体介绍
最近一直在研究机器学习,看过两本机器学习的书,然后又看到深度学习,对深度学习产生了浓厚的兴趣,希望短时间内可以做到深度学习的入门和实践,因此写一个深度学习系列吧,通过实践来掌握<深度学习> ...
随机推荐
- MOT19数据集百度云盘
图片按视频分的压缩包 [已失效] 链接: https://pan.baidu.com/s/1kNw6yhvqgitNK5N__WOpxw 提取码: yia4 链接: https://pan.baidu ...
- Gamma阶段第六次scrum meeting
每日任务内容 队员 昨日完成任务 明日要完成的任务 张圆宁 #91 用户体验与优化https://github.com/rRetr0Git/rateMyCourse/issues/91(持续完成) # ...
- React组件介绍与使用(父传子、子传父、兄弟传)
1.创建组件的方法 1.1.函数式无状态组件 1.1.1.语法 1 function myComponent(props) { 2 return 3 <div>Hello {pro ...
- mysql 添加注释
给表添加注释: alter table m_tb100_disabledsoldier comment '残疾士兵'; 给表中的字段添加注释alter table m_tb100_disable ...
- Linux下多网卡绑定bond0及模式
Linux 多网卡绑定 网卡绑定mode共有七种(0~6) bond0.bond1.bond2.bond3.bond4.bond5.bond6 常用的有三种 mode=0:平衡负载模式,有自动备援,但 ...
- windows下隐藏磁盘分区(转)
在一定情况下有的人会想隐藏掉部分分区,比如双系统的情况 有两种方式 方法1: 删除盘符,适合在双系统的情况下隐藏掉另外一个系统相关的分区 请注意是删除盘符 不是删除分区 此电脑右键管理 点击磁盘管理 ...
- Docker 制作定制asp.netcore 的容器
上文Windows docker k8s asp.net core的k8swebap镜像只是一个asp.net core程序,在实际生产中我们希望容器中还有一些其他程序,比如ssh 和telegraf ...
- java什么是构造方法
构造方法 一.构造方法的特点 (1)每当创建给定类的实例时就调用的方法 (2)与类同名,但没有返回类型 (3)Java 为对象分配内存,初始化实例变量并调用构造方法 (4)两种构造方法 1.参数化构造 ...
- VSCode 命令
淘宝 NPM 镜像 https://npm.taobao.org/ Ctrl+~ 显示终端 npm start 启动项目 cnpm install 安装模块
- NetCore2.2开发环境搭建和2008R2部署环境搭建
开发环境: 开发工具:VS2017 系统:Win10 64位 Skd下载地址: https://dotnet.microsoft.com/download 3个都下载下载,安装dotnet-sdk-2 ...