ApachShiro 一个系统 两套验证方法-(后台管理员登录、前台App用户登录)同一接口实现、源码分析
需求:
在公司新的系统里面博主我使用的是ApachShiro 作为安全框架、作为后端的鉴权以及登录、分配权限等操作 管理员的信息都是存储在管理员表
前台App 用户也需要校验用户名和密码进行登录、但是用户的信息却是存在另一张表里面、如何给这两个不同的数据表进行登录?鉴权呢?
当然 按照Shiro的强大,我们完全可以用一个接口作为登录的验证、不同的Realm 来执行不同的逻辑即可
相关知识储备 Realm
用最简单的话来说 一个Realm就是一个检验用户身份的组件,但这里这个组件需要我们继承去重写,因为每个系统有各自不同的业务逻辑,这些事情是Shiro所不能了解的,我们得通过这个
Realm 告诉Shiro 我们的密码是怎么加密得到的,还有用户名是哪个,以及加密的方式是啥
————————————————————————————————————————————
了解这些需要了解的东西之后,我们模仿现有的Realm,照猫画虎的来一个
@Component

public class WeChatRealm extends AuthorizingRealm {

    @Autowired

    private VehicleOwnerService vehicleOwnerService;

    @Autowired

    private SysUserService sysUserService;

    /**

     * 授权 微信接口没有权限

     *

     * @param principals

     * @return

     */

    @Override

    protected AuthorizationInfo doGetAuthorizationInfo(PrincipalCollection principals) {

        //没有权限机制返回Null即可

        return null;

    }

    /*

     * @Author MRC

     * @Description 认证

     * @Date 11:36 2019/9/11

     * @Param [token]

     * @return org.apache.shiro.authc.AuthenticationInfo

     **/

    @Override

    protected AuthenticationInfo doGetAuthenticationInfo(AuthenticationToken token) throws AuthenticationException {

        System.out.println("微信登录认证");

        //登录用户名

        String username = (String) token.getPrincipal();

        Wrapper<VehicleOwner> vehicleOwnerWrapper = new EntityWrapper<>();

        vehicleOwnerWrapper.eq("phone",username);

        VehicleOwner vehicleOwner = vehicleOwnerService.selectOne(vehicleOwnerWrapper);

        if (vehicleOwner == null) {

            //找不到这个用户直接返回null

            return null;

        }

        //构造一个简单的认证信息

        SimpleAuthenticationInfo authenticationInfo = new SimpleAuthenticationInfo(

                vehicleOwner, //用户名

                vehicleOwner.getPassword(), //密码

                ByteSource.Util.bytes(username + vehicleOwner.getSalt()),//salt=username+salt

                getName()  //realm name

        );

        return authenticationInfo;

    }

}
- 继承 AuthorizingRealm 重写 doGetAuthorizationInfo()鉴权方法 以及 doGetAuthenticationInfo()认证方法
- 按照传入的用户名查找这个用户是否存在,不存在就返回null即可
- 这里不校验密码,直接把用户名和密码以及盐值(如果存在加盐机制)就一起传递过去 交给Shiro去校验
加入到Shiro SecurityManager当中
    /**

     * 前端验证Realm

     * @return

     */

    public WeChatRealm getWeChatRealm() {

        //使用MD5凭证管理器

        weChatRealm.setCredentialsMatcher(hashedCredentialsMatcher());

        return weChatRealm;

    }
通过@Bean 的方式注入一个SecurityManager 对象 并且加入多个Realm
@Bean

    public SecurityManager securityManager() {

        DefaultWebSecurityManager securityManager = new DefaultWebSecurityManager();

//      securityManager.setRealm(myShiroRealm());

        List<Realm> list = new ArrayList<>();

        list.add(myShiroRealm());

        list.add(getWeChatRealm());

        //设置多个Realm

        securityManager.setRealms(list);

        // 自定义session管理 使用redis

        securityManager.setSessionManager(sessionManager());

        // 自定义缓存实现 使用redis

        securityManager.setCacheManager(redisCacheManager());

        return securityManager;

    }
配置是配置好了 那他们两个是如何工作的呢?
debug 走你~
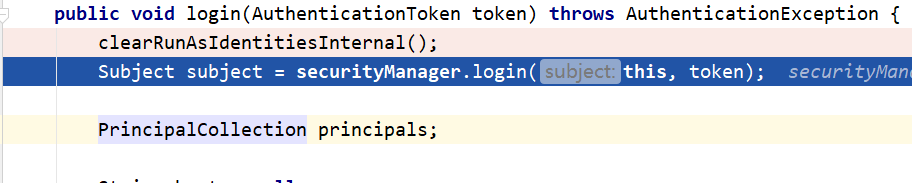
从前台拿到的用户名和密码封装成 token 传递到login方法内
        Subject subject = SecurityUtils.getSubject();
     //封装toKen

        UsernamePasswordToken token = new UsernamePasswordToken(sysUser.getUsername(), sysUser.getPassword());

        //这里会抛出异常

        subject.login(token);
继续跟进 ,进入用户名校验的过程。

token 里面封装了我们传递过来的admin用户名和密码
继续跟进,进入到login方法。 跳转到authenticate(token)方法 这里才是真正意义上验证方法

跟进到 authenticate(AuthenticationToken token) 方法

doAuthenticate(token) 才是要进行验证的方法,继续跟进,进入到
protected AuthenticationInfo doAuthenticate(AuthenticationToken authenticationToken) throws AuthenticationException {


     //初始化Realms

        assertRealmsConfigured();
     //取出我们多个Realm

        Collection<Realm> realms = getRealms();
     //一个或者多个执行不同的方法

        if (realms.size() == 1) {

            return doSingleRealmAuthentication(realms.iterator().next(), authenticationToken);

        } else {

            return doMultiRealmAuthentication(realms, authenticationToken);

        }

    }

这里取出我们配置的两个Realm

我们配置里两个控制器,需要去做两个不同的校验,我们继续跟进。
这里我把这个方法的源代码贴出来,分析一下
protected AuthenticationInfo doMultiRealmAuthentication(Collection<Realm> realms, AuthenticationToken token) {
//获取验证策略
AuthenticationStrategy strategy = getAuthenticationStrategy();
//获取到一个简单的验证信息(图1)
AuthenticationInfo aggregate = strategy.beforeAllAttempts(realms, token);
if (log.isTraceEnabled()) {
log.trace("Iterating through {} realms for PAM authentication", realms.size());
}
//开始循环拿出所有的Realm
for (Realm realm : realms) {
//这里返回的是传入的 aggregate ,不知道这个是干嘛的(图2)
aggregate = strategy.beforeAttempt(realm, token, aggregate);
//判断是否支持toKen
if (realm.supports(token)) {
log.trace("Attempting to authenticate token [{}] using realm [{}]", token, realm);
AuthenticationInfo info = null;
Throwable t = null;
try {
//关键 开始获取验证信息 开始用户名和密码的比对
info = realm.getAuthenticationInfo(token);
} catch (Throwable throwable) {
t = throwable;
if (log.isWarnEnabled()) {
String msg = "Realm [" + realm + "] threw an exception during a multi-realm authentication attempt:";
log.warn(msg, t);
}
}
//验证完成后
aggregate = strategy.afterAttempt(realm, token, info, aggregate, t);
} else {
log.debug("Realm [{}] does not support token {}. Skipping realm.", realm, token);
}
}
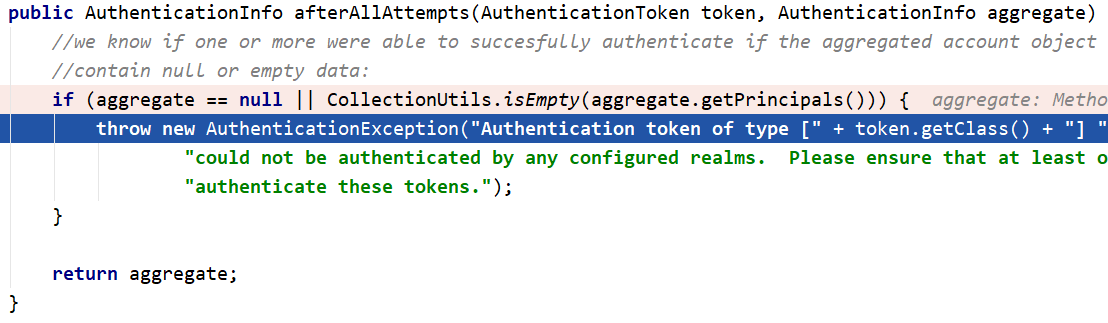
//将最终的验证信息返回出去 图7
//如果aggregate(我们验证的用户信息)为空则抛出一个异常
aggregate = strategy.afterAllAttempts(token, aggregate);
return aggregate;
}
public final AuthenticationInfo getAuthenticationInfo(AuthenticationToken token) throws AuthenticationException {


     //获取缓存里面的验证信息

        AuthenticationInfo info = getCachedAuthenticationInfo(token);

        if (info == null) {

       //缓存里面没有,开始验证,跳转到我们自己写的逻辑 (图3)

            //otherwise not cached, perform the lookup:

            info = doGetAuthenticationInfo(token);

            log.debug("Looked up AuthenticationInfo [{}] from doGetAuthenticationInfo", info);

            if (token != null && info != null) {


         //这里把我们前台传递过来的token 以及从数据库查询出来的对象要进行一个对比

                cacheAuthenticationInfoIfPossible(token, info);

            }

        } else {

            log.debug("Using cached authentication info [{}] to perform credentials matching.", info);

        }

        if (info != null) {
       //终于是密码的比对

            assertCredentialsMatch(token, info);

        } else {

            log.debug("No AuthenticationInfo found for submitted AuthenticationToken [{}].  Returning null.", token);

        }

     //密码正确 返回info

        return info;

    }
protected void assertCredentialsMatch(AuthenticationToken token, AuthenticationInfo info) throws AuthenticationException {
     ### 获取密码凭证管理器

        CredentialsMatcher cm = getCredentialsMatcher();

        if (cm != null) {
       //检验密码正确性(图6)

            if (!cm.doCredentialsMatch(token, info)) {

                //not successful - throw an exception to indicate this:
          //密码错误,抛出异常

                String msg = "Submitted credentials for token [" + token + "] did not match the expected credentials.";

                throw new IncorrectCredentialsException(msg);

            }

        } else {

            throw new AuthenticationException("A CredentialsMatcher must be configured in order to verify " +

                    "credentials during authentication.  If you do not wish for credentials to be examined, you " +

                    "can configure an " + AllowAllCredentialsMatcher.class.getName() + " instance.");

        }

    }
图一
在所有的尝试之前,它先New 出一个简单的验证对象

图二
返回的依旧是一个传入的一个Aggregate对象

图3 跳转到我们自己写的逻辑层 返回一个用户名和密码的包装体
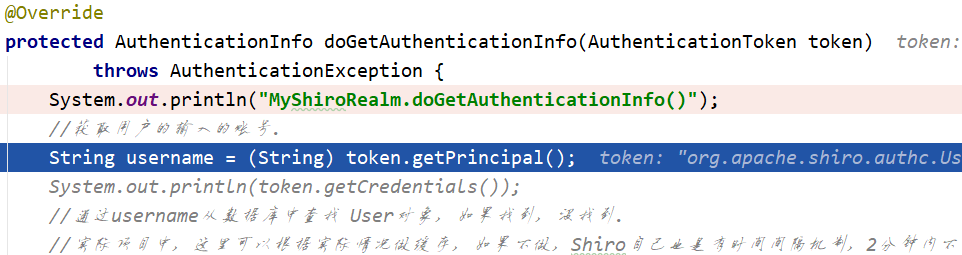
图4 这里没有开启缓存,直接跳出,不走下面的缓存相关的方法

图5 拿到我们配置的凭证管理器,配置的MD5以及加密次数

图6 检验密码的正确性 使用equals方法进行比对两个密码的方法

第二遍循环,因为在第一个循环(第一个Realm)里面已经匹配到,第二个肯定匹配不到,我们继续跟进
返回了一个NULL
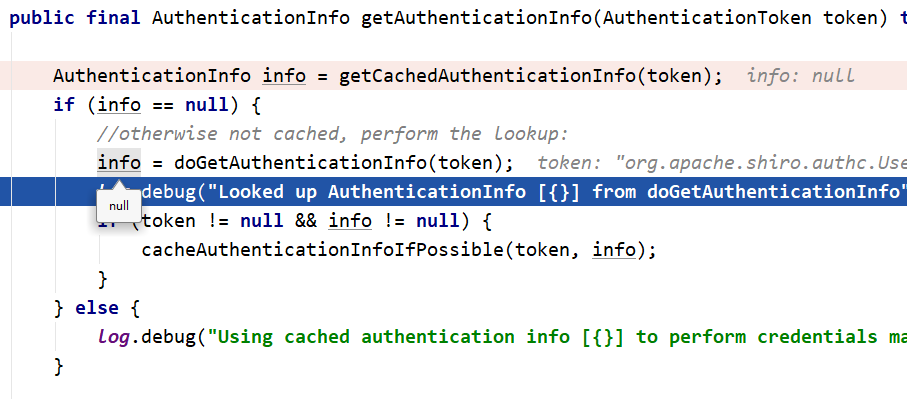
图7
如果两个都匹配不到,就会抛出一个异常,账号不存在的异常,我们捕获即可
ApachShiro 一个系统 两套验证方法-(后台管理员登录、前台App用户登录)同一接口实现、源码分析的更多相关文章
- [Abp 源码分析]十一、权限验证
0.简介 Abp 本身集成了一套权限验证体系,通过 ASP.NET Core 的过滤器与 Castle 的拦截器进行拦截请求,并进行权限验证.在 Abp 框架内部,权限分为两块,一个是功能(Featu ...
- 开源网站流量统计系统Piwik源码分析——参数统计(一)
Piwik现已改名为Matomo,这是一套国外著名的开源网站统计系统,类似于百度统计.Google Analytics等系统.最大的区别就是可以看到其中的源码,这正合我意.因为我一直对统计的系统很好奇 ...
- 使用react全家桶制作博客后台管理系统 网站PWA升级 移动端常见问题处理 循序渐进学.Net Core Web Api开发系列【4】:前端访问WebApi [Abp 源码分析]四、模块配置 [Abp 源码分析]三、依赖注入
使用react全家桶制作博客后台管理系统 前面的话 笔者在做一个完整的博客上线项目,包括前台.后台.后端接口和服务器配置.本文将详细介绍使用react全家桶制作的博客后台管理系统 概述 该项目是基 ...
- ABP源码分析九:后台工作任务
文主要说明ABP中后台工作者模块(BackgroundWorker)的实现方式,和后台工作模块(BackgroundJob).ABP通过BackgroundWorkerManager来管理Backgr ...
- [Abp vNext 源码分析] - 2. 模块系统的变化
一.简要说明 本篇文章主要分析 Abp vNext 当中的模块系统,从类型构造层面上来看,Abp vNext 当中不再只是单纯的通过 AbpModuleManager 来管理其他的模块,它现在则是 I ...
- [Abp 源码分析]十二、多租户体系与权限验证
0.简介 承接上篇文章我们会在这篇文章详细解说一下 Abp 是如何结合 IPermissionChecker 与 IFeatureChecker 来实现一个完整的多租户系统的权限校验的. 1.多租户的 ...
- 【精】EOS智能合约:system系统合约源码分析
系统合约在链启动阶段就会被部署,是因为系统合约赋予了EOS链资源.命名拍卖.基础数据准备.生产者信息.投票等能力.本篇文章将会从源码角度详细研究system合约. 关键字:EOS,eosio.syst ...
- 一个由正则表达式引发的血案 vs2017使用rdlc实现批量打印 vs2017使用rdlc [asp.net core 源码分析] 01 - Session SignalR sql for xml path用法 MemCahe C# 操作Excel图形——绘制、读取、隐藏、删除图形 IOC,DIP,DI,IoC容器
1. 血案由来 近期我在为Lazada卖家中心做一个自助注册的项目,其中的shop name校验规则较为复杂,要求:1. 英文字母大小写2. 数字3. 越南文4. 一些特殊字符,如“&”,“- ...
- [Abp vNext 源码分析] - 7. 权限与验证
一.简要说明 在上篇文章里面,我们在 ApplicationService 当中看到了权限检测代码,通过注入 IAuthorizationService 就可以实现权限检测.不过跳转到源码才发现,这个 ...
随机推荐
- mysql 字段添加以及删除
mysql> select * from user; +------+-----------+-----------+ | id | name | address | +------+----- ...
- mysql 添加表字段
mysql> alter table table1 add price ) not null; Query OK, rows affected (0.05 sec) Records: Dupli ...
- app内嵌H5的上传图片的功能
1.上传组件 <!-- - hasBorder {Boolean} cell底部边框,oneline 为 true 有效 - inlineBorder {Boolean} cell底部短边框 - ...
- OpenFOAM——平行平板间具有相对运动(库埃特流)
本算例翻译整理自:http://the-foam-house5.webnode.es/products/chapter-1-plane-parallel-plates-case/ 这个算例研究了一个距 ...
- 集成了SSM框架的系统怎么做测试?
1.首先在测试文件夹下新建一个测试基类BaseTest BaseTest中的代码如下: package wbl_ssm_blog.mapper; import org.junit.Test; impo ...
- 软件工程--团队项目选择与NABCD
目录 Part1:项目说明 项目基础 我们的目标 Part2:项目NABCD Need Approach Benefit Competitors Delivery & Data Deliver ...
- [linux]杀死同一个应用的所有进程
ps -ef|grep "c.py"|grep -v grep|awk '{print $2}' ps -ef|grep "c.py"|grep -v grep ...
- 如何打开uboot的函数debug()的开关,输出更多调试信息?
答: 有两种方法: 一. 方法一 在文件<file>.c的首行加入以下内容: #define DEBUG #undef CONFIG_LOGLEVEL #define CONFIG_LOG ...
- osg::Group源码
osg::Group源码 /* -*-c++-*- OpenSceneGraph - Copyright (C) 1998-2006 Robert Osfield * * This library i ...
- svg复用方式<g>, <defs>, <symbol>, <use>
svg复用元素的方式主要有 <g>, <defs>, <symbol>, <use> 1. <g> group, 分组,定义一组元素,初始不 ...