TensorFlow图像预处理完整样例
参考书
《TensorFlow:实战Google深度学习框架》(第2版)
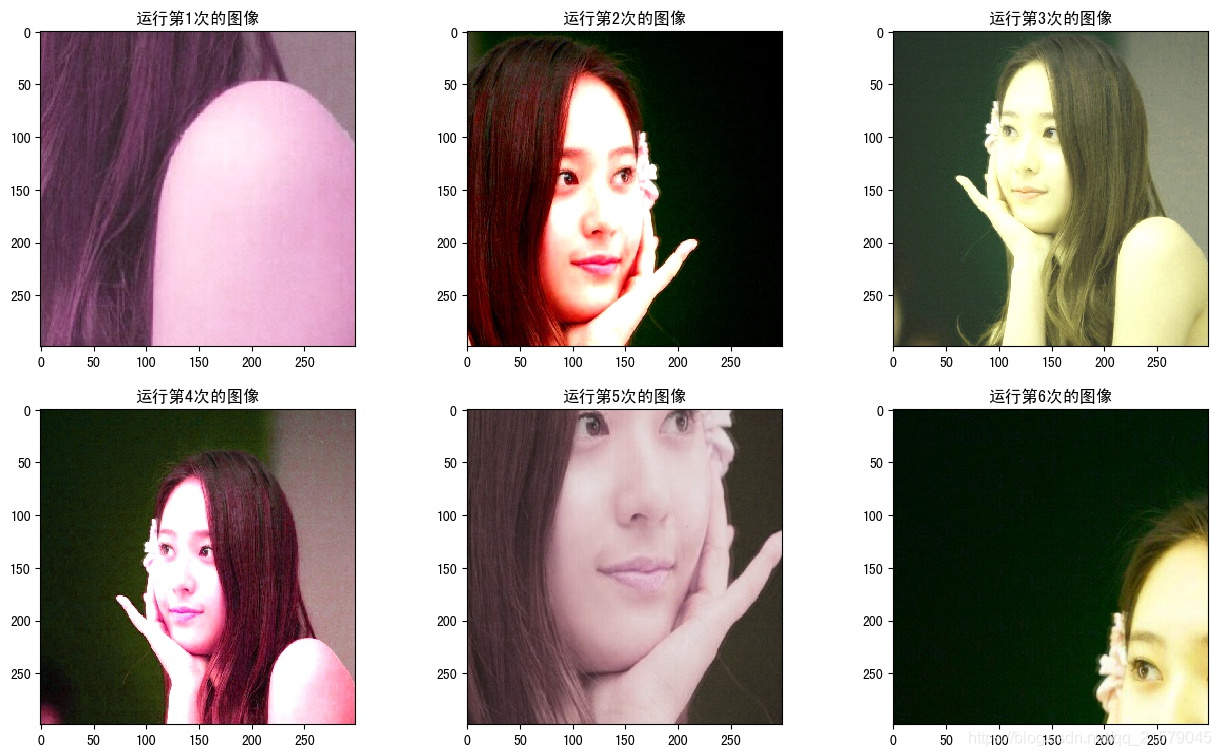
以下TensorFlow程序完成了从图像片段截取,到图像大小调整再到图像翻转及色彩调整的整个图像预处理过程。
#!/usr/bin/env python

# -*- coding: UTF-8 -*-

# coding=utf-8

"""

@author: Li Tian

@contact: 694317828@qq.com

@software: pycharm

@file: figure_deal_test2.py

@time: 2019/1/28 11:39

@desc: 图像预处理完整样例

"""

import tensorflow as tf

import numpy as np

import matplotlib.pyplot as plt

# 给定一张图像,随机调整图像的色彩。因为调整亮度,对比度,饱和度和色相的顺序会影响最后得到的结果。

# 所以可以定义多种不同的顺序。具体使用哪一种顺序可以在训练数据预处理时随机地选择一种。

# 这样可以进一步降低无关因素对模型的影响。

def distort_color(image, color_ordering=0):

    if color_ordering == 0:

        image = tf.image.random_brightness(image, max_delta=32. / 255.)

        image = tf.image.random_saturation(image, lower=0.5, upper=1.5)

        image = tf.image.random_hue(image, max_delta=0.2)

        image = tf.image.random_contrast(image, lower=0.5, upper=1.5)

    elif color_ordering == 1:

        image = tf.image.random_saturation(image, lower=0.5, upper=1.5)

        image = tf.image.random_brightness(image, max_delta=32. / 255.)

        image = tf.image.random_contrast(image, lower=0.5, upper=1.5)

        image = tf.image.random_hue(image, max_delta=0.2)

    elif color_ordering == 2:

        # 还可以定义其他的排列,但是在这里就不再一一列出了。

        # ...

        pass

    return tf.clip_by_value(image, 0.0, 1.0)

# 给定一张解码后的图像、目标图像的尺寸以及图像上的标注框,此函数可以对给出的图像进行预处理。

# 这个函数的输入图像是图像识别问题中原始的训练图像,而输出则是深井网络模型的输入层。注意这里

# 只是处理模型的训练数据,对于预测的数据,一般不需要使用随机变换的步骤。。

def preprocess_for_train(image, height, width, bbox):

    # 如果没有提供标注框,则认为整个图像就是需要关注的部分。

    if bbox is None:

        bbox = tf.constant([0.0, 0.0, 1.0, 1.0], dtype=tf.float32, shape=[1, 1, 4])

    # 转换图像张量的类型。

    if image.dtype != tf.float32:

        image = tf.image.convert_image_dtype(image, dtype=tf.float32)

    # 随机截取图像,减小需要关注的物体大小对图像识别算法的影响。

    bbox_begin, bbox_size, _ = tf.image.sample_distorted_bounding_box(tf.shape(image), bounding_boxes=bbox)

    distorted_image = tf.slice(image, bbox_begin, bbox_size)

    # 将随机截取的图像调整为神经网络层输入层的大小。大小调整的算法是随机选择的。

    distorted_image = tf.image.resize_images(distorted_image, [height, width], method=np.random.randint(4))

    # 随机左右翻转图像。

    distorted_image = tf.image.random_flip_left_right(distorted_image)

    # 使用一种随机的顺序调整图像色彩。

    distorted_image = distort_color(distorted_image, np.random.randint(2))

    return distorted_image

image_raw_data = tf.gfile.FastGFile('F:/Python3Space/figuredata_deal/krystal.jpg', "rb").read()

with tf.Session() as sess:

    img_data = tf.image.decode_jpeg(image_raw_data)

    boxes = tf.constant([[[0.05, 0.05, 0.9, 0.7], [0.35, 0.47, 0.5, 0.56]]])

    # 开始绘图

    plt.rcParams['font.sans-serif'] = ['SimHei']  # 步骤一(替换sans-serif字体)

    plt.rcParams['axes.unicode_minus'] = False  # 步骤二(解决坐标轴负数的负号显示问题)

    fig1 = plt.figure(1, (16, 9), dpi=100)

    # 运行6次获得6种不同的图像。

    for i in range(6):

        # 将图像的尺寸调整为299*299.

        ax = plt.subplot(2, 3, i+1)

        ax.set_title('运行第' + str(i+1) + '次的图像')

        result = preprocess_for_train(img_data, 299, 299, boxes)

        plt.imshow(result.eval())

    fig1.subplots_adjust(wspace=0.1)

    # plt.tight_layout()

    plt.savefig('F:/Python3Space/figuredata_deal/图像预处理完整样例.jpg', bbox_inches='tight')
运行结果:

TensorFlow图像预处理完整样例的更多相关文章
- 吴裕雄 python 神经网络——TensorFlow 图像预处理完整样例
import numpy as np import tensorflow as tf import matplotlib.pyplot as plt def distort_color(image, ...
- 吴裕雄--天生自然 pythonTensorFlow图形数据处理:图像预处理完整样例
import numpy as np import tensorflow as tf import matplotlib.pyplot as plt #随机调整图片的色彩,定义两种顺序. def di ...
- TensorFlow入门之MNIST样例代码分析
这几天想系统的学习一下TensorFlow,为之后的工作打下一些基础.看了下<TensorFlow:实战Google深度学习框架>这本书,目前个人觉得这本书还是对初学者挺友好的,作者站在初 ...
- TensorFlow图像预处理-函数
更多的基本的API请参看TensorFlow中文社区:http://www.tensorfly.cn/tfdoc/api_docs/python/array_ops.html 下面是实验的代码,可以参 ...
- TensorFlow 图像预处理(一) 图像编解码,图像尺寸调整
from: https://blog.csdn.net/chaipp0607/article/details/73029923 TensorFlow提供了几类图像处理函数,下面介绍图像的编码与解码,图 ...
- 『TensorFlow』第九弹_图像预处理_不爱红妆爱武装
部分代码单独测试: 这里实践了图像大小调整的代码,值得注意的是格式问题: 输入输出图像时一定要使用uint8编码, 但是数据处理过程中TF会自动把编码方式调整为float32,所以输入时没问题,输出时 ...
- 通过Canvas及File API缩放并上传图片完整演示样例
创建一个只管的用户界面,并同意你控制图片的大小.上传到server端的数据,并不须要处理enctype为 multi-part/form-data 的情况.只一个简单的POST表单处理程序就能够了. ...
- Nginx完整配置配置样例【官方版】
我们主要参考nginx官方给出的完整配置的样例: https://www.nginx.com/resources/wiki/start/topics/examples/full/# 完整摘录如下: n ...
- Android清理设备内存具体完整演示样例(二)
版权声明: https://blog.csdn.net/lfdfhl/article/details/27672913 MainActivity例如以下: package cc.c; import j ...
随机推荐
- 如何快速上手一款新的嵌入式CPU芯片(记录CC2540开发经历)
新换了工作,需要熟悉新公司的产品开发项目,更新博客就懈怠了,不过环境的不同,也让我对嵌入式开发有了更深刻的理解.在原公司我主要负责在STM32F207芯片平台上, 利用UCOS+LWIP进行嵌入式服务 ...
- [WF4.0 实战] 事件驱动应用
看到题目或许非常多人都会疑问,为什么要使用事件监听呢? 眼下的认识: 1,使用事件监听能够将工作流的结点返回值返回到client 2,能够实现等待与重新启动,相当于之前的WaitActivity创建B ...
- 高仿美团iOS版,版本5.7
高仿美团iOS版,版本:5.7 iOS技术交流群:112365317 github链接:https://github.com/lookingstars/meituan 假设你认为不错.欢迎star 哦 ...
- 【健康生活】Google、百度之间的选择
没有什么技术性的分析,仅仅是个人吐槽而已. 一般人遇到问题就会说一句"百度一下",说实话,百度在中国推广的真的非常不错,可谓是家喻户晓,搜索个八卦新闻,小文章,小电影什么的的确非常 ...
- WPF数据验证(5)―― 错误模板
<Style TargetType="{x:Type TextBox}"> <Setter Property="Validatio ...
- ArchLinux最小化安装 必备库 常用命令
铸成强大的工作站环境——ArchLinux最小化安装 所有问题归结起来,只是一个问题:ArchLinux最小化安装,需要安装哪些包? 1.bash//最基本的Bash Shell(必须)2.bzip2 ...
- 使用C语言获取字符串或文件的MD5值
libmd5地址:https://sourceforge.net/projects/libmd5-rfc/ MD5Demo1.c #include <stdio.h> #include & ...
- tomcat 部署项目的多种方式
项目放在tomcat webapps也不会加载两次 下面可以指定项目名称及path 加载war 部署war包 后面不用加war的后缀 <Host appBase="D:/pr ...
- java 获取时间戳
//java 获取时间戳 long currentTime=System.currentTimeMillis();
- Jmeter代理服务器录制请求
1.文档前提说明 1)本文使用jmeter的版本为 apache-jmeter-2.13 及以上版本 2)java版本要求在 1.8.0 以上 注:jmeter版本一般和java相应的版本一起使用,如 ...
