
Netty练手项目-简单Http服务器
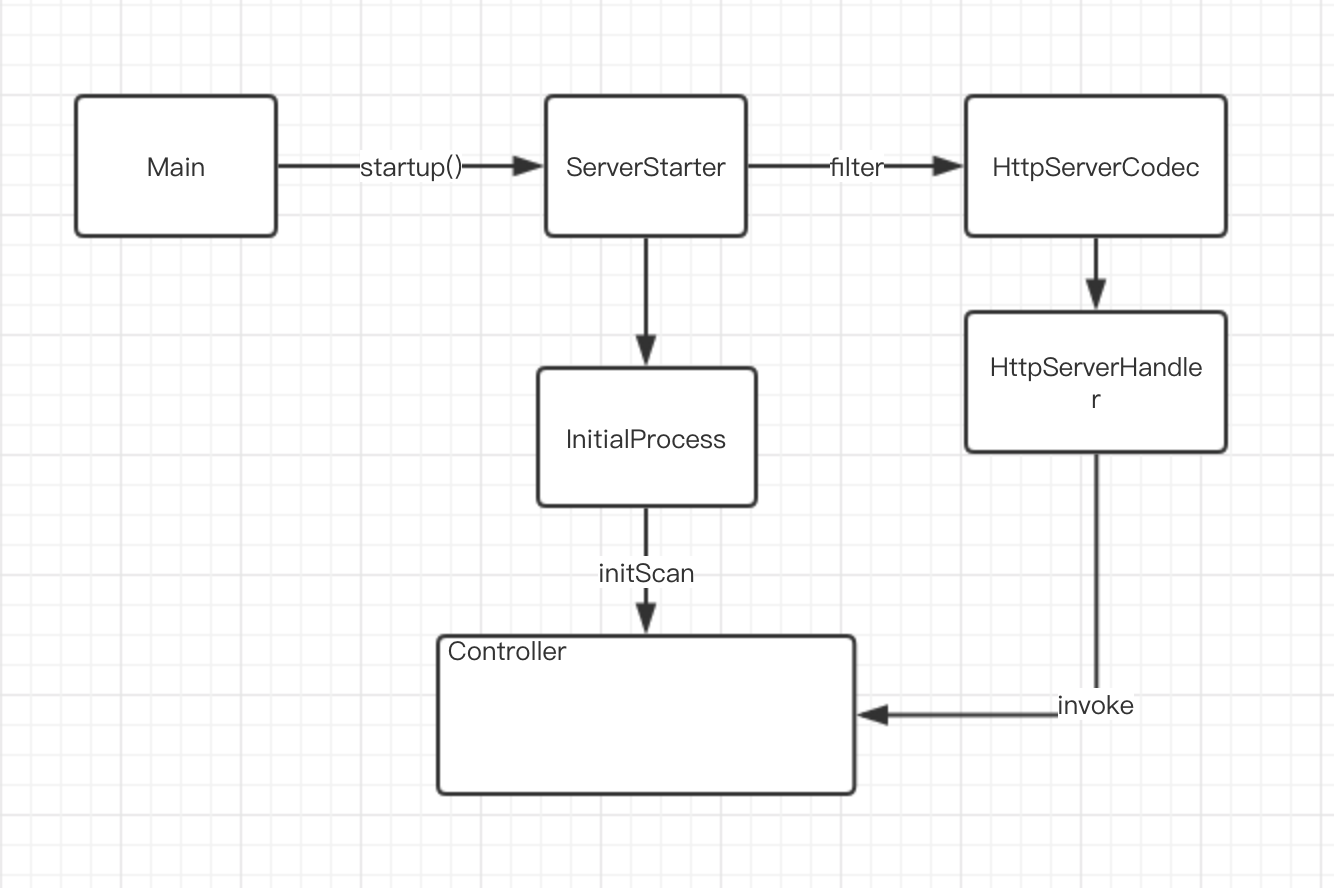
简单的设计思路就是,启动一个可以截断并处理Http请求的服务器代码。使用netty提供的boss线程与worker线程的模型,并使用netty的http解码器。自行编写了http url处理的部分。在接口层面,使用json作为格式。
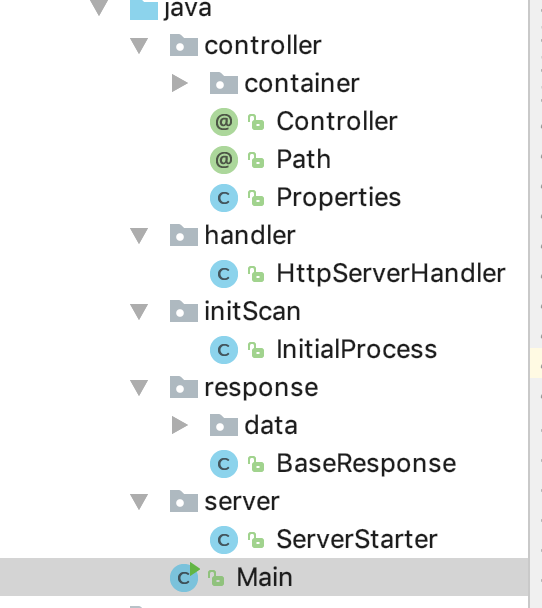
初始化扫描会指定扫描controller.container下的类,使用了自定义Annotation并且单例的方式加载,未考虑太多细节就为了好玩。
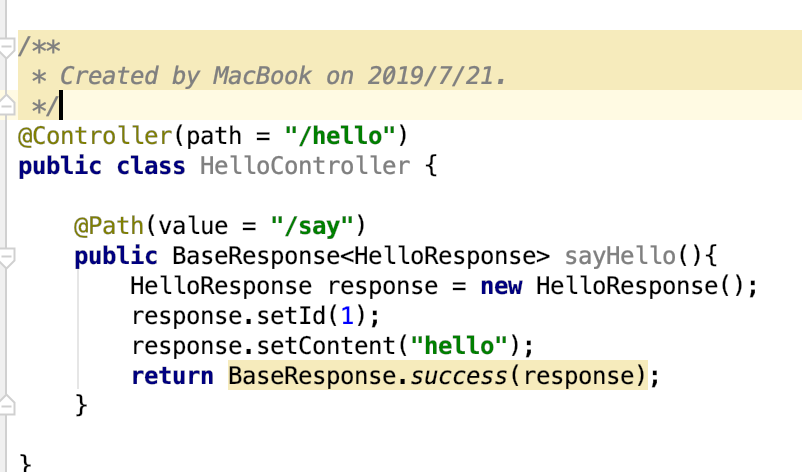
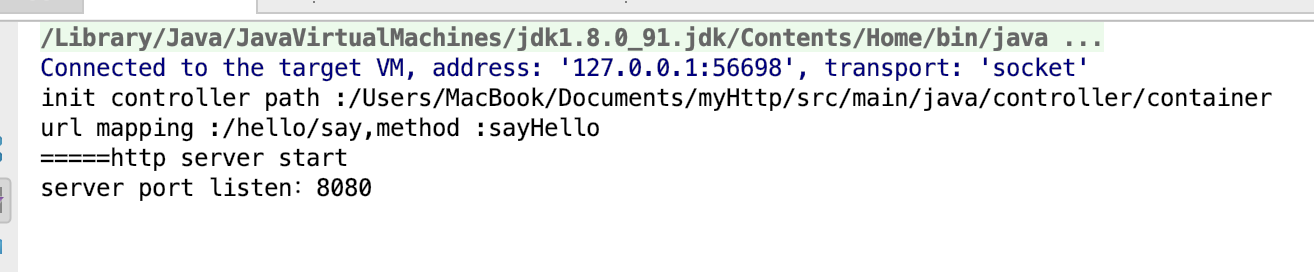
接下来使用postman尝试调用接口。
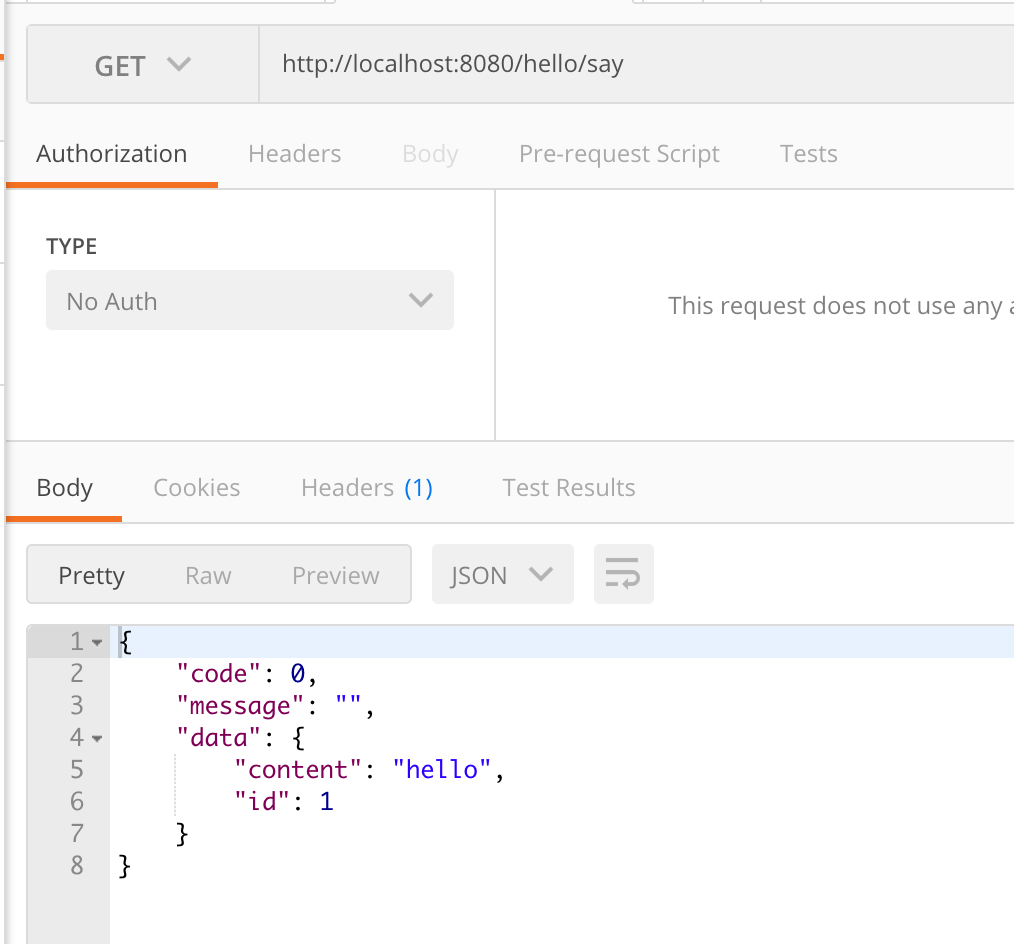
一个简单的netty搭建的web服务就完成了。
package server;

import handler.HttpServerHandler;

import initScan.InitialProcess;

import io.netty.bootstrap.ServerBootstrap;

import io.netty.channel.ChannelFuture;

import io.netty.channel.ChannelInitializer;

import io.netty.channel.ChannelOption;

import io.netty.channel.EventLoopGroup;

import io.netty.channel.nio.NioEventLoopGroup;

import io.netty.channel.socket.SocketChannel;

import io.netty.channel.socket.nio.NioServerSocketChannel;

import io.netty.handler.codec.http.HttpServerCodec;

/**

 * Created by MacBook on 2019/7/14.

 */

public class ServerStarter {

    private EventLoopGroup boss ;

    private EventLoopGroup worker ;

    private int port;

    private static int DEFAULT_PORT = 8080;

    public ServerStarter(){

        boss = new NioEventLoopGroup();

        worker = new NioEventLoopGroup();

        port = DEFAULT_PORT;

    }

    public ServerStarter(int port){

        this();

        if(port < 0 || port > 65535){

            throw new IllegalArgumentException("port:"+port+" is illegal");

        }

        this.port = port;

    }

    public void startup() throws InterruptedException{

        if(boss.isShutdown() || worker.isShutdown()){

            throw new IllegalStateException("server was closed");

        }

        // 初始化容器

        InitialProcess initialProcess = new InitialProcess();

        initialProcess.init();

        ServerBootstrap serverBootstrap = new ServerBootstrap();

        System.out.println("=====http server start ");

        serverBootstrap.channel(NioServerSocketChannel.class)

                .group(boss,worker)

                .childOption(ChannelOption.SO_KEEPALIVE,true)

                .option(ChannelOption.SO_BACKLOG,1024)

                .childHandler(new ChannelInitializer<SocketChannel>() {

                    protected void initChannel(SocketChannel socketChannel) throws Exception {

                        socketChannel.pipeline().addLast("http-decode",new HttpServerCodec());

                        socketChannel.pipeline().addLast(new HttpServerHandler());

                    }

                });

        ChannelFuture future = serverBootstrap.bind(port).sync();

        System.out.println("server port listen:"+port);

        future.channel().closeFuture().sync();

        shutDownGracefully();

    }

    /**

     * 关闭管道

     */

    public void shutDownGracefully(){

        this.boss.shutdownGracefully();

        this.worker.shutdownGracefully();

    }

}
这是服务器启动的核心代码,首先初始化两个Nio线程组,把它们绑定到ServerBootstrap里,并添加Handler。
import com.alibaba.fastjson.JSON;

import com.alibaba.fastjson.parser.Feature;

import com.alibaba.fastjson.serializer.SerializeConfig;

import com.alibaba.fastjson.serializer.SerializerFeature;

import controller.Properties;

import io.netty.channel.ChannelFutureListener;

import io.netty.channel.ChannelHandlerContext;

import io.netty.channel.ChannelInboundHandlerAdapter;

import io.netty.handler.codec.http.*;

import response.BaseResponse;

import java.lang.reflect.Method;

/**

 * Created by MacBook on 2019/7/14.

 */

public class HttpServerHandler extends ChannelInboundHandlerAdapter{

    @Override

    public void channelRead(ChannelHandlerContext ctx, Object msg) throws Exception {

        if(msg instanceof HttpRequest){

            HttpRequest request = (HttpRequest)msg;

//            boolean keepAlive = HttpUtil.isKeepAlive(request);

            System.out.println("http request method :"+request.method());

            System.out.println("http request uri : "+request.uri());

            Object controller = Properties.urlController.get(request.uri());

            Method m = Properties.urlMethod.get(request.uri());

            if(controller == null){

                FullHttpResponse httpResponse = new DefaultFullHttpResponse(HttpVersion.HTTP_1_1, HttpResponseStatus.NOT_FOUND);

                ctx.writeAndFlush(httpResponse).addListener(ChannelFutureListener.CLOSE);

            }else {

                FullHttpResponse httpResponse = new DefaultFullHttpResponse(HttpVersion.HTTP_1_1, HttpResponseStatus.OK);

                httpResponse.headers().set(HttpHeaderNames.CONTENT_TYPE, "application/json");

                Object result = m.invoke(controller);

                httpResponse.content().writeBytes(JSON.toJSONString(result,SerializerFeature.WriteMapNullValue).getBytes());

                ctx.writeAndFlush(httpResponse).addListener(ChannelFutureListener.CLOSE);

            }

        }

    }

}
这是处理器的代码,在经过第一个Http解码器之后,进来的对象msg已经被转化为HttpRequest了。
Netty练手项目-简单Http服务器的更多相关文章
- 微信小程序初体验,入门练手项目--通讯录,后台是阿里云服务器(一)
内容: 一.前言 二.相关概念 三.开始工作 四.启动项目起来 五.项目结构 六.设计理念 七.路由 八.部署线上后端服务 同步交流学习社区: https://www.mwcxs.top/page/4 ...
- web前端学习部落22群分享给需要前端练手项目
前端学习还是很有趣的,可以较快的上手然后自己开发一些好玩的项目来练手,网上也可以一抓一大把关于前端开发的小项目,可是还是有新手在学习的时候不知道可以做什么,以及怎么做,因此,就整理了一些前端项目教程, ...
- Python之路【第二十四篇】:Python学习路径及练手项目合集
Python学习路径及练手项目合集 Wayne Shi· 2 个月前 参照:https://zhuanlan.zhihu.com/p/23561159 更多文章欢迎关注专栏:学习编程. 本系列Py ...
- 推荐:一个适合于Python新手的入门练手项目
随着人工智能的兴起,国内掀起了一股Python学习热潮,入门级编程语言,大多选择Python,有经验的程序员,也开始学习Python,正所谓是人生苦短,我用Python 有个Python入门练手项目, ...
- 80个Python练手项目列表
80个Python练手项目列表 我若将死,给孩子留遗言,只留一句话:Repetition is the mother of all learning重复是学习之母.他们将来长大,学知识,技巧.爱情 ...
- webpack练手项目之easySlide(三):commonChunks(转)
Hello,大家好. 在之前两篇文章中: webpack练手项目之easySlide(一):初探webpack webpack练手项目之easySlide(二):代码分割 与大家分享了webpack的 ...
- webpack练手项目之easySlide(二):代码分割(转)
在上一篇 webpack练手项目之easySlide(一):初探webpack 中我们一起为大家介绍了webpack的基本用法,使用webpack对前端代码进行模块化打包. 但是乍一看webpack ...
- 练手项目:利用pygame库编写射击游戏
本项目使用pygame模块编写了射击游戏,目的在于训练自己的Python基本功.了解中小型程序框架以及学习代码重构等.游戏具有一定的可玩性,感兴趣的可以试一下. 项目说明:出自<Python编程 ...
- 适合Python的5大练手项目, 你练了么?
在练手项目的选择上,还存在疑问?不知道要从哪种项目先下手? 首先有两点建议: 最好不要写太应用的程序练手,要思考什么更像是知识,老只会写写爬虫是无用的,但是完全不写也不行. 对于练手的程序,要注意简化 ...
随机推荐
- springmvc集成swagger
1.保证项目为maven项目 2.导入jar包依赖 <dependency> <groupId>io.springfox</groupId> <artifac ...
- 基于spring reactor3构建的即时通讯api。
欢迎阅读Rmessage文档 技术栈 Rmessage是采用Reactor3,基于reactor-netty项目构建的实时消息推送api. 什么是Reactor3? Reactor 是一个用于JVM的 ...
- 安装mysql报Requires: libc.so.6(GLIBC_2.17)(64bit)
Error: Package: mysql-community-server-5.6.40-2.el7.x86_64 (mysql56-community) Requires: libc.so.6(G ...
- 视图push和presentViewController注意点
presentViewController: - (void)publishClick{ NSLog(@"发布按钮被点击"); PublishViewController *pub ...
- k8s 管理机密信息
一.启动应用安全信息的保护: Secret介绍: 应用启动过程中可能需要一些敏感信息,比如访问数据库的用户名密码或者秘钥.将这些信息直接保存在容器镜像中显然不妥,Kubernetes 提供的解决方案是 ...
- main.js中的Vue.config.productionTip = false
开发模式:npm run dev是前端自己开发用的生产模式:npm run build 打包之后给后端放在服务端上用的Vue.config.productionTip = false1上面这行代码的意 ...
- Android ConstraintLayout 说明和例子
快速说明 当我们点击一个按钮时,显示效果如下 Baseline的显示需要右键该控件,然后 约束类型 尺寸约束 实心方块,用来调整组件的大小 边界约束 空心圆圈,建立组件之间,组件和parent的约束关 ...
- python3.6下pycharm连接mysql
由于python3.x里面没有了MysqlDB,所以使用python3.6+django连接不上mysql,会报错 no modul "MysqlDB".于是就有了一个替代品,叫p ...
- Scala 内部类及外部类
转自:https://blog.csdn.net/yyywyr/article/details/50193767 Scala内部类是从属于外部类对象的. 1.代码如下 package com.yy.o ...
- BEGIN_MESSAGE_MAP和END_MESSAGE_MAP()
这两个宏表示这个类的消息映射开始和结束,中间的宏定义定义了此类的所有的消息映射.前面的afx_msg void OnPaint():只是声明OnPaint()函数的一个消息处理函数,然后是OnPain ...