win10环境安装配置Nginx
前言:
参考 https://blog.csdn.net/kisscatforever/article/details/73129270
Nginx的应用场景
1、 http服务器。Nginx是一个http服务可以独立提供http服务。可以做网页静态服务器。
2、 虚拟主机。可以实现在一台服务器虚拟出多个网站。例如个人网站使用的虚拟主机。
基于端口的,不同的端口
基于域名的,不同域名
3、 反向代理,负载均衡。当网站的访问量达到一定程度后,单台服务器不能满足用户的请求时,需要用多台服务器集群可以使用nginx做反向代理。并且多台服务器可以平均分担负载,不会因为某台服务器负载高宕机而某台服务器闲置的情况。
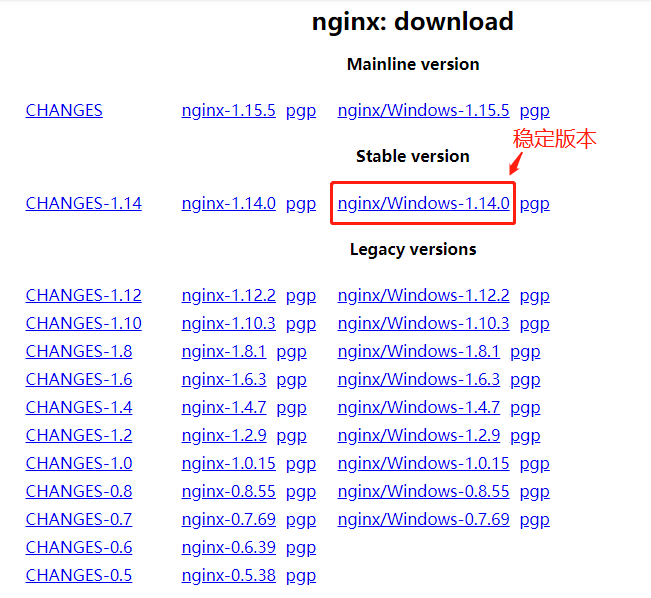
1、到官网下载nginx安装包。如下图所示(建议安装稳定版本):
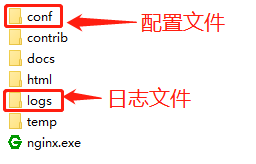
2、解压安装包,如下图所示:
3、开始安装(建议用cmd命令执行安装)
1)定位到加压文件根目录:cd C:\nginx-1.14.0
2)安装:C:\server\nginx-1.14.0>start nginx
4、其他命令
停止:C:\server\nginx-1.14.0>nginx.exe -s stop
重新载入Nginx:C:\server\nginx-1.14.0>nginx.exe -s reload
查看Nginx版本:C:\server\nginx-1.14.0>nginx -v
========================配置nginx文件(以下为本地案例)===========================
 #user  nobody;

 worker_processes  1;

 #error_log  logs/error.log;

 #error_log  logs/error.log  notice;

 #error_log  logs/error.log  info;

 #pid        logs/nginx.pid;

 events {

     worker_connections  1024;

 }

 http {

     include       mime.types;

     default_type  application/octet-stream;

     #log_format  main  '$remote_addr - $remote_user [$time_local] "$request" '

     #                  '$status $body_bytes_sent "$http_referer" '

     #                  '"$http_user_agent" "$http_x_forwarded_for"';

     #access_log  logs/access.log  main;

     sendfile        on;

     #tcp_nopush     on;

     #keepalive_timeout  0;

     keepalive_timeout  65;

     #gzip  on;

     server {

         listen       88;

         server_name 127.0.0.1;

         #charset koi8-r;

           proxy_set_header   Host    127.0.0.1:88;

           proxy_set_header X-Real-IP $remote_addr;

           proxy_set_header REMOTE-HOST $remote_addr;

           proxy_set_header X-Forwarded-For $proxy_add_x_forwarded_for;

         #access_log  logs/host.access.log  main;

         location ^~ /ProxyService/  {    proxy_set_header Host $host;  proxy_pass http://127.0.0.1:8067/;  }

         location ^~ /ph/  {    proxy_set_header Host $host;  proxy_pass http://127.0.0.1:8091/;  }

         location ^~ /report/  {    proxy_set_header Host $host;  proxy_pass http://127.0.0.1:90/;  }

        location  ^~ /admin/  { proxy_pass http://127.0.0.1:88/;         }

         #其他路径默认访问前台网站

         location / {

          proxy_redirect        off;

          proxy_pass http://WeixinRespon;

          proxy_set_header HOST $host;

          proxy_set_header X-Real-IP $remote_addr;

          proxy_set_header X-Forwarded-For $proxy_add_x_forwarded_for;

         }

         #error_page  404              /404.html;

         # redirect server error pages to the static page /50x.html

         #

         error_page   500 502 503 504  /50x.html;

         location = /50x.html {

             root   html;

         }

         # proxy the PHP scripts to Apache listening on 127.0.0.1:80

         #

         #location ~ \.php$ {

         #    proxy_pass   http://127.0.0.1;

         #}

         # pass the PHP scripts to FastCGI server listening on 127.0.0.1:9000

         #

         #location ~ \.php$ {

         #    root           html;

         #    fastcgi_pass   127.0.0.1:9000;

         #    fastcgi_index  index.php;

         #    fastcgi_param  SCRIPT_FILENAME  /scripts$fastcgi_script_name;

         #    include        fastcgi_params;

         #}

         # deny access to .htaccess files, if Apache's document root

         # concurs with nginx's one

         #

         #location ~ /\.ht {

         #    deny  all;

         #}

     }

 upstream WeixinRespon {

     server 127.0.0.1:8080;

 }

     # HTTPS server

     #

     #server {

     #    listen       443 ssl;

     #    server_name  localhost;

     #    ssl_certificate      cert.pem;

     #    ssl_certificate_key  cert.key;

     #    ssl_session_cache    shared:SSL:1m;

     #    ssl_session_timeout  5m;

     #    ssl_ciphers  HIGH:!aNULL:!MD5;

     #    ssl_prefer_server_ciphers  on;

     #    location / {

     #        root   html;

     #        index  index.html index.htm;

     #    }

     #}

 }
win10环境安装配置Nginx的更多相关文章
- linux环境安装配置nginx
安装依赖 yum install gcc yum install pcre-devel yum install zlib zlib-devel yum install openssl openssl- ...
- LNMP1.3一键安装Linux环境,配置Nginx运行ThinkPHP3.2
LNMP1.3一键安装Linux环境,配置Nginx运行ThinkPHP3.2 你是否遇见过:安装LNMP1.3环境后,运行ThinkPHP 3.2,只能打开首页,不能访问控制器,报404错误. 按照 ...
- Linux下安装php环境并且配置Nginx支持php-fpm模块[www]
Linux下安装php环境并且配置Nginx支持php-fpm模块 http://www.cnblogs.com/freeweb/p/5425554.html 5分钟搭建 nginx +php --- ...
- ELK 6安装配置 nginx日志收集 kabana汉化
#ELK 6安装配置 nginx日志收集 kabana汉化 #环境 centos 7.4 ,ELK 6 ,单节点 #服务端 Logstash 收集,过滤 Elasticsearch 存储,索引日志 K ...
- (转)windows 下安装配置 Nginx 详解
windows 下安装配置 Nginx 详解 本文转自https://blog.csdn.net/kingscoming/article/details/79042874 nginx功能之一可以启动一 ...
- Linux下xampp集成环境安装配置方法 、部署bugfree及部署禅道
XAMPP(Apache+MySQL+PHP+PERL)是一个功能强大的建站集成软件包.XAMPP 是一个易于安装且包含 MySQL.PHP 和 Perl 的 Apache 发行版.XAMPP 的确非 ...
- Sencha Toucha 2 —1.环境安装配置、在线打包、离线打包
环境安装配置 1. 下载 1.1 Sencha Touch 下载 http://cdn.sencha.com/touch/sencha-touch-2.2.1-gpl.zip 1 ...
- [转载]SharePoint 2013测试环境安装配置指南
软件版本 Windows Server 2012 标准版 SQL Server 2012 标准版 SharePoint Server 2013 企业版 Office Web Apps 2013 备注: ...
- Windows7 x64 跨平台开发环境安装配置
======================================================================= Windows7 x64 跨平台开发环境安装配置 201 ...
随机推荐
- js for (i=0;i<a.length;a[i++]=0) 中等于0怎么理解?
js的问题for (i=0;i<a.length;a[i++]=0) 中等于0怎么理解? 很奇怪的一个for循环 竟然是将原来数组的数据全改为0
- Android中利用jsoup解析html页面
学习jsoup :jsoup学习网站 Android 中使用: 添加依赖 implementation 'org.jsoup:jsoup:1.10.1' 直接上代码: package com.load ...
- kotlin之null值安全性
var a: String =null // 编译错误 var a: String? =null // 编译通过 要允许null值, 需要将变量声明为可为null的字符串类型:String? fun ...
- 阶段5 3.微服务项目【学成在线】_day04 页面静态化_08-freemarker基础-空值处理
把stus注释掉 正常访问就会报错 第20行 这里的stus为空,所以造成了这个错误. 非空判断 不为空用双问号来判断 <#if stus??><#list stus as stu& ...
- 一百三十一:CMS系统之轮播图上传图片功能
将七牛js放到common下 把获取uptoken的接口放到common视图中 把初始化七牛放到banners.js中 //初始化七牛$(function () { qiniujs.setUp({ ' ...
- Java NIO学习笔记八 Pipe
Java NIO Pipe Java NIO管道是两个线程之间的单向数据连接.Pipe 具有源信道和接受通道.您将数据写入sink通道.然后可以从源通道读取该数据. 这是一个原理的Pipe流程图: J ...
- Spring Boot自定义Mapper的SQL语句
代码如下: 先创建一个Provider类: public class RptEbankFsymtTranflowingProvider { public String select(String or ...
- 配置zabbix监控windows,cmd运行报错cannot connect to Service Manager: [0x00000005]
错误原因: cmd运行没有管理员权限 解决: 找到cmd.exe的位置C:\Windows\System32,选中--右键--使用管理员身份运行 再通过cmd进入到zabbix_agentd文件夹进行 ...
- ES 数据类型
官网数据类型网址 有价值的参考博客 本文 Elasticsearch 版本为 7.2 1. 核心数据类型 (1)字符串类型: text, keyword (2)数字类型:long, integer, ...
- 【log4j】的学习和理解 + 打印所有 SQL
log4j 1.2 学习和理解 + 打印所有 SQL 一.基本资料 官方文档:http://logging.apache.org/log4j/1.2/manual.html(理解基本概念和其他) lo ...