树莓派与Arduino Leonardo使用NRF24L01无线模块通信之基于RF24库 (四) 树莓派单子节点查询
考虑到项目的实际需要,树莓派作为主机,应该只在需要的时候查询特定节点发送的数据,因此接收到数据后需要根据头部判断是否是自己需要的数据,如果不是继续接收数据,超过一定时间未查询到特定节点的数据,则退出程序,避免无限等待。
本项目中各个节点和树莓派的通信不区分信道,因此如果由树莓派发送给特定节点的数据会被所有节点接收到,因此子节点可以判别该数据是否发给自己的,需要在数据的第二个字节中加入目标节点的编号(第一个字节为源节点的编号)。
树莓派代码
如下:
#include <cstdlib>

#include <iostream>

#include <sstream>

#include <string>

#include <unistd.h>

#include <RF24/RF24.h>

using namespace std;

RF24 radio(,,BCM2835_SPI_SPEED_8MHZ);

/********** User Config *********/

// Assign a unique identifier for this node, 0 or 1

bool radioNumber = ;

bool role = ;//receive mode

unsigned long  start_time=millis();

unsigned long count=;

/********************************/

// Radio pipe addresses for the 2 nodes to communicate.

const uint64_t pipes = 0xE8E8F0F0E1LL;

unsigned long  receData;

unsigned long  respData=0x01;

unsigned long  srchead=0x00000000;

int main(int argc, char** argv){

  cout << "RF24/examples/GettingStarted/\n";

  // Setup and configure rf radio

  radio.begin();

  // optionally, increase the delay between retries & # of retries

  radio.setRetries(,);

  // Dump the configuration of the rf unit for debugging

  radio.printDetails();

  radio.openReadingPipe(,pipes);

/***********************************/

  // This simple sketch opens two pipes for these two nodes to communicate

  // back and forth.

  radio.startListening();

  cout << "Listening .... \n";

  int node = atoi(argv[]);

  cout << "Listening Node is : " <<node<<" \n";

  while(){

    unsigned long end_time = millis();

      if(radio.available()){

        radio.read(&receData,sizeof(unsigned long));

        //cout<<"receData is: "<<receData<<"\n";

        unsigned int check = (unsigned int) receData>>;

        unsigned long data = receData & 0x0000ffff;

        //cout<<"check is "<<check<<"\n";

        if(check==node && (receData & 0x00ff0000)==srchead){

            cout<<"Get Node Data: "<<data<<",Time consume "<<(end_time-start_time)<<"ms \n";

            break;

        }

    }

    cout<<"time out is "<<(end_time-start_time)<<"\n";

    if((end_time-start_time)>=){

        cout<<"Wait Data from Node "<<node<<" time out \n";

        break;

    }

  }

  return ;

}
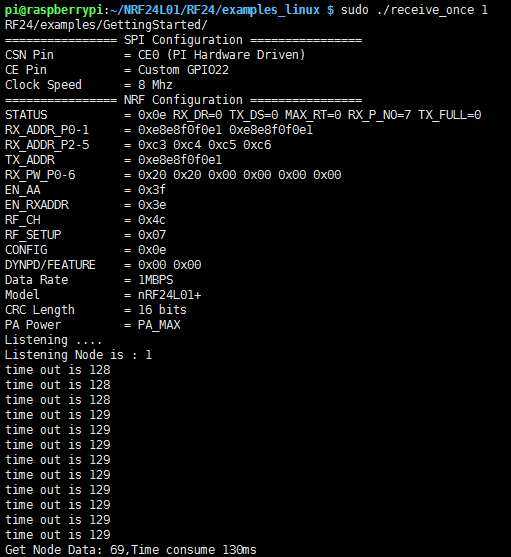
输入指令:sudo ./receive_once 1,参数1表示要查询的节点节点。得到以下结果:
Arduino Leonardo代码
Arduino Leonardo作为子节点,代码与前一节一样,不停发送和接收相互切换。如下:
#include <SPI.h>

#include "RF24.h"

#include <SPI.h>

#include "RF24.h"

#include <printf.h>

/****************** User Config ***************************/

/***      Set this radio as radio number 0 or 1         ***/

bool radioNumber = ;

/* Hardware configuration: Set up nRF24L01 radio on SPI bus plus pins 7 & 8 */

RF24 radio(,);

/**********************************************************/

byte addresses[][] = {"1Node","2Node"};

// Used to control whether this node is sending or receiving

bool role = ;//1表示发送模式,0表示接收模式

unsigned long start_time = millis();

//这个是我们即将建立的传输渠道编码

//!!要和另一个模块的一致

const uint64_t pipes = 0xE8E8F0F0E1LL;

//这个变量会保持我们接受到的信息

//变量类型一定要和传过来的一样

//要传输的数据

unsigned long sendData = ;

unsigned long srchead = 0x01000000;//高16位为头标志,前8位为源节点,后8位为目的节点。根据标志不同区分不同发送源,00为中心主节点

unsigned long deshead = 0x00000000;//高16位为头标志,前8位为源节点,后8位为目的节点。根据标志不同区分不同发送源,00为中心主节点

unsigned long receData;

void setup() {

  pinMode(,OUTPUT);//指示灯

  Serial.begin();

  printf_begin();

  Serial.println(F("RF24/examples/GettingStarted"));

  radio.begin();

  radio.setPALevel(RF24_PA_MAX);

  radio.openWritingPipe(pipes);

}

void loop() {

   Serial.print("role:");

   Serial.println(role);

  if(role){

     unsigned long data = sendData+srchead+deshead;

     Serial.print("Sending:");

     Serial.println(data);

     digitalWrite(,HIGH);

     bool ok = radio.write(&data,sizeof(unsigned long));

       role = ;

       radio.startListening();
       radio.openReadingPipe(1,pipes);

       start_time = millis();

  }

  if(!role){

     digitalWrite(,LOW);

     if(radio.available()){

         radio.read(&receData,sizeof(unsigned long));

         //根据目标节点,判断是否是发给自己的,如果是,执行相关操作

         unsigned long check = receData & 0x00ff0000;

         if(check == srchead){

            //接收到来自主机的数据,执行相关操作

             Serial.print("Response:");

             Serial.println(receData);

         }

         role = ;

         radio.stopListening();
         radio.openWritingPipe(pipes);

     }else{

        unsigned long end_time = millis();

        if((end_time-start_time)>=){

          role = ;

          radio.stopListening();
          radio.openWritingPipe(pipes);

        }

     }

  }

} // Loop
树莓派与Arduino Leonardo使用NRF24L01无线模块通信之基于RF24库 (四) 树莓派单子节点查询的更多相关文章
- 树莓派与Arduino Leonardo使用NRF24L01无线模块通信之基于RF24库 (六) 树莓派查询子节点温湿度数据
nrl24l01每次只能发送4个字节,前面说到,第一个字节用于源节点,第二个字节用于目的节点.因此只剩下两个字节用于温度和湿度,一个字节只有八位,需要表示温湿度的正负数,因此每个字节的第一位表示正负符 ...
- 树莓派与Arduino Leonardo使用NRF24L01无线模块通信之基于RF24库 (五) 树莓派单子节点发送数据
本项目中各个节点和树莓派的通信不区分信道,因此如果由树莓派发送给特定节点的数据会被所有节点接收到,因此子节点可以判别该数据是否发给自己的,需要在数据的第二个字节中加入目标节点的编号(第一个字节为源节点 ...
- 树莓派与Arduino Leonardo使用NRF24L01无线模块通信之基于RF24库 (三) 全双工通信
设计思路 Arduino Leonardo初始化为发送模式,发送完成后,立即切换为接收模式,不停的监听,收到数据后立即切换为发送模式,若超过一定时间还为接收到数据,则切换为发送模式. 树莓派初始化为接 ...
- 树莓派与Arduino Leonardo使用NRF24L01无线模块通信之基于RF24库 (二) 发送自定义数据
在我的项目里,树莓派主要作为中心节点,用于接收数据,Arduino作为子节点,用于发送数据,考虑到以后会有很多子节点,但又不至于使得代码过于繁琐,因此所有的传输数据添加一个头部编号用于区分不同节点. ...
- 树莓派与Arduino Leonardo使用NRF24L01无线模块通信之基于RF24库 (一) 配置与测试
引脚连接说明 与树莓派的连线 NRF24L01 => 树莓派 GND => GND VCC => 3.3V CE = ...
- STC8H开发(五): SPI驱动nRF24L01无线模块
目录 STC8H开发(一): 在Keil5中配置和使用FwLib_STC8封装库(图文详解) STC8H开发(二): 在Linux VSCode中配置和使用FwLib_STC8封装库(图文详解) ST ...
- nRF2401A/nRF24L01/nRF24L01+无线模块最常见问题汇集(转)
俗话说:每个人一生下来什么都会的,都是通过自己努力和探索出来的,NRF系列芯片,刚开始都好奇心加兴趣才来捣鼓它的,刚开始做硬件和软件,没有收发数据弄得整个人头都快炸开了,所以在此和大家分享一下前辈的经 ...
- nRF24L01无线模块笔记
nRF24L01模块 官网链接: https://www.nordicsemi.com/Products/nRF24-series 常见的无线收发模块, 工作在2.4GHz频段, 适合近距离遥控和数据 ...
- [51单片机] nRF24L01 无线模块 测试 按键-灯-远程控制
哈哈,穷吊死一个,自己做的一个超简单的板还没有电源提供,只得借助我的大开发板啦.其实这2个模块是完全可以分开的,无线嘛,你懂得!进入正题,这个实验的功能就是一个发送模块(大的那个板)连接4个按键,通过 ...
随机推荐
- 2017-2018-1 20155216 《信息安全系统设计基础》 实现mypwd
2017-2018-1 20155216 <信息安全系统设计基础> 实现mypwd 作业要求: 1.学习pwd命令 2.研究pwd实现需要的系统调用(man -k; grep),写出伪代码 ...
- JavaWeb总结(十)
Filter配置详解 web项目目录示意图 <!-- Filter配置 --> <filter> <display-name>Filter_one</disp ...
- 人脸检测——MTCNN
人脸检测——MTCNN .
- 5 功能4:个人站点页面设计(ORM跨表与分组查询)
1.个人站点页面文章的查询 # 个人站点 http://www.cnblogs.com/wh1520577322/ http://www.cnblogs.com/liucong12345/ http: ...
- 3 CRM 销售与客户 我的客户,公共客户池
1.销售与客户的表结构 1.公共客户与我的客户 ---公共客户(公共资源) 1.没有报名 2.3天没有跟进 3.15天没有成单 客户分布表 龙泰 男 yuan 2018-5-1 3天未跟进 龙泰 男 ...
- taglib报错The content of element type "taglib" must match "(tlib-version,...)
<?xml version="1.0" encoding="UTF-8"?><!DOCTYPE taglib PUBLIC "-// ...
- springmvc pager-taglib 分页,bootstrap样式
注意: 嵌入到项目中时必须以带参形式访问: http://localhost:8081/DETECT-X/showConnLogsByPager.action?pageSize=5&pager ...
- chrome JS关闭当前页无效问题
如果没有父窗口,JS中 window.opener = null; window.open("", "_self"); window.close(); 对chr ...
- js.ajax优缺点,工作流程
1.ajax的优点 Ajax的给我们带来的好处大家基本上都深有体会,在这里我只简单的讲几点: 1.最大的一点是页面无刷新,在页面内与服务器通信,给用户的体验非常好. 2.使用异步方式与服务器通信,不 ...
- 简单的redis工具类
import java.util.Arrays; import java.util.List;import java.util.Set; import org.apache.commons.lang. ...