python操作RabbiMQ
RabbitMQ是一个在AMQP基础上完整的,可复用的企业消息系统。他遵循Mozilla Public License开源协议。
MQ全称为Message Queue, 消息队列(MQ)是一种应用程序对应用程序的通信方法。应用程序通过读写出入队列的消息(针对应用程序的数据)来通信,而无需专用连接来链接它们。消 息传递指的是程序之间通过在消息中发送数据进行通信,而不是通过直接调用彼此来通信,直接调用通常是用于诸如远程过程调用的技术。排队指的是应用程序通过 队列来通信。队列的使用除去了接收和发送应用程序同时执行的要求。
 #!/usr/bin/env python

 # _*_coding:utf-8 _*_

 import  Queue

 import  threading

 message = Queue.Queue(10)

 def producter(i):

     while True:

         message.put(i)

 def consumer(i):

     while True:

         message.get()

 for i in range(5):

     w = threading.Thread(target=producter,args=(i,))

     w.start()

 for i in range(2):

     w = threading.Thread(target=consumer,args=(i,))

     w.start()
生产者消费者模型
对于RabbitMQ来说,生产和消费不再针对内存里的一个Queue对象,而是某台服务器上的RabbitMQ Server实现的消息队列。
 #!/usr/bin/env python

 # _*_coding:utf-8 _*_

 import  pika

 connection = pika.BlockingConnection(pika.ConnectionParameters(host='192.168.1.108')) #连接一台rabbitMQ

 channel = connection.channel()  #创建一个频道

 channel.queue_declare("chenchao")  #声明一个消息队列

 channel.basic_publish(exchange='',routing_key="chenchao",body="Fucking!")   #发送消息

 print "sent Fucking world!!!!"

 connection.close()  #关闭连接
生产者
 #!/usr/bin/env python

 # _*_coding:utf-8 _*_

 # #############################消费者########################

 import  pika

 connection = pika.BlockingConnection(pika.ConnectionParameters(host='192.168.1.108'))

 channel = connection.channel()

 channel.queue_declare("chenchao")

 def callback(ch, method, properties, body):  #固定格式 必须有4个参数

     print body

 channel.basic_consume(callback,queue="chenchao",no_ack=True)  #将从队列里取出的数据回调给callback方法

 channel.start_consuming()   #开始取值
消费者
1、acknowledgment 消息不丢失
no-ack = False,如果在传递消息的过程中消费者遇到情况(its channel is closed, connection is closed, or TCP connection is lost)挂掉了,那么,RabbitMQ会重新将该任务消息添加到队列中。
 #!/usr/bin/env python

 # _*_coding:utf-8 _*_

 # #############################消费者########################

 import  pika

 connection = pika.BlockingConnection(pika.ConnectionParameters(host='192.168.1.108'))

 channel = connection.channel()

 channel.queue_declare("chenchao")

 def callback(ch, method, properties, body):  #固定格式 必须有4个参数

     print body

     import time

     time.sleep(8)

     print "sleep over"

     ch.basic_ack(delivery_tag = method.delivery_tag )   #向生产者发送应答

 channel.basic_consume(callback,queue="chenchao",no_ack=False)  #将从队列里取出的数据回调给callback方法

 channel.start_consuming()   #开始取值
消费者
ch.basic_ack(delivery_tag = method.delivery_tag ) #向生产者发送应答,表示已经接收到了数据
no_ack=False
2、durable 消息不丢失
如果之前的队列为非持久化的,那么之后就不能将其修改为持久化的,必须重新创建一个新的队列,并声明为持久化的队列,并且在发送消息时也要注明是持久化消息才行。
 #!/usr/bin/env python

 # _*_coding:utf-8 _*_

 # #######################生产者######################

 import  pika

 connection = pika.BlockingConnection(pika.ConnectionParameters(host='192.168.1.108')) #连接一台rabbitMQ

 channel = connection.channel()  #创建一个频道

 channel.queue_declare("chenchao2",durable=True)  #声明一个消息队列为持久化的队列

 channel.basic_publish(exchange='',

                       routing_key="chenchao2",

                       body="Message NO.1",

                       properties=pika.BasicProperties(delivery_mode=2,))  #发送消息为持久化的数据

 print "sent Message OK!"

 connection.close()  #关闭连接
生产者
durable=True
properties=pika.BasicProperties(delivery_mode=2,)
 #!/usr/bin/env python

 # _*_coding:utf-8 _*_

 # #############################消费者########################

 import  pika

 connection = pika.BlockingConnection(pika.ConnectionParameters(host='192.168.1.108'))

 channel = connection.channel()

 channel.queue_declare("chenchao2",durable=True)  #生命一个可持续化的队列(如果队列已经存在,这句可有可无)

 def callback(ch, method, properties, body):  #固定格式 必须有4个参数

     print body

     import time

     time.sleep(8)

     print "sleep over"

     ch.basic_ack(delivery_tag = method.delivery_tag )   #向生产者发送应答

 channel.basic_consume(callback,queue="chenchao2",no_ack=False)  #将从队列里取出的数据回调给callback方法

 channel.start_consuming()   #开始取值
消费者
3、消息获取顺序
默认消息队列里的数据是按照顺序被消费者拿走,例如:消费者1 去队列中获取 奇数 序列的任务,消费者1去队列中获取 偶数 序列的任务。
channel.basic_qos(prefetch_count=1) 表示谁来谁取,不再按照奇偶数排列
 #!/usr/bin/env python

 # _*_coding:utf-8 _*_

 # #############################消费者########################

 import  pika

 connection = pika.BlockingConnection(pika.ConnectionParameters(host='192.168.1.108'))

 channel = connection.channel()

 channel.queue_declare("chenchao2",durable=True)  #生命一个可持续化的队列(如果队列已经存在,这句可有可无)

 def callback(ch, method, properties, body):  #固定格式 必须有4个参数

     print body

     import time

     time.sleep(8)

     print "sleep over"

     ch.basic_ack(delivery_tag = method.delivery_tag )   #向生产者发送应答

 channel.basic_qos(prefetch_count=1)   #获取消息不在按奇偶规则获取

 channel.basic_consume(callback,queue="chenchao2",no_ack=False)  #将从队列里取出的数据回调给callback方法

 channel.start_consuming()   #开始取值
消费者
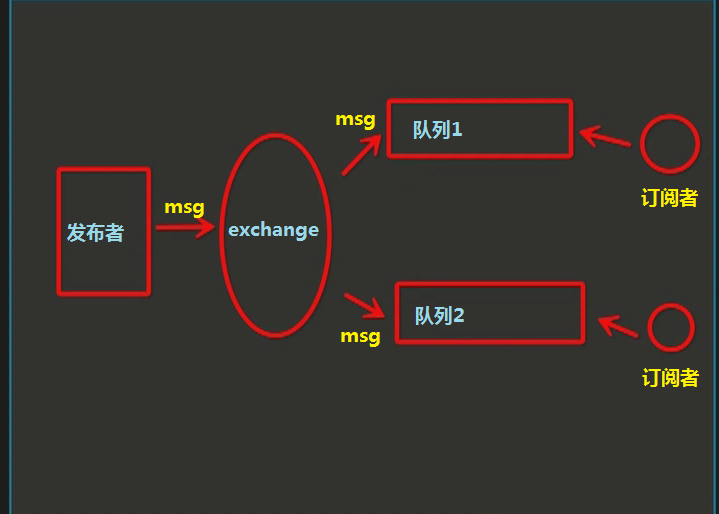
4、发布订阅
发布订阅和简单的消息队列区别在于,发布订阅会将消息发送给所有的订阅者,而消息队列中的数据被消费一次便消失。所以,RabbitMQ实现发布和订阅时,会为每一个订阅者创建一个队列,而发布者发布消息时,会将消息放置在所有相关队列中。
 #!/usr/bin/env python

 # _*_coding:utf-8 _*_

 import pika

 import sys

 connection = pika.BlockingConnection(pika.ConnectionParameters(

         host='192.168.1.108'))

 channel = connection.channel()

 channel.exchange_declare(exchange='chenchao',

                          type='fanout')     #声明一个名称为chenchao的exchange  类型为fanout

 message = ' '.join(sys.argv[1:]) or "info: Hello every consumer2"

 channel.basic_publish(exchange='chenchao',

                       routing_key='',

                       body=message)      #将消息发送到exchange里,通过exchange发送到所有队列

 print(" [x] Sent %r" % message)

 connection.close()
发布者
channel.exchange_declare(exchange='chenchao',
                         type='fanout')     #声明一个名称为chenchao的exchange  类型为fanout
 #!/usr/bin/env python

 # _*_coding:utf-8 _*_

 import pika

 connection = pika.BlockingConnection(pika.ConnectionParameters(

         host='192.168.1.108'))

 channel = connection.channel()

 channel.exchange_declare(exchange='chenchao',

                          type='fanout')       #声明类型为fanou名称为chenchao的exchange

 result = channel.queue_declare(exclusive=True)

 queue_name = result.method.queue     #生成一个随机名的队列

 channel.queue_bind(exchange='chenchao',

                    queue=queue_name)    #将队列与exchange绑定

 print(' [*] Waiting for logs. To exit press CTRL+C')

 def callback(ch, method, properties, body):

     print(" [x] %r" % body)

 channel.basic_consume(callback,

                       queue=queue_name,

                       no_ack=True)

 channel.start_consuming()
订阅者
channel.queue_bind(exchange='chenchao',
                   queue=queue_name)    #将队列与exchange绑定
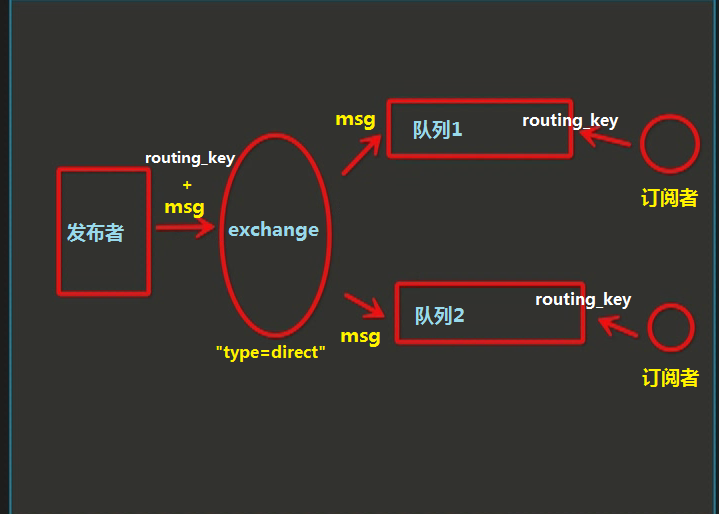
5、关键字发送
exchange type = direct
之前事例,发送消息时明确指定某个队列并向其中发送消息,RabbitMQ还支持根据关键字发送,即:队列绑定关键字,发送者将数据根据关键字发送到消息exchange,exchange根据 关键字 判定应该将数据发送至指定队列。
 #!/usr/bin/env python

 # _*_coding:utf-8 _*_

 import pika

 import sys

 connection = pika.BlockingConnection(pika.ConnectionParameters(

         host='192.168.1.108'))

 channel = connection.channel()

 channel.exchange_declare(exchange='import',

                          type='direct')     #声明一个名称为import的exchange  类型为direct

 message = ' '.join(sys.argv[1:]) or "info: Hello are you Q1???"

 channel.basic_publish(exchange='import',

                       routing_key='Nice',

                       body=message)      #将消息与关键字发送到exchange里,通过关键字发送到绑定的队列

 print(" [x] Sent %r" % message)

 connection.close()
生产者
type='direct'
routing_key='Nice'
 #!/usr/bin/env python

 # _*_coding:utf-8 _*_

 import pika

 connection = pika.BlockingConnection(pika.ConnectionParameters(

         host='192.168.1.108'))

 channel = connection.channel()

 channel.exchange_declare(exchange='import',

                          type='direct')       #声明类型为direct名称为import的exchange

 result = channel.queue_declare(exclusive=True)

 queue_name = result.method.queue     #生成一个随机名的队列

 channel.queue_bind(exchange='import',

                    queue=queue_name,

                    routing_key="Queue1")    #将队列与exchange绑定,并声明关键字

 channel.queue_bind(exchange='import',

                    queue=queue_name,

                    routing_key="Nice")    #将队列与exchange绑定,并声明关键字

 print(' [*] Waiting for logs. To exit press CTRL+C')

 def callback(ch, method, properties, body):

     print(" [x] %r:%r" % (method.routing_key, body))

 channel.basic_consume(callback,

                       queue=queue_name,

                       no_ack=True)

 channel.start_consuming()
订阅者
 #!/usr/bin/env python

 # _*_coding:utf-8 _*_

 import pika

 connection = pika.BlockingConnection(pika.ConnectionParameters(

         host='192.168.1.108'))

 channel = connection.channel()

 channel.exchange_declare(exchange='import',

                          type='direct')       #声明类型为direct名称为import的exchange

 result = channel.queue_declare(exclusive=True)

 queue_name = result.method.queue     #生成一个随机名的队列

 channel.queue_bind(exchange='import',

                    queue=queue_name,

                    routing_key="Queue2")    #将队列与exchange绑定,并声明关键字

 channel.queue_bind(exchange='import',

                    queue=queue_name,

                    routing_key="Nice")    #将队列与exchange绑定,并声明关键字

 print(' [*] Waiting for logs. To exit press CTRL+C')

 def callback(ch, method, properties, body):

     print(" [x] %r:%r" % (method.routing_key, body))

 channel.basic_consume(callback,

                       queue=queue_name,

                       no_ack=True)

 channel.start_consuming()
订阅者2
type='direct'
routing_key="Nice"
6、模糊匹配
exchange type = topic
在topic类型下,可以让队列绑定几个模糊的关键字,之后发送者将数据发送到exchange,exchange将传入”路由值“和 ”关键字“进行匹配,匹配成功,则将数据发送到指定队列。
- # 表示可以匹配 0 个 或 多个 单词
- * 表示只能匹配 一个 单词
routing_key="Nice.*"
routing_key="Nice.#"

发送者路由值              队列中
old.boy.python old.* -- 不匹配old.boy.python old.# -- 匹配#!/usr/bin/env python
# _*_coding:utf-8 _*_ import pika
import sys connection = pika.BlockingConnection(pika.ConnectionParameters(
host='192.168.1.108'))
channel = connection.channel() channel.exchange_declare(exchange='topic_logs',
type='topic') #声明一个名称为import的exchange 类型为direct message = ' '.join(sys.argv[1:]) or "info: Are you choosed?"
channel.basic_publish(exchange='topic_logs',
routing_key='Nice',
body=message) #将消息与关键字发送到exchange里,通过关键字发送到绑定的队列
print(" [x] Sent %r" % message)
connection.close()
发布者
type='topic'
 #!/usr/bin/env python

 # _*_coding:utf-8 _*_

 import pika

 connection = pika.BlockingConnection(pika.ConnectionParameters(

         host='192.168.1.108'))

 channel = connection.channel()

 channel.exchange_declare(exchange='topic_logs',

                          type='topic')       #声明类型为topic的exchange

 result = channel.queue_declare(exclusive=True)

 queue_name = result.method.queue     #生成一个随机名的队列

 channel.queue_bind(exchange='topic_logs',

                    queue=queue_name,

                    routing_key="Nice.*")    #将队列与exchange绑定,并声明关键字 *代表只能匹配一个

 print(' [*] Waiting for logs. To exit press CTRL+C')

 def callback(ch, method, properties, body):

     print(" [x] %r:%r" % (method.routing_key, body))

 channel.basic_consume(callback,

                       queue=queue_name,

                       no_ack=True)

 channel.start_consuming()
订阅者1
type='topic'
routing_key="Nice.*"
 #!/usr/bin/env python

 # _*_coding:utf-8 _*_

 import pika

 connection = pika.BlockingConnection(pika.ConnectionParameters(

         host='192.168.1.108'))

 channel = connection.channel()

 channel.exchange_declare(exchange='topic_logs',

                          type='topic')       #声明类型为direct名称为import的exchange

 result = channel.queue_declare(exclusive=True)

 queue_name = result.method.queue     #生成一个随机名的队列

 channel.queue_bind(exchange='topic_logs',

                    queue=queue_name,

                    routing_key="Nice.#")    #将队列与exchange绑定,并声明关键字 #代表只能匹配0个或者多个

 print(' [*] Waiting for logs. To exit press CTRL+C')

 def callback(ch, method, properties, body):

     print(" [x] %r:%r" % (method.routing_key, body))

 channel.basic_consume(callback,

                       queue=queue_name,

                       no_ack=True)

 channel.start_consuming()
订阅者2
routing_key="Nice.#"
python操作RabbiMQ的更多相关文章
- Python之路:Python操作 RabbitMQ、Redis、Memcache、SQLAlchemy
Memcached Memcached 是一个高性能的分布式内存对象缓存系统,用于动态Web应用以减轻数据库负载.它通过在内存中缓存数据和对象来减少读取数据库的次数,从而提高动态.数据库驱动网站的速度 ...
- 【转】Python操作 RabbitMQ、Redis、Memcache、SQLAlchemy
Memcached Memcached 是一个高性能的分布式内存对象缓存系统,用于动态Web应用以减轻数据库负载.它通过在内存中缓存数据和对象来减少读取数据库的次数,从而提高动态.数据库驱动网站的速度 ...
- python操作RabbitMQ、Redis、Memcache、SQLAlchemy
Memcached Memcached 是一个高性能的分布式内存对象缓存系统,用于动态Web应用以减轻数据库负载.它通过在内存中缓存数据和对象来减少读取数据库的次数,从而提高动态.数据库驱动网站的速度 ...
- Python菜鸟之路:Python基础-Python操作RabbitMQ
RabbitMQ简介 rabbitmq中文翻译的话,主要还是mq字母上:Message Queue,即消息队列的意思.rabbitmq服务类似于mysql.apache服务,只是提供的功能不一样.ra ...
- Python操作 RabbitMQ、Redis、Memcache
Python操作 RabbitMQ.Redis.Memcache Memcached Memcached 是一个高性能的分布式内存对象缓存系统,用于动态Web应用以减轻数据库负载.它通过在内存中缓存数 ...
- Python(九) Python 操作 MySQL 之 pysql 与 SQLAchemy
本文针对 Python 操作 MySQL 主要使用的两种方式讲解: 原生模块 pymsql ORM框架 SQLAchemy 本章内容: pymsql 执行 sql 增\删\改\查 语句 pymsql ...
- Python 【第六章】:Python操作 RabbitMQ、Redis、Memcache、SQLAlchemy
Memcached Memcached 是一个高性能的分布式内存对象缓存系统,用于动态Web应用以减轻数据库负载.它通过在内存中缓存数据和对象来减少读取数据库的次数,从而提高动态.数据库驱动网站的速度 ...
- 练习:python 操作Mysql 实现登录验证 用户权限管理
python 操作Mysql 实现登录验证 用户权限管理
- Python操作MySQL
本篇对于Python操作MySQL主要使用两种方式: 原生模块 pymsql ORM框架 SQLAchemy pymsql pymsql是Python中操作MySQL的模块,其使用方法和MySQLdb ...
随机推荐
- innerHTML/outerHTML; innerText/outerText; textContent
innerHTML v.s. outerHTML Element.innerHTML Reference: https://developer.mozilla.org/en-US/docs/Web/A ...
- 判断奇数,java陷阱
/** 判断是否为奇数 @author husky / public class IsOdd { public static void main(String[] args) { int demo1 ...
- ccf集合竞价
我不懂为什么是错误.然后零分.贴出测试. 然后即使注释掉while循环中的break部分,也是如此. #include<iostream> #include<iomanip> ...
- 【BZOJ2120】【块状链表】数颜色
Description 墨墨购买了一套N支彩色画笔(其中有些颜色可能相同),摆成一排,你需要回答墨墨的提问.墨墨会像你发布如下指令: 1. Q L R代表询问你从第L支画笔到第R支画笔中共有几种不同颜 ...
- ie11下,插入框架Html
if(navigator.userAgent.indexOf("MSIE")>0 || (navigator.userAgent.indexOf("Trident& ...
- yum安装ftp服务器
1.安装vsftp,本文采用yum安装: #yum install vsftpd 2.安装后运行: # service vsftpd restart Shutting downvsftpd: ...
- MVC Unit Testing学习笔记
MVC Unit Testing 参考文档: 1.http://www.asp.net/mvc/overview/testing 2.http://www.asp.net/mvc/tutorials/ ...
- python模块之hashlib加密
40.加密模块:hashlib 1. >>> import hashlib >>> ret1 = hashlib.md5() ...
- Josephus
利用循环链表模拟约瑟夫问题,把自杀的人的顺序排列出来 代码如下: #include<stdio.h> #include<stdlib.h> typedef int status ...
- java单点登录系统CAS的简单使用
转:http://blog.csdn.net/yunye114105/article/details/7997041 背景 有几个相对独立的java的web应用系统, 各自有自己的登陆验证功能,用户在 ...