CSS(八):定位属性
一、position属性
1、relative(相对定位)
- 相对它原来的位置,通过指定偏移,到达新的位置。
- 扔在标准流中,它对父级盒子和相邻的盒子都没有任何影响。
看下面的例子:
<!DOCTYPE html>

<html lang="en">

<head>

    <meta charset="UTF-8">

    <meta name="viewport" content="width=device-width, initial-scale=1.0">

    <meta http-equiv="X-UA-Compatible" content="ie=edge">

    <title>相对定位</title>

    <style type="text/css">

      .box1,.box2,.box3{

         width: 100px;

         height: 100px;

      }

      .box1{

        background-color: red;

      }

      .box2{

        background-color:blue;

      }

      .box3{

        background-color: yellow;

      }

    </style>

</head>

<body>

    <div class="box"></div>

    <div class="box1"></div>

    <div class="box2"></div>

    <div class="box3"></div>

</body>

</html>
效果:

然后分别给第一个和第二个盒子添加定位:
<!DOCTYPE html>

<html lang="en">

<head>

    <meta charset="UTF-8">

    <meta name="viewport" content="width=device-width, initial-scale=1.0">

    <meta http-equiv="X-UA-Compatible" content="ie=edge">

    <title>相对定位</title>

    <style type="text/css">

      .box1,.box2,.box3{

         width: 100px;

         height: 100px;

      }

      .box1{

        background-color: red;

        position: relative;

        left: 100px;

      }

      .box2{

        background-color:blue;

        position: relative;

        left: 100px;

        top: 50px;

      }

      .box3{

        background-color: yellow;

      }

    </style>

</head>

<body>

    <div class="box"></div>

    <div class="box1"></div>

    <div class="box2"></div>

    <div class="box3"></div>

</body>

</html>
效果:
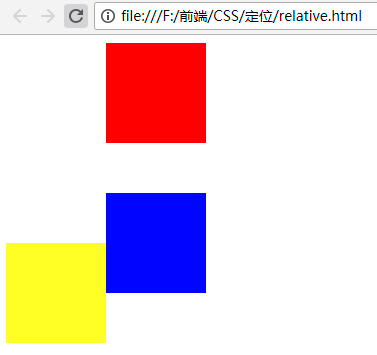
观察上面的截图会发现:第一个和第二个盒子分别相对于原来的位置进行了偏移,但是对父级盒子和相邻的盒子都没有影响。
2、absolute(绝对定位)
- 相对已设定非static定位属性的父元素计算偏移量,脱离文档流。
看下面的例子:
<!DOCTYPE html>

<html lang="en">

<head>

    <meta charset="UTF-8">

    <meta name="viewport" content="width=device-width, initial-scale=1.0">

    <meta http-equiv="X-UA-Compatible" content="ie=edge">

    <title>绝对定位</title>

    <style type="text/css">

      .box1,.box2,.box3{

         width: 100px;

         height: 100px;

      }

      .box1{

        background-color: red;

        position: relative;

        left: 100px;

      }

      .box2{

        background-color:blue;

        position: absolute;

        left: 100px;

        top: 50px;

      }

      .box3{

        background-color: yellow;

        width: 120px;

      }

    </style>

</head>

<body>

    <div class="box"></div>

    <div class="box1"></div>

    <div class="box2"></div>

    <div class="box3"></div>

</body>

</html>
效果:

观察上面的截图可以发现:absolute定位是脱离文档流的,是相对于父元素进行偏移。
3、fixed(相对浏览器固定定位,IE6不支持)
看下面的例子:
<!DOCTYPE html>

<html lang="en">

<head>

    <meta charset="UTF-8">

    <meta name="viewport" content="width=device-width, initial-scale=1.0">

    <meta http-equiv="X-UA-Compatible" content="ie=edge">

    <title>fixed</title>

    <style type="text/css">

      .box1,.box2,.box3{

         width: 100px;

         height: 100px;

      }

      .box1{

        background-color: red;

        position: relative;

        left: 100px;

      }

      .box2{

        background-color:blue;

        position: absolute;

        left: 100px;

        top: 50px;

      }

      .box3{

        background-color: yellow;

        width: 120px;

        position: fixed;

        left: 100px;

        top: 200px;

      }

    </style>

</head>

<body>

    <div class="box"></div>

    <div class="box1"></div>

    <div class="box2"></div>

    <div class="box3"></div>

    <br /><br /><br /><br /><br /><br /><br /><br /><br /><br /><br /><br /><br /><br /><br />

    <br /><br /><br /><br /><br /><br /><br /><br /><br /><br /><br /><br /><br />

    <br /><br /><br /><br /><br /><br /><br /><br /><br /><br /><br /><br /><br />

    <br /><br /><br /><br /><br /><br /><br />

</body>

</html>
效果:

上下移动滚动条的时候你会发现,第三个盒子的位置不会随着滚动条的滚动而上下移动,相对于浏览器是固定的。
4、static(默认)
- 偏移量设置
- X轴(left、right属性)与Y轴(top、bottom属性)
- 可取值:像素或百分比。
5、定位图解

6、Z-Index
Z-Index用来设置定位盒子的层级
- 数字越大层级越高,越在上层。
例如:Z-Index:2;
注意:
- 数字之后没有单位。
- 数字可以设置为负值。
看下面的例子:
<!DOCTYPE html>

<html lang="en">

<head>

    <meta charset="UTF-8">

    <meta name="viewport" content="width=device-width, initial-scale=1.0">

    <meta http-equiv="X-UA-Compatible" content="ie=edge">

    <title>绝对定位</title>

    <style type="text/css">

      .box1,.box2,.box3{

         width: 100px;

         height: 100px;

      }

      .box1{

        background-color: red;

        position: relative;

        left: 100px;

      }

      .box2{

        background-color:blue;

        position: absolute;

        left: 100px;

        top: 50px;

      }

      .box3{

        background-color: yellow;

        width: 120px;

      }

    </style>

</head>

<body>

    <div class="box"></div>

    <div class="box1"></div>

    <div class="box2"></div>

    <div class="box3"></div>

</body>

</html>
效果:

现在给box1添加层级:
<!DOCTYPE html>

<html lang="en">

<head>

    <meta charset="UTF-8">

    <meta name="viewport" content="width=device-width, initial-scale=1.0">

    <meta http-equiv="X-UA-Compatible" content="ie=edge">

    <title>绝对定位</title>

    <style type="text/css">

      .box1,.box2,.box3{

         width: 100px;

         height: 100px;

      }

      .box1{

        background-color: red;

        position: relative;

        left: 100px;

        z-index: 1;

      }

      .box2{

        background-color:blue;

        position: absolute;

        left: 100px;

        top: 50px;

      }

      .box3{

        background-color: yellow;

        width: 120px;

      }

    </style>

</head>

<body>

    <div class="box"></div>

    <div class="box1"></div>

    <div class="box2"></div>

    <div class="box3"></div>

</body>

</html>
效果:

这时box1就会在box2上面。
也可以给box2添加层级:
<!DOCTYPE html>

<html lang="en">

<head>

    <meta charset="UTF-8">

    <meta name="viewport" content="width=device-width, initial-scale=1.0">

    <meta http-equiv="X-UA-Compatible" content="ie=edge">

    <title>绝对定位</title>

    <style type="text/css">

      .box1,.box2,.box3{

         width: 100px;

         height: 100px;

      }

      .box1{

        background-color: red;

        position: relative;

        left: 100px;

        /* z-index: 1; 添加层级 */

      }

      .box2{

        background-color:blue;

        position: absolute;

        left: 100px;

        top: 50px;

        z-index: -2;/*添加负数的层级*/

      }

      .box3{

        background-color: yellow;

        width: 120px;

      }

    </style>

</head>

<body>

    <div class="box"></div>

    <div class="box1"></div>

    <div class="box2"></div>

    <div class="box3"></div>

</body>

</html>
效果:

实例:
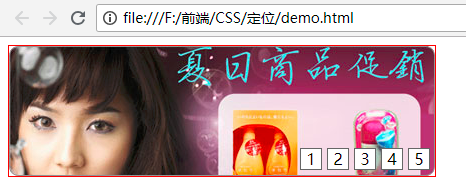
实现网页横幅的效果:
<!DOCTYPE html>

<html lang="en">

<head>

    <meta charset="UTF-8">

    <meta name="viewport" content="width=device-width, initial-scale=1.0">

    <meta http-equiv="X-UA-Compatible" content="ie=edge">

    <title>定位基本应用</title>

    <style type="text/css">

      #adverImg{

          width: 426px;

          height: 130px;/*和图片的宽度和高度一致*/

          position: relative;/*父元素添加相对定位*/

          border: 1px solid red;

      }

      #number{

          position: absolute;

          right: 5px;

          bottom: -10px;

      }

      /*li标签设置样式,使用后代选择器*/

      #number li{

          list-style: none;/*设置li标签样式:不显示前面的圆点*/

          float: left; /*设置浮动:使li标签在一行显示*/

          width: 20px;

          height: 20px;

          border: 1px solid #666666;/*设置边框*/

          margin-left: 5px;/*设置向左的外边距,使每个li标签之间有空格*/

          text-align: center;/*设置文字水平方向居中*/

          line-height: 20px;/*设置文字垂直方向居中*/

          /* color: white; */

          cursor: pointer;/*设置鼠标移动到li标签时显示小手的形状*/

          background-color: white;

      }

    </style>

</head>

<body>

    <div id="adverImg">

        <img src="data:images/adver-01.jpg" alt="商品促销" />

        <ul id="number">

            <li>1</li>

            <li>2</li>

            <li>3</li>

            <li>4</li>

            <li>5</li>

        </ul>

    </div>

</body>

</html>
效果:
CSS(八):定位属性的更多相关文章
- css - Position定位属性与层级关系
今天同事发现一个有意思的问题,关于position的层级关系的,他要不说我也没注意过 测试后果然有趣,有待深入研究: <!DOCTYPE html> <html> <he ...
- CSS Position 定位属性
本篇文章主要介绍元素的Position属性,此属性可以设置元素在页面的定位方式. 目录 1. 介绍 position:介绍position的值以及辅助属性. 2. position 定位方式:介绍po ...
- CSS position(定位)属性
关于CSS position,来自MDN的描述: CSS position属性用于指定一个元素在文档中的定位方式.top.right.bottom.left 属性则决定了该元素的最终位置. 然后来看看 ...
- CSS position定位属性
css中的position属性是用于设置元素位置的定位方式 它有以下几种取值: static:默认定位方式,子容器在父容器中按照默认顺序进行摆放 absolute:绝对定位,元素不占据父容器空间,相当 ...
- CSS的定位属性实现text-shadow属性的文本下产生阴影效果
只要先理解text-shadow的原理,就能用定位元素进行效果的模仿. text-shadow: h-shadiv v-shadov blur color h-shadv为文本水平移动的距离,正值相对 ...
- CSS属性:定位属性(图文详解)
本文最初发表于博客园,并在GitHub上持续更新前端的系列文章.欢迎在GitHub上关注我,一起入门和进阶前端. 以下是正文. CSS的定位属性有三种,分别是绝对定位.相对定位.固定定位. posit ...
- css中的定位属性position(转)
css中的定位属性position 同样的也是上课的时候发现学生难以理解的一些问题拿出来记录一下,希望帮助初学者. 在css中定位属性position的运用在页面中是很常用的,特别是一些结合js来 ...
- css 08-CSS属性:定位属性
08-CSS属性:定位属性 CSS的定位属性有三种,分别是绝对定位.相对定位.固定定位. position: absolute; <!-- 绝对定位 --> position: relat ...
- CSS定位属性Position详解
CSS中最常用的布局类属性,一个是Float(CSS浮动属性Float详解),另一个就是CSS定位属性Position. 1. position:static 所有元素的默认定位都是:position ...
随机推荐
- mysql出现Too many connections的解决...
最近写javaee项目的时候,mysql报了too many connections的错误,百度的内容有一些有问题,所以我重新写一下我的解决方法. mysql -u root -p 回车输入密码进入m ...
- EndNote 输出样式模板(根据国家标准制订)
EndNote 输出样式模板(根据国家标准制定) EndNote 相当于一个数据库,将添加/导入的文献存档.需要引用文献的时候就从中选择一个插入到文档中,EndNote 会自动给你编号.在文档末尾 ...
- session 详解
一.Session简单介绍 在WEB开发中,服务器可以为每个用户浏览器创建一个会话对象(session对象),注意:一个浏览器独占一个session对象(默认情况下).因此,在需要保存用户数据时,服务 ...
- ubuntu18.04分辨率
一.使用xrandr命令可以查询当前的显示状态.找出被连接的显示器名称:VGA-1 jack@noi:~$ xrandr Screen : minimum x , current x , maximu ...
- php正则表达式入门-常用语法格式
php正则表达式入门-常用语法格式 原文地址:http://www.jbxue.com/article/24467.html 分享下php正则表达式中的一些常用语法格式,用于匹配字母.数字等,个人感觉 ...
- Golang之字符串格式化
字符串格式化 // Go 之 字符串格式化 // // Copyright (c) 2015 - Batu // package main import ( "fmt" ) typ ...
- redis-cli 连接远程服务器
# redis-cli -h 10.11.09.10 -p 6379 #注意空格
- Swift中Notification.Name这么难用怎么办
Swift中Notification.Name这么难用怎么办 以前的发送通知的参数就是一个简单的字符串: NSNotificationCenter.defaultCenter().post(" ...
- 21、uwp UI自动化测试(WinAppDriver)
使用 UI自动化测试的好处就是在代码逻辑中写好 case 后,来实现 “一劳永逸” 的作用,并且自动化测试能够模拟人工达不到要求,比如快速切换页面.快速点击按钮等,对于提高软件的稳定性很有帮助. 安装 ...
- 使用IntelliJ IDEA搭建kafka源码环境时遇到Output path错误解决办法
kafka源码环境搭建好之后,需要在IntelliJ IDEA开发工具中以debug方式启动kafka服务器来测试消息的生产和消费. 但是在启动kafka.Kafka类中的main方法(也就是运行 k ...