C#自定义控件—流动管道
C#用户控件之流动管道
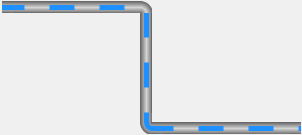
如何绘制一个动态的流动管道(FlowPipe)?
分两步绘制
- 定义属性;
- 画布重绘;
主要技能:
- 管道的绘制(渐变色矩形)
  /// <summary>

  /// 画渐变色矩形的方法

  /// </summary>

  /// <param name="g">画布</param>

  /// <param name="brush">画刷</param>

  /// <param name="pen">笔</param>

  /// <param name="rectangle">矩形</param>

  private void PaintRectangle(Graphics g, Brush brush, Pen pen, Rectangle rectangle)

  {

      //填充矩形

      g.FillRectangle(brush, rectangle);

      switch (this.pipeStyle)

      {

          case PipeStyle.Horizontal:

              g.DrawLine(pen, rectangle.X, rectangle.Y, rectangle.X + rectangle.Width, rectangle.Y);

              g.DrawLine(pen, rectangle.X, rectangle.Y + rectangle.Height - 1, rectangle.X + rectangle.Width, rectangle.Height);

              break;

          case PipeStyle.Vertical:

              g.DrawLine(pen, rectangle.X, rectangle.Y, rectangle.X, rectangle.Y + rectangle.Height);

              g.DrawLine(pen, rectangle.X + rectangle.Width - 1, rectangle.Y, rectangle.X + rectangle.Width - 1, rectangle.Height);

              break;

          default:

              break;

      }

  }
- 管道的绘制(渐变色半圆)
/// <summary>

/// 画渐变色半圆的方法

/// </summary>

/// <param name="g">画布</param>

/// <param name="colorBlend"></param>

/// <param name="p"></param>

/// <param name="rect"></param>

/// <param name="startAngle"></param>

/// <param name="sweepAngle"></param>

private void PaintEllipse(Graphics g, ColorBlend colorBlend, Pen p, Rectangle rect, float startAngle, float sweepAngle)

{

    //第一步:创建GPI路径

    GraphicsPath path = new GraphicsPath();

    path.AddEllipse(rect);

    //第二步:渐变色填充

    PathGradientBrush brush = new PathGradientBrush(path);

    brush.CenterPoint = new Point(rect.X + rect.Width / 2, rect.Y + rect.Height / 2);

    brush.InterpolationColors = colorBlend;

    //第三步:绘制管道

    g.FillPie(brush, rect, startAngle, sweepAngle);

    //第四步:绘制边线

    g.DrawArc(p, rect, startAngle, sweepAngle);

}
- 流动条的绘制(用笔的虚线)
//画虚线,关键用笔和路径来画

Pen pen = new Pen(this.flowColor, this.flowWidth);

pen.DashStyle = DashStyle.Custom;

pen.DashPattern = new float[]

{

    flowLength,flowLengthGap

};

pen.DashOffset = this.startOffset;

g.DrawPath(pen, path);

 //流动条路径

 GraphicsPath path = new GraphicsPath();

 //虚线路径—左边、中间、右边

 switch (this.pipeTurnLeft)

 {

     case PipeTurn.Up:

         path.AddArc(new Rectangle(this.Height / 2, this.Height / 2 * (-1) -1, this.Height, this.Height), 181.0f, -91.0f);

         break;

     case PipeTurn.Down:

         path.AddArc(new Rectangle(this.Height / 2, this.Height / 2, this.Height, this.Height), 180.0f, 90.0f);

         break;

     default:

         path.AddLine(-1, this.Height / 2, this.Height+1, this.Height / 2);

         break;

 }
关键理解:绘制的椭圆、线(Rectangle)<x,y【圆切矩形相对于控件原点<左上角>的坐标】,宽,高,开始角度,扫描角度>理解了就好画了
path.AddArc(new Rectangle(this.Height / 2, this.Height / 2, this.Height, this.Height), 180.0f, 90.0f);
path.AddLine(-1, this.Height / 2, this.Height+1, this.Height / 2);可以流动的关键要素
     //流动条流动速度(刷新速度)

     this.myTimer = new Timer();

     myTimer.Interval = 50;

     this.myTimer.Tick += MyTimer_Tick; ;

 }

 #region 定时循环

 private void MyTimer_Tick(object sender, EventArgs e)

 {

     this.startOffset = this.startOffset - this.moveSpeed;

     if (this.startOffset > this.flowLength + this.flowLengthGap || this.startOffset < (this.flowLength + this.flowLengthGap) * (-1))

     { this.startOffset = 0; }

     this.Invalidate();

 }

 #endregion
1.定义属性
- 管道的(两端转向、样式、边沿颜色、中间颜色、激活)
- 流动条的(速度、长度、宽度、间隙、颜色)
//属性示例:按照示例添加以上各种属性

private float moveSpeed = 0.3f;

[Browsable(true)]

[Category("布局_G")]

[Description("流动条速度,负数为反向")]  //属性说明

public float MoveSpeed

{

    get { return moveSpeed; }

    set

    {

        this.moveSpeed = value;

        this.Invalidate();  //重绘

    }

}
2.画布重绘
【管道分为左、中、右三部分。先画管道(矩形):左、中、右;再画流动条(虚线):左、中、右】

//矩形画刷

LinearGradientBrush linearGradientBrush = new LinearGradientBrush(new Point(0, 0), new Point(0, this.Height), pipeColorEdge, pipeColorEdge);

linearGradientBrush.InterpolationColors = colorBlend;

//绘制左部分

switch (this.pipeTurnLeft)

{

    case PipeTurn.Up:

        this.PaintEllipse(g, colorBlend, p, new Rectangle(0, this.Height * (-1)-1, this.Height * 2, this.Height * 2), 90.0f, 90.0f);

        break;

    case PipeTurn.Down:

        this.PaintEllipse(g, colorBlend, p, new Rectangle(0, 0, this.Height * 2, this.Height * 2), 180.0f, 90.0f);

        break;

    default:

        this.PaintRectangle(g, linearGradientBrush, p, new Rectangle(-1, 0, this.Height+1, this.Height));

        break;

}

//绘制右部分

switch (this.pipeTurnRight)

{

    case PipeTurn.Up:

        this.PaintEllipse(g, colorBlend, p, new Rectangle(this.Width - this.Height * 2, this.Height * (-1)-1, this.Height * 2, this.Height * 2), 0.0f, 90.0f);

        break;

    case PipeTurn.Down:

        this.PaintEllipse(g, colorBlend, p, new Rectangle(this.Width - this.Height * 2, 0, this.Height * 2, this.Height * 2), 270.0f, 90.0f);

        break;

    default:

        this.PaintRectangle(g, linearGradientBrush, p, new Rectangle(this.Width - this.Height, 0, this.Height, this.Height));

        break;

}

//绘制中间

if (this.Width > this.Height * 2)

{

    this.PaintRectangle(g, linearGradientBrush, p, new Rectangle(this.Height - 1, 0, this.Width - this.Height * 2 + 2, this.Height));

}
//流动条路径

GraphicsPath path = new GraphicsPath();

//虚线路径—左边

switch (this.pipeTurnLeft)

{

    case PipeTurn.Up:

        path.AddArc(new Rectangle(this.Height / 2, this.Height / 2 * (-1) -1, this.Height, this.Height), 181.0f, -91.0f);

        break;

    case PipeTurn.Down:

        path.AddArc(new Rectangle(this.Height / 2, this.Height / 2, this.Height, this.Height), 180.0f, 90.0f);

        break;

    default:

        path.AddLine(-1, this.Height / 2, this.Height+1, this.Height / 2);

        break;

}

//虚线路径—中间

if (this.Width > this.Height * 2)

{

    path.AddLine(this.Height, this.Height / 2, this.Width - this.Height -1, this.Height / 2);

}

//虚线路径—右边

switch (this.pipeTurnRight)

{

    case PipeTurn.Up:

        path.AddArc(new Rectangle(this.Width - 1 - this.Height * 3 / 2, -this.Height / 2-1 , this.Height, this.Height), 88f, -91.0f);

        break;

    case PipeTurn.Down:

        path.AddArc(new Rectangle(this.Width - 1 - this.Height * 3 / 2, this.Height / 2, this.Height, this.Height), 270.0f, 90.0f);

        break;

    default:

        path.AddLine(this.Width - this.Height, this.Height / 2, this.Width , this.Height / 2);

        break;

}

//画虚线,关键用笔和路径来

Pen pen = new Pen(this.flowColor, this.flowWidth);

pen.DashStyle = DashStyle.Custom;

pen.DashPattern = new float[]

{

    flowLength,flowLengthGap

};

pen.DashOffset = this.startOffset;

g.DrawPath(pen, path);
格式都是一样的,掌握关键代码,肝就对了。
End
C#自定义控件—流动管道的更多相关文章
- NodeJS Stream 五:双工流
双工流就是同时实现了 Readable 和 Writable 的流,即可以作为上游生产数据,又可以作为下游消费数据,这样可以处于数据流动管道的中间部分,即 rs.pipe(rws1).pipe(rws ...
- nodeJS之流stream
前面的话 当内存中无法一次装下需要处理的数据时,或者一边读取一边处理更加高效时,我们就需要用到数据流.NodeJS中通过各种Stream来提供对数据流的操作.本文将详细说明NodeJS中的流strea ...
- 基于react-app搭建react-router+redux项目
前言 总括: 本文采用react+redux+react-router+less+es6+webpack,以实现一个简易备忘录(todolist)为例尽可能全面的讲述使用react全家桶实现一个完整应 ...
- 1.3 React 组件
1.3.1 React 组件介绍 在 React 中组件是第一元素,是 React 的基础,一个 React 应用就是基于 React 组件的组合而成.前面的 JSX 练习过后,大家应该对 React ...
- Web 组态运用之用户数据 ARPU 分析图
前言 作为企业的发展,通过运营的有效管理,增加收入.降低成本,取得更好的经济效益,是核心所在,在电信企业同样如此.电信企业的利润大体上是由业务收入和成本决定的,而收入和成本又可进一步分别分解表达为不同 ...
- 极简 Node.js 入门 - 4.5 双工流
极简 Node.js 入门系列教程:https://www.yuque.com/sunluyong/node 本文更佳阅读体验:https://www.yuque.com/sunluyong/node ...
- (五十五)c#Winform自定义控件-管道
前提 入行已经7,8年了,一直想做一套漂亮点的自定义控件,于是就有了本系列文章. GitHub:https://github.com/kwwwvagaa/NetWinformControl 码云:ht ...
- OpenFOAM——不对称突变管道中的低雷诺数流动
本算例来自<ANSYS Fluid Dynamics Verification Manual>中的VMFL064: Low Reynolds Number Flow in a Channe ...
- (五十八)c#Winform自定义控件-管道阀门(工业)
前提 入行已经7,8年了,一直想做一套漂亮点的自定义控件,于是就有了本系列文章. GitHub:https://github.com/kwwwvagaa/NetWinformControl 码云:ht ...
- 基于HTML5实现3D监控应用流动效果
http://www.hightopo.com/guide/guide/core/lighting/examples/example_flowing.html 流动效果在3D领域有着广泛的应用场景,如 ...
随机推荐
- Java开发框架演变过程
JavaWeb开发简史 Java框架创始人 Java框架说明 Spring: 把应用程序中的bean统一交给Spring进行管理控制,简化了我们的代码操作,和降低了代码的耦合度,Spring框架基本上 ...
- Vue2 移动端 ui库 MintUI
MintUI MintUI是饿了么团队开发的基于移动端的vue组件库.用于搭建移动端界面. http://mint-ui.github.io/docs/#/zh-cn2
- PHP str_replace() 函数详解
PHP str_replace() 函数详解 1.前言: str_replace() 函数以其他字符替换字符串中的一些字符(区分大小写). 该函数区分大小写.请使用 str_ireplace() 函数 ...
- [oeasy]python0074[专业选修]字节序_byte_order_struct_pack_大端序_小端序
进制转化 回忆上次内容 上次 总结了 计算字符串值的函数 eval 四种进制的转化函数 bin oct int hex 函数名 前缀 目标字符串所用进制 bin 0b 二进制 oct 0o ...
- 关于导入react native项目导致运行异常的那些事
从git上导入公司的项目,在本地运行的时候,项目无法运行.sdk,jdk,node都是使用公司规定的版本,项目中的local.properties文件sdk.dir路径也换成了自己本地的目录,结果就在 ...
- mp实现一个自连接查询
起因是我设置了一个考核表结构,其中包含指标值,指标当前值,是主副指标等列. 后面我要进行考核的验收的时候,我发现验收要取得的是主当前指标值/主指标值以及副指标当前值/副指标值.如果想要让这两条数据一次 ...
- RPA京麦咚咚批量发送消息
京麦咚咚发送消息,首先我们需要确定给谁发,发送什么内容 给谁发:可以传入京东用户名.京东订单号.咚咚将通过此条件进行搜索进入会话框 发送什么内容:批量发送信息给不同的用户,比如给不同的订单用户发送其相 ...
- stable diffusion 实践与测试
stable diffusion 实践与测试 放大 原图高清放大 原始图片 当不满意图片质量的时候 使用stable diffusion进行二次处理 选择适合图片风格的模型,再次根据图片写出提示词 输 ...
- Apache COC闪电演讲总结【OSGraph】
大家能看到我最近一直在折腾与OSGraph这个产品相关的事情,之前在文章<妙用OSGraph:发掘GitHub知识图谱上的开源故事>中向大家阐述过这个产品的设计理念和应用价值.比方说以下问 ...
- 【BlueTooth】 小米手机蓝牙传输文件
打开小米手机的蓝牙设置,寻找电脑设备(电脑装有蓝牙设备) 同时电脑也打开蓝牙面板,两个设备都开始进行匹配: 然后电脑打开蓝牙的[接收传输文件] 手机打开图库或者文件管理,找到文件发送时选择[蓝牙] 传 ...