Pytorch风格迁移代码
最近研究了一下风格迁移,主要是想应用于某些主题节日时动态融合背景,生成一些抽象的艺术图片,这里给大家分享一个现成的代码,我本地把环境搭建好后跑了试试,有兴趣的可以直接拿去运行:
1 import torch
2 import torch.nn as nn
3 import torch.nn.functional as F
4 import torch.optim as optim
5
6 from PIL import Image
7 import matplotlib.pyplot as plt
8
9 import torchvision.transforms as transforms
10 import torchvision.models as models
11 import datetime
12
13 device = torch.device("cuda" if torch.cuda.is_available() else "cpu")
14
15
16 num_steps = 10000 # cpu跑的话,低于300吧,不然耗时很长
17 save_path = "data/drew/img/end_%s.jpg" % datetime.datetime.now().strftime("%Y%m%d%H%M%S")
18 content_img_path = "data/drew/img/dancing.jpg"
19 style_img_path = "data/drew/img/picasso.jpg"
20
21
22 def get_img_size(img_name):
23 im = Image.open(img_name).convert('RGB') # 这里要转成RGB
24 return im, im.height, im.width
25
26
27 def image_loader(img, im_h, im_w):
28 loader = transforms.Compose([transforms.Resize([im_h, im_w]), transforms.ToTensor()]) # 如果跑不动,这里的Resize设置小一点,我这用的是适配融入内容的尺寸
29 im_l = loader(img).unsqueeze(0)
30 return im_l.to(device, torch.float)
31
32
33 c_image, c_im_h, c_im_w = get_img_size(content_img_path)
34 s_image, s_im_h, s_im_w = get_img_size(style_img_path)
35 content_img = image_loader(c_image, c_im_h, c_im_w)
36 style_img = image_loader(s_image, c_im_h, c_im_w)
37
38
39 assert style_img.size() == content_img.size(), "we need to import style and content images of the same size"
40 unloader = transforms.ToPILImage()
41
42 plt.ion()
43
44
45 def imshow(tensor, title=None):
46 image = tensor.cpu().clone() # we clone the tensor to not do changes on it
47 image = image.squeeze(0) # remove the fake batch dimension
48 image = unloader(image)
49 plt.imshow(image)
50 if title is not None:
51 plt.title(title)
52 plt.pause(0.001) # pause a bit so that plots are updated
53
54
55 # plt.figure()
56 # imshow(style_img, title='Style Image')
57 #
58 # plt.figure()
59 # imshow(content_img, title='Content Image')
60
61
62 class ContentLoss(nn.Module):
63
64 def __init__(self, target,):
65 super(ContentLoss, self).__init__()
66 self.target = target.detach()
67
68 def forward(self, input):
69 self.loss = F.mse_loss(input, self.target)
70 return input
71
72
73 def gram_matrix(input):
74 a, b, c, d = input.size() # a=batch size(=1)
75
76 features = input.view(a * b, c * d) # resise F_XL into \hat F_XL
77
78 G = torch.mm(features, features.t()) # compute the gram product
79
80 return G.div(a * b * c * d)
81
82
83 class StyleLoss(nn.Module):
84
85 def __init__(self, target_feature):
86 super(StyleLoss, self).__init__()
87 self.target = gram_matrix(target_feature).detach()
88
89 def forward(self, input):
90 G = gram_matrix(input)
91 self.loss = F.mse_loss(G, self.target)
92 return input
93
94
95 cnn = models.vgg19(pretrained=True).features.to(device).eval()
96
97
98 cnn_normalization_mean = torch.tensor([0.485, 0.456, 0.406]).to(device)
99 cnn_normalization_std = torch.tensor([0.229, 0.224, 0.225]).to(device)
100
101
102 class Normalization(nn.Module):
103 def __init__(self, mean, std):
104 super(Normalization, self).__init__()
105 self.mean = mean.clone().detach().view(-1, 1, 1)
106 self.std = std.clone().detach().view(-1, 1, 1)
107
108 def forward(self, img):
109 # normalize img
110 return (img - self.mean) / self.std
111
112
113 content_layers_default = ['conv_4']
114 style_layers_default = ['conv_1', 'conv_2', 'conv_3', 'conv_4', 'conv_5']
115
116
117 def get_style_model_and_losses(cnn, normalization_mean, normalization_std, style_img, content_img,
118 content_layers=content_layers_default, style_layers=style_layers_default):
119 normalization = Normalization(normalization_mean, normalization_std).to(device)
120
121 content_losses = []
122 style_losses = []
123
124 model = nn.Sequential(normalization)
125
126 i = 0 # increment every time we see a conv
127 for layer in cnn.children():
128 if isinstance(layer, nn.Conv2d):
129 i += 1
130 name = 'conv_{}'.format(i)
131 elif isinstance(layer, nn.ReLU):
132 name = 'relu_{}'.format(i)
133 layer = nn.ReLU(inplace=False)
134 elif isinstance(layer, nn.MaxPool2d):
135 name = 'pool_{}'.format(i)
136 elif isinstance(layer, nn.BatchNorm2d):
137 name = 'bn_{}'.format(i)
138 else:
139 raise RuntimeError('Unrecognized layer: {}'.format(layer.__class__.__name__))
140
141 model.add_module(name, layer)
142
143 if name in content_layers:
144 # add content loss:
145 target = model(content_img).detach()
146 content_loss = ContentLoss(target)
147 model.add_module("content_loss_{}".format(i), content_loss)
148 content_losses.append(content_loss)
149
150 if name in style_layers:
151 # add style loss:
152 target_feature = model(style_img).detach()
153 style_loss = StyleLoss(target_feature)
154 model.add_module("style_loss_{}".format(i), style_loss)
155 style_losses.append(style_loss)
156
157 # now we trim off the layers after the last content and style losses
158 for i in range(len(model) - 1, -1, -1):
159 if isinstance(model[i], ContentLoss) or isinstance(model[i], StyleLoss):
160 break
161
162 model = model[:(i + 1)]
163
164 return model, style_losses, content_losses
165
166
167 input_img = content_img.clone()
168
169 # plt.figure()
170 # imshow(input_img, title='Input Image')
171
172
173 def get_input_optimizer(input_img):
174 optimizer = optim.LBFGS([input_img])
175 return optimizer
176
177
178 def run_style_transfer(cnn, normalization_mean, normalization_std,
179 content_img, style_img, input_img, num_steps=num_steps,
180 style_weight=1000000, content_weight=1):
181 """Run the style transfer."""
182 print('Building the style transfer model..')
183 model, style_losses, content_losses = get_style_model_and_losses(cnn,
184 normalization_mean, normalization_std, style_img, content_img)
185
186 # We want to optimize the input and not the model parameters so we
187 # update all the requires_grad fields accordingly
188 input_img.requires_grad_(True)
189 model.requires_grad_(False)
190
191 optimizer = get_input_optimizer(input_img)
192
193 print('Optimizing..')
194 run = [0]
195 while run[0] <= num_steps:
196
197 def closure():
198 # correct the values of updated input image
199 with torch.no_grad():
200 input_img.clamp_(0, 1)
201
202 optimizer.zero_grad()
203 model(input_img)
204 style_score = 0
205 content_score = 0
206
207 for sl in style_losses:
208 style_score += sl.loss
209 for cl in content_losses:
210 content_score += cl.loss
211
212 style_score *= style_weight
213 content_score *= content_weight
214
215 loss = style_score + content_score
216 loss.backward()
217
218 run[0] += 1
219 if run[0] % 50 == 0:
220 print("run {}:".format(run))
221 print('Style Loss : {:4f} Content Loss: {:4f}'.format(
222 style_score.item(), content_score.item()))
223 print()
224
225 return style_score + content_score
226
227 optimizer.step(closure)
228
229 # a last correction...
230 with torch.no_grad():
231 input_img.clamp_(0, 1)
232
233 return input_img
234
235
236 begin_time = datetime.datetime.now()
237 print("******************开始时间*****************", begin_time)
238 output = run_style_transfer(cnn, cnn_normalization_mean, cnn_normalization_std,
239 content_img, style_img, input_img)
240 try:
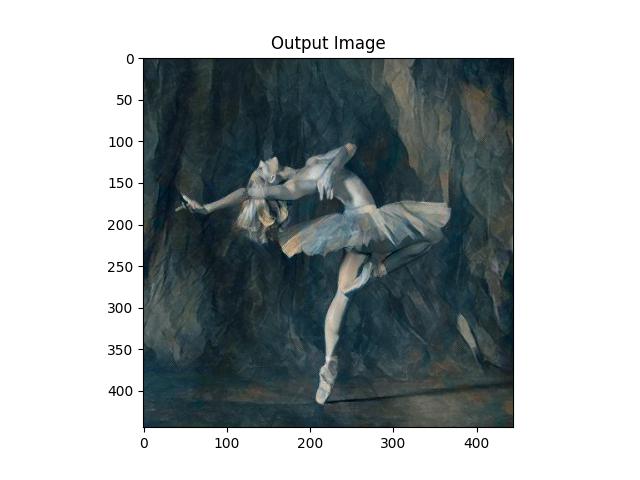
241 plt.figure()
242 imshow(output, title='Output Image')
243
244 # sphinx_gallery_thumbnail_number = 4
245 plt.ioff()
246 plt.savefig(save_path)
247 except Exception as e:
248 print(e)
249 print("******************结束时间*****************", datetime.datetime.now())
250 print("******************耗时*****************", datetime.datetime.now()-begin_time)
251 # plt.show()
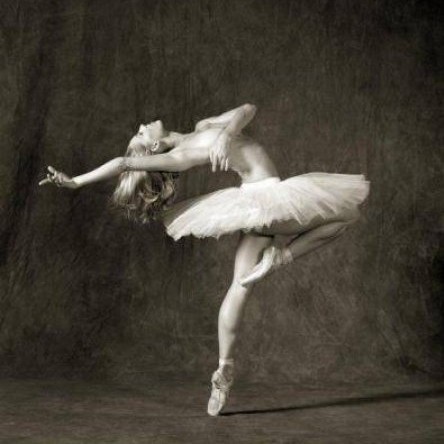
dancing.jpg
picasso.jpg
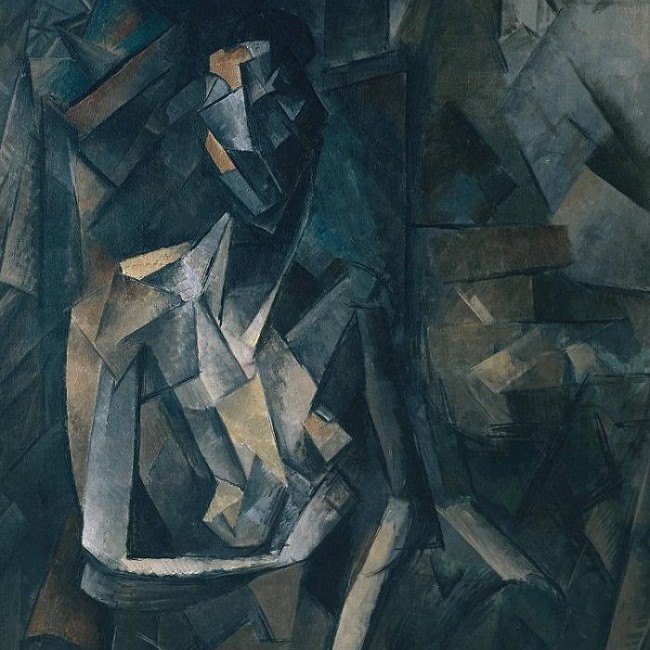
我这迁移后的图像,还是不错的。
风格:

内容:

迁移融合后:

风格;
融入:
迁移后:
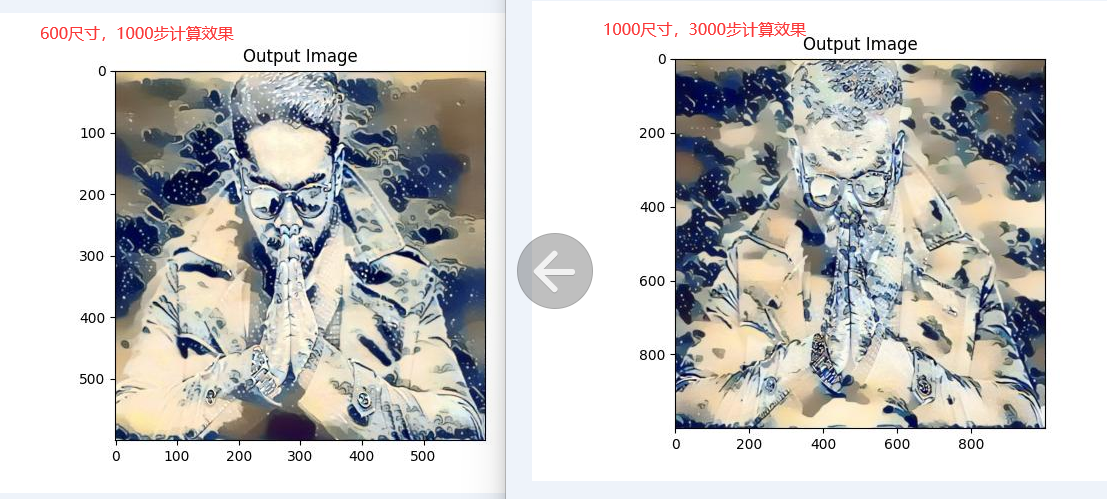
1000尺寸,3000步计算,8分钟内完成,还是不错的。

用1080的原图一训练就扛不住,毕竟只启用了单显卡:

效果还可以,哈哈~
有兴趣的可以去研究一下原文:
原文地址:
https://pytorch.org/tutorials/advanced/neural_style_tutorial.html
原GitHub代码地址:
https://github.com/pytorch/tutorials/blob/master/advanced_source/neural_style_tutorial.py
需要准备:
有显卡并且支持pytorch训练的服务器,只是cpu的话就算了,GPU服务器跑几分钟,cpu服务器跑跑一小时,cpu还100%!
Pytorch风格迁移代码的更多相关文章
- 图像风格迁移(Pytorch)
图像风格迁移 最后要生成的图片是怎样的是难以想象的,所以朴素的监督学习方法可能不会生效, Content Loss 根据输入图片和输出图片的像素差别可以比较损失 \(l_{content} = \fr ...
- 『cs231n』通过代码理解风格迁移
『cs231n』卷积神经网络的可视化应用 文件目录 vgg16.py import os import numpy as np import tensorflow as tf from downloa ...
- keras图像风格迁移
风格迁移: 在内容上尽量与基准图像保持一致,在风格上尽量与风格图像保持一致. 1. 使用预训练的VGG19网络提取特征 2. 损失函数之一是"内容损失"(content loss) ...
- fast neural style transfer图像风格迁移基于tensorflow实现
引自:深度学习实践:使用Tensorflow实现快速风格迁移 一.风格迁移简介 风格迁移(Style Transfer)是深度学习众多应用中非常有趣的一种,如图,我们可以使用这种方法把一张图片的风格“ ...
- TensorFlow从1到2(十三)图片风格迁移
风格迁移 <从锅炉工到AI专家(8)>中我们介绍了一个"图片风格迁移"的例子.因为所引用的作品中使用了TensorFlow 1.x的代码,算法也相对复杂,所以文中没有仔 ...
- 单图像三维重建、2D到3D风格迁移和3D DeepDream
作者:Longway Date:2020-04-25 来源:单图像三维重建.2D到3D风格迁移和3D DeepDream 项目网址:http://hiroharu-kato.com/projects_ ...
- pytorch 测试 迁移学习
训练源码: 源码仓库:https://github.com/pytorch/tutorials 迁移学习测试代码:tutorials/beginner_source/transfer_learning ...
- Gram格拉姆矩阵在风格迁移中的应用
Gram定义 n维欧式空间中任意k个向量之间两两的内积所组成的矩阵,称为这k个向量的格拉姆矩阵(Gram matrix) 根据定义可以看到,每个Gram矩阵背后都有一组向量,Gram矩阵就是由这一组向 ...
- Keras实现风格迁移
风格迁移 风格迁移算法经历多次定义和更新,现在应用在许多智能手机APP上. 风格迁移在保留目标图片内容的基础上,将图片风格引用在目标图片上. 风格本质上是指在各种空间尺度上图像中的纹理,颜色和视觉图案 ...
- Distill详述「可微图像参数化」:神经网络可视化和风格迁移利器!
近日,期刊平台 Distill 发布了谷歌研究人员的一篇文章,介绍一个适用于神经网络可视化和风格迁移的强大工具:可微图像参数化.这篇文章从多个方面介绍了该工具. 图像分类神经网络拥有卓越的图像生成能力 ...
随机推荐
- 基于 Mindspore 框架与 ModelArts 平台的 MNIST 手写体识别实验
简介 实验包含 2部分: 基于 Mindspore 框架的模型本地训练及预测 基于 Modelarts 平台和 PyTorch框架的模型训练及部署 基于 Mindspore 框架的模型本地训练及预测 ...
- vid = two 切开 分开 - 两个眼睛 还有看的含义 - 词根
vid = two 切开 分开 - 两个眼睛 还有看的含义 - 词根 vi = wo acs 构词
- ECharts 中国地图 vue
<template> <div> <div id="china_map_box"> <div id="china_map&quo ...
- MFC自定义CStatusBar文字的颜色
MFC里面的CStatusBar是没法自定义文字颜色的,需要我们自己绘制.这篇文章是在 Display colored text on Status Bar 代码的基础上进行改进的,使用起来更方便. ...
- .NET Aspire Preview 4 发布!
.NET Aspire是一个有态度的云原生应用开发框架,旨在改善生成.NET云原生应用的体验,并提供一组强大的工具来帮助你生成和运行分布式应用.它允许开发者快速创建属于自己的云原生应用,或改造已有的项 ...
- Welcome to YARP - 3 负载均衡 (Load Balancing)
目录 Welcome to YARP - 1.认识YARP并搭建反向代理服务 Welcome to YARP - 2.配置功能 2.1 - 配置文件(Configuration Files) 2.2 ...
- 探讨三维模型OBJ格式轻量化在三维展示效果上的重要性
探讨三维模型OBJ格式轻量化在三维展示效果上的重要性 三维模型的OBJ格式轻量化在三维展示效果方面具有重要性.以下是对三维模型OBJ格式轻量化在三维展示效果上的重要性进行分析: 1.提高渲染性能:原始 ...
- npm ERR! code 1 npm ERR! path E:\20231213\vue-element-admin\node_modules\node-sass npm ERR! command failed npm ERR! command C:\WINDOWS\system32\cmd.exe /d /s /c node scripts/build.js
执行npm install报错,根据下面报错信息可知,是由于nodejs和node-sass版本不一致造成的,也就是当前项目比较旧,而我安装的nodejs比较新. PS E:\20231213\vue ...
- [Oracle]细节、经验
[版权声明]未经博主同意,谢绝转载!(请尊重原创,博主保留追究权) https://blog.csdn.net/m0_69908381/article/details/131054454 出自[进步* ...
- hdfs disk balancer 磁盘均衡器
目录 1.背景 2.hdfs balancer和 hdfs disk balancer有何不同? 3.操作 3.1 生成计划 3.2 执行计划 3.3 查询计划 3.4 取消计划 4.和disk ba ...