jackson学习之十(终篇):springboot整合(配置类)
欢迎访问我的GitHub
https://github.com/zq2599/blog_demos
内容:所有原创文章分类汇总及配套源码,涉及Java、Docker、Kubernetes、DevOPS等;
系列文章汇总
- jackson学习之一:基本信息
- jackson学习之二:jackson-core
- jackson学习之三:常用API操作
- jackson学习之四:WRAP_ROOT_VALUE(root对象)
- jackson学习之五:JsonInclude注解
- jackson学习之六:常用类注解
- jackson学习之七:常用Field注解
- jackson学习之八:常用方法注解
- jackson学习之九:springboot整合(配置文件)
- jackson学习之十(终篇):springboot整合(配置类)
本篇概览
- 本文是《jackson学习》系列的终篇,经过前面的一系列实战,相信您已可以熟练使用jackson灵活的执行各种json序列化和反序列化操作,那么,本篇就以轻松的方式来完成整个系列吧;
- 上一篇介绍的是在springboot中通过配置文件对jackson做设置,今天要聊的是另一种常用的jackson配置方式:配置类,就是自己编写代码实例化和配置springboot全局使用的ObjectMapper实例;
源码下载
- 如果您不想编码,可以在GitHub下载所有源码,地址和链接信息如下表所示(https://github.com/zq2599/blog_demos):
| 名称 | 链接 | 备注 |
|---|---|---|
| 项目主页 | https://github.com/zq2599/blog_demos | 该项目在GitHub上的主页 |
| git仓库地址(https) | https://github.com/zq2599/blog_demos.git | 该项目源码的仓库地址,https协议 |
| git仓库地址(ssh) | git@github.com:zq2599/blog_demos.git | 该项目源码的仓库地址,ssh协议 |
- 这个git项目中有多个文件夹,本章的应用在jacksondemo文件夹下,如下图红框所示:
- jacksondemo是父子结构的工程,本篇的代码在springbootconfigbean子工程中,如下图:

编码
- 在父工程jacksondemo下新增子工程springbootconfigbean,pom.xml如下:
<?xml version="1.0" encoding="UTF-8"?>

<project xmlns="http://maven.apache.org/POM/4.0.0" xmlns:xsi="http://www.w3.org/2001/XMLSchema-instance"

         xsi:schemaLocation="http://maven.apache.org/POM/4.0.0 https://maven.apache.org/xsd/maven-4.0.0.xsd">

    <modelVersion>4.0.0</modelVersion>

    <parent>

        <artifactId>jacksondemo</artifactId>

        <groupId>com.bolingcavalry</groupId>

        <version>1.0-SNAPSHOT</version>

        <relativePath>../pom.xml</relativePath>

    </parent>

    <groupId>com.bolingcavalry</groupId>

    <artifactId>springbootconfigbean</artifactId>

    <version>0.0.1-SNAPSHOT</version>

    <name>springbootconfigbean</name>

    <description>Demo project for Spring Boot with Jackson, configuration from config bean</description>

    <properties>

        <java.version>1.8</java.version>

    </properties>

    <!--不用spring-boot-starter-parent作为parent时的配置-->

    <dependencyManagement>

        <dependencies>

            <dependency>

                <groupId>org.springframework.boot</groupId>

                <artifactId>spring-boot-dependencies</artifactId>

                <version>2.3.3.RELEASE</version>

                <type>pom</type>

                <scope>import</scope>

            </dependency>

        </dependencies>

    </dependencyManagement>

    <dependencies>

        <dependency>

            <groupId>org.springframework.boot</groupId>

            <artifactId>spring-boot-starter-web</artifactId>

        </dependency>

        <dependency>

            <groupId>org.springframework.boot</groupId>

            <artifactId>spring-boot-starter-test</artifactId>

            <scope>test</scope>

            <exclusions>

                <exclusion>

                    <groupId>org.junit.vintage</groupId>

                    <artifactId>junit-vintage-engine</artifactId>

                </exclusion>

            </exclusions>

        </dependency>

        <!-- swagger依赖 -->

        <dependency>

            <groupId>io.springfox</groupId>

            <artifactId>springfox-swagger2</artifactId>

        </dependency>

        <!-- swagger-ui -->

        <dependency>

            <groupId>io.springfox</groupId>

            <artifactId>springfox-swagger-ui</artifactId>

        </dependency>

    </dependencies>

    <build>

        <plugins>

            <plugin>

                <groupId>org.springframework.boot</groupId>

                <artifactId>spring-boot-maven-plugin</artifactId>

            </plugin>

        </plugins>

    </build>

</project>
- 本文最重要的代码是配置类JacksonConfig.java,如下,需要ConditionalOnMissingBean注解避免冲突,另外还给实例指定了名称customizeObjectMapper,如果应用中通过Autowired使用此实例,需要指定这个名字,避免报错"There is more than one bean of 'ObjectMapper ' type":
@Configuration

public class JacksonConfig {

    @Bean("customizeObjectMapper")

    @Primary

    @ConditionalOnMissingBean(ObjectMapper.class)

    public ObjectMapper getObjectMapper(Jackson2ObjectMapperBuilder builder) {

        ObjectMapper mapper = builder.build();

        // 日期格式

        mapper.setDateFormat(new SimpleDateFormat("yyyy-MM-dd hh:mm:ss"));

        // 美化输出

        mapper.enable(SerializationFeature.INDENT_OUTPUT);

        return mapper;

    }

}
- 对于JacksonConfig.getObjectMapper方法内的设置,如果您想做更多设置,请参考《jackson学习之三:常用API操作》里面的设置内容;
- 启动类依然很简单:
package com.bolingcavalry.springbootconfigbean;

import org.springframework.boot.SpringApplication;

import org.springframework.boot.autoconfigure.SpringBootApplication;

@SpringBootApplication

public class SpringbootConfigBeanApplication {

    public static void main(String[] args) {

        SpringApplication.run(SpringbootConfigBeanApplication.class, args);

    }

}
- swagger配置:
package com.bolingcavalry.springbootconfigbean;

import org.springframework.context.annotation.Bean;

import org.springframework.context.annotation.Configuration;

import springfox.documentation.builders.ApiInfoBuilder;

import springfox.documentation.builders.PathSelectors;

import springfox.documentation.builders.RequestHandlerSelectors;

import springfox.documentation.service.ApiInfo;

import springfox.documentation.service.Contact;

import springfox.documentation.service.Tag;

import springfox.documentation.spi.DocumentationType;

import springfox.documentation.spring.web.plugins.Docket;

import springfox.documentation.swagger2.annotations.EnableSwagger2;

@Configuration

@EnableSwagger2

public class SwaggerConfig {

    @Bean

    public Docket createRestApi() {

        return new Docket(DocumentationType.SWAGGER_2)

                .apiInfo(apiInfo())

                .tags(new Tag("JsonPropertySerializationController", "JsonProperty相关测试"))

                .select()

                // 当前包路径

                .apis(RequestHandlerSelectors.basePackage("com.bolingcavalry.springbootconfigbean.controller"))

                .paths(PathSelectors.any())

                .build();

    }

    //构建 api文档的详细信息函数,注意这里的注解引用的是哪个

    private ApiInfo apiInfo() {

        return new ApiInfoBuilder()

                //页面标题

                .title("SpringBoot整合Jackson(基于配置文件)")

                //创建人

                .contact(new Contact("程序员欣宸", "https://github.com/zq2599/blog_demos", "zq2599@gmail.com"))

                //版本号

                .version("1.0")

                //描述

                .description("API 描述")

                .build();

    }

}
- 最后是测试用的Controller类,要注意的是在使用ObjectMapper实例的地方,用Autowired注解的时候,记得带上Qualifier注解:
package com.bolingcavalry.springbootconfigbean.controller;

import com.bolingcavalry.springbootconfigbean.bean.Test;

import com.fasterxml.jackson.core.JsonProcessingException;

import com.fasterxml.jackson.databind.ObjectMapper;

import io.swagger.annotations.Api;

import io.swagger.annotations.ApiOperation;

import org.slf4j.Logger;

import org.slf4j.LoggerFactory;

import org.springframework.beans.factory.annotation.Autowired;

import org.springframework.beans.factory.annotation.Qualifier;

import org.springframework.web.bind.annotation.RequestBody;

import org.springframework.web.bind.annotation.RequestMapping;

import org.springframework.web.bind.annotation.RequestMethod;

import org.springframework.web.bind.annotation.RestController;

@RestController

@RequestMapping("/jsonproperty")

@Api(tags = {"JsonPropertySerializationController"})

public class JsonPropertySerializationController {

    private static final Logger logger = LoggerFactory.getLogger(JsonPropertySerializationController.class);

    @Qualifier("customizeObjectMapper")

    @Autowired

    ObjectMapper mapper;

    @ApiOperation(value = "测试序列化", notes = "测试序列化")

    @RequestMapping(value = "/serialization", method = RequestMethod.GET)

    public Test serialization() throws JsonProcessingException {

        Test test = new Test();

        logger.info(mapper.writeValueAsString(test));

        return test;

    }

    @ApiOperation(value = "测试反序列化", notes="测试反序列化")

    @RequestMapping(value = "/deserialization",method = RequestMethod.PUT)

    public String deserialization(@RequestBody Test test) {

        return test.toString();

    }

}
验证
- 启动SpringbootConfigBeanApplication后,浏览器打开:http://localhost:8080/swagger-ui.html
- 先验证序列化接口/jsonproperty/serialization:

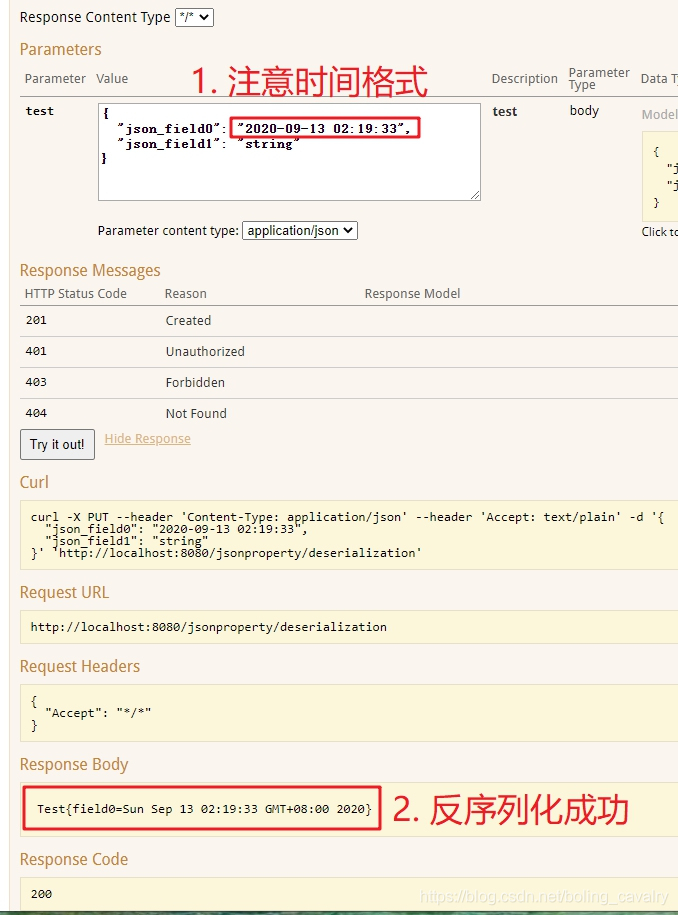
3. 再验证反序列化接口 /jsonproperty/deserialization:
- 至此,整个《jackson学习》系列就全部完成了,希望这十篇内容能够给您带来一些参考,助您在编码过程中更加得心应手的使用Jackson;
你不孤单,欣宸原创一路相伴
欢迎关注公众号:程序员欣宸
微信搜索「程序员欣宸」,我是欣宸,期待与您一同畅游Java世界...
https://github.com/zq2599/blog_demos
jackson学习之十(终篇):springboot整合(配置类)的更多相关文章
- 从.Net到Java学习第十二篇——SpringBoot+JPA提供跨域接口
从.Net到Java学习系列目录 最近又撸了半个月的前端代码,做app离线存储,然后又花了一周去将过去的wcf项目转webapi,java又被落下了,总感觉我特么像斗地主中的癞子牌,变来变去..... ...
- springboot(十四):springboot整合shiro-登录认证和权限管理(转)
springboot(十四):springboot整合shiro-登录认证和权限管理 .embody{ padding:10px 10px 10px; margin:0 -20px; border-b ...
- SpringBoot系列十二:SpringBoot整合 Shiro
声明:本文来源于MLDN培训视频的课堂笔记,写在这里只是为了方便查阅. 1.概念:SpringBoot 整合 Shiro 2.具体内容 Shiro 是现在最为流行的权限认证开发框架,与它起名的只有最初 ...
- 第三篇 SpringBoot整合log4j2详解
源代码:https://pan.baidu.com/s/1d1Lwv1gIvVNltIKVWeEseA 提取码:wff0 SpringBoot整合Log4j2步骤: 1.删除spring-boot-s ...
- rabbitmq学习(五):springboot整合rabbitmq
一.Springboot对rabbitmq的支持 springboot提供了对rabbitmq的支持,并且大大简化了rabbitmq的相关配置.在springboot中,框架帮我们将不同的交换机划分出 ...
- Redis和springboot 整合redisUtil类
一.引入依赖 <dependency> <groupId>org.springframework.boot</groupId> <artifactId> ...
- Redis和SpringBoot整合RedisUtils类
一.引入依赖 <dependency> <groupId>org.springframework.boot</groupId> <artifactId> ...
- springboot项目配置类
一.在springboot项目中,如果不进行配置,直接访问静态页面是无法访问的,需要进行配置,springboot舍弃了XML文件的配置方式,这里我们采用开发配置类的方式.新建MvcConfig类,加 ...
- SpringBoot第十二篇:整合jsp
作者:追梦1819 原文:https://www.cnblogs.com/yanfei1819/p/10953600.html 版权声明:本文为博主原创文章,转载请附上博文链接! 引言 Sprin ...
随机推荐
- MyISAM与InnoDB两者之间区别与选择(转)
Mysql在V5.1之前默认存储引擎是MyISAM:在此之后默认存储引擎是InnoDB MyISAM:默认表类型,它是基于传统的ISAM类型,ISAM是Indexed Sequential Acces ...
- 使用memory_profiler异常
在使用memory_profiler模块0.55.0版本执行命令诊断程序内存用量时,遇到下面错误: C:\Users\Chen\Desktop\python_doc\第四模块课件>python ...
- DOCKER 安装步骤-最靠谱的笔记
一.系统环境规划 服务器名 项目名称 docker 操作系统 CentOS Linux release 7.1.1503 (Core) Docker 版本 17.03.2-ce 二.Docker ...
- 边缘计算k8s集群SuperEdge初体验
前言 手上一直都有一堆的学生主机,各种各样渠道途径拿来的机器. 一直管理里面都比较蛋疼,甚至也不太记得住它们在哪是什么IP,管理起来很是头疼. 有阵子空闲的时候想折腾了一下边缘计算集群方案. 希望能把 ...
- [Usaco2009 Feb]Revamping Trails 道路升级
题目描述 每天,农夫John需要经过一些道路去检查牛棚N里面的牛. 农场上有M(1<=M<=50,000)条双向泥土道路,编号为1..M. 道路i连接牛棚P1_i和P2_i (1 < ...
- centos下解压rar文件,Linux解压tar.gz和tar.bz2的命令
1.下载:根据主机系统下载合适的版本,当前64为centos系统演示下载: wget http://www.rarlab.com/rar/rarlinux-x64-5.3.0.tar.gz 2.解压安 ...
- Python+Selenium+Unittest实现PO模式web自动化框架(2)
1.Common目录下的具体模块讲解. 2.basepage.py basepage.py模块里面是封装的对元素的操作.例如:查找元素.点击元素.文本输入等等. # --^_^-- coding:ut ...
- Hash Array Mapped Trie
Hash Array Mapped Trie Python\hamt.c
- URI与URL傻傻分不清楚?
前言 总所周知,缓存是解决Http1.1协议传输性能的问题中最主要的手段. 缓存既可以存在于浏览器上,也可以存在于服务器中. 而影响缓存的Http头部有很多,其中Cache-Control是比较重要的 ...
- 慕课网金职位 Java工程师2020 百度网盘下载
百度网盘链接:https://pan.baidu.com/s/1xshLRO3ru0LAsQQ0pE67Qg 提取码:bh9f 如果失效加我微信:610060008[视频不加密,资料代码齐全,超清一手 ...