
springboot 使用 swagger2
段时间,同事分享了一下 swagger-ui,于是自己尝试了一下。大致的使用过程这里记录一下:
1.添加依赖
<!--swagger-ui-->
<dependency>
   <groupId>io.springfox</groupId>
   <artifactId>springfox-swagger2</artifactId>
   <version>2.6.1</version>
</dependency>

<dependency>
   <groupId>io.springfox</groupId>
   <artifactId>springfox-swagger-ui</artifactId>
   <version>2.6.1</version>
</dependency>
第一个是API获取的包,第二是官方给出的一个ui界面
2.启用注解或者使用配置类的方式
- 注解方式:启动类上加 @EnableSwagger2 注解和 @ComponentScan(basePackages = {"com.**"}) ,basePackages 取值 是你要扫描的具体的包名
- 配置类方式 。下面只是提供其中一种方式:
import org.springframework.beans.factory.annotation.Value;
import org.springframework.context.annotation.Bean;
import org.springframework.context.annotation.Configuration;
import springfox.documentation.builders.ApiInfoBuilder;
import springfox.documentation.builders.RequestHandlerSelectors;
import springfox.documentation.service.ApiInfo;
import springfox.documentation.service.Contact;
import springfox.documentation.spi.DocumentationType;
import springfox.documentation.spring.web.plugins.Docket;
import springfox.documentation.swagger2.annotations.EnableSwagger2;
@Configuration
@EnableSwagger2
public class SwaggerConfig {
// 这里是用来配置是否启用swagger 的。
@Value("${swagger.enable: true}")
private boolean enableSwagger; public static final String SWAGGER_SCAN_BASE_PACKAGE = "com.test.web.controller";
public static final String VERSION = "1.0.0"; ApiInfo apiInfo() {
return new ApiInfoBuilder()
.title("Swagger API")
.description("This is to show api description")
.contact(new Contact("rh", "www.baidu.com", "ruhui@keking.cn"))
.license("Apache 2.0")
.licenseUrl("http://www.apache.org/licenses/LICENSE-2.0.html")
.termsOfServiceUrl("")
.version(VERSION)
.build();
} @Bean
public Docket customImplementation(){
return new Docket(DocumentationType.SWAGGER_2)
.select()
.apis(RequestHandlerSelectors.basePackage(SWAGGER_SCAN_BASE_PACKAGE))
.build()
.apiInfo(apiInfo());
}
}
3.使用相关注解对项目里的方法或者类进行标识
@Api:用在类上,说明该类的作用
@ApiOperation:用在方法上,说明方法的作用
@ApiImplicitParams:用在方法上包含一组参数说明
@ApiImplicitParam:用在@ApiImplicitParams注解中,指定一个请求参数的各个方面
   paramType:参数放在哪个地方
        header-->请求参数的获取:@RequestHeader
        query-->请求参数的获取:@RequestParam
        path(用于restful接口)-->请求参数的获取:@PathVariable
        body(不常用)
        form(不常用)
    name:参数名
    dataType:参数类型
    required:参数是否必须传
    value:参数的意思
    defaultValue:参数的默认值
@ApiResponses:用于表示一组响应
@ApiResponse:用在@ApiResponses中,一般用于表达一个错误的响应信息
    code:数字,例如400
    message:信息,例如"请求参数没填好"
    response:抛出异常的类
@ApiModel:描述一个Model的信息(这种一般用在post创建的时候,使用@RequestBody这样的场景,请求参数无法使用@ApiImplicitParam注解进行描述的时候)
   @ApiModelProperty:描述一个model的属性

注解有很多,下面列举一个在方法上使用的示例:
  @ApiOperation(value = "根据Id获取用户信息", httpMethod = "GET")

    @ApiImplicitParam(paramType = "query", name = "id", required = true, value = "用户id", defaultValue = "1")

    @RequestMapping(value = "/get", method = {RequestMethod.GET})

    public User userList(Integer id){

        List<User> userList = new ArrayList<>();

        for (int i=1; i<= 5; i++){

            User user = new User(i, "用户" + i);

            userList.add(user);

        }

        return userList.get(id -1);

    }
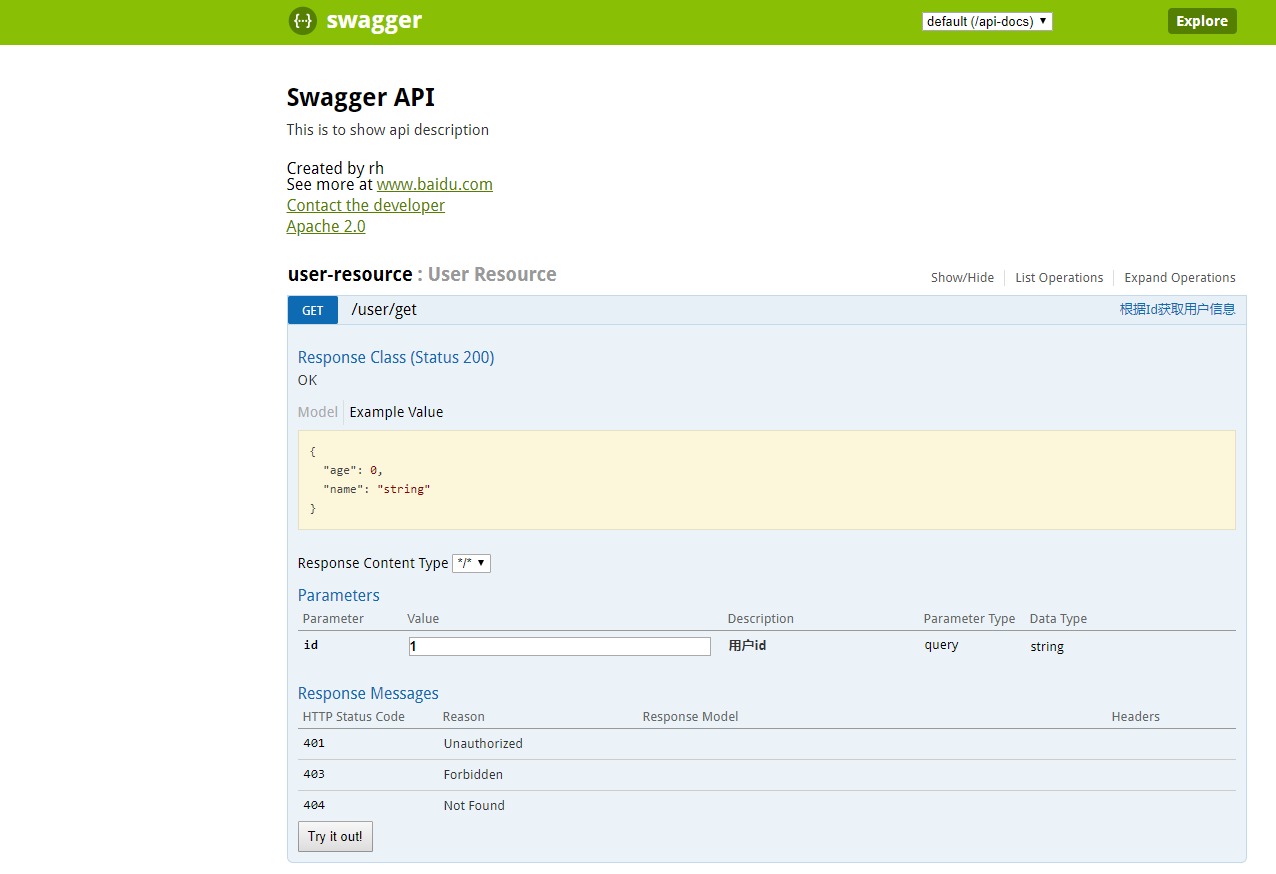
4.启动项目,打开地址 http://服务名:端口/swagger-ui.html#/. 如我的服务启动后打开地址:http://localhost:8080/swagger-ui.html#/
5.配置不同环境是否启用 swagger
- 请看第2步中:使用配置类方式。对 enable 属性进行赋值就行
 @Bean

    public Docket customImplementation(){

        return new Docket(DocumentationType.SWAGGER_2)

                .select()

                .apis(RequestHandlerSelectors.basePackage(SWAGGER_SCAN_BASE_PACKAGE))

                .build()

                .apiInfo(apiInfo());

} - 通过 profile 方式。 在 SwaggerConfig 类上使用 Profile 注解,指定 profile 为 dev、uat,然后配置文件中指定 spring.profiles.active = dev 或者 uat。这个时候就启用了。
@Configuration
@EnableSwagger2
@Profile({"dev","uat"}) // 这里可以用来配置哪个环境启用swagger  -- 对应属性spring.profiles.active
public class SwaggerConfig {
}
springboot 使用 swagger2的更多相关文章
- SpringBoot(七):SpringBoot整合Swagger2
原文地址:https://blog.csdn.net/saytime/article/details/74937664 手写Api文档的几个痛点: 文档需要更新的时候,需要再次发送一份给前端,也就是文 ...
- springboot新增swagger2配置
转自http://www.cnblogs.com/jtlgb/p/8532433.html SpringBoot整合Swagger2 相信各位在公司写API文档数量应该不少,当然如果你还处在自己一个人 ...
- SpringBoot之Swagger2
SpringBoot利用Swagger2只需配置少量的注解信息便能方便地构建强大的API文档. 1.添加maven依赖 2.创建Swagger2配置类 3.在API添加文档内容 4.访问http:// ...
- 【转载】SpringBoot系列——Swagger2
微服务学习二:springboot与swagger2的集成:https://www.cnblogs.com/fengli9998/p/7522973.html 注:需要在启动类加 @EnableSwa ...
- SpringBoot使用Swagger2实现Restful API
很多时候,我们需要创建一个接口项目用来数据调转,其中不包含任何业务逻辑,比如我们公司.这时我们就需要实现一个具有Restful API的接口项目. 本文介绍springboot使用swagger2实现 ...
- SpringBoot整合Swagger2
相信各位在公司写API文档数量应该不少,当然如果你还处在自己一个人开发前后台的年代,当我没说,如今为了前后台更好的对接,还是为了以后交接方便,都有要求写API文档. 手写Api文档的几个痛点: 文档需 ...
- 微服务学习二:springboot与swagger2的集成
现在测试都提倡自动化测试,那我们作为后台的开发人员,也得进步下啊,以前用postman来测试后台接口,那个麻烦啊,一个字母输错就导致测试失败,现在swagger的出现可谓是拯救了这些开发人员,便捷之处 ...
- SpringBoot集成Swagger2实现Restful(类型转换错误解决办法)
1.pom.xml增加依赖包 <dependency> <groupId>io.springfox</groupId> <artifactId>spri ...
- springboot与swagger2的集成
springboot与swagger2的集成 1.出现的背景 随着互联网技术的发展,现在的网站架构基本都由原来的后端渲染变成了:前端渲染.先后端分离的形态,而前端和后端的唯一联系,变成了API接口: ...
- SpringBoot与Swagger2整合
一.Swagger简介与优势 相信各位在公司写API文档数量应该不少,当然如果你还处在自己一个人开发前后台的年代,当我没说,如今为了前后台更好的对接,还为了以后交接方便,都有要求写API文档. Swa ...
随机推荐
- 09--STL关联容器(map/multimap)
一:map/multimap的简介 map是标准的关联式容器,一个map是一个键值对序列,即(key,value)对.它提供基于key的快速检索能力. map中key值是唯一的.集合中的元素按一定的顺 ...
- springBoot多数据源(不同类型数据库)项目
一个基于springboot的多数据源(mysql.sqlserver)项目,先看看项目结构,注意dao层 多数据源mysql配置代码: package com.douzi.robotcenter.c ...
- MongoDB3.6 一键化自动部署方案
1.系统基础配置 下面的命令默认都使用root用户进行操作,操作系统为Centos7,mongodb3.6.x以上版本 1.1 修改系统配置文件/etc/security/limits.conf和/e ...
- Python 各种进制转换
#coding=gbk var=input("请输入十六进制数:") b=bin(int(var,16)) print(b[2:]) 详细请参考python自带int函数.bin函 ...
- 第十三节:实际开发中使用最多的监视锁Monitor、lock语法糖的扩展、混合锁的使用(ManualResetEvent、SemaphoreSlim、ReaderWriterLockSlim)
一. 监视锁(Monitor和lock) 1. Monitor类,限定线程个数的一把锁,两个核心方法: Enter:锁住某个资源. Exit:退出某一个资源. 测试案例:开启5个线程同时对一个变量进行 ...
- MySQL无法插入中文的解决方案
本人在做数据库的连接过程中,发现无法插入中文值.原因是mysql的默认编码是latin1,只须将编码改为utf8即可. 在mysql的命令行窗口中输入 status 会出现当前的编码.在mysql的安 ...
- MapReduce Partition解析
Map的结果,会通过partition分发到Reducer上,reducer操作过后会进行输出.输出的文件格式后缀000001就代表1分区. Mapper处理过后的键值对,是需要送到Reducer那边 ...
- mongoose 连接数据库操作
连接数据库 var mongoose = require('mongoose'); var schema = mongoose.Schema; // 连接MongoDB mongoose.connec ...
- 网络抓包教程之tcpdump
现在的移动端应用几乎都会通过网络请求来和服务器交互,通过抓包来诊断和网络相关的bug是程序员的重要技能之一.抓包的手段有很多:针对http和https可以使用Charles设置代理来做,对于更广泛的协 ...
- @Autowired mapper 层次 bean 带红线
在利用@Autowired 注解创建bean 时候 有时间会带有下滑红色横线 给人一种报错的感觉 下面是去除红线的办法 将颜色红色error 等级降低为黄色warn 即可