Nginx php-fpm 分离搭建 (上) 未完
最近又重新看了一遍 'nginx入门到精通' 抽点时间 出来搭几个Demo 会有更深体会:
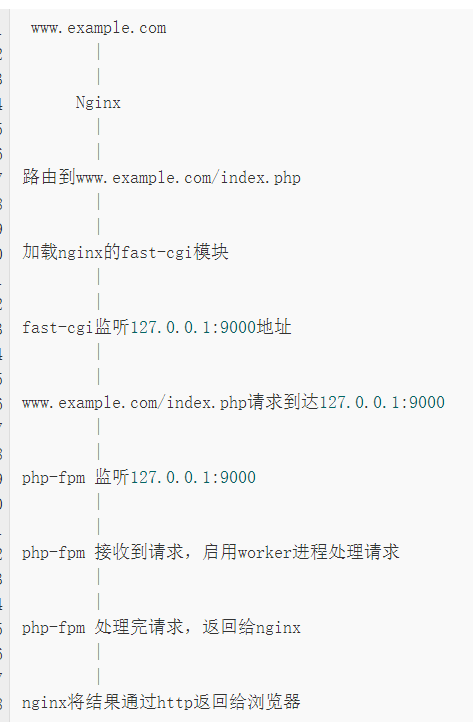
Nginx如何与Php-fpm结合
Nginx不只有处理http请求的功能,还能做反向代理。Nginx通过反向代理功能将动态请求转向后端Php-fpm。
nginx与php-fpm的结合,完整的流程是这样的
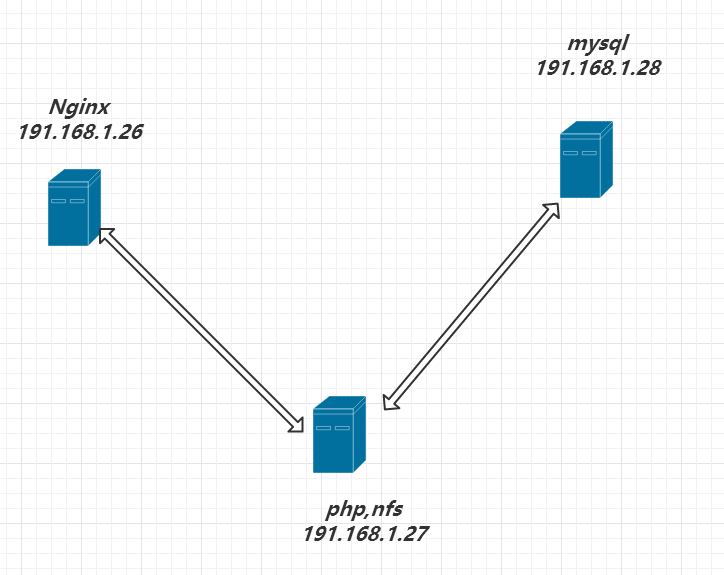
环境说明:
OS:centos6.8 x86
主机IP:
191,168.1.26 nginx
191,168.1.27 php-fpm
191,168.1.28 mysql
1 Nginx 安装
yum install gcc* wget -y #都懂得
安装nginx 相关依赖: *-devel (开发包)
# pcre 支持正则表达式

# zlib 支持数据压缩

# openssl支持HTTPS
 yum install zlib zlib-devel pcre pcre-devel openssl openssl-devel -y

下载Nginx 源码包:
#cd /usr/src
#下载:nginx-1.8.1.tar.gz 解压  tar -zxvf nginx-1.8.1.tar.gz
cd /usr/src && wget http://mirrors.sohu.com/nginx/nginx-1.8.1.tar.gz && tar -zxvf nginx-1.8.1.tar.gz

cd ./nginx-1.8.1

创建groupadd useradd用户 : www   # 创建nginx worker进程工作用户
groupadd -g 700 www
useradd -u 800 -g 700 -s /sbin/nologin www
安装nginx
#--with-http_ssl_module 启用HTTPS加密

#--with-http_stub_status_module 启用nginx状态监控

#--with-http_gzip_static_module  启用静态压缩

#--with-http_realip_module 做代理时获取客户端真实IP

./configure --prefix=/usr/local/nginx --user=www --group=www --with-http_ssl_module --with-http_stub_status_module
--with-http_gzip_static_module --with-http_realip_module --with-pcre --with-http_ssl_module --with-http_stub_status_module --with-http_gzip_static_module --with-http_realip_module
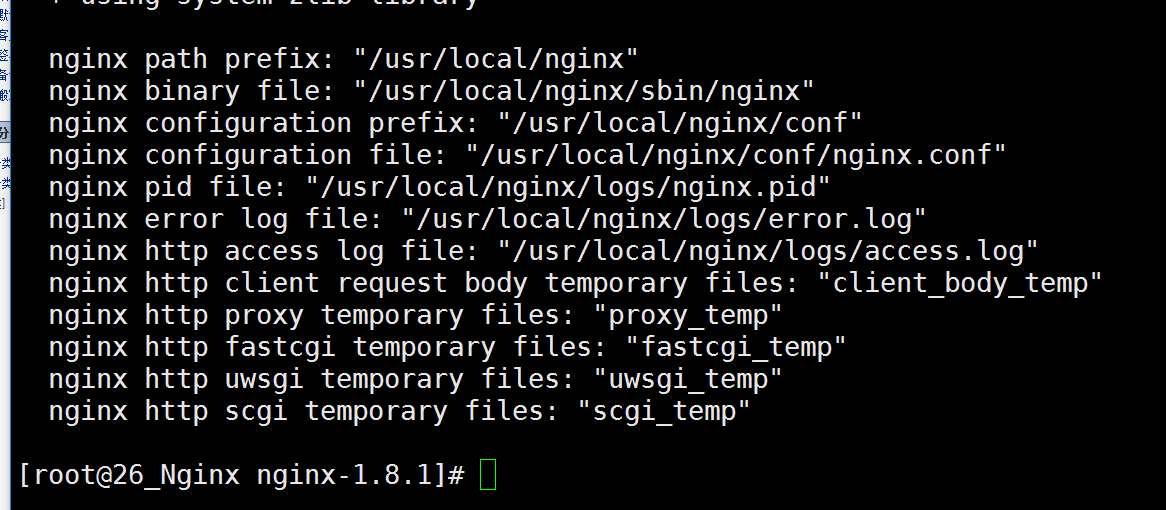
[root@26_Nginx nginx-1.8.1]# make && make install
[root@26_Nginx nginx-1.8.1]# vim /etc/init.d/nginx # 创建nginx服务脚本
#!/bin/sh

#

# nginx - this script starts and stops the nginx daemon

#

# chkconfig: - 85 15

# description: Nginx is an HTTP(S) server, HTTP(S) reverse \

#   proxy and IMAP/POP3 proxy server

# processname: nginx

# config: /etc/nginx/nginx.conf

# config: /etc/sysconfig/nginx

# pidfile: /var/run/nginx.pid

# Source function library.

. /etc/rc.d/init.d/functions

# Source networking configuration.

. /etc/sysconfig/network

# Check that networking is up.

[ "$NETWORKING" = "no" ] && exit 0

    nginx="/usr/local/nginx/sbin/nginx"

    prog=$(basename $nginx)

    NGINX_CONF_FILE="/usr/local/nginx/conf/nginx.conf"

[ -f /etc/sysconfig/nginx ] && . /etc/sysconfig/nginx

    lockfile=/var/lock/subsys/nginx

start() {

    [ -x $nginx ] || exit 5

    [ -f $NGINX_CONF_FILE ] || exit 6

    echo -n $"Starting $prog: "

    daemon $nginx -c $NGINX_CONF_FILE

    retval=$?

    echo

[ $retval -eq 0 ] && touch $lockfile

    return $retval

}

stop() {

    echo -n $"Stopping $prog: "

    killproc $prog -QUIT

    retval=$?

    echo

[ $retval -eq 0 ] && rm -f $lockfile

    return $retval

    killall -9 nginx

}

restart() {

    configtest || return $?

    stop

    sleep 1

    start

}

reload() {

    configtest || return $?

    echo -n $"Reloading $prog: "

    killproc $nginx -HUP

    RETVAL=$?

    echo

}

force_reload() {

    restart

}

configtest() {

    $nginx -t -c $NGINX_CONF_FILE

}

rh_status() {

    status $prog

}

rh_status_q() {

    rh_status >/dev/null 2>&1

}

case "$1" in

    start)

        rh_status_q && exit 0

        $1

    ;;

    stop)

        rh_status_q || exit 0

        $1

    ;;

    restart|configtest)

        $1

    ;;

    reload)

        rh_status_q || exit 7

        $1

    ;;

    force-reload)

        force_reload

    ;;

    status)

        rh_status

    ;;

    condrestart|try-restart)

        rh_status_q || exit 0

    ;;

    *)

        echo $"Usage: $0 {start|stop|status|restart|condrestart|try-restart|reload|force-reload|configtest}"

        exit 2

esac
授权file

[root@26_Nginx nginx-1.8.1]# chmod +x /etc/init.d/nginx

Nginx   添加 用户  组
[root@26_Nginx nginx-1.8.1]# vim /usr/local/nginx/conf/nginx.conf
user www www;
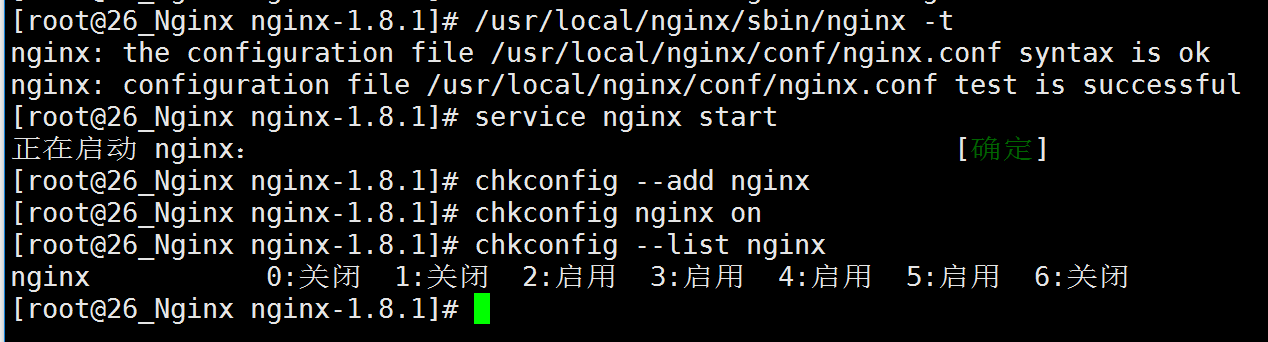
service nginx start
添加开机启动项 chkconfig nginx on
临时关闭 防火墙: iptables -F
修改 nginx 配置文件如下:
vim /usr/local/nginx/conf/nginx.conf
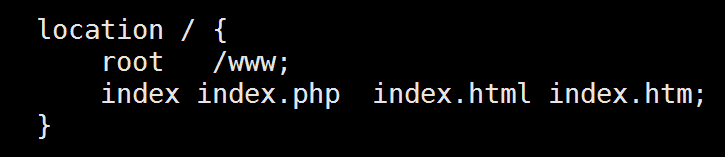
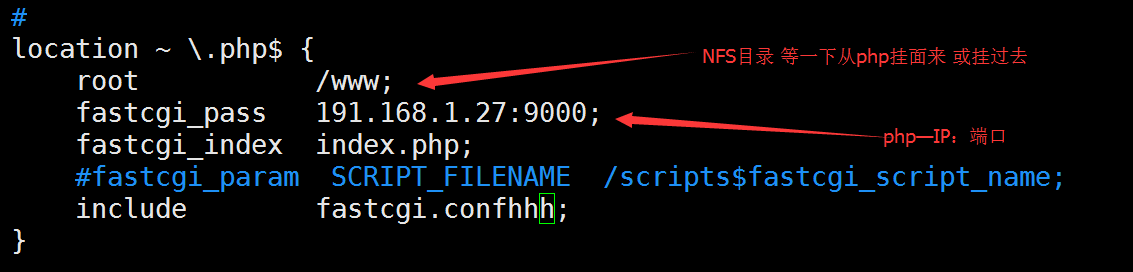
配置修正:
location ~ \.php$ {
root /www;
fastcgi_pass 191.168.1.27:9000;
fastcgi_index index.php;
include fastcgi.conf;
}
配置文件检查:
/usr/local/nginx/sbin/nginx -t
[root@26_Nginx nginx-1.8.1]# /usr/local/nginx/sbin/nginx -t
nginx: the configuration file /usr/local/nginx/conf/nginx.conf syntax is ok
nginx: configuration file /usr/local/nginx/conf/nginx.conf test is successful
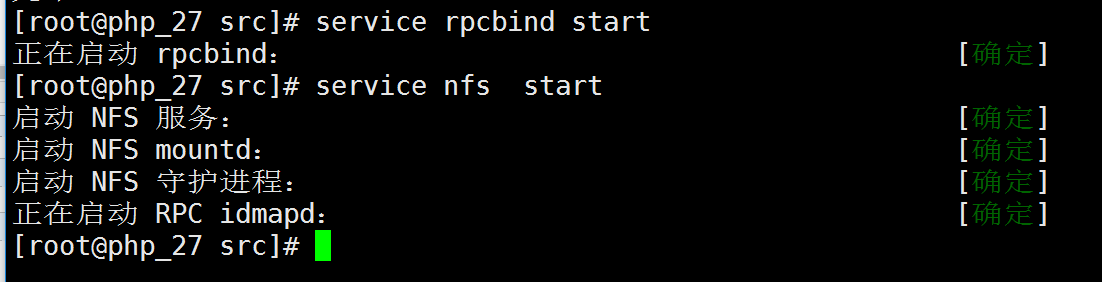
1.2 nfs + rpcbin 安装 共享文件存储server
创建网站测试文件:
mkdir /www
创建测试文件:
echo '<?php phpinfo(); ?>' >> /www/index.php
yum install nfs-utils rpcbin -y
修改nfs 配置文件件
echo '/www 191.168.1.0/24' >> /etc/exports

重启 nfs rpcbin 服务:
service rpcbind restart
service nfs restart
两台主机可重启一下 ntpd 对一下时间 yum install ntpd -y
service ntpd restart
2:php—191.168.1.27:
nfs 安装:
yum install nfs-utils rpcbind -y
挂载 nginx 主机 nfs 到 /www
mount -t nfs 191.168.1.26:/www /www
安装 php-fpm 依赖:
yum install libmcrypt libmcrypt-devel mhash mhash-devel libxml2-devel openssl openssl-devel bzip2-devel libcurl-devel gd -y
EPEL源 没有 libmcrypt , mhash 包
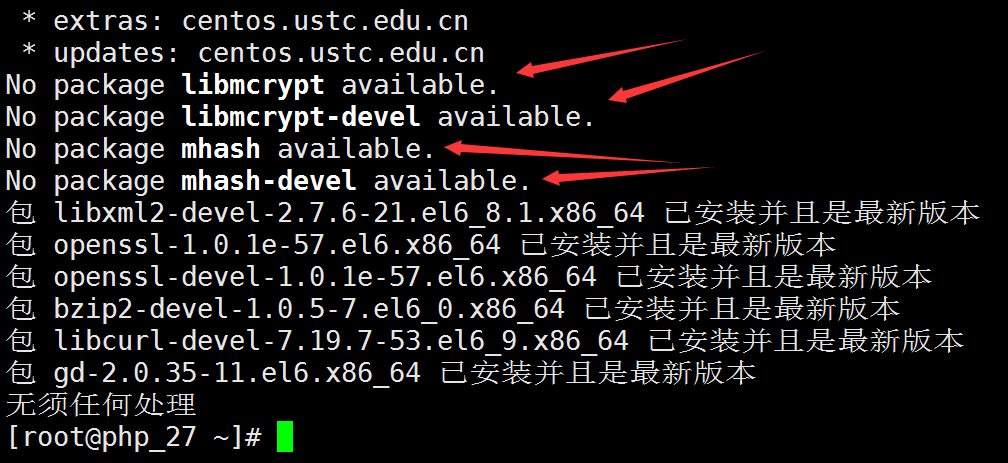
更换EPEL源 :
 [root@php_27 ~]# vim /etc/yum.repos.d/epel-centos6.repo

[epel]

name=Extra Packages for Enterprise Linux 6 - $basearch

baseurl=http://download.fedoraproject.org/pub/epel/6/$basearch

#mirrorlist=https://mirrors.fedoraproject.org/metalink?repo=epel-6&arch=$basearch

failovermethod=priority

enabled=1

gpgcheck=0

gpgkey=file:///etc/pki/rpm-gpg/RPM-GPG-KEY-EPEL-6

[epel-debuginfo]

name=Extra Packages for Enterprise Linux 6 - $basearch - Debug

baseurl=http://download.fedoraproject.org/pub/epel/6/$basearch/debug

#mirrorlist=https://mirrors.fedoraproject.org/metalink?repo=epel-debug-6&arch=$basearch

failovermethod=priority

enabled=0

gpgkey=file:///etc/pki/rpm-gpg/RPM-GPG-KEY-EPEL-6

gpgcheck=0

[epel-source]

name=Extra Packages for Enterprise Linux 6 - $basearch - Source

baseurl=http://download.fedoraproject.org/pub/epel/6/SRPMS

#mirrorlist=https://mirrors.fedoraproject.org/metalink?repo=epel-source-6&arch=$basearch

failovermethod=priority

enabled=0

gpgkey=file:///etc/pki/rpm-gpg/RPM-GPG-KEY-EPEL-6

gpgcheck=0
yum repolist
重新安装
yum install libmcrypt libmcrypt-devel mhash mhash-devel libxml2-devel openssl openssl-devel bzip2-devel libcurl-devel创建PHP 运行 组·用户
groupadd -g 700 www
useradd -u 700 -g 700 -s /sbin/nologin www php --with 一些参数说明:
---------------------------------------------------------------

 1 ./configure --prefix=/usr/local/php \      //安装位置

 2  --with-mysql \                   //支持mysql

 3  --with-pdo-mysql \                //支持pdo模块

 4  --with-mysqli \                  //支持mysqli模块

 5  --with-openssl \                  //支持openssl模块

 6  --enable-fpm \                   //支持fpm模式

 7  --enable-sockets \                //启用socket支持

 8  --enable-sysvshm \                //启用系统共享内存支持

 9  --enable-mbstring \                //使多字节字符串的支持

10  --with-freetype-dir \              //设置FreeType安装前缀路径

11  --with-jpeg-dir \                //设置libjpeg安装前缀路径

12  --with-png-dir \                 //设置libpng安装前缀路径

13  --with-zlib-dir \                //设置libz安装前缀路径

14  --with-libxml-dir=/usr \            //设置libxml2安装路径

15  --enable-xml \
16  --with-mhash \                 //支持mhash

17  --with-mcrypt \                 //支持mcrypt

18  --with-config-file-path=/etc \        //配置文件路径

19  --with-config-file-scan-dir=/etc/php.d \   //配置文件扫描路径

20  --with-bz2 \                      //支持BZip2

21  --with-curl                   //支持curl
---------------------------------------------------------------
下载PHP 源码包并解压:
cd /usr/src/ && wget http://mirrors.sohu.com/php/php-5.6.7.tar.gz && tar -zxvf php-5.6.7.tar.gz
cd php-5.6.7
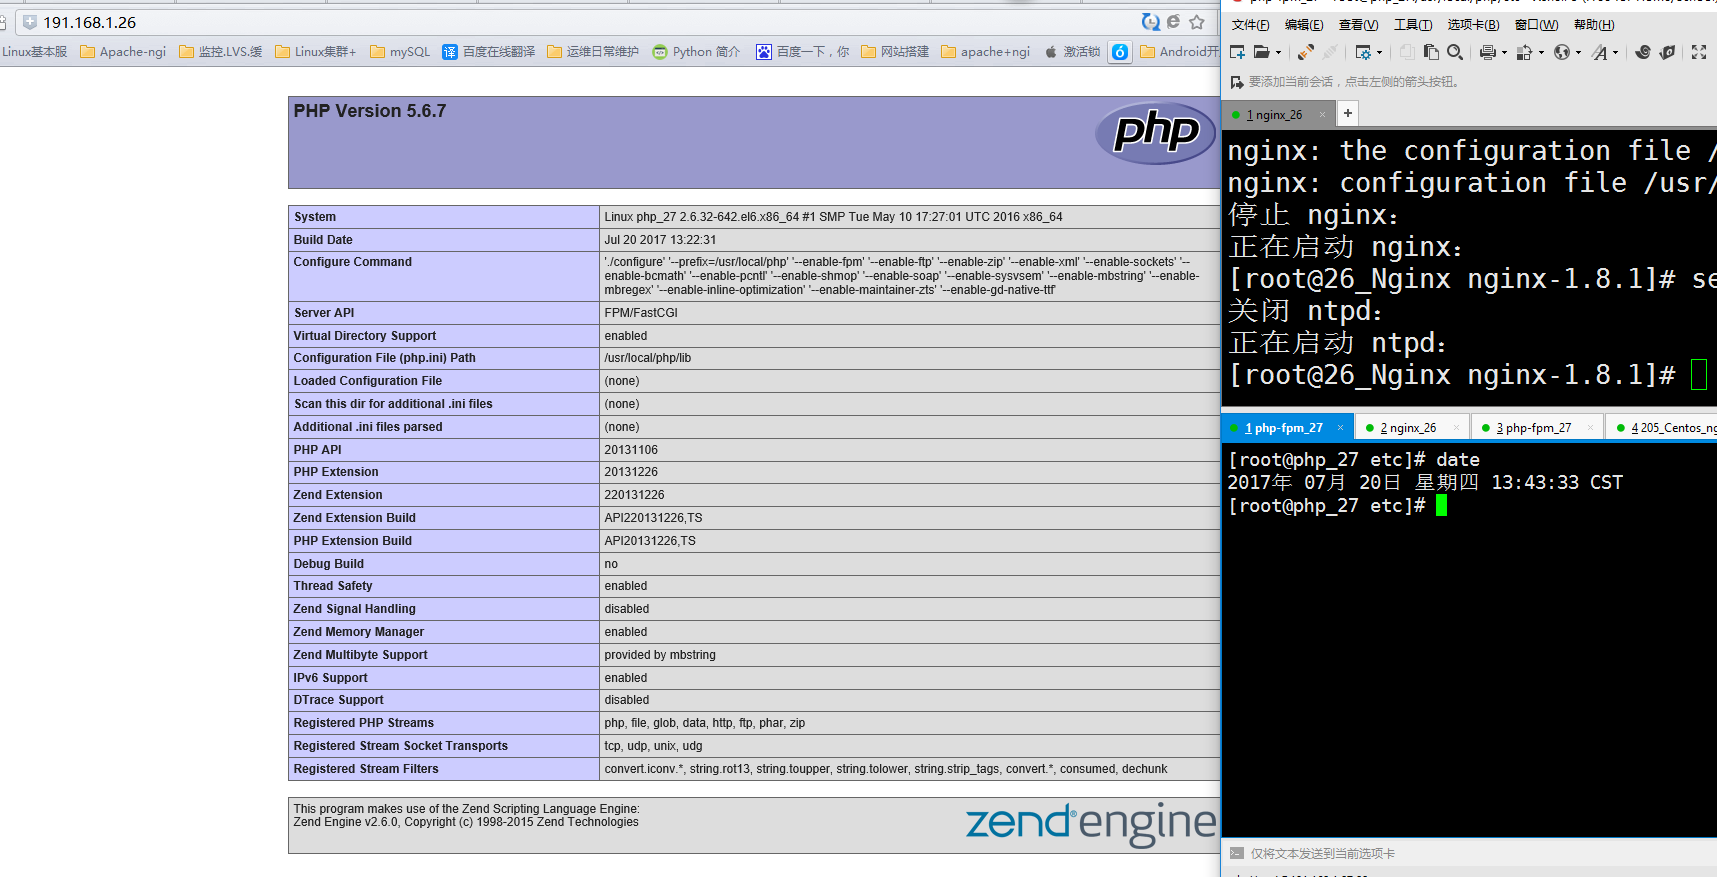
./configure --prefix=/usr/local/php --enable-fpm --enable-ftp --enable-zip --enable-xml --enable-sockets --enable-bcmath --enable-pcntl --enable-shmop --enable-soap --enable-sysvsem --enable-mbstring --enable-mbregex --enable-inline-optimization --enable-maintainer-zts --enable-gd-native-ttf
--with-fpm-user=www --with-fpm-group=www --with-mysql --with-mysqli --with-pdo-mysql --with-openssl --with-freetype-dir --with-iconv-dir --with-jpeg-dir --with-png-dir --with-libxml-dir --with-curl --with-zlib --with-bz2 --with-xmlrpc --with-gd --with-config-file-path=/usr/local/php/etc --with-config-file-scan-dir=/usr/local/php/etc/php.d
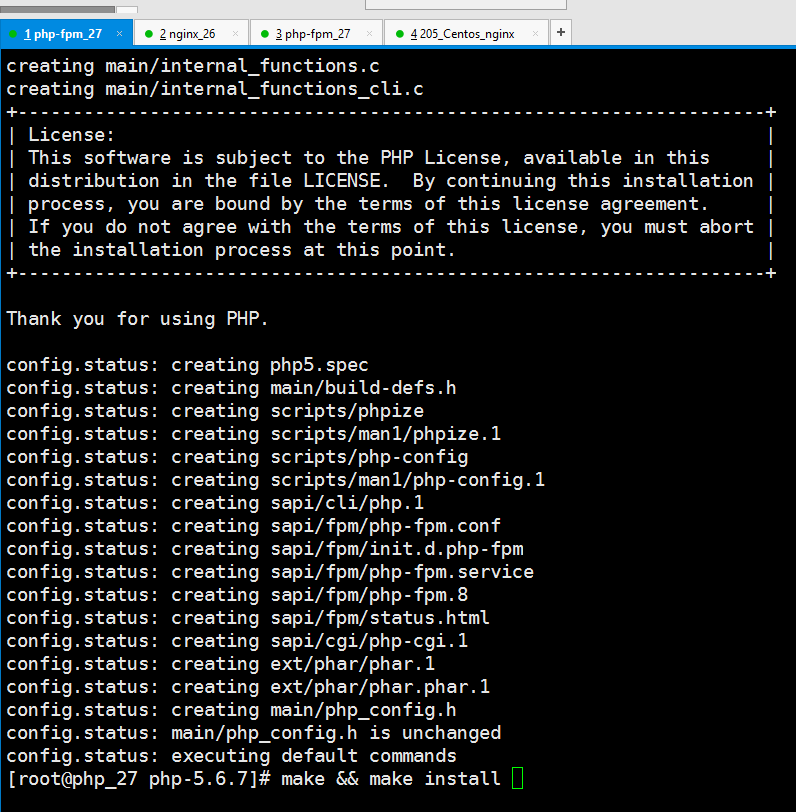
编译时间有点长:
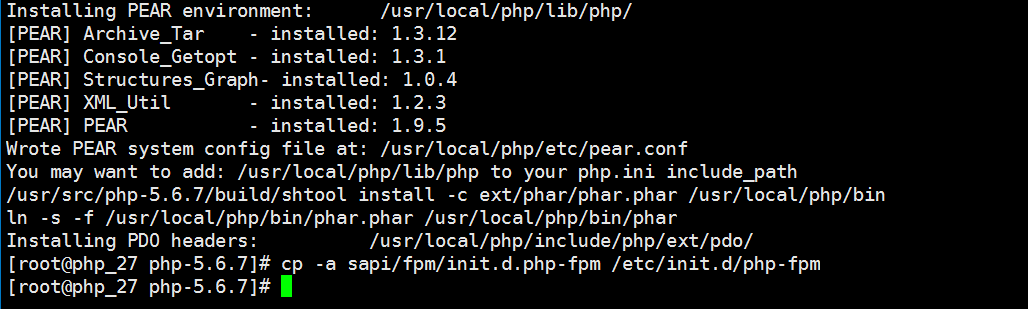
COPY 启动脚本到 /etc/init.d/
[root@php_27 php-5.6.7]# cp -a sapi/fpm/init.d.php-fpm /etc/init.d/php-fpm
[root@php_27 php-5.6.7]# chmod +x /etc/init.d/php-fpm
[root@php_27 php-5.6.7]# cp -a php.ini-production /usr/local/php/etc/php.ini
[root@php_27 php-5.6.7]# cd /usr/local/php/etc/
[root@php_27 etc]# cp -a php-fpm.conf.default php-fpm.conf
[root@php_27 etc]# vim php-fpm.conf # 修改监听地址
listen = 191.168.1.27:9000

重启 nginx
3 安装MYSQL #第三台主机 191.168.1.28 安装Mysql
先来安装NFS rpcbind 并且挂载到 nginx php-fpm
yum install nfs-utils rpcbind -y
测试用先关闭 iptables -F
创建/WWW 网站目录 #这里可以使用git管理网站目录
mkdir /www
修改NFS配置文件
echo "/www 191.168.1.1/24(rw,no_root_squash)" >> /etc/exports
重启服务
service rpcbind start
service nfs start
在其它两台主机
showmount -e 191.168.1.28 #error
clnt_create: RPC: Port mapper failure - Unable to receive: errno 113 (No route to host)
或 clnt_create: RPC: Unknown host的解决方法
第一条为 我 用了 iptables -F 解决 iptables stop
第二条 echo '191.168.1.28 mysql_server' > /etc/hosts
在次 showmount -e mysql_server
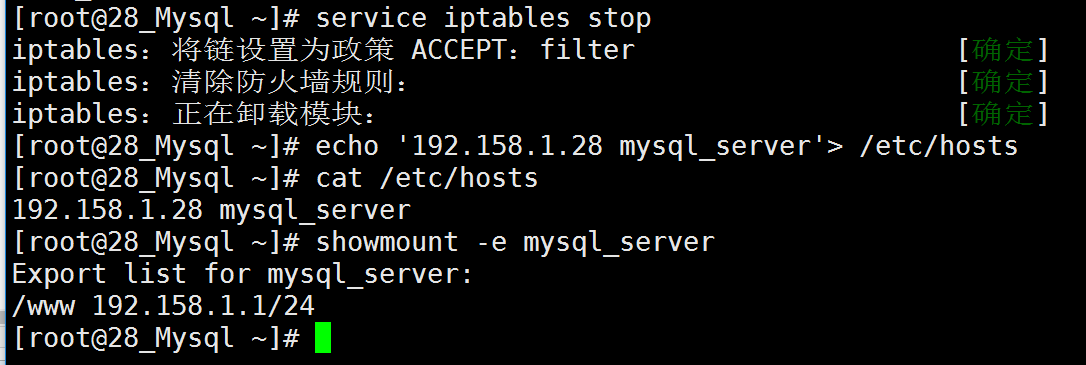
在次挂载 OK
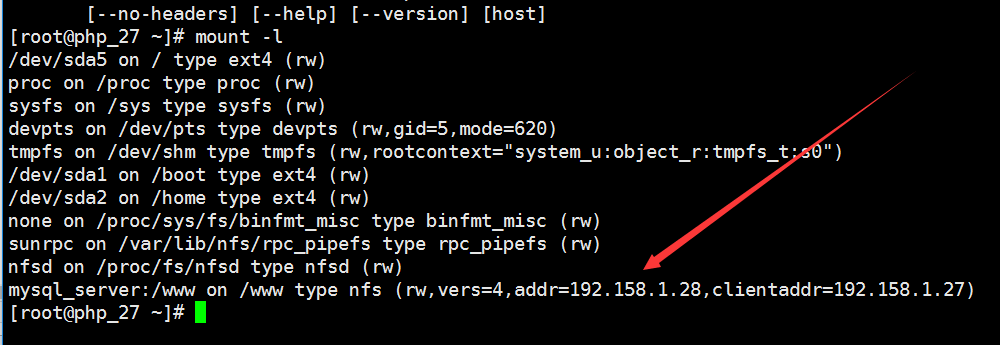
mount -t nfs mysql_server:/www /www

mount -l
yum install mysql mysql-server mysql-devel -y
Nginx php-fpm 分离搭建 (上) 未完的更多相关文章
- virtualbox搭建ubuntu server nginx+mysql+tomcat web服务器1 (未完待续)
virtualbox搭建ubuntu server nginx+mysql+tomcat web服务器1 (未完待续) 第一次接触到 linux,不知道linux的确很强大,然后用virtualbox ...
- nginx与php分离搭建
nginx与php分离搭建 nginx配置 server { listen 80; 定义端口 server_name www.a.org; 定义域名 location / ...
- Kubernetes(二)-- 搭建(未完待续)
一.部署前规划 1. 操作系统初始化设置 :需要设置好集群机器,关闭防火墙和selinux 2. 创建ca证书和私钥 :集群间通信要加密,那么肯定要有ca的创建,以后就用这一步创建的ca当作证书颁发机 ...
- MacOS下Rails+Nginx+SSL环境的搭建(上)
这里把主要的步骤写下来,反正我是走了不少弯路,希望由此需求的朋友们别再走类似的弯路.虽说环境是在MacOS下搭建,但是基本上和linux下的很相像,大家可以举一反三. 一.安装Rails 这个是最简单 ...
- Java Web 1-开发环境搭建(未完待续)
Java Web包含什么?前台.后台,前台的HTML.JSP,后台的Servlet.(目前所知) 开发环境: JDK,MySQL,Tomcat,Eclipse @ Windows 10 说明:本文总结 ...
- 快速安装Nginx及配置详解(未完待续)
导读: Nginx (engine x) 是一个高性能的HTTP和反向代理服务器,也是一个IMAP/POP3/SMTP服务器,从2007年被德国人开发出来后可以说在市场的占有率一路飙升,因为它支持高并 ...
- 搭建EOS未完
纯净机器上部署 EOS 测试网 演示的系统为 Ubuntu 18.04 LTS,内存8g以上,硬盘300g+ clone EOS代码 们以EOS-Mainnet仓库部署,(EOS-Mainnet是部署 ...
- [ambari环境搭建](未完待续)
[安装] https://blog.csdn.net/Happy_Sunshine_Boy/article/details/86595945#commentBox https://www.jiansh ...
- nginx服务器的负载均衡和动静分离(未完)
安装nginx,我的博客里面有介绍源码和yum安装. 实战:使用nginx实现动静分离的负载均衡集群 实战:使用haproxy实现负载均衡集群 LB负载均衡集群分为两类:LVS(四层)和Nginx或p ...
随机推荐
- Python学习第三课——运算符
# 运算符 + - * / **(幂) %(取余) //(取整) num=9%2 print("余数为"+(str)(num)) #运算结果为 1 num1=9//2 print( ...
- Zookeeper集群搭建(单机多节点,伪集群,docker-compose集群)
Zookeeper介绍 原理简介 ZooKeeper是一个分布式的.开源的分布式应用程序协调服务.它公开了一组简单的原语,分布式应用程序可以在此基础上实现更高级别的同步.配置维护.组和命名服务.它的设 ...
- 《C++ Primer(中文版)(第5版)》斯坦利·李普曼 (Stanley B. Lippman) (作者), 约瑟·拉乔伊 (Josee Lajoie) (作者), 芭芭拉·默 (Barbara E. Moo) (作者) azw3
内容简介: 这本久负盛名的C++经典教程,时隔八年之久,终迎来的重大升级.除令全球无数程序员从中受益,甚至为之迷醉的——C++ 大师 Stanley B. Lippman 的丰富实践经验,C++标准委 ...
- JS操作DOM节点查找
JS中常用的DOM操作事件,包括有节点查找,键盘鼠标事件等等,本文内容介绍DOM的节点查找. <script> window.onload = function(){ //children ...
- java的基本类型和对应的封装类
封装,是java这门语言的重要核心思想之一,封装也是对面向对象这一思想很好的体现. 在很多情况下,我们需要对数据进行一些转换,如:将一字符串"123"转换成int类型的123,或者 ...
- 吴裕雄--天生自然JAVA数据库编程:SQL常用语句基础
DROP TABLE user ; -- 删除表 CREATE TABLE user( id INT AUTO_INCREMENT PRIMARY KEY , name ) NOT NULL , pa ...
- 吴裕雄 Bootstrap 前端框架开发——Bootstrap 图片:为图片添加圆角 (IE8 不支持)
<!DOCTYPE html> <html> <head> <meta charset="utf-8"> <title> ...
- maven安装和eclipse集成遇到的问题
修改完maven的位置之后,修改配置文件conf/settings.xml <localRepository>E:/apache-maven-3.3.1-bin/mvn/mvnreposi ...
- 学生选课数据库MySQL语句练习题45道
1. 查询Student表中的所有记录的Sname.Ssex和Class列. select Sname,Ssex,Class from Student;2. 查询教师所有的单位即不重复的Depart列 ...
- imagenet下载及训练
imagenet 种子 迅雷打开验证集http://academictorrents.com/download/5d6d0df7ed81efd49ca99ea4737e0ae5e3a5f2e5.tor ...