
吴裕雄--天生自然 pythonTensorFlow自然语言处理:Attention模型--测试
import sys

import codecs

import tensorflow as tf

# 1.参数设置。

# 读取checkpoint的路径。9000表示是训练程序在第9000步保存的checkpoint。

CHECKPOINT_PATH = "F:\\temp\\attention_ckpt-9000"

# 模型参数。必须与训练时的模型参数保持一致。

HIDDEN_SIZE = 1024                          # LSTM的隐藏层规模。

DECODER_LAYERS = 2                          # 解码器中LSTM结构的层数。

SRC_VOCAB_SIZE = 10000                      # 源语言词汇表大小。

TRG_VOCAB_SIZE = 4000                       # 目标语言词汇表大小。

SHARE_EMB_AND_SOFTMAX = True                # 在Softmax层和词向量层之间共享参数。

# 词汇表文件

SRC_VOCAB = "F:\\TensorFlowGoogle\\201806-github\\TensorFlowGoogleCode\\Chapter09\\en.vocab"

TRG_VOCAB = "F:\\TensorFlowGoogle\\201806-github\\TensorFlowGoogleCode\\Chapter09\\zh.vocab"

# 词汇表中<sos>和<eos>的ID。在解码过程中需要用<sos>作为第一步的输入,并将检查

# 是否是<eos>,因此需要知道这两个符号的ID。

SOS_ID = 1

EOS_ID = 2
# 2.定义NMT模型和解码步骤。

# 定义NMTModel类来描述模型。

class NMTModel(object):

    # 在模型的初始化函数中定义模型要用到的变量。

    def __init__(self):

        # 定义编码器和解码器所使用的LSTM结构。

        self.enc_cell_fw = tf.nn.rnn_cell.BasicLSTMCell(HIDDEN_SIZE)

        self.enc_cell_bw = tf.nn.rnn_cell.BasicLSTMCell(HIDDEN_SIZE)

        self.dec_cell = tf.nn.rnn_cell.MultiRNNCell([tf.nn.rnn_cell.BasicLSTMCell(HIDDEN_SIZE) for _ in range(DECODER_LAYERS)])

        # 为源语言和目标语言分别定义词向量。

        self.src_embedding = tf.get_variable("src_emb", [SRC_VOCAB_SIZE, HIDDEN_SIZE])

        self.trg_embedding = tf.get_variable("trg_emb", [TRG_VOCAB_SIZE, HIDDEN_SIZE])

        # 定义softmax层的变量

        if SHARE_EMB_AND_SOFTMAX:

            self.softmax_weight = tf.transpose(self.trg_embedding)

        else:

            self.softmax_weight = tf.get_variable("weight", [HIDDEN_SIZE, TRG_VOCAB_SIZE])

        self.softmax_bias = tf.get_variable("softmax_bias", [TRG_VOCAB_SIZE])

    def inference(self, src_input):

        # 虽然输入只有一个句子,但因为dynamic_rnn要求输入是batch的形式,因此这里

        # 将输入句子整理为大小为1的batch。

        src_size = tf.convert_to_tensor([len(src_input)], dtype=tf.int32)

        src_input = tf.convert_to_tensor([src_input], dtype=tf.int32)

        src_emb = tf.nn.embedding_lookup(self.src_embedding, src_input)

        with tf.variable_scope("encoder"):

            # 使用bidirectional_dynamic_rnn构造编码器。这一步与训练时相同。

            enc_outputs, enc_state = tf.nn.bidirectional_dynamic_rnn(self.enc_cell_fw, self.enc_cell_bw, src_emb, src_size, dtype=tf.float32)

            # 将两个LSTM的输出拼接为一个张量。

            enc_outputs = tf.concat([enc_outputs[0], enc_outputs[1]], -1)

        with tf.variable_scope("decoder"):

            # 定义解码器使用的注意力机制。

            attention_mechanism = tf.contrib.seq2seq.BahdanauAttention(HIDDEN_SIZE, enc_outputs,memory_sequence_length=src_size)

            # 将解码器的循环神经网络self.dec_cell和注意力一起封装成更高层的循环神经网络。

            attention_cell = tf.contrib.seq2seq.AttentionWrapper(self.dec_cell, attention_mechanism,attention_layer_size=HIDDEN_SIZE)

        # 设置解码的最大步数。这是为了避免在极端情况出现无限循环的问题。

        MAX_DEC_LEN=100

        with tf.variable_scope("decoder/rnn/attention_wrapper"):

            # 使用一个变长的TensorArray来存储生成的句子。

            init_array = tf.TensorArray(dtype=tf.int32, size=0,dynamic_size=True, clear_after_read=False)

            # 填入第一个单词<sos>作为解码器的输入。

            init_array = init_array.write(0, SOS_ID)

            # 调用attention_cell.zero_state构建初始的循环状态。循环状态包含

            # 循环神经网络的隐藏状态,保存生成句子的TensorArray,以及记录解码

            # 步数的一个整数step。

            init_loop_var = (attention_cell.zero_state(batch_size=1, dtype=tf.float32),init_array, 0)

            # tf.while_loop的循环条件:

            # 循环直到解码器输出<eos>,或者达到最大步数为止。

            def continue_loop_condition(state, trg_ids, step):

                return tf.reduce_all(tf.logical_and(tf.not_equal(trg_ids.read(step), EOS_ID),tf.less(step, MAX_DEC_LEN-1)))

            def loop_body(state, trg_ids, step):

                # 读取最后一步输出的单词,并读取其词向量。

                trg_input = [trg_ids.read(step)]

                trg_emb = tf.nn.embedding_lookup(self.trg_embedding,trg_input)

                # 调用attention_cell向前计算一步。

                dec_outputs, next_state = attention_cell.call(state=state, inputs=trg_emb)

                # 计算每个可能的输出单词对应的logit,并选取logit值最大的单词作为

                # 这一步的而输出。

                output = tf.reshape(dec_outputs, [-1, HIDDEN_SIZE])

                logits = (tf.matmul(output, self.softmax_weight)+ self.softmax_bias)

                next_id = tf.argmax(logits, axis=1, output_type=tf.int32)

                # 将这一步输出的单词写入循环状态的trg_ids中。

                trg_ids = trg_ids.write(step+1, next_id[0])

                return next_state, trg_ids, step+1

            # 执行tf.while_loop,返回最终状态。

            state, trg_ids, step = tf.while_loop(continue_loop_condition, loop_body, init_loop_var)

            return trg_ids.stack()
# 3.翻译一个测试句子。

def main():

    # 定义训练用的循环神经网络模型。

    with tf.variable_scope("nmt_model", reuse=None):

        model = NMTModel()

    # 定义个测试句子。

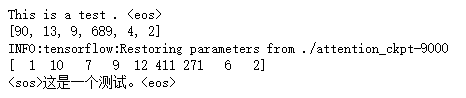
    test_en_text = "This is a test . <eos>"

    print(test_en_text)

    # 根据英文词汇表,将测试句子转为单词ID。

    with codecs.open(SRC_VOCAB, "r", "utf-8") as f_vocab:

        src_vocab = [w.strip() for w in f_vocab.readlines()]

        src_id_dict = dict((src_vocab[x], x) for x in range(len(src_vocab)))

    test_en_ids = [(src_id_dict[token] if token in src_id_dict else src_id_dict['<unk>'])for token in test_en_text.split()]

    print(test_en_ids)

    # 建立解码所需的计算图。

    output_op = model.inference(test_en_ids)

    sess = tf.Session()

    saver = tf.train.Saver()

    saver.restore(sess, CHECKPOINT_PATH)

    # 读取翻译结果。

    output_ids = sess.run(output_op)

    print(output_ids)

    # 根据中文词汇表,将翻译结果转换为中文文字。

    with codecs.open(TRG_VOCAB, "r", "utf-8") as f_vocab:

        trg_vocab = [w.strip() for w in f_vocab.readlines()]

    output_text = ''.join([trg_vocab[x] for x in output_ids])

    # 输出翻译结果。

    print(output_text.encode('utf8').decode(sys.stdout.encoding))

    sess.close()

if __name__ == "__main__":

    main()
吴裕雄--天生自然 pythonTensorFlow自然语言处理:Attention模型--测试的更多相关文章
- 吴裕雄--天生自然 pythonTensorFlow自然语言处理:Attention模型--训练
import tensorflow as tf # 1.参数设置. # 假设输入数据已经转换成了单词编号的格式. SRC_TRAIN_DATA = "F:\\TensorFlowGoogle ...
- 吴裕雄--天生自然 pythonTensorFlow自然语言处理:Seq2Seq模型--训练
import tensorflow as tf # 1.参数设置. # 假设输入数据已经用9.2.1小节中的方法转换成了单词编号的格式. SRC_TRAIN_DATA = "F:\\Tens ...
- 吴裕雄--天生自然 pythonTensorFlow自然语言处理:Seq2Seq模型--测试
import sys import codecs import tensorflow as tf # 1.参数设置. # 读取checkpoint的路径.9000表示是训练程序在第9000步保存的ch ...
- 吴裕雄--天生自然 pythonTensorFlow自然语言处理:PTB 语言模型
import numpy as np import tensorflow as tf # 1.设置参数. TRAIN_DATA = "F:\TensorFlowGoogle\\201806- ...
- 吴裕雄--天生自然 pythonTensorFlow自然语言处理:文本数据预处理--生成训练文件
import sys import codecs # 1. 参数设置 MODE = "PTB_TRAIN" # 将MODE设置为"PTB_TRAIN", &qu ...
- 吴裕雄--天生自然 pythonTensorFlow自然语言处理:交叉熵损失函数
import tensorflow as tf # 1. sparse_softmax_cross_entropy_with_logits样例. # 假设词汇表的大小为3, 语料包含两个单词" ...
- 吴裕雄--天生自然 pythonTensorFlow图形数据处理:循环神经网络预测正弦函数
import numpy as np import tensorflow as tf import matplotlib.pyplot as plt # 定义RNN的参数. HIDDEN_SIZE = ...
- 吴裕雄--天生自然 pythonTensorFlow图形数据处理:数据集高层操作
import tempfile import tensorflow as tf # 1. 列举输入文件. # 输入数据生成的训练和测试数据. train_files = tf.train.match_ ...
- 吴裕雄--天生自然 pythonTensorFlow图形数据处理:数据集基本使用方法
import tempfile import tensorflow as tf # 1. 从数组创建数据集. input_data = [1, 2, 3, 5, 8] dataset = tf.dat ...
随机推荐
- Webpack - 把json文件打包进js文件
把html文件打包进index.js 1 新建文件 typings.d.ts declare module "*.html" { const content: st ...
- The hierarchy of the type is inconsistent
原因:我看到有一个interface的java类里面import了一个没有用到的类,手贱,把这个接口里面引用了但是没有没有用到的类删掉了, 结果这个接口的子类用到了,统统报标题上的错误.只要把删掉的改 ...
- 剑指offer_2.1_Day_5
输入一个链表,按链表从尾到头的顺序返回一个ArrayList. import java.util.ArrayList; public class Solution { public ArrayList ...
- 十一、CI框架之输出用户IP地址
一.代码如下: 二.效果如下: 不忘初心,如果您认为这篇文章有价值,认同作者的付出,可以微信二维码打赏任意金额给作者(微信号:382477247)哦,谢谢.
- Hadoop家族系统学习路线
本文主要介绍Hadoop家族产品,常用的项目包括Hadoop,Hive,Pig,HBase,Sqoop,Mahout,Zookeeper,Avro,Ambari,Chukwa,新增加的项目包括,YAR ...
- 吴裕雄--天生自然JAVA SPRING框架开发学习笔记:第一个Spring程序
1. 创建项目 在 MyEclipse 中创建 Web 项目 springDemo01,将 Spring 框架所需的 JAR 包复制到项目的 lib 目录中,并将添加到类路径下,添加后的项目如图 2. ...
- Ansible常见错误解析
背景 由于工作中经常用到ansible,所以整理了常用的ansible错误及原因分析,方便自己也方便别人参考. 1.shell 模块常见错误 1.1 使用shell遇到"msg": ...
- Mybatis实现增删改查(二)
1. 准备 请先完成Mybatis基本配置(一)的基本内容 2. 查询多条商品信息 1)在com.mybatis.dao.PartDao中增加接口函数 public List<PartInfo& ...
- 洛谷 P5664 Emiya 家今天的饭(84分)
题目传送门 解题思路: 对于每一个列c,f[i][j][k]表示到第i行,第c列选了j个,其它列一共选了k个,然后我们读题意发现只要j>k,那就一定是不合法的,然后统计所有方案,减去所有不合法方 ...
- java课程之团队开发之用户模板和用户场景
用户模板与用户场景: 姓名:孙某 性别年龄:男 19岁 职业;学生 收入:无 知识层次能力:大学生,用电脑熟练. 生活/工作状况:正常进行上课,学霸. 动机目的,困难:喜欢依据自己的兴趣进行学习. 用 ...