
muduo网络库源码学习————线程特定数据
muduo库线程特定数据源码文件为ThreadLocal.h
//线程本地存储

// Use of this source code is governed by a BSD-style license

// that can be found in the License file.

//

// Author: Shuo Chen (chenshuo at chenshuo dot com)

#ifndef MUDUO_BASE_THREADLOCAL_H

#define MUDUO_BASE_THREADLOCAL_H

#include <boost/noncopyable.hpp>

#include <pthread.h>

namespace muduo

{

template<typename T>

class ThreadLocal : boost::noncopyable//不可拷贝

{

 public:

  ThreadLocal()

  {//构造函数创建key,ThreadLocal::destructor为销毁的回调函数

    pthread_key_create(&pkey_, &ThreadLocal::destructor);

  }

  ~ThreadLocal()

  {//析构函数销毁key,但并不是销毁实际的数据

    pthread_key_delete(pkey_);

  }

  T& value()

  {//获取线程特定数据

    T* perThreadValue = static_cast<T*>(pthread_getspecific(pkey_));

    if (!perThreadValue) //返回指针如果是空,说明特定数据还没有创建

    {

      T* newObj = new T();//创建数据

      pthread_setspecific(pkey_, newObj);//设定特定数据

      perThreadValue = newObj;

    }

    return *perThreadValue;//返回特定数据

  }

 private:

  //作为回调函数销毁实际的数据

  static void destructor(void *x)

  {

    T* obj = static_cast<T*>(x);

    typedef char T_must_be_complete_type[sizeof(T) == 0 ? -1 : 1];//完全类型

    delete obj;//调用delete销毁数据

  }

 private:

  pthread_key_t pkey_;

};

}

#endif
有两个测试程序
ThreadLocal_test.cc
//线程本地存储测试程序

#include <muduo/base/ThreadLocal.h>

#include <muduo/base/CurrentThread.h>

#include <muduo/base/Thread.h>

#include <boost/noncopyable.hpp>

#include <stdio.h>

class Test : boost::noncopyable

{

 public:

  Test()

  {

    printf("tid=%d, constructing %p\n", muduo::CurrentThread::tid(), this);

  }

  ~Test()

  {

    printf("tid=%d, destructing %p %s\n", muduo::CurrentThread::tid(), this, name_.c_str());

  }

  const std::string& name() const { return name_; }

  void setName(const std::string& n) { name_ = n; }

 private:

  std::string name_;

};

//定义两个线程特定数据对象,每个线程都有这样的对象

muduo::ThreadLocal<Test> testObj1;

muduo::ThreadLocal<Test> testObj2;

void print()//打印函数

{

  printf("tid=%d, obj1 %p name=%s\n",muduo::CurrentThread::tid(),&testObj1.value(),testObj1.value().name().c_str());

  printf("tid=%d, obj2 %p name=%s\n",muduo::CurrentThread::tid(),&testObj2.value(),testObj2.value().name().c_str());

}

void threadFunc()

{

  print();

  //testObj1.value()返回的是Test类型的引用

  testObj1.value().setName("changed 1");

  testObj2.value().setName("changed 42");

  print();

}

int main()

{

  testObj1.value().setName("main one");

  print();

  //创建线程,每个线程都有自己的testObj1,testObj2

  muduo::Thread t1(threadFunc);

  t1.start();//启动线程

  t1.join();

  testObj2.value().setName("main two");

  print();

  pthread_exit(0);//退出主线程

}
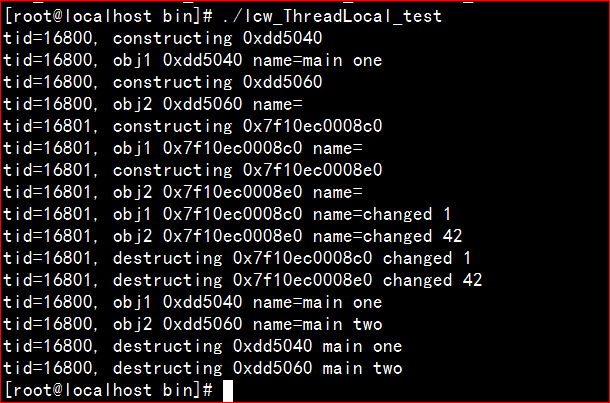
执行结果如下:
SingletonThreadLocal_test.cc
#include <muduo/base/Singleton.h>

#include <muduo/base/CurrentThread.h>

#include <muduo/base/ThreadLocal.h>

#include <muduo/base/Thread.h>

#include <boost/bind.hpp>

#include <boost/noncopyable.hpp>

#include <stdio.h>

class Test : boost::noncopyable

{

 public:

  Test()

  {

    printf("tid=%d, constructing %p\n", muduo::CurrentThread::tid(), this);

  }

  ~Test()

  {

    printf("tid=%d, destructing %p %s\n", muduo::CurrentThread::tid(), this, name_.c_str());

  }

  const std::string& name() const { return name_; }

  void setName(const std::string& n) { name_ = n; }

 private:

  std::string name_;

};

//单例对象:muduo::Singleton<muduo::ThreadLocal<Test> >::instance(),value是线程特定数据,每个线程都有的

#define STL muduo::Singleton<muduo::ThreadLocal<Test> >::instance().value()

void print()

{//打印函数

  printf("tid=%d, %p name=%s\n",muduo::CurrentThread::tid(),&STL,STL.name().c_str());

}

void threadFunc(const char* changeTo)

{

  print();

  STL.setName(changeTo);//设置线程特定数据的名称

  sleep(1);//睡眠

  print();

}

int main()

{

  STL.setName("main one");//设置线程特定数据的名称

  //创建两个线程,threadFunc带参数

  muduo::Thread t1(boost::bind(threadFunc, "thread1"));

  muduo::Thread t2(boost::bind(threadFunc, "thread2"));

  //启动两个线程

  t1.start();

  t2.start();

  t1.join();

  print();

  t2.join();

  pthread_exit(0);

}
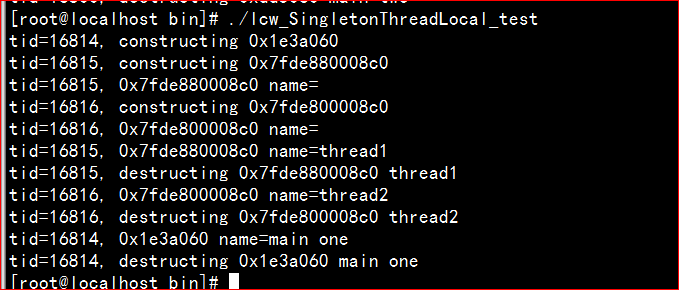
执行结果如下:
muduo网络库源码学习————线程特定数据的更多相关文章
- muduo网络库源码学习————线程本地单例类封装
muduo库中线程本地单例类封装代码是ThreadLocalSingleton.h 如下所示: //线程本地单例类封装 // Use of this source code is governed b ...
- muduo网络库源码学习————线程池实现
muduo库里面的线程池是固定线程池,即创建的线程池里面的线程个数是一定的,不是动态的.线程池里面一般要包含线程队列还有任务队列,外部程序将任务存放到线程池的任务队列中,线程池中的线程队列执行任务,也 ...
- muduo网络库源码学习————线程类
muduo库里面的线程类是使用基于对象的编程思想,源码目录为muduo/base,如下所示: 线程类头文件: // Use of this source code is governed by a B ...
- muduo网络库源码学习————线程安全
线程安全使用单例模式,保证了每次只创建单个对象,代码如下: Singleton.h // Use of this source code is governed by a BSD-style lice ...
- muduo网络库源码学习————Timestamp.cc
今天开始学习陈硕先生的muduo网络库,moduo网络库得到很多好评,陈硕先生自己也说核心代码不超过5000行,所以我觉得有必要拿过来好好学习下,学习的时候在源码上面添加一些自己的注释,方便日后理解, ...
- muduo网络库源码学习————互斥锁
muduo源码的互斥锁源码位于muduo/base,Mutex.h,进行了两个类的封装,在实际的使用中更常使用MutexLockGuard类,因为该类可以在析构函数中自动解锁,避免了某些情况忘记解锁. ...
- muduo网络库源码学习————日志滚动
muduo库里面的实现日志滚动有两种条件,一种是日志文件大小达到预设值,另一种是时间到达超过当天.滚动日志类的文件是LogFile.cc ,LogFile.h 代码如下: LogFile.cc #in ...
- muduo网络库源码学习————日志类封装
muduo库里面的日志使方法如下 这里定义了一个宏 #define LOG_INFO if (muduo::Logger::logLevel() <= muduo::Logger::INFO) ...
- muduo网络库源码学习————无界队列和有界队列
muduo库里实现了两个队列模板类:无界队列为BlockingQueue.h,有界队列为BoundedBlockingQueue.h,两个测试程序实现了生产者和消费者模型.(这里以无界队列为例,有界队 ...
随机推荐
- 请设计 一个密码生成器,要求随机生成4组10位密码(C语言)
请设计 一个密码生成器,要求随机生成4组10位密码(密码只能由字母和数字组成),每一组必须包含至少一个大写字母,每组密码不能相同,输出生成的密码. #include<stdio.h> #i ...
- lr事务
事务:transaction(性能里面的定义:客户机对服务器发送请求,服务器做出反应的过程) 用于模拟用户的一个相对完整的业务操作过程:如登录,查询,交易等操作(每次http请求不会用来作为一个事务) ...
- 理解JSON:3分钟课程
理解JSON:3分钟课程 博客分类: Java综合 jsonAjaxJavaScriptXMLLISP 本文是从 Understanding JSON: the 3 minute lesson 这篇文 ...
- C语言小练习之学生信息管理系统
C语言小练习之学生信息管理系统 main.c文件 1 2 3 4 5 6 7 8 9 10 11 12 13 14 15 16 17 18 19 20 21 22 23 24 25 26 27 2 ...
- Redis linux 下安装
Redis linux 下安装 下载Redis安装包,可以从Redis中文网站中下载 下载地址:http://www.redis.cn/download.html Redis4.0 稳定版本 使用&l ...
- Spring Cloud 系列之 Gateway 服务网关(一)
什么是 Spring Cloud Gateway Spring Cloud Gateway 作为 Spring Cloud 生态系统中的网关,目标是替代 Netflix Zuul,其不仅提供统一的路由 ...
- NIO教程 ——检视阅读
NIO教程 --检视阅读 参考 BIO,NIO,AIO 总结 Java NIO浅析 Java NIO 教程--极客,蓝本 Java NIO 系列教程 --并发编程网 BIO,NIO--知乎 NIO 入 ...
- selenium 执行js代码
获取一个input输入框的值: JavascriptExecutor js =(JavascriptExecutor) driver; merchatName=js.executeScript(&qu ...
- beanshell 常用的内置变量与函数
官方详细文档:https://github.com/beanshell/beanshell/wiki log:用来记录日志文件 log.info("jmeter"); vars - ...
- [linux][nginx] 常用
原文链接http://www.cnblogs.com/codingcloud/p/5095066.html 启动 启动代码格式:nginx安装目录地址 -c nginx配置文件地址 例如: [root ...