【WebAPI】新手入门WebAPI
一、前言
工作也有一年多了,从进入公司就一直进行BIM(建筑信息模型)C/S产品的研发,平时写的最多的就是Dev WPF。一个偶然的时机,产品需要做支付宝扫码与微信扫码,所以需要了解产品服务器中的授权服务是如何编写的,以此开始接触Web。本篇将以小白的视角学习Webapi,老司机可以直接略过。
二、Webapi编写
Step1: 编写WebApiConfig.cs,这个不用多说,就是设置路由嘛。
 public static class WebApiConfig

 {

    public static void Register(HttpConfiguration config)

    {

         config.Routes.MapHttpRoute(

         name: "DefaultApi",

         routeTemplate: "api/{controller}/{action}/{id}",

         defaults: new { id = RouteParameter.Optional }

         );

    }

 }
Step2: 在Global.asax文件中初始化路由映射。
public class MvcApplication : System.Web.HttpApplication

{

     protected void Application_Start()

     {

        AreaRegistration.RegisterAllAreas();

        WebApiConfig.Register(GlobalConfiguration.Configuration);

     }

}
Step3: 创建controller,编写Api具体服务。
public class TestController: ApiController

{

       [HttpGet]
       public string ConnectionTest()
       {
            return "connected_success";
       }

       [HttpPost]
       public HttpResponseMessage GetInfo(string value1, string value2)
       {
            var info = new Info()
            {
               Property1 = value1,
               Property2 = value2,
               Property3 = "3"
            };
            HttpResponseMessage response = new HttpResponseMessage
            {
                StatusCode = HttpStatusCode.OK,
                Content = new StringContent(JsonConvert.SerializeObject(info), Encoding.GetEncoding("UTF-8"),"application/json")
            };
            return response;
      }

}
这样,一个简单的实例就编写好了。根据之前的路由映射规则:"api/{controller}/{action}/{id}",我们的访问地址就是:http://xxx.xxx.com:xxx/api/Test/GetName
三、Webapi的请求
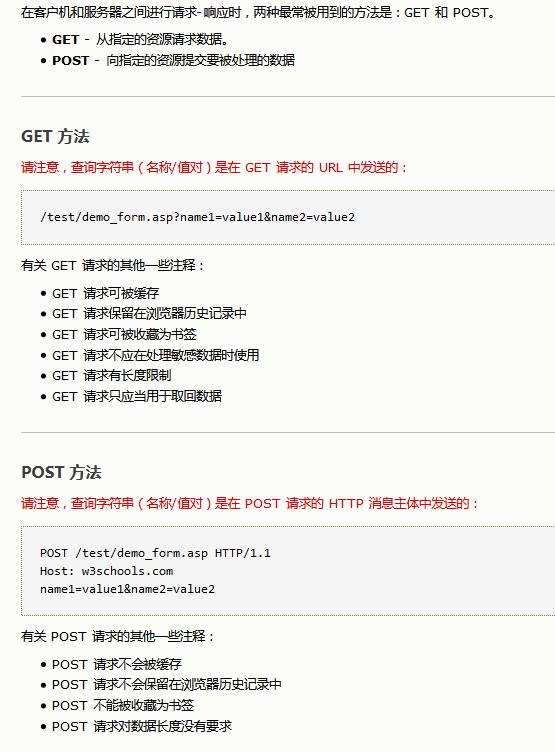
api写完了,总要去请求这个api服务的吧,那么我们得首先明白HttpGet与HttpPost两种请求方式的区别。从字面上来说,Get是获取,Post是投递、推送的意思。结合其它资料我觉得以下解释还是比较容易理解的:
下面就是两种请求方式的写法,包括前台与后台的写法。前台以ajax,后台就是C#。
Method1: Get请求写法
前台Get请求写法:
//无参数

$.ajax({

    url: "/api/controllerName/ActionName

    type: "GET",

    success: function (data)

    {

       //

    }

})

//带参数

$.ajax({

    url: "/api/controllerName/ActionName

    type: "GET",

    data:{"property1":value1,"property2":value2},

    success: function (data)

    {

       //

    }

})

或者

$.ajax({

    url: "/api/controllerName/ActionName/?property1="+value1+"&property2="+value2,

    type: "GET",

    success: function (data)

    {

       //

    }

})
后台Get请求写法:
public static void TestGet(string serverAddress)

{

    try

    {

         HttpClient httpsClient = new HttpClient

         {

                 BaseAddress = new Uri(serverAddress),

                 Timeout = TimeSpan.FromMinutes()

         };

         if (DsClientOperation.ConnectionTest(httpsClient)) //这里是连接测试判断,可根据业务自行调整

         {

           stringGetUrl = httpsClient.BaseAddress + "api/ControllerName/ActionName"; //若带参,参数写在url里,例:xxx.com?order=参数1

           Uri address = new Uri(PostUrl);

           Task<HttpResponseMessage> response = httpsClient.GetAsync(address);

           response.ContinueWith(

           (getTask) =>

           {

               if (getTask.IsFaulted)

               {

                   throw getTask.Exception;

               }

                   HttpResponseMessage getResponse = getTask.Result;

               getResponse.EnsureSuccessStatusCode();

               var result = getResponse.Content.ReadAsStringAsync().Result;

               return result;

            });

         }

   }

   catch

   {

   }

}
 public static bool ConnectionTest(string serverAddress)

 {

      if (string.IsNullOrEmpty(serverAddress)) return false;

      HttpClient httpClient = new HttpClient

      {

           BaseAddress = new Uri(serverAddress),

           Timeout = TimeSpan.FromSeconds()

      };

      Uri address = new Uri(httpClient.BaseAddress + "api/Test/ConnectionTest");

      Task<HttpResponseMessage> task = httpClient.GetAsync(address);

      try

      {

           task.Wait();

      }

      catch

      {

          return false;

      }

      HttpResponseMessage response = task.Result;

      if (!response.IsSuccessStatusCode)

          return false;

      string connectionResult;

      try

      {

          var result = response.Content.ReadAsStringAsync().Result;

          connectionResult = JsonConvert.DeserializeObject<string>(result);

      }

      catch

      {

          return false;

      }

      return connectionResult.Equals("connected_success");

  }
Method2: Post请求写法
前台Post请求写法:
//无参数

 $.ajax({

        url: "api/ControllerName/ActionName",

        type: "Post",

        success: function (data) {

        }

    });

//有1个参数
 $.ajax({
        url: "api/ControllerName/ActionName",
        type: "Post", dataType: "json",
        contentType: "application/json",
        data:{"":value1},
        success: function (data) { } });

//有2个参数

 $.ajax({

        url: "api/ControllerName/ActionName",

        type: "Post",

        dataType: "json",
        contentType: "application/json",
        data:JSON.stringify({"property1":value1,"property2":value2}), success: function (data) { } });
//再多的话要封装成对象进行传输了
最重要的是Action里的参数有[FromBody]标签,并且FromBody只能写一次
[HttpPost]
public HttpResponseMessage Action([FromBody]dynamic yourparameter)
[HttpPost]
public HttpResponseMessage Action([FromBody]JObject yourparameter)
后台Post请求写法:
public static void TestPost(string productName, string serverAddress)

{

      var productName = "Your Product";

      var requestCode = "Your Number";

      var clientDictionary = new Dictionary<string, string>

      {

             {"ProductName", productName},

             {"RequestCode", requestCode},

       };

      var packageInfo = JsonConvert.SerializeObject(clientDictionary);

      if (!string.IsNullOrEmpty(packageInfo))

      {

           try

           {

                 HttpClient httpsClient = new HttpClient

                 {

                        BaseAddress = new Uri(serverAddress),

                        Timeout = TimeSpan.FromMinutes()

                 };

                 if (DsClientOperation.ConnectionTest(httpsClient)) //这里是连接测试判断,可根据业务自行调整

                 {

                        StringContent strData = new StringContent(

                                                           packageInfo,

                                                           Encoding.UTF8,

                                                           "application/json");

                        string PostUrl = httpsClient.BaseAddress + "api/ControllerName/ActionName";

                        Uri address = new Uri(PostUrl);

                        Task<HttpResponseMessage> response = httpsClient.PostAsync(address, strData);

                        response.ContinueWith(

                            (postTask) =>

                            {

                                if (postTask.IsFaulted)

                                {

                                    throw postTask.Exception;

                                }

                                HttpResponseMessage postResponse = postTask.Result;

                                postResponse.EnsureSuccessStatusCode();

                                var result = postResponse.Content.ReadAsStringAsync().Result;
                                return result;

                            });

                    }

                }

             catch

             {

             }

        }

  }
四、结尾
大致就写到这里,如果有写错的地方可以在评论区留言,下一篇玩玩其它的,继续以小白视角研究研究MVC。
【WebAPI】新手入门WebAPI的更多相关文章
- 基于flask的轻量级webapi开发入门-从搭建到部署
基于flask的轻量级webapi开发入门-从搭建到部署 注:本文的代码开发工作均是在python3.7环境下完成的. 关键词:python flask tornado webapi 在python虚 ...
- ASP.NET Core WebAPI 开发-新建WebAPI项目 转
转 http://www.cnblogs.com/linezero/p/5497472.html ASP.NET Core WebAPI 开发-新建WebAPI项目 ASP.NET Core We ...
- 新手入门指导:Vue 2.0 的建议学习顺序
起步 1. 扎实的 JavaScript / HTML / CSS 基本功.这是前置条件. 2. 通读官方教程 (guide) 的基础篇.不要用任何构建工具,就只用最简单的 <script> ...
- Flume NG Getting Started(Flume NG 新手入门指南)
Flume NG Getting Started(Flume NG 新手入门指南)翻译 新手入门 Flume NG是什么? 有什么改变? 获得Flume NG 从源码构建 配置 flume-ng全局选 ...
- 原创:从零开始,微信小程序新手入门宝典《一》
为了方便大家了解并入门微信小程序,我将一些可能会需要的知识,列在这里,让大家方便的从零开始学习:一:微信小程序的特点张小龙:张小龙全面阐述小程序,推荐通读此文: 小程序是一种不需要下载.安装即可使用的 ...
- 【原创】新手入门一篇就够:从零开发移动端IM
一.前言 IM发展至今,已是非常重要的互联网应用形态之一,尤其移动互联网时代,它正以无与论比的优势降低了沟通成本和沟通代价,对各种应用形态产生了深远影响. 做为IM开发者或即将成为IM开发者的技术人员 ...
- 课程上线 -“新手入门 : Windows Phone 8.1 开发”
经过近1个月的准备和录制,“新手入门 : Windows Phone 8.1 开发”系列课程已经在Microsoft 虚拟学院上线,链接地址为:http://www.microsoftvirtuala ...
- WordPress建站 新手入门
WordPress建站 新手入门教程系列 1. WordPress入门 之 什么是WordPress? 2. WordPress入门 之 搭建WordPress站点需要什么条件? 3. WordPre ...
- ASP.NET Core WebAPI 开发-新建WebAPI项目
ASP.NET Core WebAPI 开发-新建WebAPI项目, ASP.NET Core 1.0 RC2 即将发布,我们现在来学习一下 ASP.NET Core WebAPI开发. 网上已经有泄 ...
随机推荐
- Azkaban 工作流调度器
Azkaban 工作流调度器 1 概述 1.1 为什么需要工作流调度系统 a)一个完整的数据分析系统通常都是由大量任务单元组成,shell脚本程序,java程序,mapreduce程序.hive脚本等 ...
- thinkphp5 开启多语言
一.配置点击打开链接1.开启语言包功能'lang_switch_on' => true,2.支持的语言列表'lang_list' => ['zh-cn','en-us'],二.语言定义(默 ...
- 牛客小白月赛9 A签到(分数取模,逆元)
传送门 对分母求一下逆元,把除法取模变成乘法取模,逆元介绍看这里 这种方法只适合模为质数的情况 #include<bits/stdc++.h> using namespace std; ; ...
- Appium + java截图方法
public static void takeScreenShot(AndroidDriver<WebElement> driver) { File screenShotFile = dr ...
- Python爬虫下载Bilibili番剧弹幕
本文绍如何利用python爬虫下载bilibili番剧弹幕. 准备: python3环境 需要安装BeautifulSoup,selenium包 phantomjs 原理: 通过aid下载bilibi ...
- 爬虫2.5-scrapy框架-下载中间件
目录 scrapy框架-下载中间件 scrapy框架-下载中间件 middlewares.py中有两个类,一个是xxSpiderMiddleware类 一个是xxDownloaderMiddlewar ...
- dotnet服务器端框架从精通到弃坑
当你们看到这篇经验分享的时候,我已经把服务器端主要力量转到JAVA了. 纯当留念. 另外里面实现oauth2.0的部分就不写了,因为特殊性太强,完全根据自家需求结合它的理念改写的. 为什么我会选择sp ...
- Teaching Machines to Understand Us 让机器理解我们 之三 自然语言学习及深度学习的信仰
Language learning 自然语言学习 Facebook’s New York office is a three-minute stroll up Broadway from LeCun’ ...
- PHP 整数
实验环境php 5.2.17,参考资料:PHP手册 1.整数溢出 如果整数超出最大范围或者运算结果超出最大范围,都会转变成float <?php $a=2147483647; var_dump( ...
- spark RDD、DataFrame、DataSet之间的相互转化
这三个数据集看似经常用,但是真正归纳总结的时候,很容易说不出来 三个之间的关系与区别参考我的另一篇blog http://www.cnblogs.com/xjh713/p/7309507.html ...