opencv3.2 dnn 图像分割
下载 http://dl.caffe.berkeleyvision.org/fcn32s-heavy-pascal.caffemodel
在opencv_contrib-3.2.0/modules/dnn/samples目录中找到下面的文件
fcn32s-heavy-pascal.prototxt
pascal-classes.txt
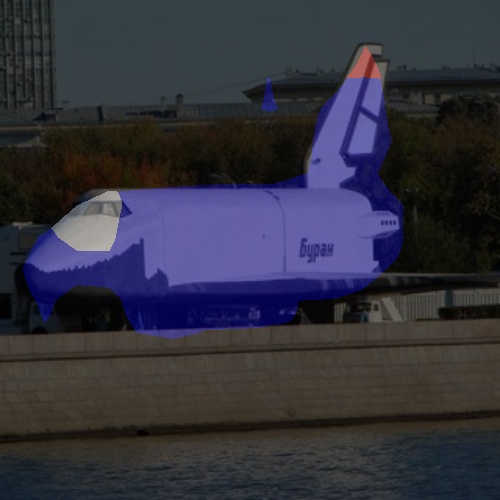
图片 space_shuttle.jpg

#include <opencv2/dnn.hpp>

#include <opencv2/imgproc.hpp>

#include <opencv2/highgui.hpp>

#include <opencv2/core/ocl.hpp>

using namespace cv;

using namespace cv::dnn;

#include <fstream>

#include <iostream>

#include <cstdlib>

using namespace std;

static const string fcnType = "fcn32s";

static vector<cv::Vec3b> readColors(const string &filename = "pascal-classes.txt")

{

    vector<cv::Vec3b> colors;

    ifstream fp(filename.c_str());

    if (!fp.is_open())

    {

        cerr << "File with colors not found: " << filename << endl;

        exit(-);

    }

    string line;

    while (!fp.eof())

    {

        getline(fp, line);

        if (line.length())

        {

            stringstream ss(line);

            string name; ss >> name;

            int temp;

            cv::Vec3b color;

            ss >> temp; color[] = temp;

            ss >> temp; color[] = temp;

            ss >> temp; color[] = temp;

            colors.push_back(color);

        }

    }

    fp.close();

    return colors;

}

static void colorizeSegmentation(dnn::Blob &score, const vector<cv::Vec3b> &colors, cv::Mat &segm)

{

    const int rows = score.rows();

    const int cols = score.cols();

    const int chns = score.channels();

    cv::Mat maxCl(rows, cols, CV_8UC1);

    cv::Mat maxVal(rows, cols, CV_32FC1);

    for (int ch = ; ch < chns; ch++)

    {

        for (int row = ; row < rows; row++)

        {

            const float *ptrScore = score.ptrf(, ch, row);

            uchar *ptrMaxCl = maxCl.ptr<uchar>(row);

            float *ptrMaxVal = maxVal.ptr<float>(row);

            for (int col = ; col < cols; col++)

            {

                if (ptrScore[col] > ptrMaxVal[col])

                {

                    ptrMaxVal[col] = ptrScore[col];

                    ptrMaxCl[col] = ch;

                }

            }

        }

    }

    segm.create(rows, cols, CV_8UC3);

    for (int row = ; row < rows; row++)

    {

        const uchar *ptrMaxCl = maxCl.ptr<uchar>(row);

        cv::Vec3b *ptrSegm = segm.ptr<cv::Vec3b>(row);

        for (int col = ; col < cols; col++)

        {

            ptrSegm[col] = colors[ptrMaxCl[col]];

        }

    }

}

int main(int argc, char **argv)

{

    cv::dnn::initModule();          //Required if OpenCV is built as static libs

    cv::ocl::setUseOpenCL(false);   //OpenCL switcher

    String modelTxt = fcnType + "-heavy-pascal.prototxt";

    String modelBin = fcnType + "-heavy-pascal.caffemodel";

    String imageFile = (argc > ) ? argv[] : "space_shuttle.jpg";

    vector<cv::Vec3b> colors = readColors();

    //! [Create the importer of Caffe model]

    Ptr<dnn::Importer> importer;

    try                                     //Try to import Caffe GoogleNet model

    {

        importer = dnn::createCaffeImporter(modelTxt, modelBin);

    }

    catch (const cv::Exception &err)        //Importer can throw errors, we will catch them

    {

        cerr << err.msg << endl;

    }

    //! [Create the importer of Caffe model]

    if (!importer)

    {

        cerr << "Can't load network by using the following files: " << endl;

        cerr << "prototxt:   " << modelTxt << endl;

        cerr << "caffemodel: " << modelBin << endl;

        cerr << fcnType << "-heavy-pascal.caffemodel can be downloaded here:" << endl;

        cerr << "http://dl.caffe.berkeleyvision.org/" << fcnType << "-heavy-pascal.caffemodel" << endl;

        exit(-);

    }

    //! [Initialize network]

    dnn::Net net;

    importer->populateNet(net);

    importer.release();                     //We don't need importer anymore

    //! [Initialize network]

    //! [Prepare blob]

    Mat img = imread(imageFile);

    if (img.empty())

    {

        cerr << "Can't read image from the file: " << imageFile << endl;

        exit(-);

    }

    resize(img, img, Size(, ));       //FCN accepts 500x500 RGB-images

    dnn::Blob inputBlob = dnn::Blob::fromImages(img);   //Convert Mat to dnn::Blob batch of images

    //! [Prepare blob]

    //! [Set input blob]

    net.setBlob(".data", inputBlob);        //set the network input

    //! [Set input blob]

    //! [Make forward pass]

    double t = (double)cv::getTickCount();

    net.forward();                          //compute output

    t = (double)cv::getTickCount() - t;

    printf("processing time: %.1fms\n", t*./getTickFrequency());

    //! [Make forward pass]

    //! [Gather output]

    dnn::Blob score = net.getBlob("score");

    cv::Mat colorize;

    colorizeSegmentation(score, colors, colorize);

    cv::Mat show;

    cv::addWeighted(img, 0.4, colorize, 0.6, 0.0, show);

    cv::imshow("show", show);

    cv::waitKey();

    return ;

} //main
opencv3.2 dnn 图像分割的更多相关文章
- caffe+opencv3.3dnn模块 完成手写数字图片识别
最近由于项目需要用到caffe,学习了下caffe的用法,在使用过程中也是遇到了些问题,通过上网搜索和问老师的方法解决了,在此记录下过程,方便以后查看,也希望能为和我一样的新手们提供帮助. 顺带附上老 ...
- OpenCV3.0 3.1版本的改进
摘要 OpenCV现在更新到了3.1版本,相对OpenCV2有了很大改进,其中对于硬件加速,移动开发(IOS,android)的支持成为亮点. 新版的OpenCV采用了内 ...
- Jetson TX1 install Opencv3
https://jkjung-avt.github.io/opencv3-on-tx2/ 注意:在编译的时候会遇到内存空间不足的情况,可以插入U盘,将程序拷贝到U盘内编译,然后安装到Jetson上.U ...
- 基于OpenCV做“三维重建”(0)-- OpenCV3.2+VIZ6.3.0在vs2012下的编译和使用
一.问题提出 ViZ对于显示3维的效果图来说,非常有帮助:我在使用OpenCV进行双目测距的过程中,有一些参数希望能够通过可视化的方法显示出来,所以参考了这方面相关的资料.做了一些实验 ...
- [Android Studio] Using API of OpenCV DNN
前言 一.故事背景 NDK方法人脸识别 OpenCV4Android系列: 1. OpenCV4Android开发实录(1):移植OpenCV3.3.0库到Android Studio 2.OpenC ...
- [OpenCV] Install OpenCV 3.3 with DNN
OpenCV 3.3 Aug 3, 2017 OpenCV 3.3 has been released with greatly improved Deep Learning module and l ...
- [OpenCV] Install OpenCV 3.4 with DNN
目标定位 一.开始全面支持 Tensorflow OpenCV3.4 新功能 当前最新进展OpenCV 3.4 dev:https://github.com/opencv/opencv/tree/ma ...
- OpenCV-3.3.0测试
安装包目录下/samples/cpp里是各种例程 其中example_cmake里CMakeLists.txt已写好,直接cmake,make就可以,example.cpp是一个调用笔记本摄像头并显示 ...
- Ubuntu + CUDA9 + CUDNN7 + OpenCV3.4 + contrib +CAFFE-master
安装ubuntu时赞美Rufus(建议ubuntu16.04.04),过程参考 https://www.cnblogs.com/willnote/p/6725594.html 安 装 前 一 定 要 ...
随机推荐
- 西邮Linux兴趣小组纳新笔试试题
下面是西邮Linux小组今年纳新的笔试试题 1. 下面这个程序的输出结果是什么? int main() { int a = (1, 2); printf(“a = %d\n”, a); return ...
- 仿<赶集生活>client启动动画效果
demo下载地址: http://yun.baidu.com/s/1i3wqEMh 由于前几年csdn泄露password的事件,导致我的账号被拿去发广告文章了,联系了管理员帮我把几篇广告文删掉,可是 ...
- 继承CListCtrl,然后重载OnLButtonUP消息,发现变成双击才触发???
原文链接: http://bbs.csdn.net/topics/380052636 1楼 因为WM_LBUTTONDOWN事件和NM_CLICK事件是同时发生的,只是后者要等到用户释放鼠标后才算完成 ...
- keras在win7下环境搭建
无gpu安装过程:一.卸载之前版本. 把之前单独安装的Python等统统卸载掉.学python的时候直接安装了python2.7,先把他卸载掉,因为Anaconda里边包含了python.二.安装A ...
- 关于java集合类TreeMap的理解(转)
概要 这一章,我们对TreeMap进行学习. 转载请注明出处:http://www.cnblogs.com/skywang12345/admin/EditPosts.aspx?postid=33109 ...
- 【转】js frame 框架编程
源地址:http://www.blogjava.net/lusm/archive/2008/02/11/179620.html 1 框架编程概述 一个Html 页面可以有一个或多个子框架,这些子框架以 ...
- excel错误:外部表不是预期的格式 错误
环境:win7+iis7+Office2007 在asp.net网站中导出Excel文件后,再把文件导入到数据库中. 读取Excel文件时,打开连接出错. 错误为:外部表不是预期的格式 解决:检查了一 ...
- 【Android】10.1 扩展组件库和其他视图--本章示例主界面
分类:C#.Android.VS2015: 创建日期:2016-02-18 1.主界面运行截图 2.MainActivity.cs文件中对应的代码 chItems.Add(new Chapter() ...
- Linux 监控分析
一.硬件基础 Cpu 逻辑的处理.计算.判断 现代分时多任务操作系统对 CPU 都是分时间片使用的:比如A进程占用10ms,然后B进程占用30ms,然后空闲60ms, 再又是A进程占10ms,B进 ...
- 收集Cocos2d提供的字体!共57种
很多游戏中,便于开发就会直接采用Cocos2d提供的字体库来使用,但是因为提供的种类很多,那么Himi利用一些时间整理了57种字体样式,这些我想足够你用了: 不多说下面一起来看看吧:(每张图对应11种 ...