
004 Android XML文件常用五大页面布局方式
1.线性布局(LinearLayout)最常用
<1>使用线性布局,首先在xml文件中修改布局为LinearLayout
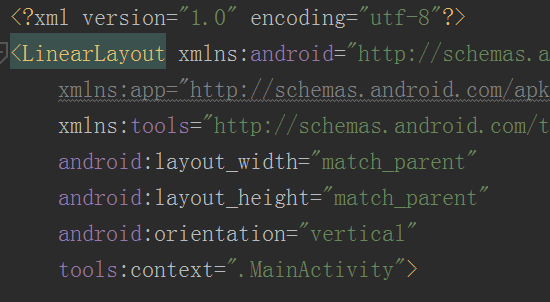
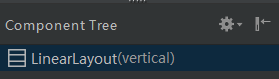
修改完成后,可在Component Tree中看见如下内容:
<2>点击LinearLayout,可在右侧的Attributes(属性)中进一步设置是水平放置或者垂直放置
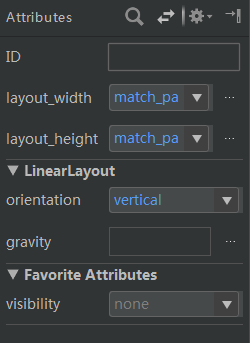
注意:每个控件的大小其实还是需要设置的,即需要设置布局高度(layout_width)和布局宽度(layout_height),默认采用match_parent
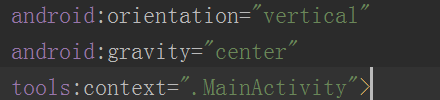
<3>对齐方式设置:即可以在xml文件中输入
android:gravity="center" 设置该线性布局内的组件居中放置
<4> 控件属性设置(attribute)
Plain Test控件设置提示字符
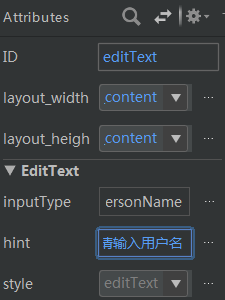
方法:在Attributes中的hint中设置提示字符
<5>设置组件的大小为自适应大小
必须删除xml文件中组件属性里的 android:layout_weight="1"
<6>设置控件的对齐方式、边距
<?xml version="1.0" encoding="utf-8"?>

<LinearLayout xmlns:android="http://schemas.android.com/apk/res/android"

    xmlns:app="http://schemas.android.com/apk/res-auto"

    xmlns:tools="http://schemas.android.com/tools"

    android:layout_width="match_parent"

    android:layout_height="match_parent"

    tools:context=".MainActivity"

    android:gravity="center_horizontal">

    <TextView

        android:id="@+id/textView"

        android:layout_marginLeft="80dp"

        android:layout_width="wrap_content"

        android:layout_height="wrap_content"

        android:text="TextView" />

</LinearLayout>
(1)在父容器的线性布局中设置属性
android:gravity="center_horizontal"
使得,该线性布局内的所有组件全都水平居中。
(2)在子容器TextView中设置属性
android:layout_marginLeft="80dp"
使得,这个TextView组件在水平居中的基础上,向右移动的80dp(即左边距为80dp)
<7>设置字体的大小、颜色
<TextView

        android:id="@+id/tv_login"

        android:layout_marginLeft="80dp"

        android:layout_width="wrap_content"

        android:layout_height="wrap_content"

        android:textColor="#044BA3"

        android:textSize="20dp"

        android:text="TextView" />
(1)在组件中添加
android:textColor="#044BA3"
设置字体的颜色。
(2)在组件中添加
android:textSize="20dp"
设置字体的大小。
<8>设置控件的id
<TextView

        android:id="@+id/tv_login"

        android:layout_marginLeft="80dp"

        android:layout_width="wrap_content"

        android:layout_height="wrap_content"

        android:text="TextView" />
注意:设置组件的id的命名方法为提取组件的两个驼峰+组件实际功能(例如:TextView---> 变为tv_login)
2.表格布局(TableLayout)
注意:表格布局不推荐使用。
<1>使用表格布局,首先在xml文件中修改布局为TableLayout

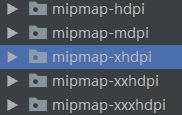
<2>外部图片导入工程后的存放位置
任选project 工程名-->app-->src-->main下的一个文件夹
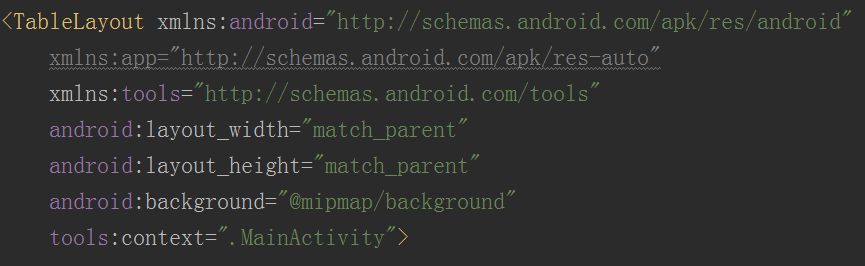
<3>app设置背景图片
在xml文件中输入 android:background="@mipmap/background"
<4>图片组件
palatte-->widgets--->imageview
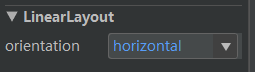
多个图片设置对齐方式
选择父容器,选择对齐方式(orientation、gratity)
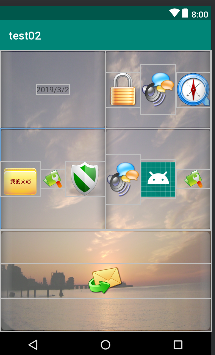
TableLayout布局使用案例(test02):
<?xml version="1.0" encoding="utf-8"?>

<TableLayout xmlns:android="http://schemas.android.com/apk/res/android"

    xmlns:app="http://schemas.android.com/apk/res-auto"

    xmlns:tools="http://schemas.android.com/tools"

    android:layout_width="match_parent"

    android:layout_height="match_parent"

    android:background="@mipmap/background"

    tools:context=".MainActivity">

    <TableRow

        android:layout_width="match_parent"

        android:layout_height="match_parent"

        android:layout_weight="0.5">

        <LinearLayout

            android:layout_width="match_parent"

            android:layout_height="match_parent"

            android:layout_weight="1"

            android:background="@mipmap/blockbg_big"

            android:gravity="center"

            android:orientation="horizontal">

            <TextView

                android:id="@+id/textView"

                android:layout_width="wrap_content"

                android:layout_height="wrap_content"

                android:text="2019/3/2" />

        </LinearLayout>

        <LinearLayout

            android:layout_width="match_parent"

            android:layout_height="match_parent"

            android:layout_weight="1"

            android:background="@mipmap/blockbg_big"

            android:gravity="center"

            android:orientation="horizontal">

            <ImageView

                android:id="@+id/imageView4"

                android:layout_width="match_parent"

                android:layout_height="wrap_content"

                android:layout_weight="1"

                app:srcCompat="@mipmap/img01" />

            <ImageView

                android:id="@+id/imageView6"

                android:layout_width="match_parent"

                android:layout_height="wrap_content"

                android:layout_weight="1"

                app:srcCompat="@mipmap/img07" />

            <ImageView

                android:id="@+id/imageView5"

                android:layout_width="match_parent"

                android:layout_height="wrap_content"

                android:layout_weight="1"

                app:srcCompat="@mipmap/img06" />

        </LinearLayout>

    </TableRow>

    <TableRow

        android:layout_width="match_parent"

        android:layout_height="match_parent"

        android:layout_weight="1">

        <LinearLayout

            android:layout_width="match_parent"

            android:layout_height="match_parent"

            android:layout_weight="1"

            android:gravity="center"

            android:background="@mipmap/blockbg_big"

            android:orientation="horizontal">

            <ImageView

                android:id="@+id/imageView9"

                android:layout_width="wrap_content"

                android:layout_height="wrap_content"

                android:layout_weight="1"

                app:srcCompat="@mipmap/img05" />

            <ImageView

                android:id="@+id/imageView8"

                android:layout_width="wrap_content"

                android:layout_height="wrap_content"

                android:layout_weight="1"

                app:srcCompat="@mipmap/img03a" />

            <ImageView

                android:id="@+id/imageView7"

                android:layout_width="wrap_content"

                android:layout_height="wrap_content"

                android:layout_weight="1"

                app:srcCompat="@mipmap/img02" />

        </LinearLayout>

        <LinearLayout

            android:layout_width="match_parent"

            android:layout_height="match_parent"

            android:layout_weight="1"

            android:gravity="center"

            android:background="@mipmap/blockbg_big"

            android:orientation="horizontal">

            <ImageView

                android:id="@+id/imageView12"

                android:layout_width="match_parent"

                android:layout_height="wrap_content"

                android:layout_weight="1"

                app:srcCompat="@mipmap/img07" />

            <ImageView

                android:id="@+id/imageView11"

                android:layout_width="match_parent"

                android:layout_height="wrap_content"

                android:layout_weight="1"

                app:srcCompat="@mipmap/ic_launcher" />

            <ImageView

                android:id="@+id/imageView10"

                android:layout_width="match_parent"

                android:layout_height="wrap_content"

                android:layout_weight="1"

                app:srcCompat="@mipmap/img03a" />

        </LinearLayout>

    </TableRow>

    <TableRow

        android:layout_width="match_parent"

        android:layout_height="match_parent"

        android:layout_weight="1"

        android:gravity="center">

        <LinearLayout

            android:layout_width="match_parent"

            android:layout_height="match_parent"

            android:layout_weight="1"

            android:gravity="center"

            android:background="@mipmap/blockbg_big"

            android:orientation="horizontal">

            <ImageView

                android:id="@+id/imageView13"

                android:layout_width="wrap_content"

                android:layout_height="wrap_content"

                android:layout_weight="1"

                app:srcCompat="@mipmap/email" />

        </LinearLayout>

    </TableRow>

</TableLayout>
效果图为:
3 约束布局(ConstraintLayout)
<1>图片组件(imageview)分别与约束布局的父容器的上下左右对齐
app:layout_constraintBottom_toBottomOf="parent"

app:layout_constraintEnd_toEndOf="parent"

app:layout_constraintStart_toStartOf="parent"

app:layout_constraintTop_toTopOf="parent"
<2>imageview 组件与imageview 组件可以在design中采用拖拽的方式使其对齐(注意:下图的连线方式)
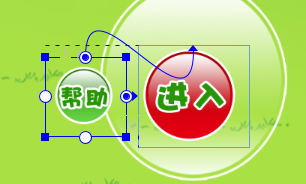
注意:约束布局(ConstraintLayout)最大的特点是可以以拖拽的方式固定组件的位置
案例:test03
4 相对布局(RelativeLayout) 常用
下面是RelativeLayout各个属性

android:layout_above="@id/xxx"  --将控件置于给定ID控件之上

android:layout_below="@id/xxx"  --将控件置于给定ID控件之下

android:layout_toLeftOf="@id/xxx"  --将控件的右边缘和给定ID控件的左边缘对齐

android:layout_toRightOf="@id/xxx"  --将控件的左边缘和给定ID控件的右边缘对齐

android:layout_alignLeft="@id/xxx"  --将控件的左边缘和给定ID控件的左边缘对齐

android:layout_alignTop="@id/xxx"  --将控件的上边缘和给定ID控件的上边缘对齐

android:layout_alignRight="@id/xxx"  --将控件的右边缘和给定ID控件的右边缘对齐

android:layout_alignBottom="@id/xxx"  --将控件的底边缘和给定ID控件的底边缘对齐

android:layout_alignParentLeft="true"  --将控件的左边缘和父控件的左边缘对齐

android:layout_alignParentTop="true"  --将控件的上边缘和父控件的上边缘对齐

android:layout_alignParentRight="true"  --将控件的右边缘和父控件的右边缘对齐

android:layout_alignParentBottom="true" --将控件的底边缘和父控件的底边缘对齐

android:layout_centerInParent="true"  --将控件置于父控件的中心位置

android:layout_centerHorizontal="true"  --将控件置于水平方向的中心位置

android:layout_centerVertical="true"  --将控件置于垂直方向的中心位置
(1)使用小案例:
<?xml version="1.0" encoding="utf-8"?>

<RelativeLayout xmlns:android="http://schemas.android.com/apk/res/android"

    xmlns:app="http://schemas.android.com/apk/res-auto"

    xmlns:tools="http://schemas.android.com/tools"

    android:layout_width="match_parent"

    android:layout_height="match_parent"

    tools:context=".UserGuideActivity">

    <Button

        android:id="@+id/bt_userguide_start"

        android:layout_width="wrap_content"

        android:layout_height="wrap_content"

        android:layout_alignParentBottom="true"

        android:layout_centerHorizontal="true"

        android:layout_marginBottom="60dp"

        android:text="开始体验"/>

</RelativeLayout>
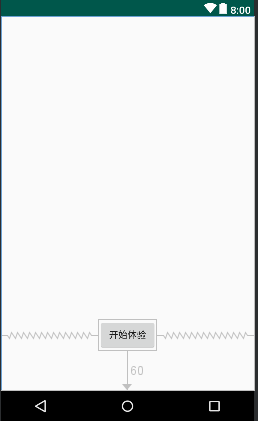
(2)效果图
(3)代码分析
<1>设置按钮距离底部60dp
android:layout_alignParentBottom="true"

android:layout_marginBottom="60dp"
<2>水平方向居中
android:layout_centerHorizontal="true"
5、网格布局(GridLayout)
典型应用:计算器的布局
源码案例:test16
<?xml version="1.0" encoding="utf-8"?>

    <GridLayout xmlns:android="http://schemas.android.com/apk/res/android"

        xmlns:tools="http://schemas.android.com/tools"

        android:layout_width="wrap_content"

        android:layout_height="wrap_content"

        android:columnCount="4"

        android:orientation="horizontal"

        android:rowCount="5"

        android:useDefaultMargins="true"

        tools:context=".MainActivity">

        <Button

            android:id="@+id/button"

            android:layout_width="wrap_content"

            android:layout_height="wrap_content"

            android:layout_row="0"

            android:layout_column="0"

            android:text="1" />

        <Button

            android:id="@+id/button2"

            android:layout_width="wrap_content"

            android:layout_height="wrap_content"

            android:layout_row="0"

            android:layout_column="1"

            android:text="2" />

        <Button

            android:id="@+id/button3"

            android:layout_width="wrap_content"

            android:layout_height="wrap_content"

            android:layout_row="0"

            android:layout_column="2"

            android:text="3" />

        <Button

            android:id="@+id/button4"

            android:layout_width="wrap_content"

            android:layout_height="wrap_content"

            android:layout_row="0"

            android:layout_column="3"

            android:text="+" />

        <Button

            android:id="@+id/button5"

            android:layout_width="wrap_content"

            android:layout_height="wrap_content"

            android:layout_row="1"

            android:layout_column="0"

            android:text="4" />

    <Button

        android:id="@+id/button6"

        android:layout_width="wrap_content"

        android:layout_height="wrap_content"

        android:layout_row="1"

        android:layout_column="1"

        android:text="5" />

    <Button

        android:id="@+id/button7"

        android:layout_width="wrap_content"

        android:layout_height="wrap_content"

        android:layout_row="1"

        android:layout_column="2"

        android:text="6" />

    <Button

        android:id="@+id/button8"

        android:layout_width="wrap_content"

        android:layout_height="wrap_content"

        android:layout_row="1"

        android:layout_column="3"

        android:text="-" />

    <Button

        android:id="@+id/button9"

        android:layout_width="wrap_content"

        android:layout_height="wrap_content"

        android:layout_row="2"

        android:layout_column="0"

        android:text="7" />

    <Button

        android:id="@+id/button10"

        android:layout_width="wrap_content"

        android:layout_height="wrap_content"

        android:layout_row="2"

        android:layout_column="1"

        android:text="8" />

    <Button

        android:id="@+id/button11"

        android:layout_width="wrap_content"

        android:layout_height="wrap_content"

        android:layout_row="2"

        android:layout_column="2"

        android:text="9" />

    <Button

        android:id="@+id/button12"

        android:layout_width="wrap_content"

        android:layout_height="wrap_content"

        android:layout_row="2"

        android:layout_column="3"

        android:text="*" />

    <Button

        android:id="@+id/button13"

        android:layout_width="wrap_content"

        android:layout_height="wrap_content"

        android:layout_row="3"

        android:layout_column="0"

        android:text="0" />

    <Button

        android:id="@+id/button14"

        android:layout_width="wrap_content"

        android:layout_height="wrap_content"

        android:layout_row="3"

        android:layout_column="1"

        android:layout_columnSpan="2"

        android:layout_gravity="fill_horizontal"

        android:text="删除" />

    <Button

        android:id="@+id/button15"

        android:layout_width="wrap_content"

        android:layout_height="wrap_content"

        android:layout_row="3"

        android:layout_column="3"

        android:text="/" />

    <Button

        android:id="@+id/button18"

        android:layout_width="wrap_content"

        android:layout_height="wrap_content"

        android:layout_row="4"

        android:layout_column="0"

        android:layout_columnSpan="2"

        android:layout_gravity="fill_horizontal"

        android:text="clear" />

    <Button

        android:id="@+id/button20"

        android:layout_width="wrap_content"

        android:layout_height="wrap_content"

        android:layout_row="4"

        android:layout_column="2"

        android:layout_columnSpan="2"

        android:layout_gravity="fill_horizontal"

        android:text="Button" />

</GridLayout>
004 Android XML文件常用五大页面布局方式的更多相关文章
- maven(4)------maven核心pom.xml文件常用元素分析
在maven项目中,pom文件是核心文件 pom.xml: <?xml version="1.0" encoding="UTF-8"?> <p ...
- 《!--suppress ALL --> 在Android XML 文件中的用途是什么?
<!--suppress ALL --> 在Android XML 文件中的用途是什么? 警告一次又一次地出现在谷歌地图的 XML 文件中,但是当我使用时,所有警告都被禁用.那么压制所有评 ...
- 006 Android XML 文件布局及组件属性设置技巧汇总
1.textview 组件文本实现替换(快速实现字符资源的调用) android 应用资源位置在 project(工程名)--->app--->res--->values 在stri ...
- 【Android】纯代码创建页面布局(含异步加载图片)
开发环境:macOS 10.12 + Android Studio 2.2,MinSDK Android 5.1 先看看总体效果 本示例是基于Fragment进行的,直接上代码: [界面结构] 在 F ...
- android xml文件
一.布局文件:在layout目录下,使用比较广泛: 我们可以为应用定义两套或多套布局,例如:可以新建目录layout_land(代表手机横屏布局),layout_port(代表手机竖屏布局),系统会根 ...
- Android XML文件解析
在Android平台上可以使用Simple API for XML(SAX) . Document Object Model(DOM)和Android附带的pull解析器解析XML文件. 下面是本例子 ...
- [android] xml文件的序列化
生成xml文件,模拟备份短信,创建短信的业务bean,创建一个domain的包放业务bean,这个业务bean里面,定义成员属性,生成get set方法,生成有参和无参的构造方法. 生成随机数,实例化 ...
- Android--->LinearLayout页面布局方式
main.xml布局方式 <?xml version="1.0" encoding="utf-8"?> <LinearLayout xmlns ...
- Web页面布局方式小结
Web页面是由块元素组成的,正常情况下块元素一个个按垂直方向排布,构成了页面.可是这样的主要的布局方式绝大多时候不能满足我们的需求,所以各种布局方式应运而生,本文就对这些布局方式做个小结. 1.元素漂 ...
随机推荐
- ParallaxEffect
[ParallaxEffect] ParallaxEffect是一种用简单的2D贴图来模拟3D效果的简易方法.譬如一棵树,摄像机俯视时,当树远离摄像机时,树顶偏远,当树靠近,树顶偏近.苹果官方Adve ...
- json_encode和json_decode和isset和array_key_exists
1.json_decode() json_decode — 对 JSON 格式的字符串进行编码 说明 mixed json_decode ( string $json [, bool ...
- [luogu3369]普通平衡树(替罪羊树模板)
解题关键:由于需要根据平衡进行重建,所以不能进行去重,否则无法保证平衡性. #include<cstdio> #include<cstring> #include<alg ...
- 新建tomcat的server服务,在左侧项目浏览处,右键空白的地方,选择new,再选择other选项
新建tomcat的server服务,在左侧项目浏览处,右键空白的地方,选择new,再选择other选项. 在弹出的窗口中,下拉滚动条找到Server,并单击next按钮. 在弹出的窗口中,找到第一个A ...
- 788. Rotated Digits 旋转数字
[抄题]: X is a good number if after rotating each digit individually by 180 degrees, we get a valid nu ...
- 数字图像处理实验(13):PROJECT 05-04,Parametric Wiener Filter 标签: 图像处理MATLAB 2017-05-27 10:59
实验要求: Objective: To understand the high performance of the parametric Wiener Filter in image restora ...
- CF 1091E New Year and the Factorisation Collaboration
昨晚Good Bye 2018D题没做出来,车翻大了…… 官方题解 传送门 初赛知识:一个无向图所有顶点度数之和为偶数.然而这东西还有一个高端的名字:Handshaking lemma 但是 ...
- 2.python IP/DNS地址处理之IPy/Dnspython模块
1.IPy模块 在IP地址规划中,涉及到计算大量的IP地址,包括网段.网络掩码.广播地址.子网数.IP类型等,即便是专业的网络人员也要进行繁琐的计算,而IPy模块提供了专门针对IPV4地址与IPV6 ...
- [GO]冒泡排序的原理和代码实现
冒泡排序的原理:对于一个数组里所有的元素进行两两比较,发生大于则变换数组下标则为升序排序,发生小于则变换数据下标的则为降序排序 比如给定的数组为[1, -2, 3, -4],对于我们的需求,两两比较后 ...
- ApplicationContex是干啥的
ApplicationContext就是一个百宝箱 ApplicationContext是Spring的核心,Context我们通常解释为上下文环境,我想用“容器”来表述它更容易理解一些,Applic ...