基于已构建S2SH项目配置全注解方式简化配置文件
如果还不熟悉s2sh项目搭建的朋友可以先阅读
eclipse环境下基于tomcat-7.0.82构建struts2项目
eclipse环境下基于已构建struts2项目整合spring+hibernate
这两篇文章熟悉一下。
本文是基于以上两篇文章的基础构建的,以下给出全注解方式配置S2SH项目的参考步骤。
第一步:实体类映射数据库表,简化hibernate通过xml配置文件映射
首先我们新建实体类作为测试,包结构如图所示:
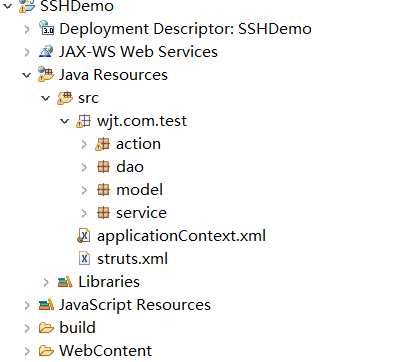
新建User到model包下,实体类字段信息如下所示:
package wjt.com.test.model;

import javax.persistence.Column;

import javax.persistence.Entity;

import javax.persistence.GeneratedValue;

import javax.persistence.Id;

import javax.persistence.Table;

import javax.persistence.Temporal;

import javax.persistence.TemporalType;

import org.hibernate.annotations.GenericGenerator;

import java.util.Date;

@Entity

@Table(name="wjt_user")

public class User {

    @Id

    @Column(name="ID",length=32)

    //主键生成策略

    @GeneratedValue(generator = "paymentableGenerator")

    //hibernate的主键生成策略,name属性与@GeneratedValue的generator = "paymentableGenerator"对应,

    //strategy 指定具体生成器的类名(指定生成策略)

    @GenericGenerator(name="paymentableGenerator",strategy="uuid")

    private String id;

    private String name;

    private String types;

    @Temporal(value=TemporalType.DATE)

    private Data date;

    public String getId() {

        return id;

    }

    public void setId(String id) {

        this.id = id;

    }

    public String getName() {

        return name;

    }

    public void setName(String name) {

        this.name = name;

    }

    public String getTypes() {

        return types;

    }

    public void setTypes(String types) {

        this.types = types;

    }

}
hibernate各注解的用途及其属性参考前辈的文章:
hibernate用注解配置实体类的映射
实体类准备完毕,我们需要将其交给hibernate工厂扫描映射到数据库表,需要在hibernate的session工厂中配置packagesToScan属性,给出applicationContect.xml配置如下:
<?xml version="1.0" encoding="UTF-8"?>
<beans xmlns="http://www.springframework.org/schema/beans"
xmlns:xsi="http://www.w3.org/2001/XMLSchema-instance" xmlns:context="http://www.springframework.org/schema/context"
xmlns:task="http://www.springframework.org/schema/task" xmlns:tx="http://www.springframework.org/schema/tx"
xmlns:aop="http://www.springframework.org/schema/aop"
xsi:schemaLocation="
http://www.springframework.org/schema/beans
http://www.springframework.org/schema/beans/spring-beans-3.0.xsd
http://www.springframework.org/schema/context
http://www.springframework.org/schema/context/spring-context-3.0.xsd
http://www.springframework.org/schema/task
http://www.springframework.org/schema/task/spring-task-3.1.xsd
http://www.springframework.org/schema/tx
http://www.springframework.org/schema/tx/spring-tx-3.0.xsd
http://www.springframework.org/schema/aop
http://www.springframework.org/schema/aop/spring-aop-3.0.xsd
"> <!-- 数据源配置 -->
<bean id="dataSource"
class="org.springframework.jdbc.datasource.DriverManagerDataSource">
<property name="driverClassName" value="com.mysql.jdbc.Driver" />
<property name="url"
value="jdbc:mysql://localhost:3306/wjt_test?useUnicode=true&characterEncoding=UTF-8&zeroDateTimeBehavior=convertToNull&autoReconnect=true" />
<property name="username" value="root" />
<property name="password" value="wujingtao" /> </bean> <!-- 配置hibernate session工厂 -->
<bean id="sessionFactory"
class="org.springframework.orm.hibernate4.LocalSessionFactoryBean">
<property name="dataSource" ref="dataSource" />
<property name="hibernateProperties">
<props>
<prop key="hibernate.hbm2ddl.auto">update</prop>
<prop key="hibernate.dialect">org.hibernate.dialect.MySQL5InnoDBDialect</prop>
<prop key="hibernate.show_sql">false</prop>
<prop key="hibernate.format_sql">true</prop>
</props>
</property> <!-- 扫描实体类映射数据库表的包 -->
<property name="packagesToScan">
<list>
<value>com.wjt.model</value>
</list>
</property> </bean> </beans>
第二步:基于注解方式配置IOC
在原项目中service层、dao层中实现类添加注解完成bean对spring容器的注册,去掉采用set访问器属性注入的方式,增加注解声明,代码改写如下:
dao层:
package wjt.com.test.dao.impl;

import org.hibernate.HibernateException;

import org.hibernate.Session;

import org.hibernate.SessionFactory;

import org.springframework.beans.factory.annotation.Autowired;

import org.springframework.stereotype.Repository;

import wjt.com.test.dao.TestDaoI;

@Repository("testDao")//这里是bean注册到spring容器

public class TestDaoImpl implements TestDaoI{

    @Autowired//这里是将声明的bean注入,其中sessionFactory依旧是在配置文件中注册的

    private SessionFactory sessionFactory;

    private Session getCurrentSession() {

        try {

            return sessionFactory.getCurrentSession();

        } catch (HibernateException e) {

            return sessionFactory.openSession();

        }

    }

    @Override

    public void testDaoMethod() {

        System.out.println("dao层测试方法...");

        if(getCurrentSession()!=null) {

            System.out.println("session工厂注入成功!");

        }

    }

}
service层:
package wjt.com.test.service.impl;

import org.springframework.beans.factory.annotation.Autowired;

import org.springframework.stereotype.Service;

import wjt.com.test.dao.TestDaoI;

import wjt.com.test.service.TestServiceI;

@Service("testService")

public class TestServiceImpl implements TestServiceI{

    @Autowired

    private TestDaoI testDao;

    @Override

    public void testServiceMethod() {

        System.out.println("service层测试方法...");

        testDao.testDaoMethod();

    }

}
action层:
package wjt.com.test.action;

import org.apache.struts2.convention.annotation.Action;

import org.apache.struts2.convention.annotation.Namespace;

import org.apache.struts2.convention.annotation.Result;

import org.springframework.beans.factory.annotation.Autowired;

import com.opensymphony.xwork2.ActionSupport;

import wjt.com.test.service.TestServiceI;

@Namespace("/")

@Action(value = "testAction", results = {

        @Result(name = "success", location = "/index.jsp"),

    })

public class TestAction extends ActionSupport {

    @Autowired

    private TestServiceI testService;

    public String execute() throws Exception {

        System.out.println("struts==========================");

        testService.testServiceMethod();

        return "success";

    }

}
TestAction类名上方的注解在后文中有解释,这里先挂问号。
到这里还需要在applicationContext.xml中声明spring对注解的支持以及spring容器对已注册bean进行扫描完成属性的注入从而达到控制反转的目的,
在<beans></beans>节点下增加如下配置:
    <!-- 注解支持 -->

    <context:annotation-config />

    <!-- 扫描注册bean并注入属性 -->

    <context:component-scan base-package="wjt.com.**"></context:component-scan>
其中*号表示扫描wjt.com包及其子包下所有注册的bean。到这里spring+hibernate注解方式配置已全部完成,对上述注解不太熟悉的可以参考前辈文章:
Spring 注解详解
第三步:struts2中action的注解方式配置
首先我们需要引入struts2对注解支持的jar包:
这个时候需要我们在TestAction类名上方添上刚才挂问号的注解,对于Action注解的解释请参考:
Struts2注解详解
我们这里注解的意义为当TestAction中默认方法返回“success”时页面跳转到index.jsp
接着我们需要简化struts2的配置文件,给出简化后的配置文件如下:
<?xml version="1.0" encoding="UTF-8"?>

<!DOCTYPE struts PUBLIC

            "-//Apache Software Foundation//DTD Struts Configuration 2.3//EN"

            "http://struts.apache.org/dtds/struts-2.3.dtd"><!-- 这里要和struts2版本号统一 -->

<struts>

    <!-- 告知Struts2运行时使用Spring来创建对象 -->

    <constant name="struts.objectFactory" value="spring" />

    <package name="default" namespace="/" extends="struts-default">

    </package>

</struts>
第三步:测试
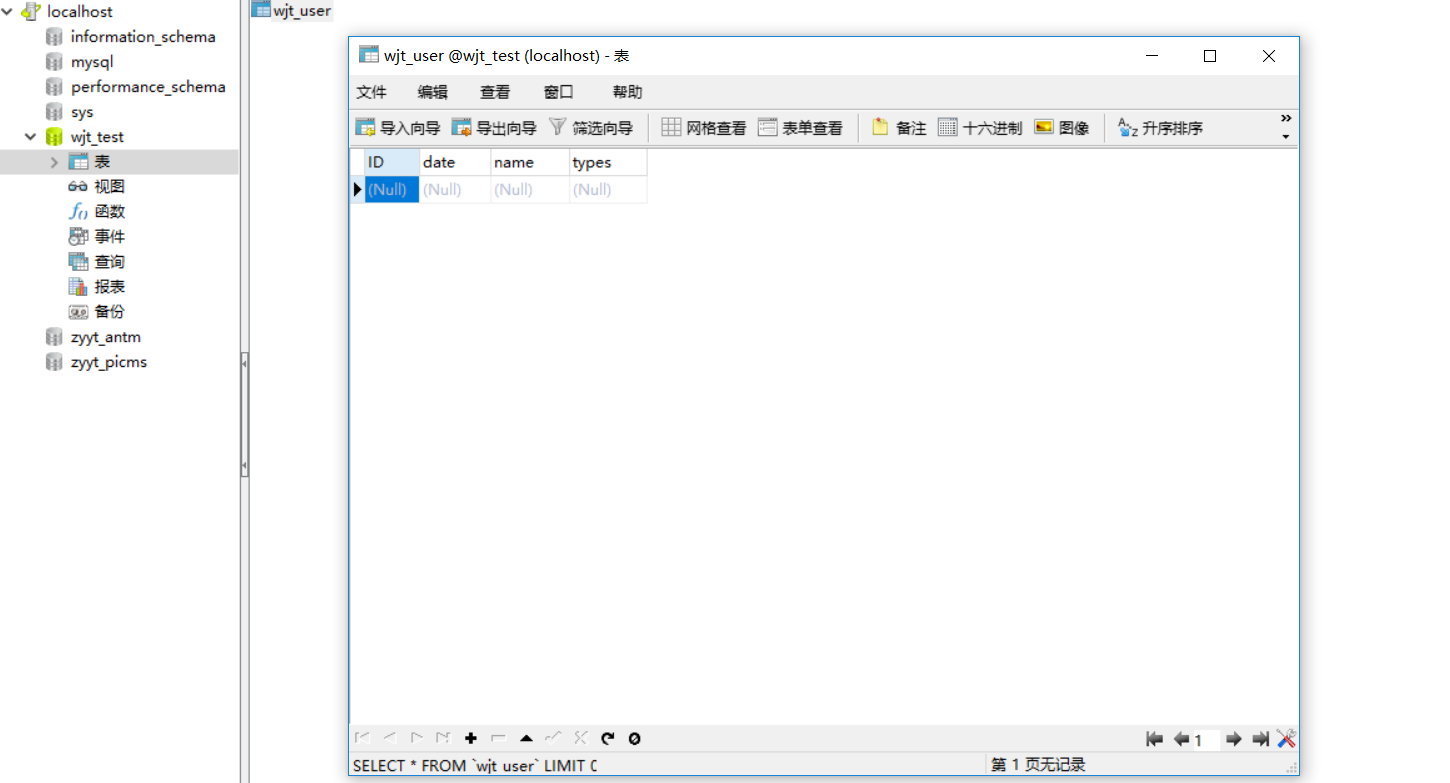
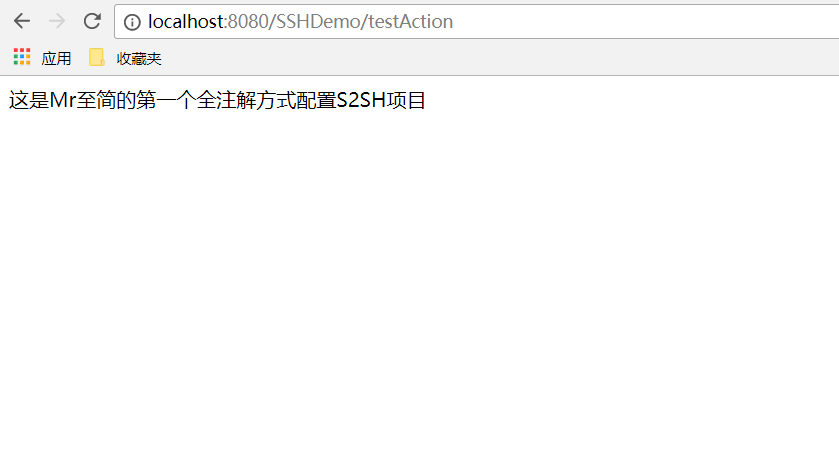
到这里一个完整的基于全注解方式配置s2sh项目就完成了,启动项目测试是否达到我们的要求:
一、项目启动数据库应当已建立一张wjt_user表
二、访问TestAction时应当跳转到index.jsp页面
为了验证测试我们在index.jsp的body标签内写入“这是Mr至简的第一个全注解方式配置S2SH项目”。
启动项目后数据库截图如下:
浏览器地址栏输入:http://localhost:8080/SSHDemo/testAction 请求后截图如下:
以上就是关于S2SH项目全注解配置的参考方案,有不合理的地方还请各位读者指出。
基于已构建S2SH项目配置全注解方式简化配置文件的更多相关文章
- eclipse环境下基于已构建struts2项目整合spring+hibernate
本文是基于已构建的struts2项目基础上整合 spring+hibernate,若读者还不熟悉struts2项目,请先阅读 eclipse环境下基于tomcat-7.0.82构建struts2项目 ...
- 【1】springmvc4 + servlet3 零配置全注解入门项目helloword
自从servlet3.0支持注解,使得javaweb项目使用全注解成为可能. 注解化将成为javaweb的发展方向.包括spring去年推出的spring-boot也是全部使用注解. 代码:https ...
- Jenkins:基于linux构建ivy项目
Jenkins:基于linux构建ivy项目 (二) 基于以上<Jenkins:VMware虚拟机Linux系统的详细安装和使用教程(一)>的配置再进行对ivy项目构建: 启动tomcat ...
- 基于Typescript的Vue项目配置国际化
基于Typescript的Vue项目配置国际化 简介 使用vue-i18n插件对基于Typescript的vue项目配置国际化,切换多种语言, 配合element-ui或者其他UI库 本文以配置中英文 ...
- 简述--构建React项目的几种方式
前言: 构建React项目的几种方式: 构建:create-react-app 快速脚手架 构建:generator-react-webpack 构建:webpack一步一步构建 1)构建:creat ...
- Eclipse中构建maven项目的两种方式
Eclipse中构建maven项目的两种方式 方式一: 1.构建maven项目 1.1 新建meven项目,可在Other中找到maven文件夹 1.2 进入maven项目后,点击next 1.3 在 ...
- ThinkPHP多应用/项目配置技巧(使用同一配置文件)--(十六)
原文:ThinkPHP多应用/项目配置技巧(使用同一配置文件)--(十六) ThinkPHP多应用配置技巧(没有使用分组,这是通过入口文件产生的Home.Admin)----很实用! 比如:现在有Ho ...
- mybaits的注解方式与配置文件方式比较
注解方式比配置文件方式简单了更多. 俩种配置 一个是制定配置文件路径,一个直接class指向dao层接口 只需加一个注解@**** 就能够实现 比写一个xml的配置文件简单更多.
- 基于dubbo构建分布式项目与服务模块
关于分布式服务架构的背景和需求可查阅http://dubbo.io/.不同于传统的单工程项目,本文主要学习如何通过maven和dubbo将构建分布项目以及服务模块,下面直接开始. 创建项目以及模块 ...
随机推荐
- <c:forEach /c:forEach>中varStatus的作用
varStatus封装了当前遍历的状态,可以从该对象上查看是遍历到了第几个元素举例如下 <c:forEach items="${cs}" var="c" ...
- B-Tree 和 B+Tree 结构及应用,InnoDB 引擎, MyISAM 引擎
1.什么是B-Tree 和 B+Tree,他们是做什么用的? B-Tree是为了磁盘或其它存储设备而设计的一种多叉平衡查找树,B-Tree 和 B+Tree 广泛应用于文件存储系统以及数据库系统中. ...
- ruby 模块 respond_to
def hi puts 'hi friend' end module Amodule def self.hello puts 'hello friend' end end def rsp(txt) p ...
- docker-Gitlab、GitLab Runner安装
以下操作均在CentOs下操作 1.Gitlab install ① 启动gitlab docker run --detach \ --hostname 115.30.149.35 \ --publi ...
- hash算法与拉链法解决冲突
<?php class HashNode { public $key; public $value; public $nextNode; public function __construct( ...
- HanLP《自然语言处理入门》笔记--1.新手上路
1. 新手上路 自然语言处理(Natural Language Processing,NLP)是一门融合了计算机科学.人工智能及语言学的交叉学科,它们的关系如下图所示.这门学科研究的是如何通过机器学习 ...
- Spring注解开发系列VII --- Servlet3.0
Servlet3.0简介 Servlet 3.0 作为 Java EE 6 规范体系中一员,随着 Java EE 6 规范一起发布.该版本在前一版本(Servlet 2.5)的基础上提供了若干新特性用 ...
- 使用springboot Admin 2.0.6版本 集成监控springcloud微服务应用
一 新建 添加依赖 <dependencies> <dependency> <groupId>de.codecentric</groupId> < ...
- MySQL5.6数据导入MySQL5.7报错:ERROR 1031 (HY000)
一.故障现象 今天将一个在MySQL5.7上的数据导入到MySQL5.6里面去,默认存储引擎都是InnoDB,导入报错如下: [root@oratest52 data]# mysql -uroot - ...
- ORA-12547: TNS: 丢失连接
今天服务器挂掉了,公司的人弄了一下,,把服务器修好了,,但是我本地链接数据库一直报这个ORA-12547: TNS: 丢失连接,是服务器上的TNS监听没有启动,需要重启一下,