tinyxml解析xml
基于tinyxml做的简单的xml解析。
1.创建xml
bool CreateXmlFile(string& szFileName)

{//创建xml文件,szFilePath为文件保存的路径,若创建成功返回true,否则false

    try

    {

        //创建一个XML的文档对象。

        TiXmlDocument *myDocument = new TiXmlDocument();

        TiXmlElement *RootElement = new TiXmlElement("Response");

        myDocument->LinkEndChild(RootElement);

        TiXmlElement *DeviceListElement = new TiXmlElement("DeviceList");

        RootElement->LinkEndChild(DeviceListElement);

        DeviceListElement->SetAttribute("Num", "");

        TiXmlElement *ItemElement = new TiXmlElement("Item");

        DeviceListElement->LinkEndChild(ItemElement);

        TiXmlElement *DeviceIDElement = new TiXmlElement("DeviceID");

        TiXmlElement *NameElement = new TiXmlElement("Name");

        ItemElement->LinkEndChild(DeviceIDElement);

        ItemElement->LinkEndChild(NameElement);

        TiXmlText *DeviceIDContent = new TiXmlText("");

        TiXmlText *NameContent = new TiXmlText("测试平台");

        DeviceIDElement->LinkEndChild(DeviceIDContent);

        NameElement->LinkEndChild(NameContent);

        myDocument->SaveFile(szFileName.c_str());//保存到文件

    }

    catch (string& e)

    {

        return false;

    }

    return true;

}
创建出来的xml如下:
<Response>

    <DeviceList Num="3">

        <Item>

            <DeviceID>44130000002000000002</DeviceID>

            <Name>测试平台</Name>

        </Item>

    </DeviceList>

</Response>
2.读取xml
(1)从文件读取xml
bool ReadXmlFile(string& szFileName)

{//读取Xml文件,并遍历

    try

    {

        //创建一个XML的文档对象。

        TiXmlDocument *myDocument = new TiXmlDocument(szFileName.c_str());

        myDocument->LoadFile();

        //获得根元素,即Response。

        TiXmlElement *RootElement = myDocument->RootElement();

        //输出根元素名称,即输出Response。

        cout << RootElement->Value() << endl;

        //获得第一个DeviceList节点。

        TiXmlElement *DeviceListElement = RootElement->FirstChildElement();

        TiXmlAttribute *NumAttribute = DeviceListElement->FirstAttribute();

        cout << NumAttribute->Value()<< endl;

        //获得第一个Person的name节点和age节点和ID属性。

        TiXmlElement *ItemElement = DeviceListElement->FirstChildElement();

        for (int i = ; i < ; i++)

        {

            if (ItemElement)

            {

                TiXmlElement *DeviceIDElement = ItemElement->FirstChildElement();

                //这里注意判断是否存在,否则容易崩溃

                if (DeviceIDElement && DeviceIDElement->FirstChild())

                {

                    cout << DeviceIDElement->FirstChild()->Value() << endl;

                    TiXmlElement *NameElement = DeviceIDElement->NextSiblingElement();

                    if (NameElement && NameElement->FirstChild())

                    {

                        cout << NameElement->FirstChild()->Value() << endl;

                        TiXmlElement *ParentIDElement = NameElement->NextSiblingElement();

                        if (ParentIDElement && ParentIDElement->FirstChild())

                        {

                            cout << ParentIDElement->FirstChild()->Value() << endl;

                        }

                    }

                }

                ItemElement = ItemElement->NextSiblingElement();

            }

        }

    }

    catch (string& e)

    {

        return false;

    }

    return true;

}
(2)从字符串解析xml
bool ReadXmlString(string& xmlString, VEC_DEVICE& device_list)

{//读取Xml文件,并遍历

    try

    {

        //创建一个XML的文档对象。

        TiXmlDocument *myDocument = new TiXmlDocument();

        myDocument->Parse(xmlString.c_str());

        //获得根元素,即Response。

        TiXmlElement *RootElement = myDocument->RootElement();

        //输出根元素名称,即输出Response。

        cout << RootElement->Value() << endl;

        //获得第一个DeviceList节点。

        TiXmlElement *DeviceListElement = RootElement->FirstChildElement();

        TiXmlAttribute *NumAttribute = DeviceListElement->FirstAttribute();

        cout << NumAttribute->Value()<< endl;

        //获得第一个Person的name节点和age节点和ID属性。

        TiXmlElement *ItemElement = DeviceListElement->FirstChildElement();

        ST_DEVICE_INFO device_info ;

        for (; ItemElement != NULL; ItemElement = ItemElement->NextSiblingElement())

        {

            if (ItemElement)

            {

                ST_DEVICE_INFO device_info;

                TiXmlElement *DeviceIDElement = ItemElement->FirstChildElement();

                if (DeviceIDElement && DeviceIDElement->FirstChild())

                {

                    string str = "";

                    str = DeviceIDElement->FirstChild()->Value();

                    //注意是否需要从utf-8转为GBK

                    device_info.m_strID = str.c_str();// UtfToGbk(str.c_str());

                    cout << "ID   "<<device_info.m_strID.c_str()<< endl;

                    TiXmlElement *NameElement = DeviceIDElement->NextSiblingElement();

                    if (NameElement && NameElement->FirstChild())

                    {

                        str = "";

                        str = NameElement->FirstChild()->Value();

                        device_info.m_strName = str.c_str();// UtfToGbk(str.c_str());

                        cout << "name  "<< device_info.m_strName << endl;

                        TiXmlElement *ParentIDElement = NameElement->NextSiblingElement();

                        if (ParentIDElement && ParentIDElement->FirstChild())

                        {

                            str = "";

                            str = ParentIDElement->FirstChild()->Value();

                            device_info.m_strParentID = str.c_str();// UtfToGbk(str.c_str());

                            cout << "m_strParentID  "<<device_info.m_strParentID.c_str()<< endl;

                        }

                        device_info.m_nStatus = ;

                        device_list.push_back(device_info);

                    }

                }

                else

                {

                    continue;

                }

            }

        }

    }

    catch (string& e)

    {

        return false;

    }

    return true;

}
从文件解析xml与从字符串解析xml的不同仅仅在加载xml的方式不同。
从文件是:
TiXmlDocument *myDocument = new TiXmlDocument(szFileName.c_str()); //szFileName为文件路径名

myDocument->LoadFile();
从字符串加载是:
TiXmlDocument *myDocument = new TiXmlDocument();

myDocument->Parse(xmlString.c_str());    //xmlString是字符串
如字符串可以为:
string xmlStr = "\

                <?xml version=\"1.0\" encoding=\"utf - 8\" standalone=\"no\" ?> \

                <Response>\

                    <DeviceList Num=\"3\">\

                        <Item>\

                            <DeviceID></DeviceID>\

                            <Name>测试平台</Name>\

                        </Item>\

                        <Item>\

                            <DeviceID></DeviceID>\

                            <Name>惠州市</Name>\

                            <ParentID></ParentID>\

                        </Item>\

                        <Item>\

                            <DeviceID></DeviceID>\

                            <Name>邮政储蓄门口</Name>\

                            <ParentID></ParentID>\

                        </Item>\

                        <Item>\

                            <DeviceID></DeviceID>\

                            <Name>邮政储蓄门口</Name>\

                            <ParentID></ParentID>\

                        </Item>\

                        <Item>\

                            <DeviceID></DeviceID>\

                            <Name>邮政储蓄门口</Name>\

                            <ParentID></ParentID>\

                        </Item>\

                        <Item>\

                            <DeviceID></DeviceID>\

                            <Name>邮政储蓄门口</Name>\

                            <ParentID></ParentID>\

                        </Item>\

                        <Item>\

                            <DeviceID></DeviceID>\

                            <Name>邮政储蓄门口</Name>\

                            <ParentID></ParentID>\

                        </Item>\

                        <Item>\

                            <DeviceID></DeviceID>\

                            <Name>邮政储蓄门口</Name>\

                            <ParentID></ParentID>\

                        </Item>\

                    </DeviceList>\

                </Response>" ;
有的时候需要从UTF-8转GBK,否则会乱码:
std::string UtfToGbk(const char* utf8)

{

    int len = MultiByteToWideChar(CP_UTF8, , utf8, -, NULL, );

    wchar_t* wstr = new wchar_t[len + ];

    memset(wstr, , len + );

    MultiByteToWideChar(CP_UTF8, , utf8, -, wstr, len);

    len = WideCharToMultiByte(CP_ACP, , wstr, -, NULL, , NULL, NULL);

    char* str = new char[len + ];

    memset(str, , len + );

    WideCharToMultiByte(CP_ACP, , wstr, -, str, len, NULL, NULL);

    if (wstr) delete[] wstr;

    return str;

}
3.完整的demo
以下是VS2013上的一个例子,搞怪的是utf-8转成GBK也不会乱码,转成GBK反而会乱码,原因不明。
// xmlTest.cpp : 定义控制台应用程序的入口点。

//

#include "stdafx.h"

#include <iostream>

#include <string>

#include <windows.h>

#include <atlstr.h>

#include <vector>

#define TIXML_USE_STL

#include "tinyxml.h"

#include "tinystr.h"

#pragma comment(lib,"tinyxmlSTL.lib")

using namespace std;

struct ST_DEVICE_INFO

{

    string m_strID;                 //设备ID

    string m_strParentID;           //父ID

    string m_strName;               //设备名

    int m_nType;                    //类型

    int m_nStatus;                  //状态

    float m_fLongitude;             //经度

    float m_fLatitude;              //纬度

    ST_DEVICE_INFO()

    {

        m_strID.clear();

        m_strParentID.clear();

        m_strName.clear();

        m_nType = ;

        m_nStatus = ;

        m_fLongitude = ;

        m_fLatitude = ;

    }

};

typedef vector<ST_DEVICE_INFO> VEC_DEVICE;

std::string UtfToGbk(const char* utf8)

{

    int len = MultiByteToWideChar(CP_UTF8, , utf8, -, NULL, );

    wchar_t* wstr = new wchar_t[len + ];

    memset(wstr, , len + );

    MultiByteToWideChar(CP_UTF8, , utf8, -, wstr, len);

    len = WideCharToMultiByte(CP_ACP, , wstr, -, NULL, , NULL, NULL);

    char* str = new char[len + ];

    memset(str, , len + );

    WideCharToMultiByte(CP_ACP, , wstr, -, str, len, NULL, NULL);

    if (wstr) delete[] wstr;

    return str;

}

bool CreateXmlFile(string& szFileName)

{//创建xml文件,szFilePath为文件保存的路径,若创建成功返回true,否则false

    try

    {

        //创建一个XML的文档对象。

        TiXmlDocument *myDocument = new TiXmlDocument();

        TiXmlElement *RootElement = new TiXmlElement("Response");

        myDocument->LinkEndChild(RootElement);

        TiXmlElement *DeviceListElement = new TiXmlElement("DeviceList");

        RootElement->LinkEndChild(DeviceListElement);

        DeviceListElement->SetAttribute("Num", "");

        TiXmlElement *ItemElement = new TiXmlElement("Item");

        DeviceListElement->LinkEndChild(ItemElement);

        TiXmlElement *DeviceIDElement = new TiXmlElement("DeviceID");

        TiXmlElement *NameElement = new TiXmlElement("Name");

        ItemElement->LinkEndChild(DeviceIDElement);

        ItemElement->LinkEndChild(NameElement);

        TiXmlText *DeviceIDContent = new TiXmlText("");

        TiXmlText *NameContent = new TiXmlText("测试平台");

        DeviceIDElement->LinkEndChild(DeviceIDContent);

        NameElement->LinkEndChild(NameContent);

        myDocument->SaveFile(szFileName.c_str());//保存到文件

    }

    catch (string& e)

    {

        return false;

    }

    return true;

}

bool ReadXmlFile(string& szFileName)

{//读取Xml文件,并遍历

    try

    {

        //创建一个XML的文档对象。

        TiXmlDocument *myDocument = new TiXmlDocument(szFileName.c_str());

        myDocument->LoadFile();

        //获得根元素,即Response。

        TiXmlElement *RootElement = myDocument->RootElement();

        //输出根元素名称,即输出Response。

        cout << RootElement->Value() << endl;

        //获得第一个DeviceList节点。

        TiXmlElement *DeviceListElement = RootElement->FirstChildElement();

        TiXmlAttribute *NumAttribute = DeviceListElement->FirstAttribute();

        cout << NumAttribute->Value()<< endl;

        //获得第一个Person的name节点和age节点和ID属性。

        TiXmlElement *ItemElement = DeviceListElement->FirstChildElement();

        for (int i = ; i < ; i++)

        {

            if (ItemElement)

            {

                TiXmlElement *DeviceIDElement = ItemElement->FirstChildElement();

                //这里注意判断是否存在,否则容易崩溃

                if (DeviceIDElement && DeviceIDElement->FirstChild())

                {

                    cout << DeviceIDElement->FirstChild()->Value() << endl;

                    TiXmlElement *NameElement = DeviceIDElement->NextSiblingElement();

                    if (NameElement && NameElement->FirstChild())

                    {

                        cout << NameElement->FirstChild()->Value() << endl;

                        TiXmlElement *ParentIDElement = NameElement->NextSiblingElement();

                        if (ParentIDElement && ParentIDElement->FirstChild())

                        {

                            cout << ParentIDElement->FirstChild()->Value() << endl;

                        }

                    }

                }

                ItemElement = ItemElement->NextSiblingElement();

            }

        }

    }

    catch (string& e)

    {

        return false;

    }

    return true;

}

bool ReadXmlString(string& xmlString, VEC_DEVICE& device_list)

{//读取Xml文件,并遍历

    try

    {

        //创建一个XML的文档对象。

        TiXmlDocument *myDocument = new TiXmlDocument();

        myDocument->Parse(xmlString.c_str());

        //获得根元素,即Response。

        TiXmlElement *RootElement = myDocument->RootElement();

        //输出根元素名称,即输出Response。

        cout << RootElement->Value() << endl;

        //获得第一个DeviceList节点。

        TiXmlElement *DeviceListElement = RootElement->FirstChildElement();

        TiXmlAttribute *NumAttribute = DeviceListElement->FirstAttribute();

        cout << NumAttribute->Value()<< endl;

        //获得第一个Person的name节点和age节点和ID属性。

        TiXmlElement *ItemElement = DeviceListElement->FirstChildElement();

        ST_DEVICE_INFO device_info ;

        for (; ItemElement != NULL; ItemElement = ItemElement->NextSiblingElement())

        {

            if (ItemElement)

            {

                ST_DEVICE_INFO device_info;

                TiXmlElement *DeviceIDElement = ItemElement->FirstChildElement();

                if (DeviceIDElement && DeviceIDElement->FirstChild())

                {

                    string str = "";

                    str = DeviceIDElement->FirstChild()->Value();

                    //注意是否需要从utf-8转为GBK

                    device_info.m_strID = str.c_str();// UtfToGbk(str.c_str());

                    cout << "ID   "<<device_info.m_strID.c_str()<< endl;

                    TiXmlElement *NameElement = DeviceIDElement->NextSiblingElement();

                    if (NameElement && NameElement->FirstChild())

                    {

                        str = "";

                        str = NameElement->FirstChild()->Value();

                        device_info.m_strName = str.c_str();// UtfToGbk(str.c_str());

                        cout << "name  "<< device_info.m_strName << endl;

                        TiXmlElement *ParentIDElement = NameElement->NextSiblingElement();

                        if (ParentIDElement && ParentIDElement->FirstChild())

                        {

                            str = "";

                            str = ParentIDElement->FirstChild()->Value();

                            device_info.m_strParentID = str.c_str();// UtfToGbk(str.c_str());

                            cout << "m_strParentID  "<<device_info.m_strParentID.c_str()<< endl;

                        }

                        device_info.m_nStatus = ;

                        device_list.push_back(device_info);

                    }

                }

                else

                {

                    continue;

                }

            }

        }

    }

    catch (string& e)

    {

        return false;

    }

    return true;

}

int _tmain(int argc, _TCHAR* argv[])

{

    string fileName = "test.xml";

    CreateXmlFile(fileName);

    cout << "xml文件解析:" << endl;

    ReadXmlFile(fileName);

    cout << endl;

    cout << "字符串解析:" << endl;

    string xmlStr = "\

                <?xml version=\"1.0\" encoding=\"utf - 8\" standalone=\"no\" ?> \

                <Response>\

                    <DeviceList Num=\"3\">\

                        <Item>\

                            <DeviceID></DeviceID>\

                            <Name>测试平台</Name>\

                        </Item>\

                        <Item>\

                            <DeviceID></DeviceID>\

                            <Name>惠州市</Name>\

                            <ParentID></ParentID>\

                        </Item>\

                        <Item>\

                            <DeviceID></DeviceID>\

                            <Name>邮政储蓄门口</Name>\

                            <ParentID></ParentID>\

                        </Item>\

                        <Item>\

                            <DeviceID></DeviceID>\

                            <Name>邮政储蓄门口</Name>\

                            <ParentID></ParentID>\

                        </Item>\

                        <Item>\

                            <DeviceID></DeviceID>\

                            <Name>邮政储蓄门口</Name>\

                            <ParentID></ParentID>\

                        </Item>\

                        <Item>\

                            <DeviceID></DeviceID>\

                            <Name>邮政储蓄门口</Name>\

                            <ParentID></ParentID>\

                        </Item>\

                        <Item>\

                            <DeviceID></DeviceID>\

                            <Name>邮政储蓄门口</Name>\

                            <ParentID></ParentID>\

                        </Item>\

                        <Item>\

                            <DeviceID></DeviceID>\

                            <Name>邮政储蓄门口</Name>\

                            <ParentID></ParentID>\

                        </Item>\

                    </DeviceList>\

                </Response>" ;

    VEC_DEVICE device_list ;

    device_list.clear() ;

    ReadXmlString(xmlStr, device_list) ;

    cout << endl;

    for (int i = ; i < device_list.size(); i++)

    {

        cout<< "设备ID:" <<device_list[i].m_strID<<"  设备名称:"<<device_list[i].m_strName<<"   父ID: "<<device_list[i].m_strParentID<<endl ;

    }

    system("pause");

    return ;

}
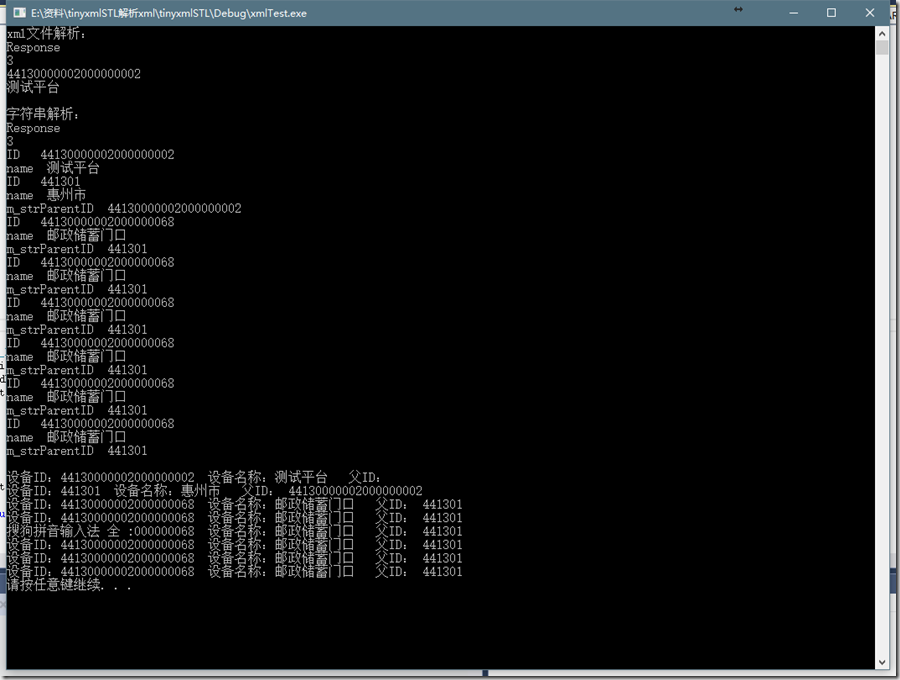
运行结果:
完整工程地址:https://gitee.com/betterwgo/timyxml
tinyxml解析xml的更多相关文章
- C++ 使用TinyXML解析XML文件
1.介绍 读取和设置xml配置文件是最常用的操作,TinyXML是一个开源的解析XML的C++解析库,能够在Windows或Linux中编译.这个解析库的模型通过解析XML文件,然后在内存中生成DOM ...
- 小知识积累-C++使用tinyxml解析Xml内存泄漏问题
项目中需要用到C++解析XML,网上搜到tinyxml这么个开源库,就用了下试试,创建对象后内部自带Clear方法,但在循环测试的时候(刚用C++做项目不久,不会什么特别的内存泄漏测试工具,于是就写个 ...
- Cocos2d-x 3.0 使用TinyXml 解析XML文件
在cocos2d-x 3.0中Xml解析已经不用自己找库了,已经为我们集成好了. text.xml <!--?xml version ="1.0" encoding =&qu ...
- cocos2d-x解析xml时的Bug
cocos2d-x中使用tinyxml解析xml配置.如下: tinyxml2::XMLDocument doc; if (tinyxml2::XML_SUCCESS != doc.LoadFile( ...
- tinyXml直接解析XML字符串
一直都用tinyxml直接LoadFile来解析XML,发现原来也可以直接解析XML字符串. XML文件: <?xml version=\"1.0\" encoding=\& ...
- iOS-数据解析XML解析的多种平台介绍
在iPhone开发中,XML的解析有很多选择,iOS SDK提供了NSXMLParser和libxml2两个类库,另外还有很多第三方类库可选,例如TBXML.TouchXML.KissXML.Tiny ...
- 转:VC解析XML文件-CMarkup的使用详解
本篇文章是对VC解析XML文件-CMarkup的使用进行了详细的分析介绍,需要的朋友参考下 VC解析XML文件的工具有很多,CMarkup, tinyXML,还有IBM的,MS的等等. 据说tinyX ...
- cocos2dx3.0-tinyxml在Android环境下解析xml失败的问题
本文由@呆代待殆原创,转载请注明出处. 正常情况下,我们在用tinyxml读取xml文件的的时候,会像下面这样写. std::string filePath = FileUtils::getInsta ...
- Tinyxml 操作XML
对于xml文件,目前的工作只是集中在配置文件和作为简单的信息文件来用,因此我不太喜欢使用msxml这种重量级的xml解析器,特别是使用msxml解析xml涉及到复杂的com类型转换,更是令人感觉繁琐. ...
随机推荐
- ios极光推送快速集成教程
内容中包含 base64string 图片造成字符过多,拒绝显示
- [转]DNS服务器原理详解与Centos6.x下搭建DNS服务器
转自:http://blog.it985.com/8958.html DNS 数据库的记录:正解,反解, Zone 的意义 通过DNS解析过程详解这篇文章,我们知道了要想访问www.zmit.cn,最 ...
- Tasks in parallel
using System; using System.Collections.Generic; using System.Linq; using System.Web; using System.We ...
- 关于TOSCA自动化测试工具, 我想问一些问题(持续整理中)
通过学习,实践踩坑,有以下问题不太明白 1. Artifacts and results from your complete test portfolio (cross-browser, mobi ...
- centos下删除名称为乱码的文件
1.通过ls -li 获取要删除乱码文件名文件的inode号,比如得到的是 146506
- Android-服务中监听电源键和Home键的广播、在锁屏下仍然工作的方法
Android-服务中监听电源键和Home键的广播 http://blog.csdn.net/u014657752/article/details/49512485 Android开发之如何监听让服 ...
- Python面试题之解读Socketserver & Tcpserver
在解析socketserver是如工作之前,我们先看看socektserver类的继承关系图: 请求类继承关系: server类继承关系: 有了上面的继承关系图后,我们解析socketserver就轻 ...
- 20145333《Java程序设计》课程总结
每周读书笔记链接汇总 第一周学习总结 第二周学习总结 第三周学习总结 第四周学习总结 第五周学习总结 第六周学习总结 第七周学习总结 第八周学习总结 第九周学习总结 第十周学习总结 实验报告链接汇总 ...
- [Deep Learning] 神经网络基础【转】
本文转载自:http://www.cnblogs.com/maybe2030/p/5597716.html 阅读目录 1. 神经元模型 2. 感知机和神经网络 3. 误差逆传播算法 4. 常见的神经网 ...
- git将本地已经存在的分支和一个指定的远端分支建立映射关系
Make an existing Git branch track a remote branch? Given a branch foo and a remote upstream: As of G ...