版本elk均为6.3+centos7.0
准备工作
官网下载elk6.3的linux环境的压缩包,sftp上传
下载对应的head插件sftp上传到指定目录
tar.gz文件解压
tar -zxvf filename -C dirname
zip文件
安装zip软件
unzip filename -d dirname
1.root用户不能启动elasticsearch
2.创建用户
useradd fan
修改密码
passwd fan
3.给用户root权限(测试图简单,线上请自行建组并授权)
赋予用户fan root权限
chmod -v u+w /etc/sudoers
visudo
在root那行添加如下
## Allow root to run any commands anywhere
root ALL=(ALL) ALL
fan ALL=(ALL) ALL
4.给目录授权 chmod 777 -R dir
5.修改配置文件limits.conf
vim /etc/security/limits.conf
#* soft core 0
#* hard rss 10000
#@student hard nproc 20
#@faculty soft nproc 20
#@faculty hard nproc 50
#ftp hard nproc 0
#@student - maxlogins 4
fan hard nofile 65536
fan soft nofile 65536
"/etc/security/limits.conf" 62L, 2465C 已写入
fan为启动用户,自己根据自己用户名更改,不改改配置会报如下错误
[2018-04-29T07:10:31,207][INFO ][o.e.t.TransportService ] [node_01] publish_address {192.168.2.10:9300}, bound_addresses {[::]:9300}
[2018-04-29T07:10:31,222][INFO ][o.e.b.BootstrapChecks ] [node_01] bound or publishing to a non-loopback address, enforcing bootstrap checks
ERROR: [2] bootstrap checks failed
[1]: max file descriptors [4096] for elasticsearch process is too low, increase to at least [65536]
[2]: max virtual memory areas vm.max_map_count [65530] is too low, increase to at least [262144]
6.修改配置文件sysctl.conf
vi /etc/sysctl.conf
文件末尾添加
vm.max_map_count=655360
否则启动报如下错误
[2018-04-29T07:19:56,208][INFO ][o.e.b.BootstrapChecks ] [node_01] bound or publishing to a non-loopback address, enforcing bootstrap checks
ERROR: [1] bootstrap checks failed
[1]: max virtual memory areas vm.max_map_count [65530] is too low, increase to at least [262144]
7.修改elasticsearch配置文件elasticsearch.yml
#cluster.name: my-application
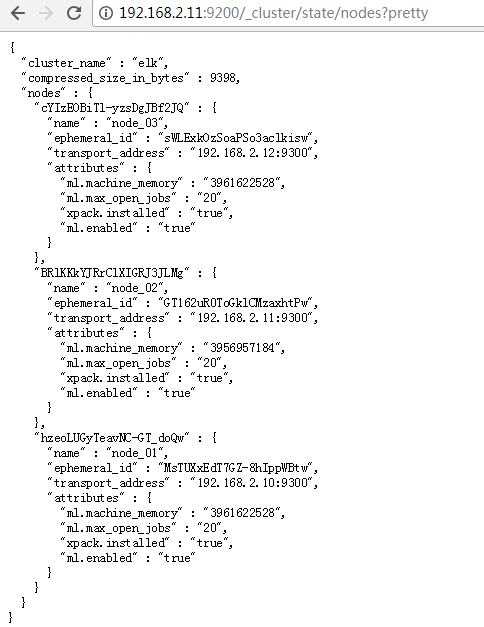
cluster.name: elk
#
# ------------------------------------ Node ------------------------------------
#
# Use a descriptive name for the node:
#
node.name: node_01
#指定该节点是否有资格被选举成为node,默认是true,es是默认集群中的第一台机器为master,如果这台机挂了就会重新选举
node.master: true
#指定该节点是否存储索引数据,默认为true
node.data: true
#设置这个参数来保证集群中的节点可以知道其它N个有master资格的节点。默认为1,对于大的集群来说,可以设置大一点的值(2-4)
discovery.zen.minimum_master_nodes: 1
#设置节点间交互的tcp端口,默认是9300
transport.tcp.port: 9300
#
# Add custom attributes to the node:
#
#node.attr.rack: r1
#
# ----------------------------------- Paths ------------------------------------
#
# Path to directory where to store the data (separate multiple locations by comma):
#
#path.data: /path/to/data
path.data: /path/to/data
#
# Path to log files:
#
#path.logs: /path/to/logs
path.logs: /path/to/logs
#
# ----------------------------------- Memory -----------------------------------
#
# Lock the memory on startup:
#
#bootstrap.memory_lock: true
#
# Make sure that the heap size is set to about half the memory available
# on the system and that the owner of the process is allowed to use this
# limit.
#
# Elasticsearch performs poorly when the system is swapping the memory.
#
# ---------------------------------- Network -----------------------------------
#
# Set the bind address to a specific IP (IPv4 or IPv6):
#
#network.host: 192.168.0.1
network.host: 192.168.2.10
#
# Set a custom port for HTTP:
#
#http.port: 9200
http.port: 9200
#
# For more information, consult the network module documentation.
#
# --------------------------------- Discovery ----------------------------------
#
# Pass an initial list of hosts to perform discovery when new node is started:
# The default list of hosts is ["127.0.0.1", "[::1]"]
#
#discovery.zen.ping.unicast.hosts: ["host1", "host2"]
discovery.zen.ping.unicast.hosts: ["192.168.2.10", "192.168.2.11", "192.168.2.12"]
#
# Prevent the "split brain" by configuring the majority of nodes (total number of master-eligible nodes / 2 + 1):
#
#discovery.zen.minimum_master_nodes:
#
# For more information, consult the zen discovery module documentation.
#
# ---------------------------------- Gateway -----------------------------------
#
# Block initial recovery after a full cluster restart until N nodes are started:
#
#gateway.recover_after_nodes: 3
#
# For more information, consult the gateway module documentation.
#
# ---------------------------------- Various -----------------------------------
#
# Require explicit names when deleting indices:
#
#action.destructive_requires_name: true
#
#head插件
http.cors.enabled: true
http.cors.allow-origin: "*"
最后两行开始不要加,后面配置head插件后再添加
8.elasticsearch启动成功
[fan@master elasticsearch-6.3.0]$ jps
114672 Jps
114595 Elasticsearch
elasticsearch.yml
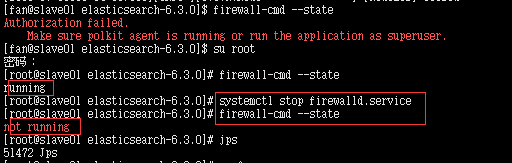
9.关闭防火墙
“failed to obtain node locks”
jps
将elasticsearch kill
elasticsearch 没有到主机的路由
关闭防火墙
10.logstash 同elasticsearch解压,然后修改配置文件
logstash 采集后台
logstash.conf
自己根据实际情况更改input中的path和output中的host index
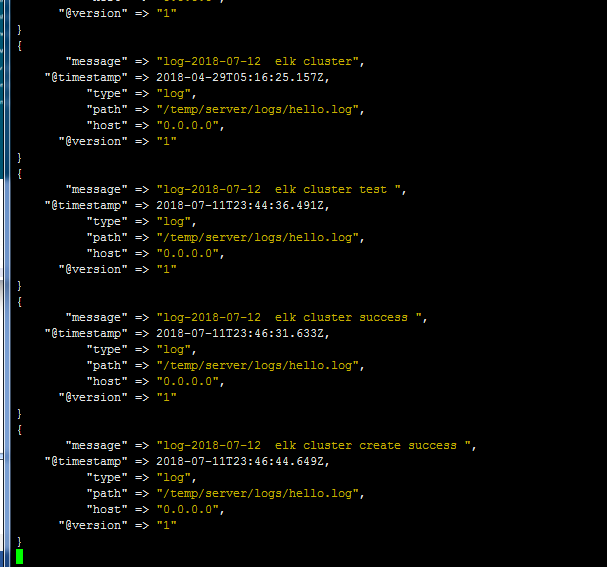
11.添加日志文件测试
logstash 后台会有添加记录
12.下载解压kibana 同上面elasticsearch
修改conf 下 kibana.yml添加elasticsearch地址,添加一个即可
elasticsearch.url: "http://192.168.2.10:9200"
然后后台启动bin目录下 nohup ./kibana &
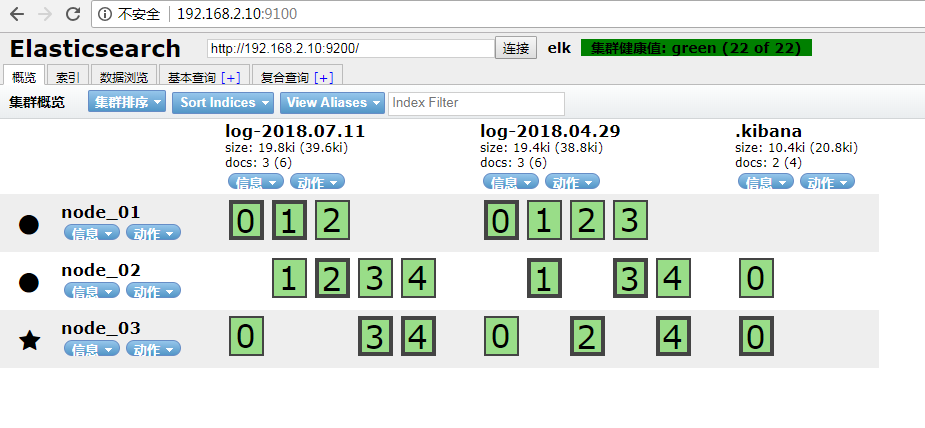
13.head安装
前提条件
上面地址下载master.zip上传解压
也可以命令:wget https://github.com/mobz/elasticsearch-head/archive/master.zip
我是下载的master.zip所以要解压
安装zip软件
yum install -y zip unzip
解压master.zip
unzip master.zip -d /srv/
b.node下载安装
下载后解压同elasticsearch
配置环境变量
vim /etc/profile
export NODE_HOME=/srv/node-v4.4.7-linux-x64
export PATH=$JAVA_HOME/bin:$HADOOP_HOME/bin:$NODE_HOME/bin:$PATH
生效环境变量source /etc/profile
npm install -g grunt-cli
[root@master elasticsearch-head-master]# grunt -version
grunt-cli v1.2.0
修改 Gruntfile.js
vim Gruntfile.js
connect: {
server: {
options: {
port: 9100,
base: '.',
keepalive: true,
hostname: '*'
}
}
}
npm install
启动head插件
grunt server
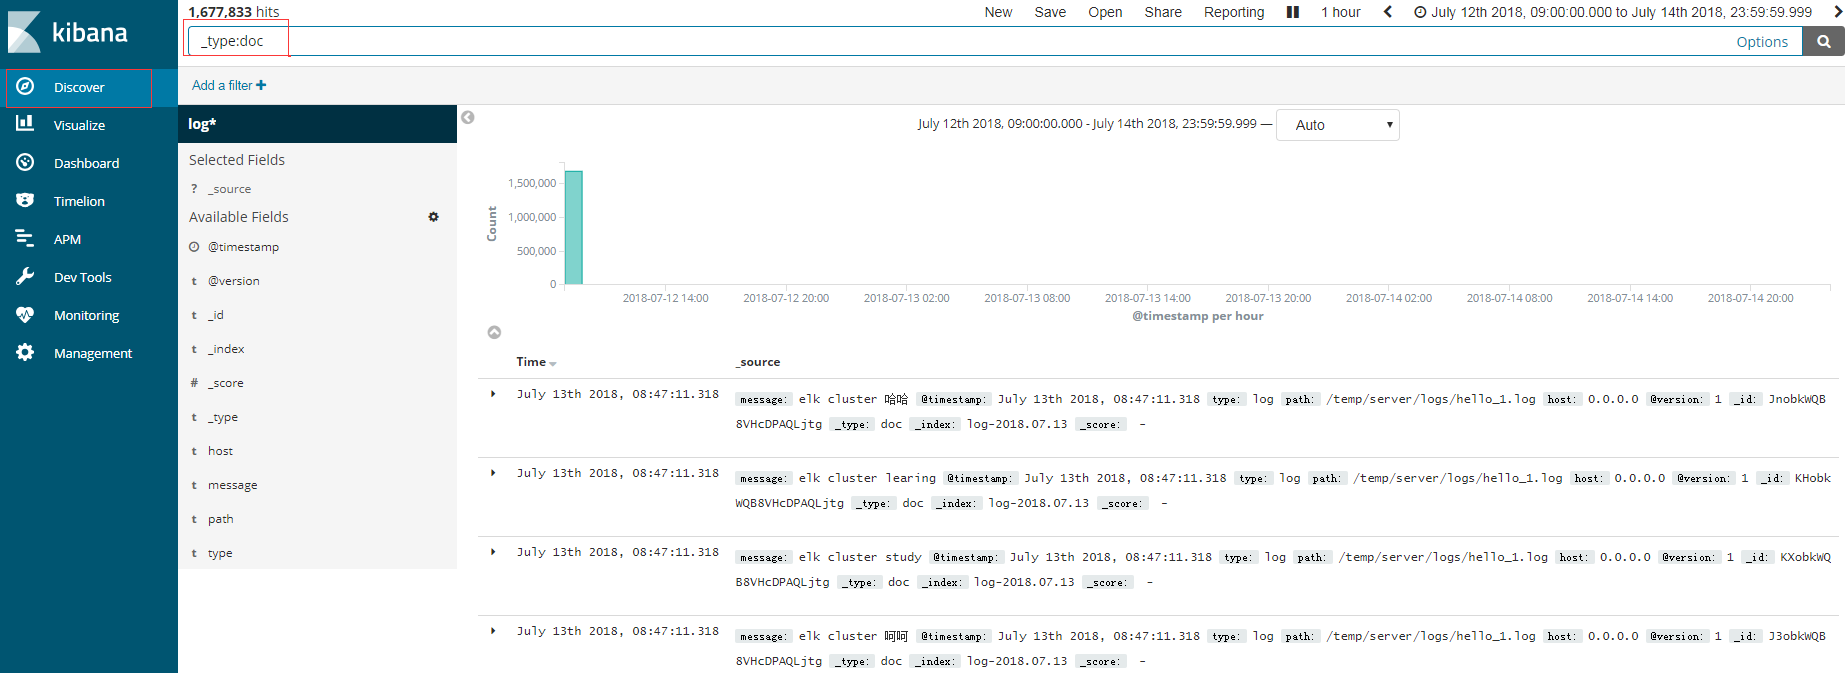
14.访问kibana
我这边直接拷贝了一个日志文件放到了前面logstash中配置的路径下
elk搭建完毕
Solr和Es区别
Solr:查询多且查询的时候更新较少。支持word, pdf等富文本索引开发者社区完善,稳定性高一点。但是笨重
1Es:一边查一边更新多系统。只支持ison格式。轻便,集群部署简单。实时性高。
由于环境不同大家可能遇到其他的问题,有问题可以加入qq群:513650703共同交流学习
- 环境搭建-CentOS集群搭建
环境搭建-CentOS集群搭建 写在前面 最近有许多小伙伴问我,大数据的hadoop分布式集群该如何去搭建.所以,想着,就写一篇博客,帮助到更多刚入门大数据的人.本博客会一步一步带你实现一个Hadoo ...
- Hadoop3集群搭建之——虚拟机安装
现在做的项目是个大数据报表系统,刚开始的时候,负责做Java方面的接口(项目前端为独立的Java web 系统,后端也是Java web的系统,前后端系统通过接口传输数据),后来领导觉得大家需要多元化 ...
- Hadoop集群搭建-03编译安装hadoop
Hadoop集群搭建-05安装配置YARN Hadoop集群搭建-04安装配置HDFS Hadoop集群搭建-03编译安装hadoop Hadoop集群搭建-02安装配置Zookeeper Hado ...
- Hadoop3集群搭建之——hbase安装及简单操作
折腾了这么久,hbase终于装好了 ------------------------- 上篇: Hadoop3集群搭建之——虚拟机安装 Hadoop3集群搭建之——安装hadoop,配置环境 Hado ...
- Hadoop3集群搭建之——hive安装
Hadoop3集群搭建之——虚拟机安装 Hadoop3集群搭建之——安装hadoop,配置环境 Hadoop3集群搭建之——配置ntp服务 Hadoop3集群搭建之——hbase安装及简单操作 现在到 ...
- redis centos集群搭建和java应用
1. 首先要ssh免密登录 redis集群,3台虚拟机,6个节点,每台机器2个节点一主一从. 192.168.132.154 c0192.168.132.156 c1192.168.132.155 c ...
- Elasticsearch集群监控工具bigdesk插件安装
bigdesk是elasticsearch的一个集群监控工具,可以通过它来查看es集群的各种状态,如:cpu.内存使用情况,索引数据.搜索情况,http连接数等. 项目git地址: https://g ...
- BigData--hadoop集群搭建之hbase安装
之前在hadoop-2.7.3 基础上搭建hbase 详情请见:https://www.cnblogs.com/aronyao/p/hadoop.html 基础条件:先配置完成zookeeper 准备 ...
- 3.Hadoop集群搭建之Zookeeper安装
前期准备 下载Zookeeper 3.4.5 若无特殊说明,则以下操作均在master节点上进行 1. 解压Zookeeper #直接解压Zookeeper压缩包 tar -zxvf zookeepe ...
随机推荐
- javascript 大中小括号的区别
小括号 JavaScript中小括号有五种语义 语义1,函数声明时参数表 function func(arg1,arg2){ // ... } 语义2,和一些语句联合使用以达到某些限定作用 // 和f ...
- 整体修改VS中C++工程和解决方案命名问题
目标:将所有basestation相关的修改为PPPStream 首先,复制一份用于修改的解决方案文件夹,然后打开解决方案,如下图,左侧的两个basestation都重新命名为PPPStream. 第 ...
- 人工智能——搜索(1)回溯策略【N皇后问题】
这学期学<人工智能>(马少平,朱小燕 编著)这本书,里面很多算法听老师讲都听不懂,就想试试写一下看看能不能写出来,就从最简单的回溯策略开始吧. 源码 题目描述 在一个n*n的国际象棋棋盘上 ...
- c++ 堆和栈以及区别
c++中内存分成5个区:堆.栈.自由存储区.全局\静态存储区.常量存储区 栈是一种连续存储的数据结构,具有先进后出的性质.堆是一种非连续的树形存储数据结构,每个节点有一个值,整棵树是经过排序的,特点是 ...
- [转] Eclipse安装SVN插件
eclipse里安装SVN插件,一般来说,有三种方式: 1. 直接下载SVN插件,将其解压到eclipse的对应目录里 2. 使用eclipse 里Help菜单的“Install New Softwa ...
- NYOJ 36 LCS(最长公共子序列)
题目链接: http://acm.nyist.edu.cn/JudgeOnline/problem.php?pid=36 最长公共子序列 时间限制:3000 ms | 内存限制:65535 KB ...
- Missing artifact com.sun:tools:jar:1.5.0解决的方法
前一阵子下了最新的JavaEE版本号的eclipse,导入mavenproject之后,pom文件一直报Missing artifact com.sun:tools:jar:1.5.0.非常纳闷,to ...
- Gobelieve 架构(转载)
Gobelieve 架构 Gobelieve github地址 im 客户连接服务器 (可分布式部署,暂无负载均衡模块) imr 路由查询服务器(主要解决im分布式部署的问题) ims 存储服务器 ( ...
- SQL 练习一 字符型函数
处理字符串时,利用字符型函数的嵌套组合是非常有效的,试分析一道考题: create table customers(cust_name varchar2(20)); insert into custo ...
- 解决安装macports更新失败问题
安装 macports 先是卡在开始,xcode的路径指定错误,重新指定一下,然后再sudo port selfupdate,就卡再ports.tar那里不动了.经过google和百度查到参考网 ...