eclipse的springMVC环境搭建并输出HelloWorld
spring简单介绍:https://www.cnblogs.com/package-java/p/10368672.html
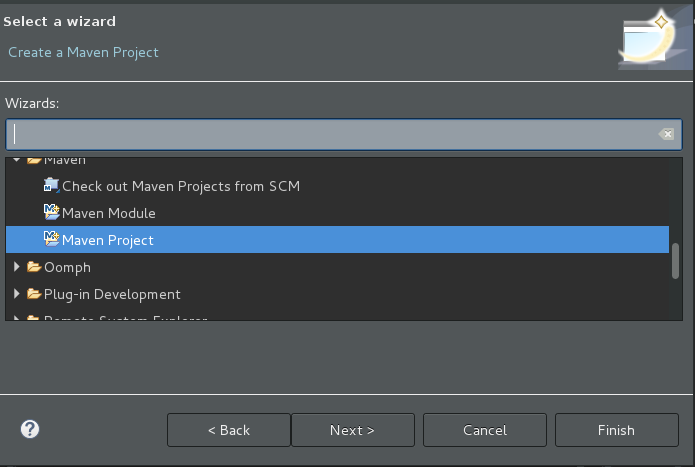
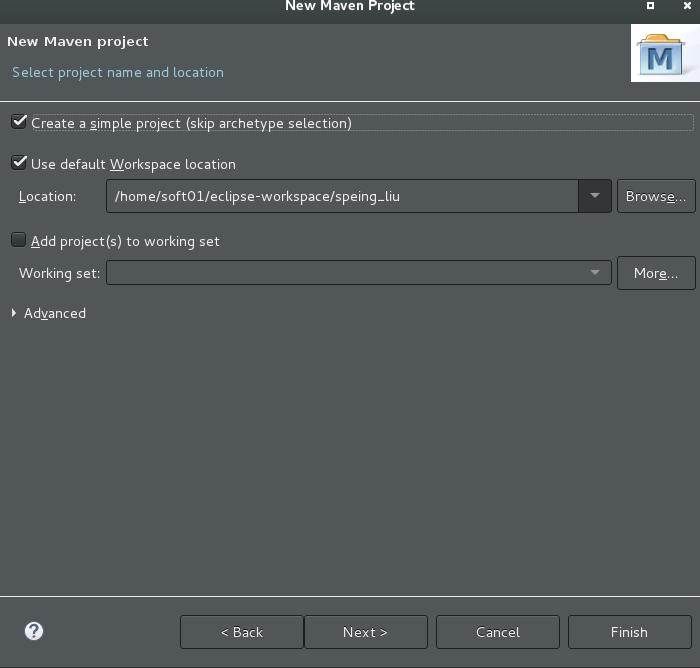
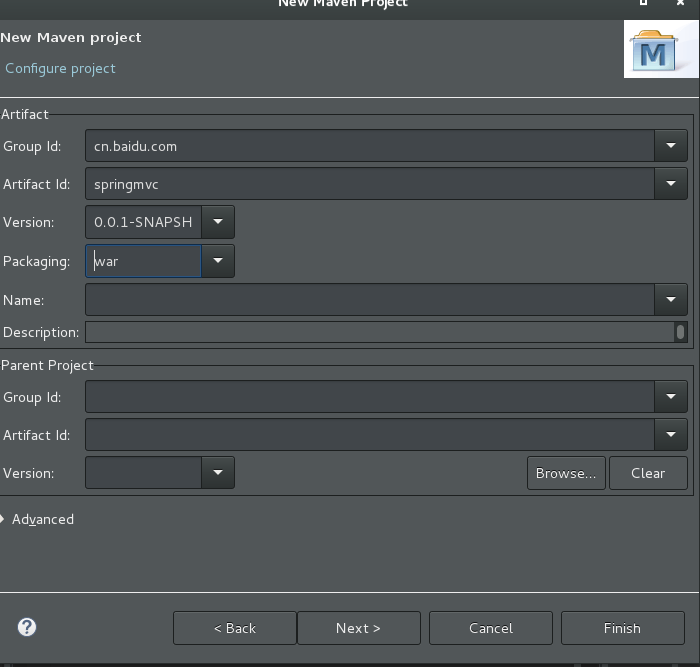
1、创建一个Maven Project项目
点击下一步
点击下一步
2、创建好项目之后可以看到pom.xml报错,接下来添加Tomcat运行环境,然后,生成`web.xml`文件
3、添加依赖
<project xmlns="http://maven.apache.org/POM/4.0.0" xmlns:xsi="http://www.w3.org/2001/XMLSchema-instance"

    xsi:schemaLocation="http://maven.apache.org/POM/4.0.0 http://maven.apache.org/xsd/maven-4.0.0.xsd">

    <modelVersion>4.0.0</modelVersion>

    <groupId>cn.tedu.spring</groupId>

    <artifactId>speing_liu</artifactId>

    <version>0.0.1-SNAPSHOT</version>

    <packaging>war</packaging>

    <dependencies>

    <!-- springmvc的依赖 -->

        <dependency>

            <groupId>org.springframework</groupId>

            <artifactId>spring-webmvc</artifactId>

            <version>4.3.9.RELEASE</version>

        </dependency>

    <!--     测试的依赖 -->

        <dependency>

            <groupId>junit</groupId>

            <artifactId>junit</artifactId>

            <version>4.12</version>

        </dependency>

    </dependencies>

</project>
4、在web.xml文件中进行配置
由于希望SpringMVC框架能接收到相关的请求,所以,首先应该对`DispatcherServlet`进行配置:
关于DispatcherServlet的包名,可以在任意Java类中声明DispatcherServlet变量,由Eclipse完成导包,则在import语句中就有了该类的包名。
以上配置中,`<url-pattern>`中配置的是`*.do`,表示SpringMVC框架将接收所有以`.do`作为资源名后缀的请求,而并不处理例如`.html`、`.jpg`等请求,如果希望接收并处理所有请求,可以使用`/*`或其它使用了通配符的配置。
为了使得Spring的运行环境是正常的,应该保证在项目部署到Tomcat的第一时间就加载Spring的配置,要实现这样的效果,可以使得:`DispatcherServlet`是默认启动的(配置`<load-on-startup>`节点),并且,它启动时加载Spring的配置文件(`DispatcherServlet`的父类`FrameworkServlet`中有`contextConfigLocation`属性,表示初始化时加载哪个配置文件)!
<?xml version="1.0" encoding="UTF-8"?>

<web-app xmlns:xsi="http://www.w3.org/2001/XMLSchema-instance"

    xmlns="http://java.sun.com/xml/ns/javaee"

    xsi:schemaLocation="http://java.sun.com/xml/ns/javaee http://java.sun.com/xml/ns/javaee/web-app_2_5.xsd"

    version="2.5">

    <display-name>SPRINGMVC-01-HELLO</display-name>

    <servlet>
 <!-- 配置SpringMVC DispatcherServlet(前端控制器) -->

        <servlet-name>SpringMVC</servlet-name>

        <servlet-class>org.springframework.web.servlet.DispatcherServlet</servlet-class>

        <init-param>
<!-- 指定Spring MVC启动所需加载的配置文件 -->

            <param-name>contextConfigLocation</param-name>

            <param-value>classpath:spring.xml</param-value>

        </init-param>

        <load-on-startup>1</load-on-startup>

    </servlet>

    <servlet-mapping>

        <servlet-name>SpringMVC</servlet-name>

        <url-pattern>*.do</url-pattern>

    </servlet-mapping>

</web-app>
至此,项目的运行效果为:启动时,会直接初始化`DispatcherServlet`,并且在初始化时,还会自动加载`spring.xml`配置文件。
如果需要检查配置是否成功,可以:使得某个类被Spring管理,且在构造方法中添加输出语句!如果启动项目时可以看到输出语句,则成功!
5、src/min/resources下创建spring.xml文件,添加组件扫描
<?xml version="1.0" encoding="UTF-8"?>

<beans xmlns="http://www.springframework.org/schema/beans"

    xmlns:xsi="http://www.w3.org/2001/XMLSchema-instance"

    xmlns:context="http://www.springframework.org/schema/context"

    xmlns:jdbc="http://www.springframework.org/schema/jdbc"

    xmlns:jee="http://www.springframework.org/schema/jee"

    xmlns:tx="http://www.springframework.org/schema/tx"

    xmlns:aop="http://www.springframework.org/schema/aop"

    xmlns:mvc="http://www.springframework.org/schema/mvc"

    xmlns:util="http://www.springframework.org/schema/util"

    xmlns:jpa="http://www.springframework.org/schema/data/jpa"

    xsi:schemaLocation="

        http://www.springframework.org/schema/beans http://www.springframework.org/schema/beans/spring-beans-3.2.xsd

        http://www.springframework.org/schema/context http://www.springframework.org/schema/context/spring-context-3.2.xsd

        http://www.springframework.org/schema/jdbc http://www.springframework.org/schema/jdbc/spring-jdbc-3.2.xsd

        http://www.springframework.org/schema/jee http://www.springframework.org/schema/jee/spring-jee-3.2.xsd

        http://www.springframework.org/schema/tx http://www.springframework.org/schema/tx/spring-tx-3.2.xsd

        http://www.springframework.org/schema/data/jpa http://www.springframework.org/schema/data/jpa/spring-jpa-1.3.xsd

        http://www.springframework.org/schema/aop http://www.springframework.org/schema/aop/spring-aop-3.2.xsd

        http://www.springframework.org/schema/mvc http://www.springframework.org/schema/mvc/spring-mvc-3.2.xsd

        http://www.springframework.org/schema/util http://www.springframework.org/schema/util/spring-util-3.2.xsd">

    <!-- 组件扫描 -->

    <!-- base-package:根包 -->

    <context:component-scan

        base-package="cn.tedu.spring.controller" />


</beans>
6、接收并处理请求
在实际开发中,并不会使用专门的配置文件去记录请求路径与处理请求的控制器的映射关系,即:不配置`HandlerMapping`(当然,这并不影响SpringMVC的工作流程,只是从代码上不这样体现而已)。
可以直接创建控制器类,例如`cn.tedu.spring.HelloController`,需要该类在组件扫描范围之内,且应该添加`@Controller`注解,然后,在类中自定义处理请求的方法。
关于处理请求的方法,访问权限应该是`public`,返回值类型暂时使用`String`,方法的名称可以自行定义,参数暂时留空,即不添加任何参数,然后,在方法之前添加`@RequestMapping("路径")`配置请求路径:
@Controller

    public class HelloController {

        // 处理请求的方法

        // 权限:public

        // 返回值:String(暂定)

        // 方法名:自定义

        // 参数列表:无(暂定)

        @RequestMapping("hello.do")

        public String showHello() {

            System.out.println("HelloController.showHello()");

            return null;

        }

    }
至此,`hello.do`的请求已经可以被以上自定义的`showHello()`方法处理,在浏览器输出`http://localhost:8080/SPRINGMVC-01-HELLO/hello.do`后,虽然在浏览器中无法正确的显示内容,但是,在Eclipse控制台可以观察到`showHello()`方法已经被正确的调用。
7、在spring.xml中配置视图解析器
处理完请求后,方法返回的`String`类型数据表示的就是视图名,例如返回`"helloworld"`,接下来,框架会根据视图名找到视图解析器,从而确定最终的视图组件,典型的视图解析器是`InternalResourceViewResolver`:
<?xml version="1.0" encoding="UTF-8"?>

<beans xmlns="http://www.springframework.org/schema/beans"

    xmlns:xsi="http://www.w3.org/2001/XMLSchema-instance"

    xmlns:context="http://www.springframework.org/schema/context"

    xmlns:jdbc="http://www.springframework.org/schema/jdbc"

    xmlns:jee="http://www.springframework.org/schema/jee"

    xmlns:tx="http://www.springframework.org/schema/tx"

    xmlns:aop="http://www.springframework.org/schema/aop"

    xmlns:mvc="http://www.springframework.org/schema/mvc"

    xmlns:util="http://www.springframework.org/schema/util"

    xmlns:jpa="http://www.springframework.org/schema/data/jpa"

    xsi:schemaLocation="

        http://www.springframework.org/schema/beans http://www.springframework.org/schema/beans/spring-beans-3.2.xsd

        http://www.springframework.org/schema/context http://www.springframework.org/schema/context/spring-context-3.2.xsd

        http://www.springframework.org/schema/jdbc http://www.springframework.org/schema/jdbc/spring-jdbc-3.2.xsd

        http://www.springframework.org/schema/jee http://www.springframework.org/schema/jee/spring-jee-3.2.xsd

        http://www.springframework.org/schema/tx http://www.springframework.org/schema/tx/spring-tx-3.2.xsd

        http://www.springframework.org/schema/data/jpa http://www.springframework.org/schema/data/jpa/spring-jpa-1.3.xsd

        http://www.springframework.org/schema/aop http://www.springframework.org/schema/aop/spring-aop-3.2.xsd

        http://www.springframework.org/schema/mvc http://www.springframework.org/schema/mvc/spring-mvc-3.2.xsd

        http://www.springframework.org/schema/util http://www.springframework.org/schema/util/spring-util-3.2.xsd">

    <!-- 组件扫描 -->

    <!-- base-package:根包 -->

    <context:component-scan

        base-package="cn.tedu.spring.controller" />

<!-- ViewResolver:视图解析器 -->

    <bean class="org.springframework.web.servlet.view.InternalResourceViewResolver">

        <!-- 前缀 -->

        <property name="prefix"

            value="/WEB-INF/" />

        <!-- 后缀 -->

        <property name="suffix"

            value=".jsp" />

    </bean>

</beans>
`InternalResourceViewResolver`的工作模式是:将**前缀 + 控制器方法返回的视图名 + 后缀**拼接起来,以项目的`webapp`为根目标,找到对应的页面文件
结合此前方法返回的字符串值为`"helloworld"`,则视图解析器会找到`webapp/WEB-INF/helloworld.jsp`文件作为最终显示的视图组件!所以,创建对应的jsp文件,然后重新部署项目运行,即可看到最终运行效果。
将第6步的返回值改成helloworld:
@Controller

    public class HelloController {

        // 处理请求的方法

        // 权限:public

        // 返回值:String(暂定)

        // 方法名:自定义

        // 参数列表:无(暂定)

        @RequestMapping("hello.do")

        public String showHello() {

            System.out.println("HelloController.showHello()");

            return "helloworld";

        }

    }
8、创建jsp文件
添加Tomcat运行环境,不然jsp会报错,参考:https://blog.csdn.net/testcs_dn/article/details/36455669
也可以看看这个:https://www.cnblogs.com/yadongliang/p/6484779.html
相关文献:https://elf8848.iteye.com/blog/875830
eclipse的springMVC环境搭建并输出HelloWorld的更多相关文章
- Eclipse swt开发环境搭建
原料: eclipse swt.下载链接为: Eclipse 4.6.2 Release Build: 4.6.2 配置说明: Developing SWT applications using Ec ...
- Eclipse JSP/Servlet 环境搭建
Eclipse JSP/Servlet 环境搭建 本文假定你已安装了 JDK 环境,如未安装,可参阅 Java 开发环境配置. 我们可以使用 Eclipse 来搭建 JSP 开发环境,首先我们分别下载 ...
- ECLIPSE JSP TOMCAT 环境搭建
ECLIPSE JSP TOMCAT 环境搭建(完整) 要学习一门语言,首先要做的就是搭建环境,然后能写一个小的Demo(类似Helloworld),不仅可以建立信心,而且还可以为之后的学习搭建一个验 ...
- SpringMVC环境搭建和详解
1.Spring容器和SpringMVC容器是父子容器 1.1 SpringMVC容器可以调用Spring容器中的所有内容 1.2 图示 2.SpringMVC环境搭建 1.导入jar包 2.在web ...
- JSP-Runood:Eclipse JSP/Servlet 环境搭建
ylbtech-JSP-Runood:Eclipse JSP/Servlet 环境搭建 1.返回顶部 1. Eclipse JSP/Servlet 环境搭建 本文假定你已安装了 JDK 环境,如未安装 ...
- Solr4.8.0源码分析(4)之Eclipse Solr调试环境搭建
Solr4.8.0源码分析(4)之Eclipse Solr调试环境搭建 由于公司里的Solr调试都是用远程jpda进行的,但是家里只有一台电脑所以不能jpda进行调试,这是因为jpda的端口冲突.所以 ...
- eclipse python开发环境搭建
eclipse python开发环境搭建[非原创] 1.在www.eclipse.org官网下载Eclipse Classic 4.2.2,Win7 64位下载eclipse-SDK-4.2.2-wi ...
- springmvc环境搭建及实例
一. 软件环境 eclipse-jee-mars-R-win32-x86_64 jdk1.7.0_79 apache-tomcat-7.0.52 spring-framework-3.2.0.RELE ...
- 【ARM-Linux开发】在win下开发的eclipse+yougatoo+jlink环境搭建
在win下开发的eclipse+yougatoo+jlink环境搭建 一 工具的安装 第一步:安装gcc编译工具 yagarto-bu-2.21_gcc-4.6.2-c-C++_nl-1.19.0_g ...
随机推荐
- Type system-Type checking
类型系统的属性: 1.结构属性: 2.规则属性:类型系统定义了一套规则(内部数据的访问规则.函数的访问规则.类型的比较与转化规则),以供编译和运行时进行检查. In programming langu ...
- Mysql-slowlog
MySQL慢查询日志是MySQL提供的一种日志记录,用来记录执行时长超过指定时长的查询语句,具体指运行时间超过 long_query_time 值的 SQL 语句,则会被记录到慢查询日志中. long ...
- 树、递归、广度优先搜索(BFS)————二叉树的最小深度
解法一:递归 遇到叶子节点不递归,否则接着往子树递归,每次递归层数加1 要确定的是,一定要保证初始输入的节点是有子节点的.因为可能出现只有单子树的情况,所以要先确认这种情况. 具体过程: 1.分析初始 ...
- [51nod1074]约瑟夫环V2
N个人坐成一个圆环(编号为1 - N),从第1个人开始报数,数到K的人出列,后面的人重新从1开始报数.问最后剩下的人的编号. 例如:N = 3,K = 2.2号先出列,然后是1号,最后剩下的是3号. ...
- 2019-03-14 Python爬虫问题 爬取网页的汉字打印出来乱码
html = requests.get(YieldCurveUrl, headers=headers) html=html.content.decode('UTF-8') # print(html) ...
- 紫书 习题7-14 UVa 307(暴搜+剪枝)
这道题一开始我想的是在排序之后只在头和尾往中间靠近来找木块, 然后就WA, 事实证明这种方法是错误的. 然后参考了别人的博客.发现别人是直接暴搜, 但是加了很多剪枝, 所以不会超时. 我也想过这个做法 ...
- 推荐几款常用的Eclipse插件
Eclipse 应该说是老牌也是最常用的Java开发工具,尽管这几年 InstelliJ IDEA 的发展势头很强劲,身边使用和推崇的人也大有人在,但个人而言还是觉有些不太习惯.这里也介绍几款自己常用 ...
- C语言实现面向对象(转)
1.引言 面向对象编程(OOP)并不是一种特定的语言或者工具,它只是一种设计方法.设计思想. 它表现出来的三个最基本的特性就是封装.继承与多态. 很多面向对象的编程语言已经包含这三个特性了,例如 Sm ...
- SpringBoot2.0 监听器ApplicationListener的使用-监听ApplicationReadyEvent事件
参考:http://www.shareniu.com/article/73.htm 一.需求是想将我的写一个方法能在项目启动后就运行,之前使用了redis的消息监听器,感觉可以照着监听器这个思路做,于 ...
- Redis-server在windows下闪退
在win7下使用Redis(windows版)很简单,只需要去Git上下载一个压缩包,解压运行即可.但是前段时间发现win10下双击redis-server既然闪退.非常不解... 在观察了错误日志才 ...