VUE-使用touchstart、touchmove、touchend实现拖拽卡片列表,实现更新排序功能
感谢本文参考地址,原文解析更加清晰如有需要请移步:https://blog.csdn.net/weixin_40400844/article/details/114849253
怕原链接失效,将代码拷贝(如有侵权,请联系删除,感谢!!)


1 <template>
2 <div>
3 <ul>
4 <li
5 class="libox"
6 v-for="(item, index) in list"
7 :key="index"
8 :id="'card' + (index + 1)"
9 >
10 <div
11 @touchstart="touchstart($event, item)"
12 @touchmove="touchMove($event, item)"
13 @touchend="touchEnd($event, item)"
14 v-show="item.name !== selectItem.name"
15 >
16 {{item.name}}
17 <svg class="icon svg-icon" aria-hidden="true">
18 <use :xlink:href="item.icon" rel="external nofollow" ></use>
19 </svg>
20 </div>
21 </li>
22 <li v-show="selectItem.name" class="selectBox" ref="selectBox">
23 {{selectItem.name}}
24 <svg class="icon svg-icon" aria-hidden="true">
25 <use :xlink:href="selectItem.icon" rel="external nofollow" ></use>
26 </svg>
27 </li>
28 </ul>
29 </div>
30 </template>
31
32 <script>
33
34 export default {
35 data() {
36 return {
37 // 列表数据
38 list: [
39 { name: '1', selected: true, icon: '#icon-mianxingbenzivg' },
40 { name: '2', selected: true, icon: '#icon-mianxingchizi' },
41 { name: '3', selected: true, icon: '#icon-mianxingdiannao' },
42 { name: '4', selected: true, icon: '#icon-mianxingdayinji' },
43 { name: '5', selected: true, icon: '#icon-mianxingdingshuqi' },
44 { name: '6', selected: true, icon: '#icon-mianxingheiban' },
45 { name: '7', selected: true, icon: '#icon-mianxinggangbi' },
46 { name: '8', selected: true, icon: '#icon-mianxingboshimao' },
47 { name: '9', selected: true, icon: '#icon-mianxingjisuanqi' },
48 { name: '10', selected: true, icon: '#icon-mianxinghuaxue' },
49 { name: '11', selected: true, icon: '#icon-mianxingqianbi' },
50 { name: '12', selected: true, icon: '#icon-mianxingshubao' },
51 { name: '13', selected: true, icon: '#icon-mianxingshuicaibi' },
52 { name: '14', selected: true, icon: '#icon-mianxingtushu' },
53 ],
54 // 选中元素内容
55 selectItem: {},
56 timeOutEvent: 0,
57 oldNodePos: {
58 x: 0,
59 y: 0,
60 },
61 oldMousePos: {
62 x: 0,
63 y: 0
64 },
65 oldIndex: 0,
66 // 长按标识
67 longClick: 0
68 };
69 },
70 watch: {
71 oldIndex(newVal) {
72 const oldIndex = this.list.findIndex(r=> r.name === this.selectItem.name);
73 this.list.splice(oldIndex, 1);
74 this.list.splice(newVal, 0, this.selectItem);
75 }
76 },
77 methods: {
78 touchstart(ev, item) {
79 this.longClick = 0;
80 const that = this;
81 const selectDom = ev.currentTarget; // div元素
82 this.timeOutEvent = setTimeout(() => {
83 that.longClick = 1;
84 that.selectItem = item;
85 // 元素初始位置
86 that.oldNodePos = {
87 x: selectDom.offsetLeft,
88 y: selectDom.offsetTop
89 };
90 // 鼠标原始位置
91 that.oldMousePos = {
92 x: ev.touches[0].pageX,
93 y: ev.touches[0].pageY
94 };
95 const lefts = that.oldMousePos.x - that.oldNodePos.x; // x轴偏移量
96 const tops = that.oldMousePos.y - that.oldNodePos.y; // y轴偏移量
97 const { pageX, pageY } = ev.touches[0]; // 手指位置
98 that.$refs.selectBox.style.left = `${pageX - lefts}px`;
99 that.$refs.selectBox.style.top = `${pageY - tops}px`;
100 }, 500);
101 },
102 touchMove(ev) {
103 clearTimeout(this.timeOutEvent);
104 const selectDom = ev.currentTarget.parentNode; // li元素
105 if (this.longClick === 1) {
106 const lefts = this.oldMousePos.x - this.oldNodePos.x; // x轴偏移量
107 const tops = this.oldMousePos.y - this.oldNodePos.y; // y轴偏移量
108 const { pageX, pageY } = ev.touches[0]; // 手指位置
109 this.$refs.selectBox.style.left = `${pageX - lefts}px`;
110 this.$refs.selectBox.style.top = `${pageY - tops}px`;
111 this.cardIndex(selectDom, pageX, pageY);
112 }
113 },
114 touchEnd() {
115 clearTimeout(this.timeOutEvent);
116 this.selectItem = {};
117 },
118 /**
119 * 计算当前移动卡片位于卡片的哪一行哪一列
120 */
121 cardIndex(selDom, moveleft, movetop) {
122 const liWid = selDom.clientWidth;
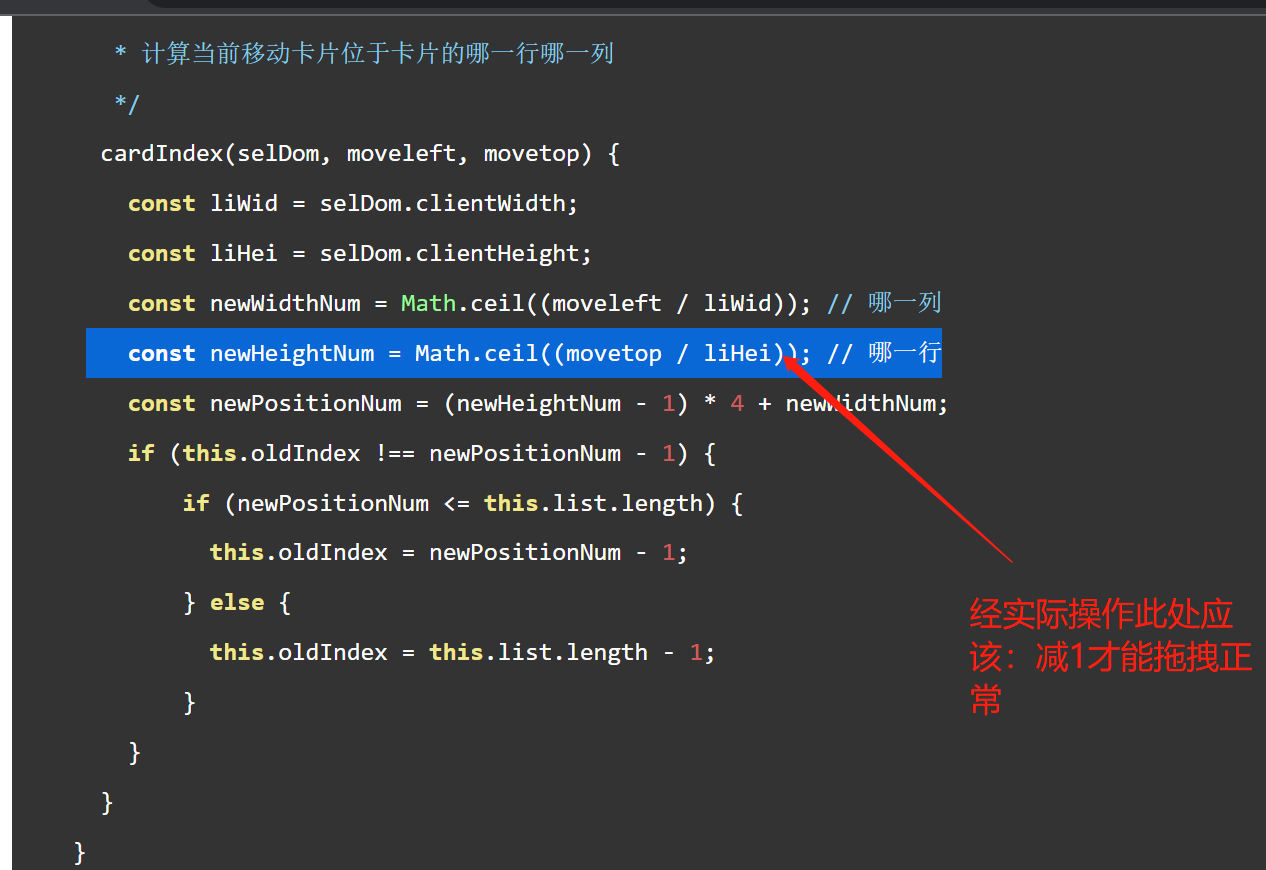
123 const liHei = selDom.clientHeight;
124 const newWidthNum = Math.ceil((moveleft / liWid)); // 哪一列
125 const newHeightNum = Math.ceil((movetop / liHei)); // 哪一行
126 const newPositionNum = (newHeightNum - 1) * 4 + newWidthNum;
127 if (this.oldIndex !== newPositionNum - 1) {
128 if (newPositionNum <= this.list.length) {
129 this.oldIndex = newPositionNum - 1;
130 } else {
131 this.oldIndex = this.list.length - 1;
132 }
133 }
134 }
135 }
136 }
137 </script>
138
139 <style lang="scss" scoped>
140 @mixin myFlexCenter{
141 display: flex;
142 justify-content: center;
143 align-items: center;
144 }
145 ul {
146 width: 100%;
147 height: 100%;
148 display: flex;
149 flex-wrap: wrap;
150 position: relative;
151 overflow: hidden;
152 .libox {
153 width: 25%;
154 height: 100px;
155 border-right: 1px dashed #cccccc;
156 border-bottom: 1px dashed #cccccc;
157 box-sizing: border-box;
158 @include myFlexCenter;
159 >div {
160 width: calc(100% - 10px);
161 height: 75px;
162 border-radius: 18px;
163 @include myFlexCenter;
164 position: relative;
165 &::after {
166 content: '';
167 width: 100%;
168 height: 100%;
169 background: rgba(255, 177, 177, 0.3);
170 position: absolute;
171 top: 0;
172 left: 0;
173 }
174 >svg {
175 width: 75px;
176 height: 75px;
177 }
178 }
179 }
180 .selectBox{
181 position: absolute;
182 width: calc(25% - 10px);
183 height: 75px;
184 border-radius: 18px;
185 >svg {
186 width: 75px;
187 height: 75px;
188 }
189 background-color: rgba(0, 0, 0, 0.1);
190 color:white;
191 @include myFlexCenter;
192 -moz-user-select:none; /*火狐*/
193 -webkit-user-select:none; /*webkit浏览器*/
194 -ms-user-select:none; /*IE10*/
195 -khtml-user-select:none; /*早期浏览器*/
196 user-select:none;
197 }
198 }
199 </style>
存在问题:只能放在卡片上方才能挪动其他卡片位置,未达到需要效果,所以进行了修改。
经实际测试后修改以下部分:
①将下方图片代码修改为(只做了减1的操作):
1 const newHeightNum = Math.ceil((movetop / liHei)) - 1; // 哪一行
②因为项目未使用scss,所以将css改成如下:
 1 <style  scoped>

 2   ul {

 3     width: 100%;

 4     height: 100%;

 5     display: flex;

 6     flex-wrap: wrap;

 7     position: relative;

 8     overflow: hidden;

 9   }

10   .libox {

11       width: 25%;

12       height: 100px;

13       box-sizing: border-box;

14       display: flex;

15       justify-content: center;

16       align-items: center;

17   }

18   .libox div {

19       width: calc(100% - 10px);

20       height: 75px;

21       border-radius: 18px;

22       display: flex;

23       justify-content: center;

24       align-items: center;

25       flex-direction: column;

26       position: relative;

27     }

28     .selectBox{

29       position: absolute;

30       width: calc(25% - 10px);

31       height: 75px;

32       border-radius: 18px;

33       background-color: inherit;

34       /* color:white; */

35       display: flex;

36       flex-direction: column;

37       justify-content: center;

38       align-items: center;

39       user-select:none;

40     }

41 </style>
效果:

VUE-使用touchstart、touchmove、touchend实现拖拽卡片列表,实现更新排序功能的更多相关文章
- 获取touchstart,touchmove,touchend 坐标
简单说下如何用jQuery 和 js原生代码获取touchstart,touchmove,touchend 坐标值: jQuery 代码: $('#id').on('touchstart',funct ...
- 移动端的touchstart,touchmove,touchend事件中的获取当前touch位置
前提:touchstart,touchmove,touchend这三个事件可以通过原生和jq绑定. 原生:document.querySelector("#aa").addEven ...
- touchstart,touchmove,touchend触摸事件的小小实践心得
近段时间使用html5开发一个公司内部应用,而触摸事件必然是移动应用中所必须的,刚开始以为移动设备上或许也会支持鼠标事件,原来是不支持的,好在webkit内核的移动浏览器支持touch事件,并且打包成 ...
- 移动端touchstart,touchmove,touchend
近段时间使用html5开发一个公司内部应用,而触摸事件必然是移动应用中所必须的,刚开始以为移动设备上或许也会支持鼠标事件,原来是不支持的,好在webkit内核的移动浏览器支持touch事件,并且打包成 ...
- Vue 结合 echarts 原生 html5 实现拖拽排版报表系统
前言 不知道各位 coder 有没有碰到过许多重复的业务需求,比如排版相类似的报表,只不过是顺序稍微换了一下,就是一个新的页面,虽然基于模板思想来写的话也能减少不少代码,但是相对的不那么方便,笔者最近 ...
- Vue拖拽组件列表实现动态页面配置
需求描述 最近在做一个后台系统,有一个功能产品需求是页面分为左右两部分,通过右边的组件列表来动态配置左边的页面视图,并且左边由组件拼装起来的视图,可以实现上下拖拽改变顺序,也可以删除. 根据这个需求我 ...
- Vue富文本编辑器(图片拖拽缩放)
富文本编辑器(图片拖拽缩放) 需求: 根据业务要求,需要能够上传图片,且上传的图片能在移动端中占满屏幕宽度,故需要能等比缩放上传的图片,还需要能拖拽.缩放.改变图片大小.尝试多个第三方富文本编辑器,很 ...
- 【UWP】拖拽列表项的排序功能实现
在一些允许用户自定义栏目顺序的app(如:凤凰新闻.网易云音乐等),我们可以方便地拖拽列表项来完成列表的重新排序,进而完成对栏目顺序的重排.这个功能很人性化,而实现起来其实很简单(甚至都不用写什么后台 ...
- C# 图片缩放,拖拽后保存成图片的功能
窗体界面部分如下: 鼠标的缩放功能需要手动在 OpertaionImg.Designer.cs 文件里面添加一句代码,具体代码如下: //picturePhoto显示图片的控件 this.pictur ...
- touchstart,touchmove,touchend事件 写法
jQuery写法: $('#id').on('touchstart',function(e) { var _touch = e.originalEvent.targetTouches[0]; var ...
随机推荐
- 【RUNOOB】C语言学习之指针
资料来源: (1) runoob; (2) C语言程序设计; 注1:Runoob中对于指针的讲述比较清晰简单,摘录出来(后续补充指针与结构体,指针与函数参数); 1.指针与变量的内存位置 (1) 每个 ...
- adb命令之monkey使用
一.Monkey介绍Monkey是Android中的一个命令行工具,可在模拟器或实际设备中运行.通过向系统发送伪随机的用户事件流(例如按键.触摸屏.手势操作等),来实现对开发中的应用程序进行压力测试, ...
- BIP拓展js的使用
__app.define("common_VM_Extend.js", function () { var selectData = null; var common_VM ...
- C与C++字符串比较
#include<iostream> #include<string> using namespace std; int main() { char a[] = "a ...
- padding&margin
margin是盒子的外边距,即盒子与盒子之间的距离,而padding是内边距,是盒子的边与盒子内部元素的距离. 鞋盒里面的鞋到 盒子的距离设置为 padding ,而 鞋盒到鞋架的距离设置为margi ...
- dockerfile实践学习
一.dockerfile简介 镜像是分层存储的,每一层在前一层的基础上进行修改. 容器也是分层存储,已经向为基础层,在其他基础上加一层作为容器运行的存储层. 创建镜像的另种两种方法 手动修改容器内容, ...
- Demo of canvas, canvas optimization and svg
It used the canvas to draw the curves in the old project, and the client felt that it was vague, so ...
- JAVA仓库管理系统(附源码+调试)
JAVA仓库管理系统--三只松鼠仓库管理系统功能描述(1)登录模块:登录信息等存储在数据库中(2)基本档案管理模块:供货商管理,销售商管理,货品档案管理,仓库管理(3)采购订货模块:用户可以通过查询条 ...
- Installation requirements for DB2 UDB 8.1 Enterprise Servers
UDB 8 Install HomeUppre-UDB 8 InstallUDB 8 Install Addendum Steps to do before/after applying a DB ...
- 像MIUI一样做Zabbix二次开发(5)——那些坑和优化方向
踩过的那些坑 从2011年开始玩Zabbix,踩过的坑着实不少,被研发的同事吐了无数槽,所谓"情到深度又爱又恨".以下简述印象比较深刻的几个坑: 二次开发的方式:2011刚开始做的 ...