Azkaban 4.0.0 系列(一)-- Solo-Server
下载
链接
https://github.com/azkaban/azkaban/releases/4.0.0.tar.gz
解压
tar -xzvf 4.0.0.tar.gz -C 自定义目标目录
修改azkaban-4.0.0目录下的build.gradle文件
找到初始配置信息

maven{

    url 'https://linkedin.bintray.com/maven'

}

进行修改

maven {

    url 'https://linkedin.jfrog.io/artifactory/open-source/'

}

原有的仓库地址在国内访问会非常缓慢,甚至不能访问,造成编译过程报错。
修改 nodejs 相关配置
进入到/..../azkaban-4.0.0/azkaban-web-server目录中,打开build.gradle文件,将node选项中的download配置值设为false

node {

    // Version of node to use.

    version = '8.10.0'

    // Version of npm to use.

    npmVersion = '5.6.0'

    // Base URL for fetching node distributions (change if you have a mirror).

    distBaseUrl = 'https://nodejs.org/dist'

    // If true, it will download node using above parameters.

    // If false, it will try to use globally installed node.

    download = false

    // Set the work directory for unpacking node

    workDir = file("${project.buildDir}/nodejs")

    // Set the work directory where node_modules should be located

    nodeModulesDir = file("${project.projectDir}")

}

如果不修改的话,azkaban在编译的过程中就会去下载 node-8.10.0,大概率会因为网络问题使下载失败,从而导致编译失败。

我们本机需要准备好node环境(笔者在编译的时候遇到过,node环境已经存在,但是提示 npm not found 的报错信息,尝试多次后无果,最后将虚拟机重启解决。)
修改azkaban-db代码,以支持Mysql8.X系列数据库
进入/..../azkaban-4.0.0/azkaban-db/src/main/java/azkaban/db目录,修改MySQLDataSource.java

  @Inject

  public MySQLDataSource(final Props props, final DBMetrics dbMetrics) {

    super();

    this.dbMetrics = dbMetrics;

    final int port = props.getInt("mysql.port");

    final String host = props.getString("mysql.host");

    final String dbName = props.getString("mysql.database");

    final String user = props.getString("mysql.user");

    final String password = props.getString("mysql.password");

    final int numConnections = props.getInt("mysql.numconnections");

    //加上mysql的驱动类配置项,如果没有配置则默认是mysql5.x

    //-----------------begin-----------------------

    String driverName = props.getString("mysql.driverName");

    if(driverName == null){

        driverName = "com.mysql.jdbc.Driver";

    }

    //-----------------end-----------------------

    final String url = "jdbc:mysql://" + (host + ":" + port + "/" + dbName);

    addConnectionProperty("useUnicode", "yes");

    addConnectionProperty("characterEncoding", "UTF-8");

    //setDriverClassName(com.mysql.jdbc.Driver);

    //修改成从配置中读取驱动类名

    addConnectionProperty("useSSL", "false");

    setDriverClassName(driverName);

    setUsername(user);

    setPassword(password);

    setUrl(url);

    setMaxTotal(numConnections);

    setValidationQuery("/* ping */ select 1");

    setTestOnBorrow(true);

  }

azkaban 默认支持MySQL5.x版本,可以根据需要,决定是否让其适配5.x及8.x
编译
提前准备好 gradle-4.6-all.zip

下载链接:https://services.gradle.org/distributions/gradle-4.6-all.zip

整合到Azkaban中,目标目录如下:

    /..../azkaban-4.0.0/gradle/wrapper/

修改配置文件 gradle-wrapper.properties :

distributionBase=GRADLE_USER_HOME

distributionPath=wrapper/dists

zipStoreBase=GRADLE_USER_HOME

zipStorePath=wrapper/dists

# distributionUrl=https://services.gradle.org/distributions/gradle-4.6-all.zip   #(注释掉这一行)

distributionUrl=gradle-4.6-all.zip   # (添加该行内容)
指令
cd /..../azkaban-4.0.0/

./gradlew build installDist

可能会出现 test failed 的提示,使用如下参数跳过测试。

./gradlew build installDist -x test

不出意外,编译会顺利进行。
启动 Solo-Server
指令
cd /..../azkaban-4.0.0/azkaban-solo-server/build/install/azkaban-solo-server

sh ./bin/start-solo.sh

服务检查指令:jps

返回:AzkabanSingleServer

浏览器访问:

http://本机ip:8081/

用户名/密码:azkaban/azkaban
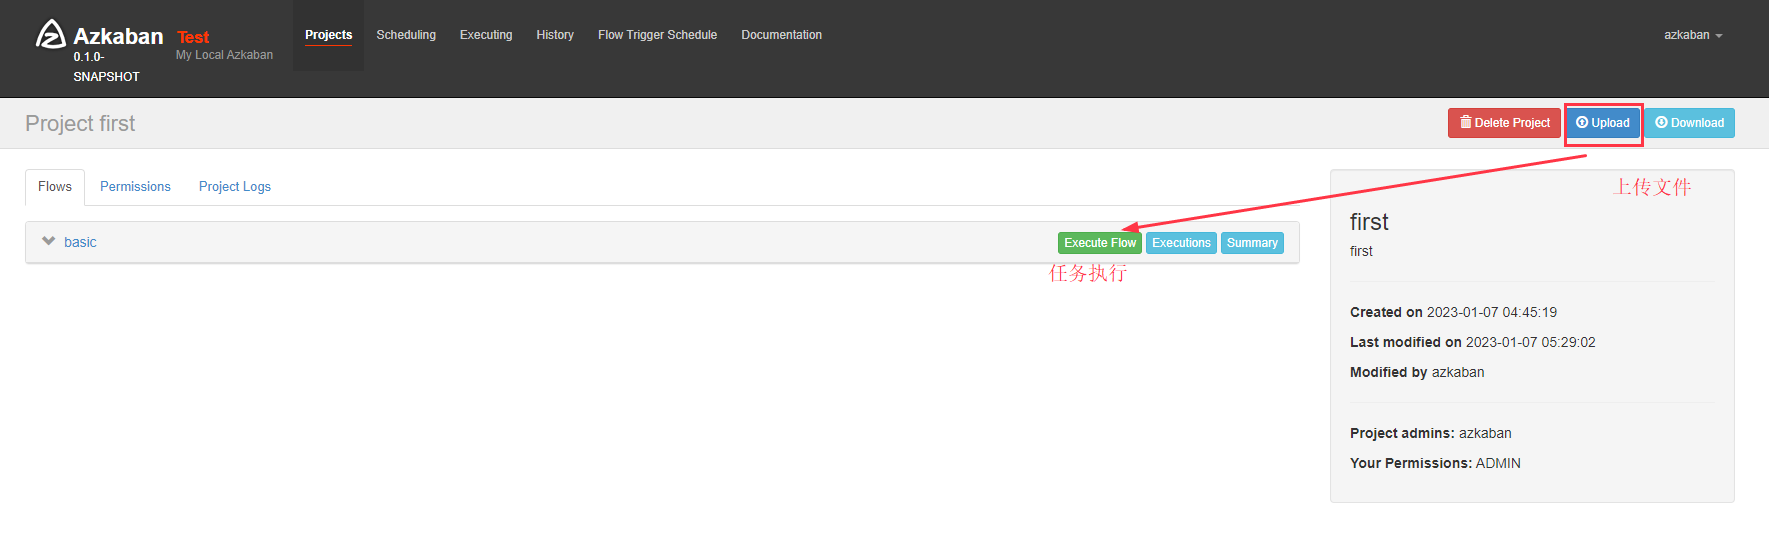
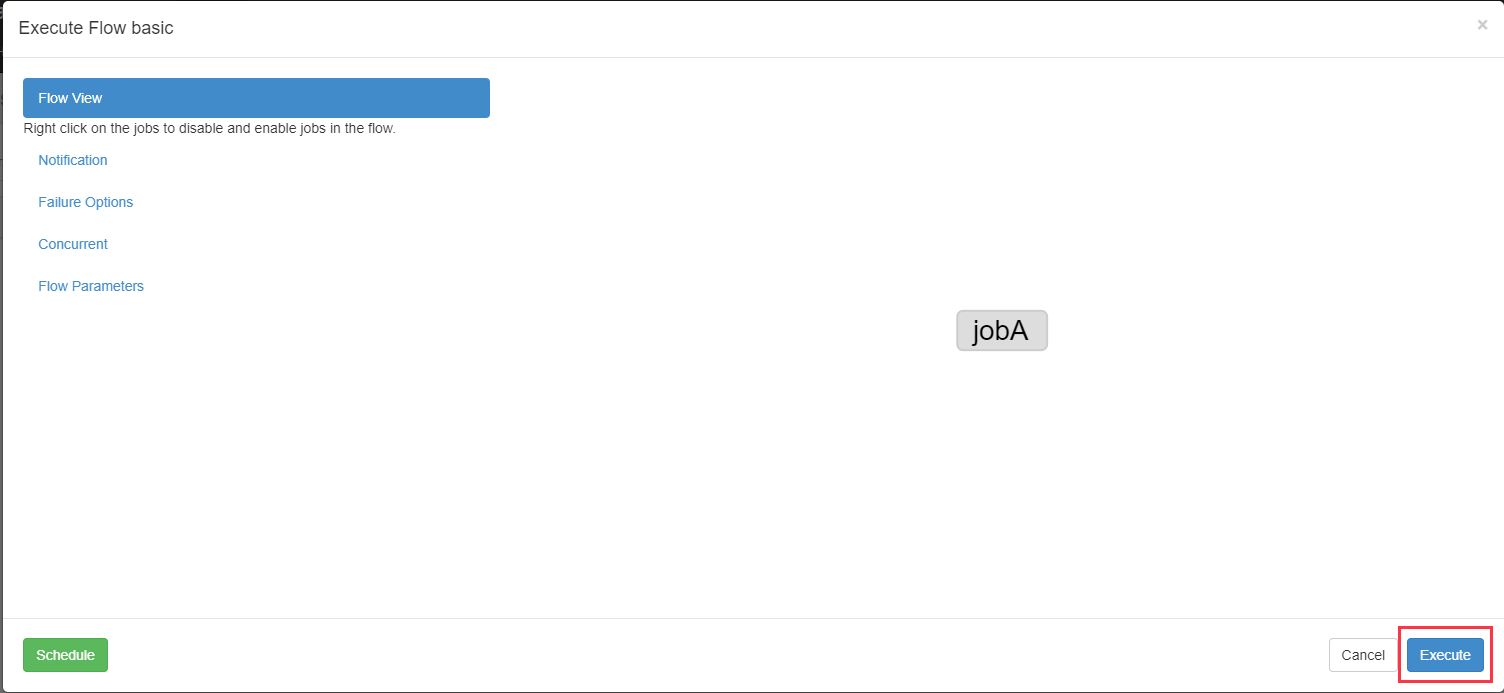
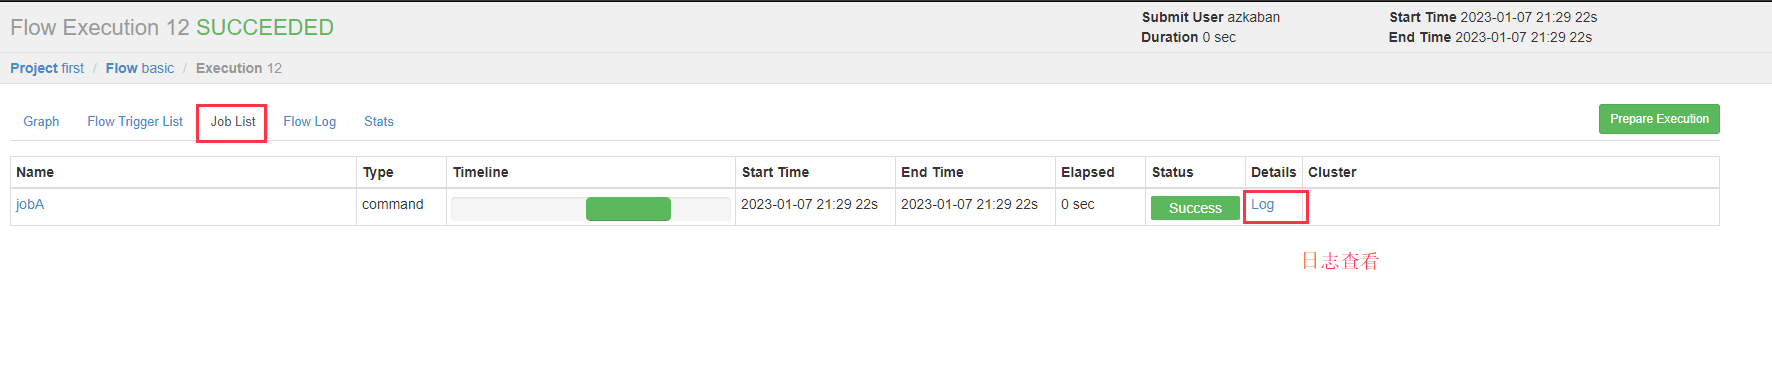
案例
文件准备
mkdir first_azkaban_project && cd first_azkaban_project

vi basic.flow    (添加文件内容)

nodes:

  - name: jobA

    type: command

    config:

      command: echo "This is an echoed text."

vi flow20.project   (添加文件内容)

azkaban-flow-version: 2.0

打包:

zip -r Archive.zip .     (在 first_azkaban_project 下)

如果没有 zip 指令,使用 yum install zip -y 进行安装

将生成的zip包拉取到本地,上传到提前创建好的项目中,运行即可。
Azkaban 4.0.0 系列(一)-- Solo-Server的更多相关文章
- Netty4.0学习笔记系列之一:Server与Client的通讯
http://blog.csdn.net/u013252773/article/details/21046697 本文是学习Netty的第一篇文章,主要对Netty的Server和Client间的通讯 ...
- Azkaban 2.5.0 搭建
一.前言 最近试着参照官方文档搭建 Azkaban,发现文档很多地方有坑,所以在此记录一下. 二.环境及软件 安装环境: 系统环境: ubuntu-12.04.2-server-amd64 安装目录: ...
- 【多端应用开发系列0.0.0——之总序】xy多端应用开发方案定制
[目录] 0.0.0 [多端应用开发系列之总序]服务器Json数据处理——Json数据概述 0.0.0 [因] 正在学习多客户端应用开发,挖个坑,把所用到的技术方案,用最简单直白的语言描述出来,写成一 ...
- 【转】WF4.0实战系列索引
转自:http://www.cnblogs.com/zhuqil/archive/2010/07/05/wf4-in-action-index.html 此系列的工作流文件案例比较多点,实用性好. W ...
- Azkaban 2.5.0 搭建和一些小问题
安装环境: 系统环境: ubuntu-12.04.2-server-amd64 安装目录: /usr/local/ae/ankaban JDK 安装目录: export JAVA_HOME=/usr/ ...
- 【Azkaban搭建】---Azkaban 3.25.0搭建细则 超实用
一.前述 Azkaban是一个工作流调度工具,因为需要各个任务之间有依赖关系,传统的Crontab 任务已经不能满足. 所以需要建立一套工作流引擎.相比Ooize来说,Azkaban的优势是作为一个客 ...
- Spark2.0机器学习系列之11: 聚类(幂迭代聚类, power iteration clustering, PIC)
在Spark2.0版本中(不是基于RDD API的MLlib),共有四种聚类方法: (1)K-means (2)Latent Dirichlet all ...
- Spark2.0机器学习系列之1: 聚类算法(LDA)
在Spark2.0版本中(不是基于RDD API的MLlib),共有四种聚类方法: (1)K-means (2)Latent Dirichlet allocation (LDA) ...
- Azkaban学习之路(四)—— Azkaban Flow 2.0的使用
一.Flow 2.0 简介 1.1 Flow 2.0 的产生 Azkaban 目前同时支持 Flow 1.0 和 Flow2.0 ,但是官方文档上更推荐使用Flow 2.0,因为Flow 1.0会在将 ...
- Entity Framework 6.0 入门系列 第一篇
Entity Framework 6.0 入门系列 第一篇 好几年前接触过一些ef感觉不是很好用,废弃.但是 Entity Framework 6.0是经过几个版本优化过的产物,性能和功能不断完善,开 ...
随机推荐
- Matplotlib 实现画中画
需要导入的包 inset_axes 要实现画中画,即在原画轴上添加新轴,需要用到mpl_toolkits.axes_grid1.inset_locator的inset_axes. 基本用法 new_a ...
- 信创要求下,FTP要不要替代?要怎么进行国产化替代?
信创在国内如火如荼地发展,无论在技术探索和突破上,还是在政策规划上,都朝着更加完善的方向大步迈进.信创目前在从大的方面来说,信创目前主要集中在基础软件.硬件和芯片上,其中基础软件包括操作系统.数据库. ...
- 2022-05-24内部群每日三题-清辉PMP
1.一家公司具有一项变更控制委员会(CCB)政策,规定其每月举行一次会议来评估和审查变更请求.一个项目正在执行过程中,由于时间表和目标较为激进,需要更快的响应时间.项目经理应该怎么做? A.更新风险登 ...
- linux下yum安装时出现Loaded plugins: fastestmirror
linux使用yum安装软件时出现报错Loaded plugins:fastestmirror,是提示这个插件不能使用了,fastestmirror是yum的一个加速插件, 解决的办法是:将这个插件禁 ...
- python下载站长素材免费简历模板(xpath)
import os.path import requests from lxml import etree if __name__ == '__main__': if not os.path.exis ...
- jquery 中根据日期计算天数,以及去掉字符串中的空格
//方法 增添dayNumber天 ,dates:日期 年月日 function SubDay(dayNumber, dates) { var date= new Date(dates ); date ...
- Linux-curl下载报错解决方法
报错提示: curl: (92) HTTP/2 stream 1 was not closed cleanly before end of the underlying stream ==> E ...
- QSS学习
padding:内边距 margin:外边距用法
- 一、100ASK_IMX6ULL嵌入式裸板学习_LED实验(中)
以C语言方式驱动(例程与代码分析) 韦东山的例程: start.s部分: .text .global _start @全局标号 _start: //设置栈 ldr sp,=0x80200000 @设置 ...
- windows下搭建nrf52832nordic_ble_sniffer_3.0+wireshark抓包环境
准备工具 pythone3.7安装包 https://www.python.org/ftp/python/3.7.7/python-3.7.7-amd64.exe Wireshark-win64-3. ...