学习Nginx(三)
nginx的性能测试及常用优化手段

一、nginx的性能测试及对比

1.环境准备

[root@test8_hadoop_kaf ~]# yum install -y httpd-tools

[root@test8_hadoop_kaf conf.d]# cat ab_xingneng.conf

server {

    listen 80;

    server_name testserver01 es.chinasoft.com;

    root /opt/app;

    location / {

        root /opt/app/code/cache;

        try_files $uri @java_page;

    }

    location @java_page {

        proxy_pass http://127.0.0.1:9090;

    }

}

2.测试由nginx提供服务的静态资源

ab -n -c 2 http://es.chinasoft.com/jack.html

-n 总的请求数

-c 并发数

-k 是否开启长连接

[root@test8_hadoop_kaf ~]# ab -n 2000 -c 2 http://es.chinasoft.com/jack.html

This is ApacheBench, Version 2.3 <$Revision: 1430300 $>

Copyright 1996 Adam Twiss, Zeus Technology Ltd, http://www.zeustech.net/

Licensed to The Apache Software Foundation, http://www.apache.org/

Benchmarking es.chinasoft.com (be patient)

Completed 200 requests

Completed 400 requests

Completed 600 requests

Completed 800 requests

Completed 1000 requests

Completed 1200 requests

Completed 1400 requests

Completed 1600 requests

Completed 1800 requests

Completed 2000 requests

Finished 2000 requests

Server Software:        nginx/1.12.2    # 服务器程序

Server Hostname:        es.chinasoft.com    # 域名

Server Port:            80        # 端口

Document Path:          /jack.html    # 访问的页面

Document Length:        114 bytes    # 内容的长度

Concurrency Level:      2

Time taken for tests:   1.777 seconds    # 测试的时间

Complete requests:      2000        # 完成的请求数量

Failed requests:        0        # 失败的请求数量

Write errors:           0        # 写失败的格式

Total transferred:      708000 bytes    # 总共传输的字节数

HTML transferred:       228000 bytes    # html传输的字节数

Requests per second:    1125.37 [#/sec] (mean)    # 每秒的请求数

Time per request:       1.777 [ms] (mean)    # 每个请求耗费的时间

Time per request:       0.889 [ms] (mean, across all concurrent requests)    # 服务器响应请求花费的时间

Transfer rate:          389.05 [Kbytes/sec] received                # 传输速度

Connection Times (ms)

              min  mean[+/-sd] median   max

Connect:        0    1   0.3      1       7

Processing:     1    1   0.6      1      16

Waiting:        1    1   0.6      1      16

Total:          1    2   0.7      2      17

Percentage of the requests served within a certain time (ms)

  50%      2

  66%      2

  75%      2

  80%      2

  90%      2

  95%      2

  98%      3

  99%      4

 100%     17 (longest request)

3.测试java的动态接口程序

[root@test8_hadoop_kaf ROOT]# cat /data/yunva/test_tomcat8.0.37_9090/webapps/ROOT/test_sleep.jsp

<%@ page language="java" import="java.util.*" pageEncoding="utf-8"%>

<HTML>

    <HEAD>

        <TITLE>JSP TEST PAGE</TITLE>

    </HEAD>

    <BODY>

        <%

            Thread.sleep(5000);

            Random rand = new Random();

            out.println("<h1>Random number:</h1>");

            out.println(rand.nextInt(99) + 100);

        %>

    </BODY>

</HTML>

[root@test8_hadoop_kaf bin]# curl -I http://es.chinasoft.com/test_sleep.jsp

HTTP/1.1 200 OK

Server: nginx/1.12.2

Date: Wed, 17 Jan 2018 11:32:14 GMT

Content-Type: text/html;charset=utf-8

Connection: keep-alive

Set-Cookie: JSESSIONID=0B5052BEF444639173C600EB08A87980; Path=/; HttpOnly

# 对动态接口进行压测,可以看到每秒完成的请求数是0.36个,性能比较差

[root@test8_hadoop_kaf ROOT]# ab -n 20 -c 2 http://es.chinasoft.com/test_sleep.jsp

This is ApacheBench, Version 2.3 <$Revision: 1430300 $>

Copyright 1996 Adam Twiss, Zeus Technology Ltd, http://www.zeustech.net/

Licensed to The Apache Software Foundation, http://www.apache.org/

Benchmarking es.chinasoft.com (be patient).....done

Server Software:        nginx/1.12.2

Server Hostname:        es.chinasoft.com

Server Port:            80

Document Path:          /test_sleep.jsp

Document Length:        112 bytes

Concurrency Level:      2

Time taken for tests:   55.033 seconds

Complete requests:      20

Failed requests:        0

Write errors:           0

Total transferred:      6880 bytes

HTML transferred:       2240 bytes

Requests per second:    0.36 [#/sec] (mean)

Time per request:       5503.345 [ms] (mean)

Time per request:       2751.672 [ms] (mean, across all concurrent requests)

Transfer rate:          0.12 [Kbytes/sec] received

Connection Times (ms)

              min  mean[+/-sd] median   max

Connect:        0    1   0.0      1       1

Processing:  5002 5002   0.2   5002    5003

Waiting:     5002 5002   0.2   5002    5003

Total:       5003 5003   0.3   5003    5003

Percentage of the requests served within a certain time (ms)

  50%   5003

  66%   5003

  75%   5003

  80%   5003

  90%   5003

  95%   5003

  98%   5003

  99%   5003

 100%   5003 (longest request)

4.测试由tomcat提供的静态资源

[root@test8_hadoop_kaf ROOT]# cd /opt/app/code/cache

[root@test8_hadoop_kaf cache]# mv jack.html jack.html.bak

这时访问jack.html就会转到tomcat去处理

[root@test8_hadoop_kaf conf.d]# ab -n 2000 -c 2 http://es.chinasoft.com/jack.html

This is ApacheBench, Version 2.3 <$Revision: 1430300 $>

Copyright 1996 Adam Twiss, Zeus Technology Ltd, http://www.zeustech.net/

Licensed to The Apache Software Foundation, http://www.apache.org/

Benchmarking es.chinasoft.com (be patient)

Completed 200 requests

Completed 400 requests

Completed 600 requests

Completed 800 requests

Completed 1000 requests

Completed 1200 requests

Completed 1400 requests

Completed 1600 requests

Completed 1800 requests

Completed 2000 requests

Finished 2000 requests

Server Software:        nginx/1.12.2

Server Hostname:        es.chinasoft.com

Server Port:            80

Document Path:          /jack.html

Document Length:        114 bytes

Concurrency Level:      2

Time taken for tests:   1.561 seconds

Complete requests:      2000

Failed requests:        0

Write errors:           0

Total transferred:      708000 bytes

HTML transferred:       228000 bytes

Requests per second:    1281.20 [#/sec] (mean)

Time per request:       1.561 [ms] (mean)

Time per request:       0.781 [ms] (mean, across all concurrent requests)

Transfer rate:          442.92 [Kbytes/sec] received

Connection Times (ms)

              min  mean[+/-sd] median   max

Connect:        0    1   0.3      0       7

Processing:     1    1   0.5      1       9

Waiting:        1    1   0.5      1       9

Total:          1    2   0.6      1      16

ERROR: The median and mean for the initial connection time are more than twice the standard

       deviation apart. These results are NOT reliable.

WARNING: The median and mean for the total time are not within a normal deviation

        These results are probably not that reliable.

Percentage of the requests served within a certain time (ms)

  50%      1

  66%      1

  75%      2

  80%      2

  90%      2

  95%      2

  98%      3

  99%      5

 100%     16 (longest request)

二、系统与nginx的性能优化

主要考虑的方面:

网络、系统、服务、程序、数据库、底层服务

系统与nginx的性能优化

文件句柄

linux\unix 一切皆文件,文件句柄就是一个索引

设置方式

系统全局性修改、用户局部性修改、进程局部性修改

soft是不强制限制,超过发邮件通知

hard是操作系统强制限制,请求会受到影响

# 针对用户root的限制

root hard nofile 1000000

root soft nofile 1000000

# 全局限制,针对所有用户的限制

* hard nofile 1000000

* soft nofile 1000000

针对Nginx进程的文件句柄限制

[root@test8_hadoop_kaf conf.d]# vim /etc/nginx/nginx.conf

worker_rlimit_nofile 655350;

cpu的性能

top

按住1 可以显示cpu的核心数

1.nginx绑定cpu,每个进程指定cpu

表示cpu的方法:

有多少核就用多少个0表示,4核用4个0表示 0000,8核用8个0表示 00000000

# 修改nginx配置,这里是4核的CPU,开放4个进程

[root@node1 ~]# cat /etc/nginx/nginx.conf

user  nginx;

worker_processes  4;

worker_cpu_affinity 0001 0010 0100 1000;

error_log  /var/log/nginx/error.log warn;

pid        /var/run/nginx.pid;

worker_rlimit_nofile 35535;

events {

    worker_connections  1024;

}

http {

    include       /etc/nginx/mime.types;

    default_type  application/octet-stream;

    log_format  main  '$remote_addr - $remote_user [$time_local] "$request" '

                      '$status $body_bytes_sent "$http_referer" '

                      '"$http_user_agent" "$http_x_forwarded_for" "$request_uri"';

    access_log  /var/log/nginx/access.log  main;

    sendfile        on;

    keepalive_timeout  65;

    include /etc/nginx/conf.d/*.conf;

}

[root@node1 ~]# /usr/sbin/nginx -s reload

[root@node1 ~]# ps -ef|grep nginx

root      18106      1  0 01:54 ?        00:00:00 nginx: master process /usr/sbin/nginx

nginx     20301  18106  0 16:46 ?        00:00:00 nginx: worker process

nginx     20302  18106  0 16:46 ?        00:00:00 nginx: worker process

nginx     20303  18106  0 16:46 ?        00:00:00 nginx: worker process

nginx     20304  18106  0 16:46 ?        00:00:00 nginx: worker process

root      20306  18433  0 16:46 pts/0    00:00:00 grep --color=auto nginx

# 可以看到不同的进程绑定在了不同的cpu上面

[root@node1 ~]# ps -eo pid,args,psr |grep [n]ginx

 18106 nginx: master process /usr/   2

 20301 nginx: worker process         0

 20302 nginx: worker process         1

 20303 nginx: worker process         2

 20304 nginx: worker process         3

2.让work1和work2共用一个cpu

修改配置

# cat nginx.conf

user  nginx;

worker_processes  4;

worker_cpu_affinity 0010 0010 0100 1000

[root@node1 nginx]# ps -ef|grep nginx

root      18106      1  0 01:54 ?        00:00:00 nginx: master process /usr/sbin/nginx

nginx     20322  18106  0 16:51 ?        00:00:00 nginx: worker process

nginx     20323  18106  0 16:51 ?        00:00:00 nginx: worker process

nginx     20324  18106  0 16:51 ?        00:00:00 nginx: worker process

nginx     20325  18106  0 16:51 ?        00:00:00 nginx: worker process

root      20327  18433  0 16:51 pts/0    00:00:00 grep --color=auto nginx

# 可以看到20322和20323都绑定在了编号为1的处理器上

[root@node1 nginx]# ps -eo pid,args,psr |grep [n]ginx

 18106 nginx: master process /usr/   2

 20322 nginx: worker process         1

 20323 nginx: worker process         1

 20324 nginx: worker process         2

 20325 nginx: worker process         3

3.配置nginx的worker交叉绑定cpu,很少使用

其中一个worker可以使用1,3...的cpu

另外一个使用2,4的cpu

[root@node1 nginx]# ps -ef|grep nginx

root      18106      1  0 01:54 ?        00:00:00 nginx: master process /usr/sbin/nginx

nginx     20339  18106  0 16:57 ?        00:00:00 nginx: worker process

nginx     20340  18106  0 16:57 ?        00:00:00 nginx: worker process

root      20342  18433  0 16:57 pts/0    00:00:00 grep --color=auto nginx

[root@node1 nginx]# ps -eo pid,args,psr |grep [n]ginx

 18106 nginx: master process /usr/   2

 20339 nginx: worker process         1

 20340 nginx: worker process         0

4.自动选择cpu

配置为auto

nginx1.9以后新增的配置

# nginx配置

worker_processes  4;

worker_cpu_affinity auto;

[root@node1 nginx]# ps -ef|grep nginx

root      18106      1  0 01:54 ?        00:00:00 nginx: master process /usr/sbin/nginx

nginx     20362  18106  0 17:03 ?        00:00:00 nginx: worker process

nginx     20363  18106  0 17:03 ?        00:00:00 nginx: worker process

nginx     20364  18106  0 17:03 ?        00:00:00 nginx: worker process

nginx     20365  18106  0 17:03 ?        00:00:00 nginx: worker process

root      20367  18433  0 17:03 pts/0    00:00:00 grep --color=auto nginx

[root@node1 nginx]# ps -eo pid,args,psr |grep [n]ginx

 18106 nginx: master process /usr/   2

 20362 nginx: worker process         0

 20363 nginx: worker process         1

 20364 nginx: worker process         2

 20365 nginx: worker process         3

建议worker数量和cpu核心一致即可

常用的优化配置项

[root@node1 nginx]# cat nginx.conf

user  nginx;

worker_processes  4;        # 4个进程,建议和cpu核心一致

worker_cpu_affinity auto;    # 自动绑定cpu

error_log  /var/log/nginx/error.log warn;

pid        /var/run/nginx.pid;

worker_rlimit_nofile 35535;    # 文件句柄限制

events {

    worker_connections  10240;    # 每个进程最大10240个连接

}

http {

    include       /etc/nginx/mime.types;

    default_type  application/octet-stream;

    log_format  main  '$remote_addr - $remote_user [$time_local] "$request" '

                      '$status $body_bytes_sent "$http_referer" '

                      '"$http_user_agent" "$http_x_forwarded_for" "$request_uri"';

    #access_log  /var/log/nginx/access.log  main;

    access_log  off;

    sendfile        on;    # 开启buffer缓存

    #tcp_nopush     on;

    #tcp_nodeny        on;

    keepalive_timeout 65; # 长连接超时时间

    gzip  on;    # gzip压缩

    gzip_disable "MSIE [1-6]\."; # ie6不兼容gzip,需要disable,否则可能无法显示网页内容

    gzip_http_version 1.1;

    include /etc/nginx/conf.d/*.conf;

}

三、工具使用
1、tcpdump  网络跟踪(所有软件的运行原理,故障排除)
2、strace   进程跟踪(跟踪进程的行为,分析故障)
######################################################################
linux下nginx日志误删后恢复
要想恢复的话,前提是没有重启nginx服务。
首先要来介绍下/proc目录。
/proc 是一个虚拟的目录,不占用实际的存储空间,其实存在于系统的内存中。其实以文件系统的方式为访问系统内核的操作提供接口,是动态从系统内核当中读取所需信息的。
下面就介绍下回复步骤,模拟下恢复的过程。但是前提是没有重启nginx服务
1,备份nginx的error日志,然后删除error日志

2,查看nginx的pid,然后到/proc/pid/fd 目录下

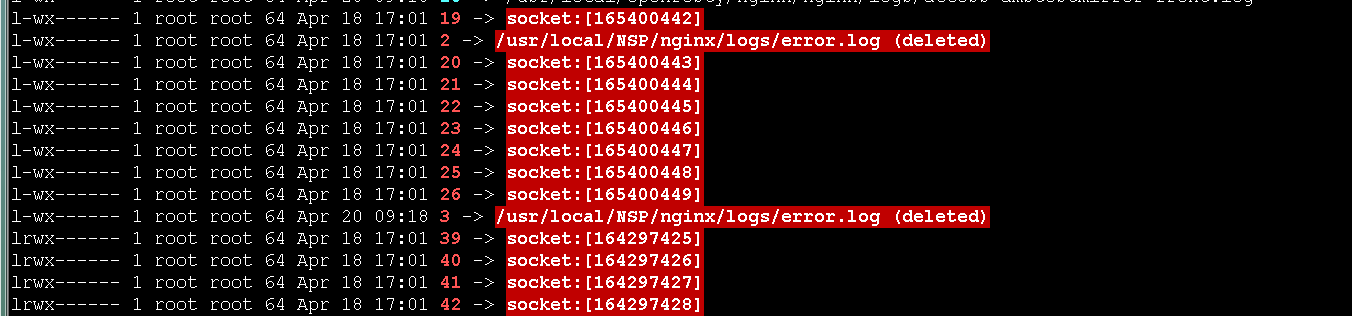
可以看到文件名:2(昨天测试的),3 他们的链接指向是errorlog,但是后面会显示已deleted了。我们用tail看下能看到3还在不停的在刷日志
3,我们直接把文件3重定向到errorlog就可恢复nginx的日志了。

具体的想看进程打开了哪些文件,可以使用lsof命令。
至此,nginx日志已经恢复,恢复以后看到好像不会继续往error.log 里面继续写日志了,需要重启下。不知道这个重启是不是必须的。知道可以留言告知下。其他的文件也可以按照此方法来试试。
学习Nginx(三)的更多相关文章
- Docker学习(三): Dockerfile指令介绍
特别声明: 博文主要是学习过程中的知识整理,以便之后的查阅回顾.部分内容来源于网络(如有摘录未标注请指出).内容如有差错,也欢迎指正! =============系列文章============= 1 ...
- Oracle学习笔记三 SQL命令
SQL简介 SQL 支持下列类别的命令: 1.数据定义语言(DDL) 2.数据操纵语言(DML) 3.事务控制语言(TCL) 4.数据控制语言(DCL)
- 从零开始学习jQuery (三) 管理jQuery包装集
本系列文章导航 从零开始学习jQuery (三) 管理jQuery包装集 一.摘要 在使用jQuery选择器获取到jQuery包装集后, 我们需要对其进行操作. 本章首先讲解如何动态的创建元素, 接着 ...
- 前端学习 第三弹: JavaScript语言的特性与发展
前端学习 第三弹: JavaScript语言的特性与发展 javascript的缺点 1.没有命名空间,没有多文件的规范,同名函数相互覆盖 导致js的模块化很差 2.标准库很小 3.null和unde ...
- Android Animation学习(三) ApiDemos解析:XML动画文件的使用
Android Animation学习(三) ApiDemos解析:XML动画文件的使用 可以用XML文件来定义Animation. 文件必须有一个唯一的根节点: <set>, <o ...
- 三、Android学习第三天——Activity的布局初步介绍(转)
(转自:http://wenku.baidu.com/view/af39b3164431b90d6c85c72f.html) 三.Android学习第三天——Activity的布局初步介绍 今天总结下 ...
- JavaWeb学习总结(三)——Tomcat服务器学习和使用(二) 包含https 非对称秘钥 NB
JavaWeb学习总结(三)--Tomcat服务器学习和使用(二) 一.打包JavaWeb应用 在Java中,使用"jar"命令来对将JavaWeb应用打包成一个War包,jar命 ...
- MyEclipse Spring 学习总结三 SpringMVC
MyEclipse Spring 学习总结三 SpringMVC 一.SpringMVC原理 1.Springmvc 框架介绍 1)Spring 框架停工了构建Web应用程序的全功能MVC模块.Spr ...
- Quartz定时任务学习(二)web应用/Quartz定时任务学习(三)属性文件和jar
web中使用Quartz 1.首先在web.xml文件中加入 如下内容(根据自己情况设定) 在web.xml中添加QuartzInitializerServlet,Quartz为能够在web应用中使用 ...
- MyBatis学习系列三——结合Spring
目录 MyBatis学习系列一之环境搭建 MyBatis学习系列二——增删改查 MyBatis学习系列三——结合Spring MyBatis在项目中应用一般都要结合Spring,这一章主要把MyBat ...
随机推荐
- 运行jar包使用外部依赖
nohup java -Dloader.path="lib/" -Dfile.encoding=utf-8 -jar test.jar > test.out 2>&am ...
- 如何在win10系统上安装linux子系统
对于软件开发人员来说,linux基本上是一个绕不过去的槛. 因为工作经常要用到linux,电脑用纯linux还是windows + 虚拟机装linux,我一直纠结. 如果装个纯linux,则一些win ...
- 开源绘画应用 Pinta 已移植到GTK 3和.NET 6
Pinta 是一款开源绘画应用,适用于 Linux.Windows 和 macOS.你可以用它来进行自由手绘/素描.你也可以用它在现有的图片上添加箭头.方框.文字等. 年初发布了 Pinta 2.0. ...
- 【2021新】C#数字格式化字符串
引用来源: https://www.cnblogs.com/flyingbread/archive/2007/01/18/620287.html https://www.cnblogs.com/117 ...
- Spark on Yarn出现hadoop.compression.lzo.LzoCodec not found问题发现及解决
问题描述: spark.SparkContext: Created broadcast 0 from textFile at WordCount.scala:37 Exception in threa ...
- think php 框架下拉分页
//以对象的形式获取数据库$data变量的信息,将lastPage()传输至页面 $lastpage = $data->lastPage(); $this->assign('lastpag ...
- CF802O题解
太厉害啦,出题人究竟是怎么想到的. 首先这题很显然可以使用费用流:对于 \(i \leq j\),连接一条边 \((i,j+n)\),流量为 \(1\),费用为 \(a_i+b_j\).最后连接 \( ...
- Django基础四之测试环境和ORM查询
Django基础四之测试环境和ORM查询 目录 Django基础四之测试环境和ORM查询 1. 搭建测试环境 1.1 测试环境搭建方法: 1.2 使用测试环境对数据库进行CURD 1.3 返回Quer ...
- C#编程基础之字符串操作
本文来源于复习基础知识的学习笔记.自用的同时希望也能帮到其他童鞋. 什么是编程语言? 计算机可以执行的指令.这些指令成为源代码或者代码 有什么用? 以人们可读可理解的方式编写指令.人们希望计算机执行指 ...
- CF375E Red and Black Tree(线性规划)
CF375E Red and Black Tree(线性规划) Luogu 题解时间 很明显有一个略显复杂的 $ n^3 $ dp,但不在今天讨论范围内. 考虑一些更简单的方法. 设有 $ m $ 个 ...