记录-Vue移动端日历设计与实现
这里给大家分享我在网上总结出来的一些知识,希望对大家有所帮助

工作中遇到一个需求是根据日历查看某一天/某一周/某一月的睡眠报告,但是找了好多日历组件都不是很符合需求,只好自己手写一个日历组件,顺便记录一下。
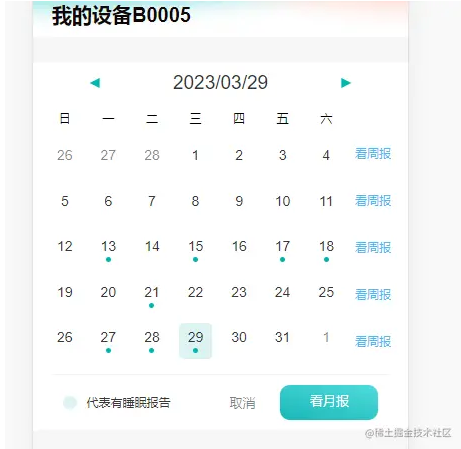
先看看UI给的设计图和,需求是有数据的日期做标记,可以查看某一周/某一月的数据,周数据不用自定义,就按照日历上的周数据截取.
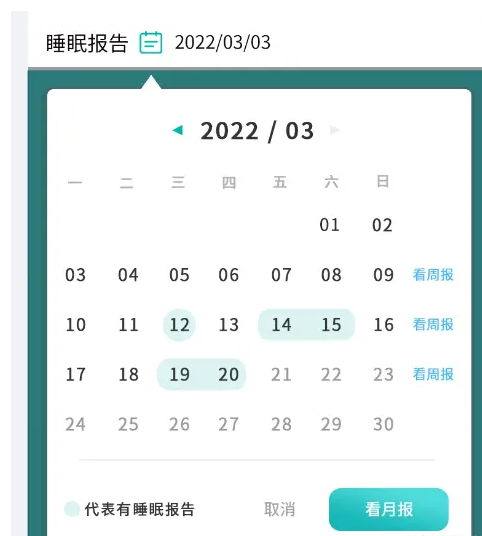
实现效果
1.规划dom部分区块划分

2.页面实现
选择月份和选择年份与日期做了条件渲染,切换方式是点击顶部时间切换选项
<template>

  <div class="calendar">

    <div class="date-top">

      <div class="left" @click="dateOperate('down')">

        <div></div>

      </div>

      <div class="time" @click="selectDate">{{ date.join("/") }}</div>

      <div class="right" @click="dateOperate('up')">

        <div></div>

      </div>

    </div>

    <!-- 日期列表 -->

    <div class="date-list" v-if="show === 'date'">

      <div class="date-content">

        <!-- 日历头 -->

        <div v-for="item in header" :key="item">

          {{ item }}

        </div>

        <!-- 日列表 -->

        <div

          v-for="(s, k) in dayList"

          :class="[

            'date-item',

            s.month !== date[1] ? 'other-day' : '',

            s.day === date[2] && s.month === date[1] ? 'today' : '',

          ]"

          :key="s + '-' + k"

          @click="selectDay(s)"

        >

          {{ s.day }}

          <div

            :class="[

              'check',

              haveList.includes(`${s.year}-${s.month}-${s.day}`) ? 'have' : '',

            ]"

          ></div>

        </div>

      </div>

      <!-- 操作栏 -->

      <div class="date-btn">

        <div

          class="btn-item"

          v-for="k in weeks + 1"

          :key="k"

          @click="weekReport(k)"

        >

          {{ k === 1 ? "" : "看周报" }}

        </div>

      </div>

    </div>

    <!-- 月份列表 -->

    <div class="month-list" v-else-if="show === 'month'">

      <div

        :class="date[1] == i ? 'month-item active' : 'month-item'"

        v-for="i in 12"

        :key="i"

        @click="selectMonth(i)"

      >

        {{ i }}月

      </div>

    </div>

    <!-- 年份列表 -->

    <div

      class="year-list"

      v-else

      @touchmove="touchMove"

      @touchstart="touchStart"

    >

      <div

        :class="date[0] === i ? 'month-item active' : 'month-item'"

        v-for="i in yearList"

        :key="i"

        @click="selectYear(i)"

      >

        {{ i }}

      </div>

    </div>

    <!-- 底部操作栏 -->

    <div class="date-bottom">

      <div class="b-left">

        <div class="tab"></div>

        <div class="totip">代表有睡眠报告</div>

      </div>

      <div class="b-right">

        <div class="cancel" @click="cancel">取消</div>

        <div class="m-report" @click="changeReport">看月报</div>

      </div>

    </div>

  </div>

</template>
css部分
<style lang="scss" scoped>

.calendar {

  width: 100%;

  background-color: #fff;

  .date-top {

    width: 100%;

    padding: 20px;

    display: flex;

    justify-content: space-around;

    align-items: center;

    .left,

    .right {

      width: 100px;

      height: 100%;

      display: flex;

      flex-direction: column;

      justify-content: center;

      align-items: center;

      div {

        width: 20px;

        height: 20px;

        background-color: #00b7ae;

      }

    }

    .left > div {

      clip-path: polygon(0% 50%, 100% 0%, 100% 100%);

    }

    .right > div {

      clip-path: polygon(0% 0%, 100% 50%, 0% 100%);

    }

    .time {

      font-size: 38px;

      font-weight: 500;

      color: #333333;

    }

  }

  .date-list,

  .year-list,

  .month-list {

    width: 100%;

    padding: 30px;

    height: 540px;

  }

  .month-list,

  .year-list {

    display: grid;

    grid-template-columns: 1fr 1fr 1fr;

    grid-template-rows: auto;

    .month-item {

      text-align: center;

      display: flex;

      justify-content: center;

      align-items: center;

      font-size: 30px;

      height: 122px;

    }

    .month-item:active {

      background-color: #eee;

    }

    .active {

      background-color: #dcf4f3;

    }

  }

  .date-list {

    padding-top: 0;

    display: flex;

    .date-content {

      flex: 1;

      height: 100%;

      display: grid;

      grid-template-columns: 1fr 1fr 1fr 1fr 1fr 1fr 1fr;

      grid-template-rows: auto;

      grid-gap: 20px 20px;

      div {

        height: 100%;

        display: flex;

        flex-direction: column;

        justify-content: center;

        align-items: center;

        border-radius: 10px;

      }

      .other-day {

        color: rgba($color: #363636, $alpha: 0.6) !important;

      }

      .today {

        background-color: #dcf4f3;

      }

      .date-item {

        font-size: 28px;

        font-weight: 400;

        color: #363636;

        .check {

          width: 10px;

          height: 10px;

          margin-top: 6px;

          border-radius: 50%;

          background-color: #00b7ae;

          opacity: 0;

        }

        .have {

          opacity: 1;

        }

      }

    }

    .date-btn {

      height: 100%;

      width: 80px;

      font-size: 22px;

      color: #4eb9f5;

      display: grid;

      grid-template-columns: 1fr;

      grid-template-rows: auto;

      grid-gap: 20px 20px;

      margin-left: 20px;

      .btn-item {

        display: flex;

        justify-content: center;

        align-items: center;

        height: 100%;

      }

    }

  }

  .date-bottom {

    width: calc(100% - 80px);

    display: flex;

    justify-content: space-between;

    align-content: center;

    padding: 20px;

    margin: 0 auto;

    border-top: 1px solid #eee;

    .b-left,

    .b-right {

      display: flex;

      align-items: center;

    }

    .b-left {

      .tab {

        width: 27px;

        height: 26px;

        background: #dcf4f3;

        border-radius: 13px;

      }

      .totip {

        font-size: 24px;

        font-weight: 400;

        color: #363636;

        margin-left: 20px;

      }

    }

    .b-right {

      .cancel {

        font-size: 26px;

        font-weight: 500;

        color: rgba($color: #000000, $alpha: 0.5);

      }

      .m-report {

        width: 195px;

        line-height: 70px;

        color: #fff;

        font-size: 26px;

        background: linear-gradient(196deg, #50dcdc, #18b6b7);

        border-radius: 20px;

        margin-left: 50px;

        text-align: center;

      }

    }

  }

}

</style>
3.接下来是逻辑处理部分
日数据的显示一共42条数据,先获取当前月的总天数,将每个月的天数保存在一个数组里,然后根据传入的参数返回相应的天数, 因为有闰年的存在,2月会是29天,所以做了闰年的判断.然后获取每周的第一天是周几,使用new Date().getDay()获取某一天是周几,返回的是0-7,这里为了方便使用将日历表头用数组保存起来返回的数字刚好是日里头对应的下标,然后根据第一天是周几计算出需要补上个月的几天数据,通过new Date(y,m,0)可以获取到上个月最后一天的,然后向日数据中添加上个月最后几天的数据,补充下个月开始的几天数据,直接使用42减去当月的天数和补充的上个月的天数得到的就是需要补充的下月天数.
月数据的切换显示,前后翻动切换年数据,每年固定都是12月所以就直接写固定值12然后v-for遍历生成dom
年数据的切换显示,每页显示12条数据,保存每页数据的第一条和最后一条用于前后翻页计算显示的数据+12或者-12.
校验选择的月份和已选择的日期是否匹配,因为选择日期后再切换月份有可能切换到的月份没有选择的日期如31日30日29日,所以需要验证是否正确,若是没有的话就当前月的最后一天.
手势操作没有写完整,只写了年份选择的滑动事件逻辑.
为了方便js部分的代码每行都有写详细的注释
自定月选择日期范围只需要修改日期点击事件的逻辑,新增一个参数判断是单日期选择还是选择一个日期范围,在事件处理里面记录点击的两个日期并计算中间的日期保存返回.
<script>

import { formatTime } from "@/utils/format";

export default {

  name: "calendar",

  props: {

    haveList: {

      type: Array,

      default: [],

    },

  },

  data() {

    return {

      // 切换日期选择

      show: "date",

      // 日历头

      header: ["日", "一", "二", "三", "四", "五", "六"],

      // 选择日期

      date: [],

      // 年列表

      yearList: [],

      // 天列表

      dayList: [],

      // 定时器

      timer: null,

      // 手势操作数据

      move: {

        pageX: 0,

        fNum: null,

        lNum: null,

      },

      // 第一天是周几

      weeks: 0,

    };

  },

  created() {},

  mounted() {

    let time = new Date();

    this.date.push(

      time.getFullYear(),

      formatTime(time.getMonth() + 1),

      formatTime(time.getDate())

    );

    this.countDay();

  },

  methods: {

    // 计算显示的天数据

    countDay() {

      console.log("chufa");

      let [y, m, d] = this.date;

      // 获取第一天是周几

      let week = new Date(`${y}/${m}/1`).getDay(),

        // 获取当前月的上个月多少天

        lastDays = this.getDays(y, m - 1),

        // 获取这个月有多少天

        days = this.getDays(y, m);

      // 计算这个月有多少周

      this.weeks = Math.ceil((days - (7 - week)) / 7) + 1;

      // 将当前月份的天数生成数组

      this.dayList = Array.from({ length: this.getDays(y, m) }, (v, k) => {

        return {

          day: formatTime(k + 1),

          month: m,

          year: y,

        };

      });

      // 将本月1日前的数据补齐

      for (let i = lastDays; i > lastDays - week; i--) {

        this.dayList.unshift({

          day: i,

          // 如果当前日期是1月补齐的是去年12月的数据

          month: +m - 1 === 0 ? 12 : formatTime(+m - 1),

          year: +m - 1 === 0 ? y - 1 : y,

        });

      }

      // 计算需要补齐多少天

      let length = this.weeks * 7 - this.dayList.length;

      console.log("length", week, lastDays, days, this.weeks);

      // 将本月最后一天的数据补齐

      for (let i = 1; i <= length; i++) {

        this.dayList.push({

          day: i,

          // 如果当前日期是12月补齐的是明年年1月的数据

          month: +m + 1 > 12 ? 1 : formatTime(+m + 1),

          year: +m + 1 > 12 ? y + 1 : y,

        });

      }

      console.log(this.dayList);

    },

    // 顶部时间点击事件

    selectDate() {

      let type = {

        month: "year",

        date: "month",

      };

      // 判断点击事件选择月份还是年份

      if (this.show !== "year") {

        this.show = type[this.show];

      }

      // 如果是月份就计算dateList数据

      if (this.show === "month") {

        // 清空每页显示的年份数据

        this.yearList.length = 0;

        // 计算页面显示的年份数据 每页显示12条数据

        for (let i = this.date[0] - 4; i <= this.date[0] + 7; i++) {

          this.yearList.push(i);

        }

      }

    },

    // 屏幕点击事件

    touchStart(val) {

      // 获取按下屏幕的x轴坐标

      this.move.pageX = val.touches[0].pageX;

    },

    // 左右滑动切换事件

    touchMove(val) {

      // 获取按下屏幕移动结束的x轴坐标

      let move = val.touches[0].pageX;

      clearTimeout(this.timer);

      // 判断往左滑动还是往右滑动

      // 滑动结束x轴坐标减去最初按下坐标为负数就是往左滑动,翻看当前日期以后的年份

      if (move - this.move.pageX < -20) {

        console.log("右滑", this.move.lNum);

        // 定时器防抖

        this.timer = setTimeout(this.changeYear("right"), 100);

      }

      // 滑动结束x轴坐标减去最初按下坐标为正数就是往右滑动,翻看当前日期以前的年份

      if (move - this.move.pageX > 20) {

        // 定时器防抖

        this.timer = setTimeout(this.changeYear("left"), 100);

      }

    },

    // 年份选择切换

    changeYear(type) {

      // 清空每页显示的年份数据

      this.yearList.length = 0;

      if (type === "right") {

        // 计算页面显示的年份数据 每页显示12条数据

        for (let i = this.move.lNum + 1; i < this.move.lNum + 13; i++) {

          this.yearList.push(i);

        }

      } else {

        for (let i = this.move.fNum - 12; i < this.move.fNum; i++) {

          this.yearList.push(i);

        }

      }

    },

    // 年份点击事件

    selectYear(val) {

      this.date[0] = val;

      this.show = "month";

    },

    // 月份点击事件

    selectMonth(val) {

      this.date[1] = val;

      this.show = "date";

      this.countDay();

      this.checkDay();

    },

    // 校验选择的月份和已选择的日期是否匹配

    checkDay() {

      // 获取选择的年月有多少天 防止这年不是闰年 就将日期跳转到28号,或者有的月份没有31号就跳到30号

      let num = this.getDays(this.date[0], this.date[1]);

      if (num < this.date[2]) {

        this.date.splice(2, 1, num);

      }

    },

    // 日期点击事件

    selectDay(val) {

      let oVal = this.date[1];

      this.date.splice(1, 2, val.month, val.day);

      if (val.month !== oVal) {

        this.countDay();

      }

      this.$emit("change", this.date.join("-"));

    },

    // 获取某个月有多少天

    getDays(year, month) {

      // 一年中每个月的天数

      let days = [31, 28, 31, 30, 31, 30, 31, 31, 30, 31, 30, 31];

      // 判断是不是闰年 2月29天

      if (year % 4 === 0 && (year % 100 !== 0 || year % 400 === 0)) {

        days[1] = 29;

      }

      return days[month - 1];

    },

    //左右按钮点击事件

    dateOperate(type) {

      let [y, m, d] = this.date;

      // 如果是向后翻

      if (type === "up") {

        // 日期向后翻 切换月份

        if (this.show === "date") {

          if (+m === 12) {

            this.date.splice(0, 1, y + 1);

            this.date.splice(1, 1, "01");

          } else {

            this.date.splice(1, 1, formatTime(+m + 1));

          }

          // 月份向后翻 切换年份

        } else if (this.show === "month") {

          this.date.splice(0, 1, y + 1);

          // 年份向后翻 重组数据

        } else {

          this.changeYear("right");

        }

        // 如果是前后翻

      } else {

        // 日期向前翻 切换月份

        if (this.show === "date") {

          if (+m === 1) {

            this.date.splice(0, 1, y - 1);

            this.date.splice(1, 1, 12);

          } else {

            this.date.splice(1, 1, formatTime(+m - 1));

          }

          // 月份向前翻 切换年份

        } else if (this.show === "month") {

          this.date.splice(0, 1, y - 1);

          // 年份向前翻 重组数据

        } else {

          this.changeYear("left");

        }

      }

      this.countDay();

      this.checkDay();

    },

    // 右侧按钮点击事件

    weekReport(i) {

      if (i === 1) return;

      let arr = [],

        // 选择一周的数据 开始

        s = 7 * (i - 1) - 7,

        // 结束

        e = 7 * (i - 1);

      // 遍历日数据 截取选择的周数据

      for (let k = s; k < e; k++) {

        arr.push(

          `${this.dayList[k].year}-${this.dayList[k].month}-${this.dayList[k].day}`

        );

      }

      this.$emit("weekReport", arr);

    },

    // 看月报事件

    changeReport() {

      let [y, m, d] = this.date;

      this.$emit("changeReport", `${y}-${m}`);

    },

    // 取消事件

    cancel() {

      this.$emit("cancel");

    },

  },

  computed: {},

  watch: {

    yearList(nVal, oVal) {

      // 记录每一页显示的数据第一位和最后一位 用于计算下一页或者上一页的数据

      this.move.fNum = nVal[0];

      this.move.lNum = nVal[11];

    },

    deep: true,

    immediate: true,

  },

};

</script>
formatTime是给月份和日期小于10的前面加0的方法
本文转载于:
https://juejin.cn/post/7218048201981853757
如果对您有所帮助,欢迎您点个关注,我会定时更新技术文档,大家一起讨论学习,一起进步。

记录-Vue移动端日历设计与实现的更多相关文章
- vue移动端金融UI组件库滴滴MandMobile面向金融场景设计附功能思维导图
vue移动端金融UI组件库滴滴MandMobile面向金融场景设计附功能思维导图 Mand Mobile是面向金融场景设计的移动端组件库,基于Vue.js实现.目前已实际应用于滴滴四大金融业务板块的1 ...
- TV端产品设计法则和分析
对TV端产品设计的分析太特么少了.翻遍网络,大多也是针对UI设计的分析,这篇从产品设计的角度,梳理下现有的TV端产品设计法则,顺道做点分析.(前方多图,高能预警) 目录: 1. TV端产品使用场景 2 ...
- Egg + Vue 服务端渲染工程化实现
在实现 egg + vue 服务端渲染工程化实现之前,我们先来看看前面两篇关于Webpack构建和Egg的文章: 在 Webpack工程化解决方案easywebpack 文章中我们提到了基于 Vue ...
- 记录vue中一些有意思的坑
记录vue中一些有意思的坑 'message' handler took 401ms 在出现这个之前,我一直纠结于 是如何使用vue-router或者不使用它,通过类似的v-if来实现.结果却出现这个 ...
- 从服务端架构设计角度,深入理解大型APP架构升级
随着智能设备普及和移动互联网发展,移动端应用逐渐成为用户新入口,重要性越来越突出.但企业一般是先有PC端应用,再推APP,APP 1.0版的功能大多从现有PC应用平移过来,没有针对移动自身特点考虑AP ...
- 了解css中px、em、rem的区别并使用Flexible实现vue移动端的适配
本人java菜鸟一名,若有错误,还请见谅. 1.px和em和rem的定义和区别 px:px像素,是相对单位,相对于屏幕的分辨率而言,也就是说,当屏幕的分辨率不同那么px相同,实际看到的大小也会不同. ...
- [vue] vue服务端渲染nuxt.js
初始化 使用脚手架工具 create-nuxt-app 快速创建 npx create-nuxt-app <项目名> npx create-nuxt-app 执行一些选择 在集成的服务器端 ...
- 那些过目不忘的无线端交互设计(DRIBBBLE GIF动态图)
Dribbble精选:Dribbble上令人惊叹的无线端交互设计!来自全球牛人们的奇思妙想,新颖动人的交互在这一张张GIF动态图上一览无余!当然界面一样打动人心,腾出手点赞的同时!记得另存哟:) 作者 ...
- 回顾2017系列篇(二):移动端APP设计趋势
移动端APP在2017年经历了诸多的变化, 人工智能.聊天式的界面.响应式设计.虚拟现实(VR)和增强现实(AR)让设计师不断面临新的挑战.研究表明,用户每天耗费在手机和平板上的平均时长为158分钟, ...
- Vue移动端项目模板
一个集成移动端开发插件的Vue移动端模板包含1.css: 使用stylus开发css 集成reset样式文件 修改UI组件文件 统一样式处理(如主题色等)2.UI组件 使用热门的vant与mint-u ...
随机推荐
- 【Lua】Lua基础语法
1 Lua 简介 Lua 是一个小巧的脚本语言,用标准C语言编写而成,由巴西里约热内卢天主教大学的 Roberto Ierusalimschy.Waldemar Celes 和 Luiz Henr ...
- win32 - 从dll中导出api并使用
从User32.dll中导出MessageBoxW 代码: #include <Windows.h> #include <iostream> #include <func ...
- win32 - wsprintfW的使用
文档:将格式化的数据写入指定的缓冲区.根据格式字符串中相应的格式说明,将转换任何参数并将其复制到输出缓冲区.该函数在其写入的字符后附加一个终止空字符,但返回值的字符计数中不包含终止空字符. 例子: # ...
- 【Android 逆向】【攻防世界】人民的名义-抓捕赵德汉1-200
1. 这一题下载下来是个jar文件,感觉很android关系不大,但还是放在了mobile这个分类下了 2. 直接java jar运行,提示需要输入密码 # java -jar 169e139f152 ...
- Docker实践之08-使用网络
目录 一.外部访问容器 启动容器时指定参数-P(大写P) 启动容器时指定参数-p(小写p) 二.容器互联 使用--link参数使容器互联 将容器加入自定义网络实现互联 三.为容器配置DNS 一.外部访 ...
- 产品分享:Qt数学函数公式学科工具,当前版本v1.0.0
若该文为原创文章,转载请注明原文出处本文章博客地址:https://hpzwl.blog.csdn.net/article/details/121194536红胖子(红模仿)的博文大全:开发技术集合 ...
- 项目实战:Qt+Arm+Fpga医疗肾镜(又名内窥镜)(实时影像、冻结、拍照、白平衡、九宫格、录像、背光调整、硬件光源调整、光源手动自动调整、物理按键)
若该文为原创文章,转载请注明原文出处本文章博客地址:https://blog.csdn.net/qq21497936/article/details/111241205长期持续带来更多项目与技术分享, ...
- python枚举之Enum模块
枚举是与多个唯一常量值绑定的一组符号(即成员).枚举中的成员可以进行身份比较,并且枚举自身也可迭代. 枚举成员名称建议使用大写字母 # 示例 from enum import Enum,unique, ...
- Kotlin 协程二 —— 通道 Channel
目录 一. Channel 基本使用 1.1 Channel 的概念 1.2 Channel 的简单使用 1.3 Channel 的迭代 1.4 close 关闭 Channel 1.5 Channe ...
- java个人博客
效果浏览 首页 详情页 Aboutme 后台管理 管理/添加博客 添加分类 管理员管理 友情链接 访问地址 前台地址http://localhost 后台地址:http://localhost/adm ...