eclipse环境下基于已构建struts2项目整合spring+hibernate
本文是基于已构建的struts2项目基础上整合
spring+hibernate,若读者还不熟悉struts2项目,请先阅读
eclipse环境下基于tomcat-7.0.82构建struts2项目
实现步骤:
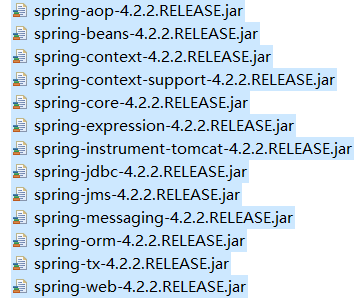
第一步:引入spring所需jar包,如下图所示:
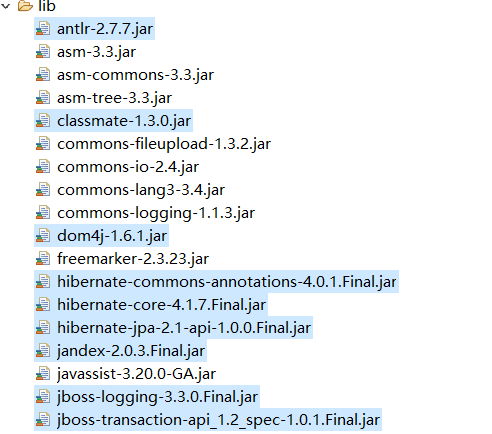
第二步:导入hibernate所需jar包,如下图中被选中jar文件:
第三步:导入struts-spring整合包,暂且就这么称呼吧

第四步:导入MySQL驱动包:

第五步:所有准备工作就绪后,接下来创建spring与hibernate配置文件,命名为applicationContext.xml,配置如下所示:
<?xml version="1.0" encoding="UTF-8"?>

<beans xmlns="http://www.springframework.org/schema/beans"

	xmlns:xsi="http://www.w3.org/2001/XMLSchema-instance" xmlns:context="http://www.springframework.org/schema/context"

	xmlns:task="http://www.springframework.org/schema/task" xmlns:tx="http://www.springframework.org/schema/tx"

	xmlns:aop="http://www.springframework.org/schema/aop"

	xsi:schemaLocation="

http://www.springframework.org/schema/beans

http://www.springframework.org/schema/beans/spring-beans-3.0.xsd

http://www.springframework.org/schema/context

http://www.springframework.org/schema/context/spring-context-3.0.xsd

http://www.springframework.org/schema/task

http://www.springframework.org/schema/task/spring-task-3.1.xsd

http://www.springframework.org/schema/tx

http://www.springframework.org/schema/tx/spring-tx-3.0.xsd

http://www.springframework.org/schema/aop

http://www.springframework.org/schema/aop/spring-aop-3.0.xsd

">

</beans>
这是spring配置文件命名空间的引入,命名空间具体含义请参考前辈资料
6.2.3 Spring 2.5配置文件详解(1)
第六步:在web.xml文件中配置对spring的监听,配置如下所示:
<?xml version="1.0" encoding="UTF-8"?>

<web-app xmlns:xsi="http://www.w3.org/2001/XMLSchema-instance" xmlns="http://java.sun.com/xml/ns/javaee" xsi:schemaLocation="http://java.sun.com/xml/ns/javaee http://java.sun.com/xml/ns/javaee/web-app_3_0.xsd" id="WebApp_ID" version="3.0">

  <display-name>SSHDemo</display-name>

      <!-- spring的监听器配置开始 -->

    <!-- spring监听器的作用:提供实例(IOC) -->

      <context-param>

        <param-name>contextConfigLocation</param-name>

        <param-value>classpath:applicationContext.xml</param-value>

    </context-param>

    <listener>

        <listener-class>org.springframework.web.context.ContextLoaderListener</listener-class>

    </listener>

  <!-- 将请求路径交由struts过滤 -->

  <filter>

        <filter-name>struts2</filter-name>

        <filter-class>org.apache.struts2.dispatcher.ng.filter.StrutsPrepareAndExecuteFilter</filter-class>

    </filter>

    <filter-mapping>

        <filter-name>struts2</filter-name>

        <url-pattern>/*</url-pattern>

    </filter-mapping>

</web-app>
这是在struts2项目基础配置上增加对spring的监听。
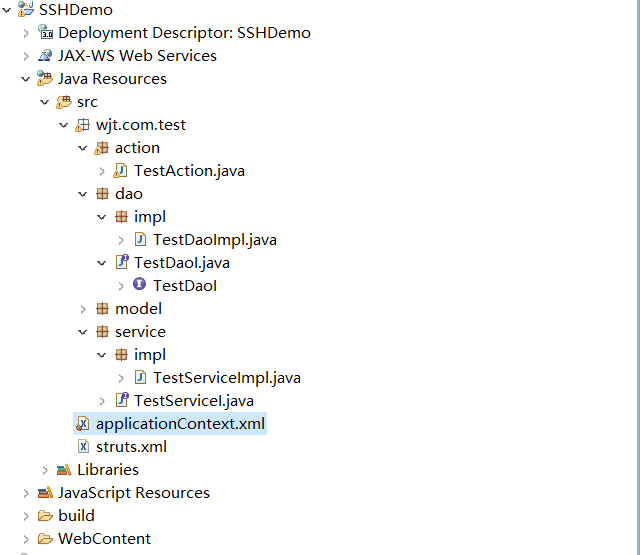
第七步:项目下构建业务层接口(TestServiceI)、实现类(TestServiceImpl)以及数据库操作层接口(TestDaoI)、实现类(TestDaoImpl)
整个项目结构如下图所示:
其中dao层实现类中我们需要注入一个session工厂(工厂注入请留意本文后续),接着打开session工厂用于操作数据库,代码如下所示:
package wjt.com.test.dao.impl;

import org.hibernate.HibernateException;

import org.hibernate.Session;

import org.hibernate.SessionFactory;

import wjt.com.test.dao.TestDaoI;

public class TestDaoImpl implements TestDaoI{

    private SessionFactory sessionFactory;

    public void setSessionFactory(SessionFactory sessionFactory) {

        this.sessionFactory = sessionFactory;

    }

    private Session getCurrentSession() {

        try {

            return sessionFactory.getCurrentSession();

        } catch (HibernateException e) {

            return sessionFactory.openSession();

        }

    }

    @Override

    public void testDaoMethod() {

        System.out.println("dao层测试方法...");

        if(getCurrentSession()!=null) {

            System.out.println("session工厂注入成功!");

        }

    }

}
其中service层实现类中我们暂时写一个空方法进行测试dao层接口对象的注入成功与否并调用dao层方法,代码如下:
package wjt.com.test.service.impl;

import wjt.com.test.dao.TestDaoI;

import wjt.com.test.service.TestServiceI;

public class TestServiceImpl implements TestServiceI{

    private TestDaoI testDao;

    public void setTestDao(TestDaoI testDao) {

        this.testDao = testDao;

    }

    @Override

    public void testServiceMethod() {

        System.out.println("service层测试方法...");

        testDao.testDaoMethod();

    }

}
其中Action层我们在原来struts2项目的基础上注入service层接口并调用其方法,代码如下:
package wjt.com.test.action;

import com.opensymphony.xwork2.ActionSupport;

import wjt.com.test.service.TestServiceI;

public class TestAction extends ActionSupport{

    private TestServiceI testService;

    public void setTestService(TestServiceI testService) {

        this.testService = testService;

    }

    public String execute() throws Exception {

        System.out.println("struts==========================");

        testService.testServiceMethod();

        return "success";

    }

}
整个s2sh项目中的结构布局如上述第七步所示,用于视图映射的类我们封装在action包下,用于实现业务逻辑的我们封装在service包下,用于访问数据库对数据进行操作的我们封装在dao包下。
第八步:配置spring+hibernate的配置文件
截止到现在整个s2sh项目的准备工作已经准备完毕,接下来我们我们配置hibernate的数据源、session工厂,配置spring的核心之一控制反转IOC或称为依赖注入DI。
配置如下:
<?xml version="1.0" encoding="UTF-8"?>
<beans xmlns="http://www.springframework.org/schema/beans"
xmlns:xsi="http://www.w3.org/2001/XMLSchema-instance" xmlns:context="http://www.springframework.org/schema/context"
xmlns:task="http://www.springframework.org/schema/task" xmlns:tx="http://www.springframework.org/schema/tx"
xmlns:aop="http://www.springframework.org/schema/aop"
xsi:schemaLocation="
http://www.springframework.org/schema/beans
http://www.springframework.org/schema/beans/spring-beans-3.0.xsd
http://www.springframework.org/schema/context
http://www.springframework.org/schema/context/spring-context-3.0.xsd
http://www.springframework.org/schema/task
http://www.springframework.org/schema/task/spring-task-3.1.xsd
http://www.springframework.org/schema/tx
http://www.springframework.org/schema/tx/spring-tx-3.0.xsd
http://www.springframework.org/schema/aop
http://www.springframework.org/schema/aop/spring-aop-3.0.xsd
"> <!-- 数据源配置 -->
<bean id="dataSource"
class="org.springframework.jdbc.datasource.DriverManagerDataSource">
<property name="driverClassName" value="com.mysql.jdbc.Driver" />
<property name="url" value="jdbc:mysql://localhost:3306/wjt_test?useUnicode=true&characterEncoding=UTF-8&zeroDateTimeBehavior=convertToNull&autoReconnect=true" />
<property name="username" value="root" />
<property name="password" value="wujingtao" />
</bean> <!-- 配置hibernate session工厂 -->
<bean id="sessionFactory"
class="org.springframework.orm.hibernate4.LocalSessionFactoryBean">
<property name="dataSource" ref="dataSource" />
<property name="hibernateProperties">
<props>
<prop key="hibernate.hbm2ddl.auto">update</prop>
<prop key="hibernate.dialect">org.hibernate.dialect.MySQL5InnoDBDialect</prop>
<prop key="hibernate.show_sql">false</prop>
<prop key="hibernate.format_sql">true</prop>
</props>
</property> </bean> <!-- 注入对象 采用属性注入方式--> <bean id="testDao" class="wjt.com.test.dao.impl.TestDaoImpl" scope="prototype">
<property name="sessionFactory" ref="sessionFactory"/><!-- 引用上方的hibernate工厂 -->
</bean> <bean id="testService" class="wjt.com.test.service.impl.TestServiceImpl" scope="prototype">
<property name="testDao" ref="testDao"/>
</bean> <bean id="testAction" class="wjt.com.test.action.TestAction" scope="prototype">
<property name="testService" ref="testService"/>
</bean> </beans>
其中IOC配置采用属性注入的方式,大家可以根据个人喜好选择spring注入的几种方式,我个人偏爱基于注解的属性注入方式,注解方式注入会在后续的文章中给出。
第九步:将struts2运行时的对象交由spring创建,即所谓的应用IOC
在struts.xml配置文件中添加如下配置:
<?xml version="1.0" encoding="UTF-8"?>

<!DOCTYPE struts PUBLIC

            "-//Apache Software Foundation//DTD Struts Configuration 2.3//EN"

            "http://struts.apache.org/dtds/struts-2.3.dtd"><!-- 这里要和struts2版本号统一 -->

<struts>

    <!-- 告知Struts2运行时使用Spring来创建对象 这行代码是新加的-->

    <constant name="struts.objectFactory" value="spring" />

    <package name="default" extends="struts-default">

        <action name="login" class="wjt.com.test.action.TestAction">

            <result name="success">index.jsp</result>

        </action>

    </package>

</struts>
测试项目:
在tomcat下部署并启动项目
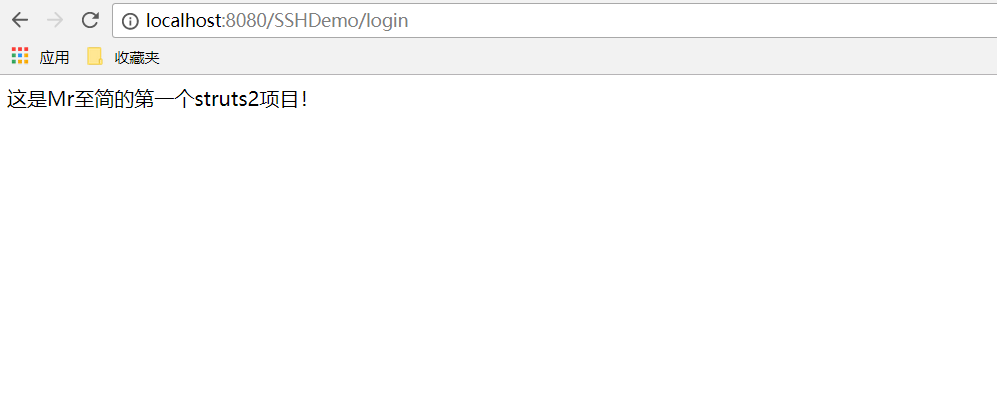
浏览器地址栏输入:http://localhost:8080/SSHDemo/login
浏览器显示如下所示:
eclipse输出显示如下:(因为我们在各层有打印信息)

到这里完整的s2sh项目构建完毕并通过测试。
本人是刚毕业的小白,写文章的目的是全当给自己做笔记了,博文有不合理的地方还请读者指出!
eclipse环境下基于已构建struts2项目整合spring+hibernate的更多相关文章
- 基于已构建S2SH项目配置全注解方式简化配置文件
如果还不熟悉s2sh项目搭建的朋友可以先阅读 eclipse环境下基于tomcat-7.0.82构建struts2项目 eclipse环境下基于已构建struts2项目整合spring+hiberna ...
- eclipse环境下基于tomcat-7.0.82构建struts2项目
开山第一篇,毕业4个月目前接触最多的框架还是s2sh框架.... 具备完整的开发环境下,在eclipse下启动tomcat出现如下所示画面表示环境构建成功. 第一步:创建web项目,截图如下 此页面只 ...
- 详细的图文教程来实现 eclipse环境下如何配置tomcat,并且把项目部署到Tomcat服务器上
很多初学,尤其自学JavaWeb的朋友首次在eclipse下配置tomcat时,总会有种难下手的感觉,在此,通过图文解说的方法,最直观的向大家演示一遍该配置过程. 第一部分:eclipse环境下如何配 ...
- .NET环境下基于RBAC的访问控制
.NET环境下基于RBAC的访问控制 Access Control of Application Based on RBAC model in .NET Environment 摘 要:本文从目前信息 ...
- eclipse环境下如何配置tomcat
eclipse环境下如何配置tomcat 很多初学,尤其自学JavaWeb的朋友首次在eclipse下配置tomcat时,总会有种难下手的感觉,在此,通过图文解说的方法,最直观的向大家演示一遍该配置过 ...
- Jenkins:基于linux构建ivy项目
Jenkins:基于linux构建ivy项目 (二) 基于以上<Jenkins:VMware虚拟机Linux系统的详细安装和使用教程(一)>的配置再进行对ivy项目构建: 启动tomcat ...
- CentOS 环境下基于 Nginx uwsgi 搭建 Django 站点
因为我的个人网站 restran.net 已经启用,博客园的内容已经不再更新.请访问我的个人网站获取这篇文章的最新内容,CentOS 环境下基于 Nginx uwsgi 搭建 Django 站点 以下 ...
- java(一)IntelliJ和eclipse环境下的Hello World
1. IntelliJ环境下的Hello World 1. 启动IntelliJ IDE,选择File->New->Project 选择Java如果没有出现Project SDK,则选择N ...
- 【应用笔记】【AN004】VB环境下基于RS-485的4-20mA电流采集
版本:第一版作者:周新稳 杨帅 日期:20160226 =========================== 本资料高清PDF 下载: http://pan.baidu.com/s/1c1uuhLQ ...
随机推荐
- win10 uwp 应用转后台清理内存
我在写小说阅读器,把每个打开的文件的内容读到内存,因为小说都很小,所以放在内存不怕太大,但是我如果打开了一本小说,再打开一本,我不会把先打开的小说的内容清除掉,在内存.所以一旦我打开多小说的时候,内存 ...
- Java 7 JVM和垃圾收集
---恢复内容开始--- 写JAVA程序,一定要了解JVM(JAVA Virtual machine)一些基础知识和垃圾收集.如果对JVM已经很了解了,可以不用继续往下阅读了.本文只针对Java 7, ...
- Kinect v2(Microsoft Kinect for Windows v2 )配置移动电源解决方案
Kinect v2配置移动电源解决方案 Kinect v2如果用于移动机器人上(也可以是其他应用场景),为方便有效地展开后续工作,为其配置移动电源是十分必要的. 一.选择移动电源 Kinect v2原 ...
- 【深度学习】keras + tensorflow 实现猫和狗图像分类
本文主要是使用[监督学习]实现一个图像分类器,目的是识别图片是猫还是狗. 从[数据预处理]到 [图片预测]实现一个完整的流程, 当然这个分类在 Kaggle 上已经有人用[迁移学习](VGG,Resn ...
- (原创)(三)机器学习笔记之Scikit Learn的线性回归模型初探
一.Scikit Learn中使用estimator三部曲 1. 构造estimator 2. 训练模型:fit 3. 利用模型进行预测:predict 二.模型评价 模型训练好后,度量模型拟合效果的 ...
- nvm进行node多版本管理
写在前面 nvm(nodejs version manager)是nodejs的管理工具,如果你需要快速更新node版本,并且不覆盖之前的版本:或者想要在不同的node版本之间进行切换: 使用nvm来 ...
- 在EF中正确的使用事务
1.EF中使用事务: using (TransactionScope tran = new TransactionScope()) { try { using(var _context = new D ...
- 使用localstorage来存储页面信息
今天小颖在跟着慕课网学习vue,不学不知道,一学吓一跳,学了才发现,我之前知道的只是vue的冰山一角,嘻嘻,今天把小颖跟着慕课网学习的demo,给大家分享下,希望对大家有所帮助嘻嘻. 环境搭建: 参考 ...
- java语言编写杨辉三角
package com.llh.demo; /** * 杨辉三角 * * @author llh * */ public class Test { /* * 杨辉三角 */ public static ...
- Windows环境下多线程编程原理与应用读书笔记(6)————临界段及其应用
<一>临界段 临界段对象通过提供所有线程必须共享的对象来控制线程.只有拥有临界段对象的线程才能够访问保护的资源.在另一个线程可以访问该资源之前,前一线程必须释放临界段对象,一遍新的线程可以 ...