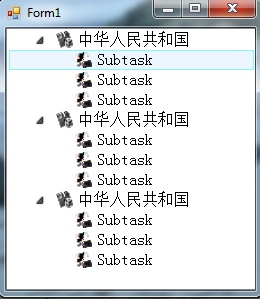
【WinForm-TreeView】实现Win7 Areo效果
效果图:

新建一个继承自TreeView的控件类,代码如下:
using System;

using System.Windows.Forms;

using System.Drawing;

using System.Runtime.InteropServices;

namespace SenseTreeView

{

    public class SenseTreeView : TreeView

    {

        #region 控件属性

        //显示字体

        private Font _NodeFont;

        public Font NodeFont

        {

            get

            {

                return _NodeFont;

            }

            set

            {

                _NodeFont = value;

            }

        }

        //选择TreeView TreeNode时的背景色

        private Brush _BackgrountBrush;

        public Brush BackgroundBrush

        {

            get

            {

                return _BackgrountBrush;

            }

            set

            {

                _BackgrountBrush = value;

            }

        }

        //选择TreeView TreeNode时背景色的边框画笔

        private Pen _BackgroundPen;

        public Pen BackgroundPen

        {

            get

            {

                return _BackgroundPen;

            }

            set

            {

                _BackgroundPen = value;

            }

        }

        //TreeView中TreeNode展开时的节点显示图标,

        private Image _NodeExpandedImage;

        public Image NodeExpandedImage

        {

            get

            {

                return _NodeExpandedImage;

            }

            set

            {

                _NodeExpandedImage = value;

            }

        }

        //TreeView中TreeNode合拢时的节点显示图标

        private Image _NodeCollapseImage;

        public Image NodeCollapseImage

        {

            get

            {

                return _NodeCollapseImage;

            }

            set

            {

                _NodeCollapseImage = value;

            }

        }

        //TreeView中TreeNode的节点显示图标的大小

        private Size _NodeImageSize;

        public Size NodeImageSize

        {

            get

            {

                return _NodeImageSize;

            }

            set

            {

                _NodeImageSize = value;

            }

        }

        //节点显示图标离左边界的位置

        private int _NodeOffset;

        public int NodeOffset

        {

            get

            {

                return _NodeOffset;

            }

            set

            {

                _NodeOffset = value;

            }

        }

        #endregion

        #region 构造函数

        public SenseTreeView()

        {

            //设置窗体Style

            //this.SetStyle(ControlStyles.UserPaint, true);               //支持用户重绘窗体

            //this.SetStyle(ControlStyles.AllPaintingInWmPaint, true);    //在内存中先绘制界面

            //this.SetStyle(ControlStyles.OptimizedDoubleBuffer, true);   //双缓冲,防止绘制时抖动

            //this.SetStyle(ControlStyles.DoubleBuffer, true);            //双缓冲,防止绘制时抖动

            //this.UpdateStyles();

            //不显示树形节点显示连接线

            this.ShowLines = false;

            //设置绘制TreeNode的模式

            this.DrawMode = TreeViewDrawMode.OwnerDrawAll;

            //不显示TreeNode前的“+”和“-”按钮

            this.ShowPlusMinus = false;

            //不支持CheckedBox

            this.CheckBoxes = false;

            //设置TreeNode的行高

            SendMessage(this.Handle, TVM_SETITEMHEIGHT, , );

            //设置默认BackgroundBrush

            BackgroundBrush = new SolidBrush(Color.FromArgb(, Color.FromArgb(, , )));

            //设置默认BackgroundPen

            BackgroundPen = new Pen(Color.FromArgb(, , ), );

            //设置默认NodeFont

            NodeFont = new Font("宋体", , FontStyle.Regular);

            //设置默认节点显示图标及Size

            NodeExpandedImage = null;

            NodeCollapseImage = null;

            NodeImageSize = new Size(, );

            //设置默认节点显示图标便宜位置

            NodeOffset = ;

        }

        #endregion

        #region 节点绘制函数

        //绘制TreeView树中TreeNode

        protected override void OnDrawNode(DrawTreeNodeEventArgs e)

        {

            TreeNode tn = e.Node as TreeNode;

            if (tn == null)

            {

                return;

            }

            //设置Image绘制Rectangle

            Point pt = new Point(tn.Bounds.X + NodeOffset, tn.Bounds.Y);

            Rectangle rt = new Rectangle(pt, NodeImageSize);

            if ((e.State & TreeNodeStates.Selected) != )

            {

                //绘制TreeNode选择后的背景框

                e.Graphics.FillRectangle(BackgroundBrush, , tn.Bounds.Y, this.Width - , tn.Bounds.Height - );

                //绘制TreeNode选择后的边框线条

                e.Graphics.DrawRectangle(BackgroundPen, , tn.Bounds.Y, this.Width - , tn.Bounds.Height - );

            }

            //绘制节点图片

            if (NodeExpandedImage != null && NodeCollapseImage != null)

            {

                if (tn.Nodes.Count != )

                {

                    if (tn.IsExpanded == true)

                    {

                        e.Graphics.DrawImage(NodeExpandedImage, rt);

                    }

                    else

                    {

                        e.Graphics.DrawImage(NodeCollapseImage, rt);

                    }

                }

                rt.X += ;

            }

            //绘制节点自身图片

            if (e.Node.SelectedImageIndex != - && this.ImageList != null)

            {

                rt.X += ;

                e.Graphics.DrawImage(this.ImageList.Images[e.Node.SelectedImageIndex], rt);

            }

            //绘制节点的文本

            rt.X += ;

            rt.Y += ;

            rt.Width = this.Width - rt.X;

            e.Graphics.DrawString(e.Node.Text, NodeFont, Brushes.Black, rt);

        }

        #endregion

        #region 鼠标消息响应函数

        //响应鼠标按下消息

        protected override void OnMouseDown(MouseEventArgs e)

        {

            TreeNode clickedNode = this.GetNodeAt(e.X, e.Y);

            if (clickedNode != null && NodeBounds(clickedNode).Contains(e.X, e.Y))

            {

                this.SelectedNode = clickedNode;

            }

        }

        //响应鼠标双击消息

        protected override void OnMouseDoubleClick(MouseEventArgs e)

        {

            TreeNode clickedNode = this.GetNodeAt(e.X, e.Y);

            if (clickedNode != null && NodeBounds(clickedNode).Contains(e.X, e.Y))

            {

                this.SelectedNode = clickedNode;

                //判断节点的状态

                if (clickedNode.Nodes.Count != )

                {

                    if (clickedNode.IsExpanded)

                    {

                        clickedNode.Collapse();

                    }

                    else

                    {

                        clickedNode.Expand();

                    }

                }

            }

        }

        #endregion

        #region 私有函数

        //返回TreeView中TreeNode的整行区域

        private Rectangle NodeBounds(TreeNode node)

        {

            // Set the return value to the normal node bounds.

            Rectangle bounds = node.Bounds;

            //if (node.Tag != null)

            //{

            //    // Retrieve a Graphics object from the TreeView handle

            //    // and use it to calculate the display width of the tag.

            //    Graphics g = this.CreateGraphics();

            //    int tagWidth = (int)g.MeasureString(node.Tag.ToString(), NodeFont).Width + 6;

            //    // Adjust the node bounds using the calculated value.

            //    bounds.Offset(tagWidth / 2, 0);

            //    bounds = Rectangle.Inflate(bounds, tagWidth / 2, 0);

            //    g.Dispose();

            //}

            bounds.Width = this.Width;

            return bounds;

        }

        #endregion

        #region 引用函数

        const int TV_FRIST = 0x1100;

        const int TVM_SETITEMHEIGHT = TV_FRIST + ;

        [DllImport("user32.dll", CharSet = CharSet.Auto)]

        private static extern IntPtr SendMessage(IntPtr hWnd, int nMsg, int wParam, int Param);

        #endregion

    }

}
在窗体里应用:
using System;

using System.Collections.Generic;

using System.ComponentModel;

using System.Data;

using System.Drawing;

using System.Text;

using System.Windows.Forms;

using SenseTreeView.Properties;

namespace SenseTreeView

{

    public partial class Form1 : Form

    {

        private SenseTreeView stv;

        public Form1()

        {

            InitializeComponent();

            // Create and initialize the TreeView control.

            stv = new SenseTreeView();

            stv.Dock = DockStyle.Left;

            stv.BackColor = Color.White;

            //stv.CheckBoxes = true;

            stv.Width = ;

            ImageList imagelist = new ImageList();

            imagelist.Images.Add(Resources._1264);

            imagelist.Images.Add(Resources._1265);

            imagelist.Images.Add(Resources._1268);

            stv.ImageList = imagelist;

            stv.NodeExpandedImage = Resources.UnSelect;

            stv.NodeCollapseImage = Resources.IsSelect;

            // Add nodes to the TreeView control.

            for (int x = ; x < ; ++x)

            {

                // Add a root node to the TreeView control.

                TreeNode node = new TreeNode("中华人民共和国");

                node.SelectedImageIndex = ;

                for (int y = ; y < ; ++y)

                {

                    // Add a child node to the root node.

                    TreeNode tn = new TreeNode("Subtask");

                    tn.SelectedImageIndex = ;

                    node.Nodes.Add(tn);

                }

                stv.Nodes.Add(node);

            }

            stv.ExpandAll();

            // Initialize the form and add the TreeView control to it.

            this.Controls.Add(stv);

        }

    }

}
【WinForm-TreeView】实现Win7 Areo效果的更多相关文章
- WinForm的TreeView实现Win7 Areo效果
新建一个继承自TreeView的控件类,代码如下: using System; using System.Windows.Forms; using System.Drawing; using Syst ...
- 关于WinForm TreeView的分享~
最近在写个测试demo的时候使用到WinForm TreeView,已经好久没接触了,有些生疏,所以还是记录一下遇到的一些问题. 1.如果动态绑定TreeView,这个功能一般会在数据量不确定,需要去 ...
- Windows 7个性化配置,关闭Win7动画效果,设置窗口背景为“ 豆绿色”
减少眼睛疲劳配色(豆绿色): RGB:, , ,颜色名称:#C7EDCC 1.任务栏设置 2.关闭Win7动画效果 控制面板 -> 轻松访问 -> 优化视频显示 3.去掉窗口阴影 右键单击 ...
- winform treeView 数据绑定
转载:http://www.jetwu.cn/archives/737 winform treeView 数据绑定 private void Form1_Load(object sender, Eve ...
- winform实现图片的滑动效果
使用winform实现图片的滑动效果(类似网站首页图片滑动切换效果),结果实现了,但是效果其实不是很理想.也许有更好的方法. Timer timerSlide = null; //当前 ...
- Winform TreeView 查找下一个节点
转载:http://www.cnblogs.com/Ruiky/archive/2013/02/01/2888674.html public static class TreeViewHelper { ...
- Windows Server 2008 R2 开启Win7主题效果Aero
1.打开 开始---管理工具----服务器管理器--功能 2.点击 “添加功能”,选择“桌面体验”,这样就会安装上win7 主题和Windows media player 3.重启电脑后,在“服务”里 ...
- winform Treeview控件使用
做角色菜单权限时用到treeview控件做树状显示菜单,简单总结了一下用法: 1.在winform窗体中拖入treeview控件,注意修改属性CheckBoxes属性为true,即在节点旁显示复选框 ...
- winform TreeView的一些用法以及异步加载
今天,主要弄了一下对于树型控件的一些方法,以及异步加载.参考: http://www.cnblogs.com/greatverve/archive/2012/03/23/winform-treevie ...
随机推荐
- 使用批处理执行 sql cmd
当 sql脚本文件太大了, 就可以考虑用这个方式来执行 1.准备好要执行的 sql脚本文件并保存为*.sql格式 2.找到 SQLCMD.EXE 文件所在的路径(每个版本sql路径不一样) C:\Pr ...
- Springboot问题解决记录
本随笔只为了方便查阅 如何将SpringBoot项目地打成一个war包: 传送门:https://blog.csdn.net/zhoucheng05_13/article/details/779152 ...
- 初学SpringBoot遇到的坑和笔记
目录 1.日期返回给前端显示不理想问题 1.1重现 1.2原因 1.3解决 1.4结果 2.MyBatis-Plus数据库字段未找到问题 2.1重现 2.2原因 2.3解决 3.Long型雪花主键返回 ...
- CString VariantToString(VARIANT var);转换
Variant类型转换成CString代码 对数据库的操作常常会用Variant和_bstr_t类型,在进行MFC等程序中,通常会用到CString类.从variant转换成CString代码如下:v ...
- Feign的雪崩处理
在声明式远程服务调用Feign中,实现服务灾难性雪崩效应处理也是通过Hystrix实现的.而feign启动器spring-cloud-starter-feign中是包含Hystrix相关依赖的.如果只 ...
- Spring 基于 AspectJ 的 AOP 开发
Spring 基于 AspectJ 的 AOP 开发 在 Spring 的 aop 代理方式中, AspectJ 才是主流. 1. AspectJ 简介 AspectJ 是一个基于 java 语言的 ...
- Maven 之 profile 与Spring boot 的 profile
一.概述 不同的环境(测试环境.开发环境)有不同的配置,目前希望在打包的时候,就直接打出针对不同环境的包(内含有某个环境的配置).Maven本身在 pom.xml 中就提供了 profile 标签进行 ...
- pat L2--005 简单复习一下并差集
布置宴席最微妙的事情,就是给前来参宴的各位宾客安排座位.无论如何,总不能把两个死对头排到同一张宴会桌旁!这个艰巨任务现在就交给你,对任何一对客人,请编写程序告诉主人他们是否能被安排同席. 输入格式: ...
- Specialization For SCCM
JUST A LINK FOR ALL SCCM QUESTION http://eskonr.com/
- JavaScript例子3-对多选框进行操作,输出选中的多选框的个数
<!DOCTYPE html> <html> <head> <meta charset="UTF-8"> <title> ...
