
Photon Server LoadBalancing搭建
准备:申请3台Windows虚拟机。
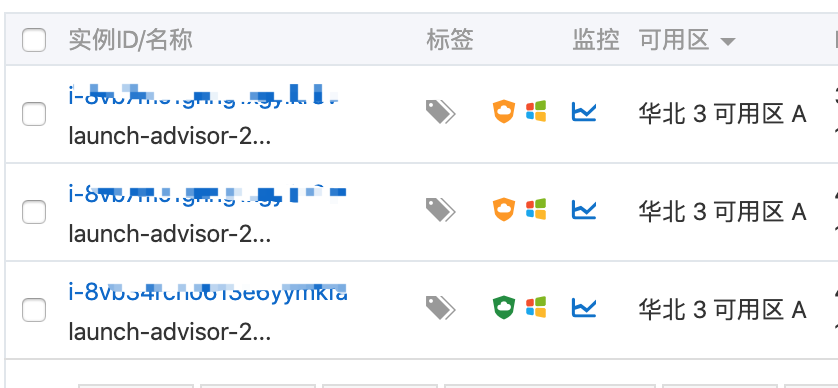
3台虚拟机上都部署上Photon Server.
一、主虚拟机上部署MasterServer。
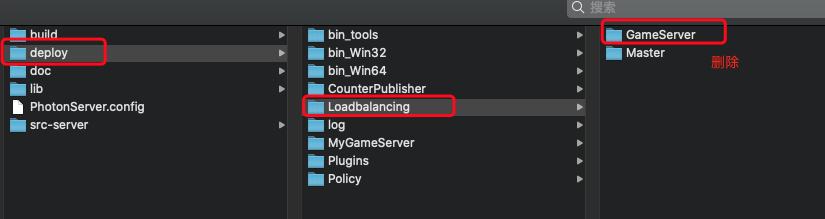
(1)在第一台虚拟机中,部署的Photon Server目目录下找到Loadbalancing目录,删除GameServer文件夹
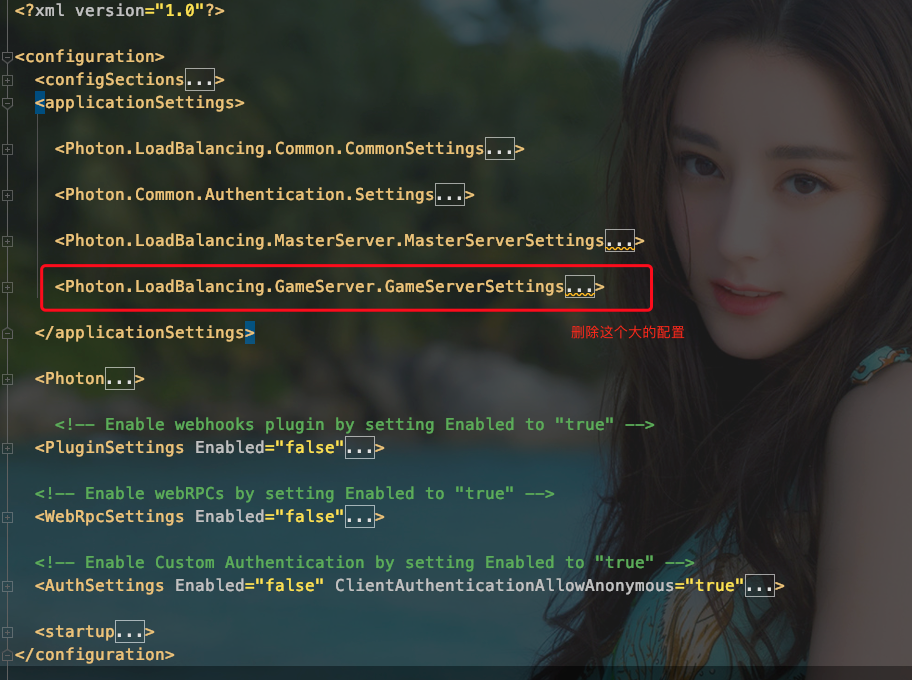
(2)修改Master的配置文件。Photon.LoadBalancing.dll.config (在目录Master/bin/中)
(3)修改PhotonServer.config 配置文件。(在目录 bin_Win64/ 中) 删除跟Game相关的配置
<?xml version="1.0" encoding="Windows-1252"?>

<!--

    (c) 2015 by Exit Games GmbH, http://www.exitgames.com

    Photon server configuration file.

    For details see the photon-config.pdf.

    This file contains two configurations:

        "LoadBalancing"

                Loadbalanced setup for local development: A Master-server and a game-server.

                Starts the apps: Game, Master, CounterPublisher

                Listens: udp-port 5055, tcp-port: 4530, 843 and 943

-->

<Configuration>

    <!-- Multiple instances are supported. Each instance has its own node in the config file. -->

    <LoadBalancing

        MaxMessageSize="512000"

        MaxQueuedDataPerPeer="512000"

        PerPeerMaxReliableDataInTransit="51200"

        PerPeerTransmitRateLimitKBSec="256"

        PerPeerTransmitRatePeriodMilliseconds="200"

        MinimumTimeout="5000"

        MaximumTimeout="30000"

        DisplayName="LoadBalancing (MyCloud)">

        <!-- 0.0.0.0 opens listeners on all available IPs. Machines with multiple IPs should define the correct one here. -->

        <!-- Port 5055 is Photon's default for UDP connections. -->

        <UDPListeners>

            <UDPListener

                IPAddress="0.0.0.0"

                Port="5055"

                OverrideApplication="Master">

            </UDPListener>

        </UDPListeners>

        <!-- 0.0.0.0 opens listeners on all available IPs. Machines with multiple IPs should define the correct one here. -->

        <TCPListeners>

            <!-- TCP listener for Game clients on Master application -->

            <TCPListener

                IPAddress="0.0.0.0"

                Port="4530"

                OverrideApplication="Master"

                PolicyFile="Policy\assets\socket-policy.xml"

                InactivityTimeout="10000"

                >

            </TCPListener>

            <!-- DON'T EDIT THIS. TCP listener for GameServers on Master application -->

            <TCPListener

                IPAddress="0.0.0.0"

                Port="4520">

            </TCPListener>

        </TCPListeners>

        <!-- Policy request listener for Unity and Flash (port 843) and Silverlight (port 943)  -->

        <PolicyFileListeners>

          <!-- multiple Listeners allowed for different ports -->

          <PolicyFileListener

            IPAddress="0.0.0.0"

            Port="843"

            PolicyFile="Policy\assets\socket-policy.xml">

          </PolicyFileListener>

          <PolicyFileListener

            IPAddress="0.0.0.0"

            Port="943"

            PolicyFile="Policy\assets\socket-policy-silverlight.xml">

          </PolicyFileListener>

        </PolicyFileListeners>

        <!-- WebSocket (and Flash-Fallback) compatible listener -->

        <WebSocketListeners>

            <WebSocketListener

                IPAddress="0.0.0.0"

                Port="9090"

                DisableNagle="true"

                InactivityTimeout="10000"

                OverrideApplication="Master">

            </WebSocketListener>

        </WebSocketListeners>

        <!-- Defines the Photon Runtime Assembly to use. -->

        <Runtime

            Assembly="PhotonHostRuntime, Culture=neutral"

            Type="PhotonHostRuntime.PhotonDomainManager"

            UnhandledExceptionPolicy="Ignore">

        </Runtime>

        <!-- Defines which applications are loaded on start and which of them is used by default. Make sure the default application is defined. -->

        <!-- Application-folders must be located in the same folder as the bin_win32 folders. The BaseDirectory must include a "bin" folder. -->

        <Applications Default="Master">

            <Application

                Name="Master"

                BaseDirectory="LoadBalancing\Master"

                Assembly="Photon.LoadBalancing"

                Type="Photon.LoadBalancing.MasterServer.MasterApplication"

                ForceAutoRestart="true"

                WatchFiles="dll;config"

                ExcludeFiles="log4net.config"

                >

            </Application>

            <!-- CounterPublisher Application -->

            <Application

                Name="CounterPublisher"

                BaseDirectory="CounterPublisher"

                Assembly="CounterPublisher"

                Type="Photon.CounterPublisher.Application"

                ForceAutoRestart="true"

                WatchFiles="dll;config"

                ExcludeFiles="log4net.config">

            </Application>

        </Applications>

    </LoadBalancing>

</Configuration>
(4)启动服务。
二、在另外两台虚拟机上部署GameServer服务
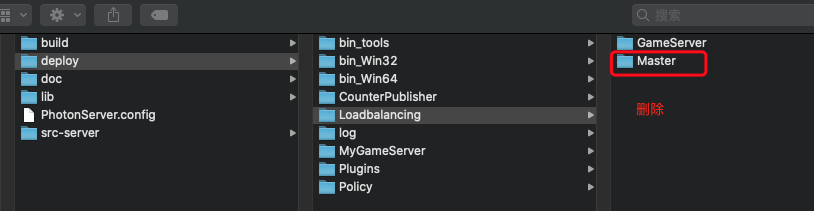
(1)在目前中删除Master
(2)修改GameServer/bin/Photon.LoadBalancing.dll.config 配置文件。
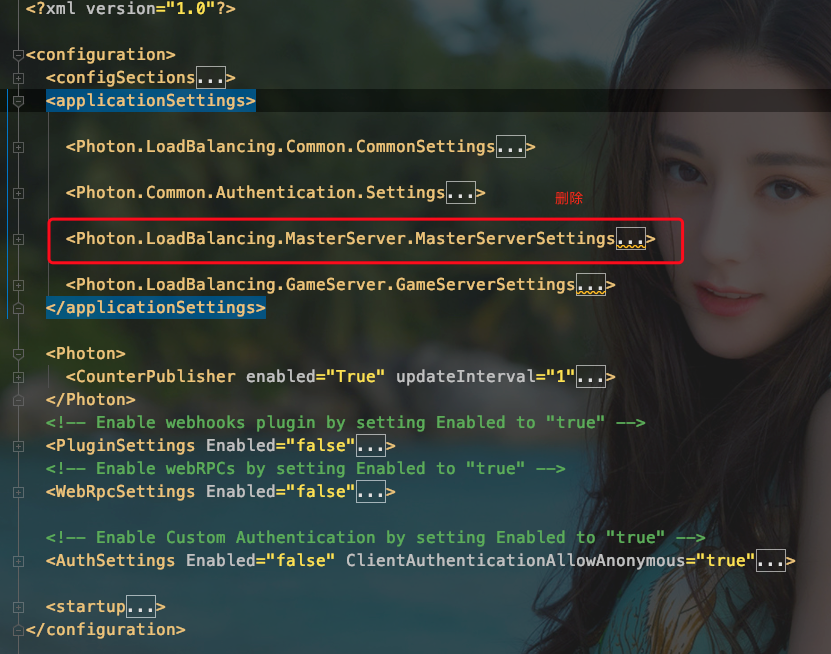
先删除MasterServer配置项
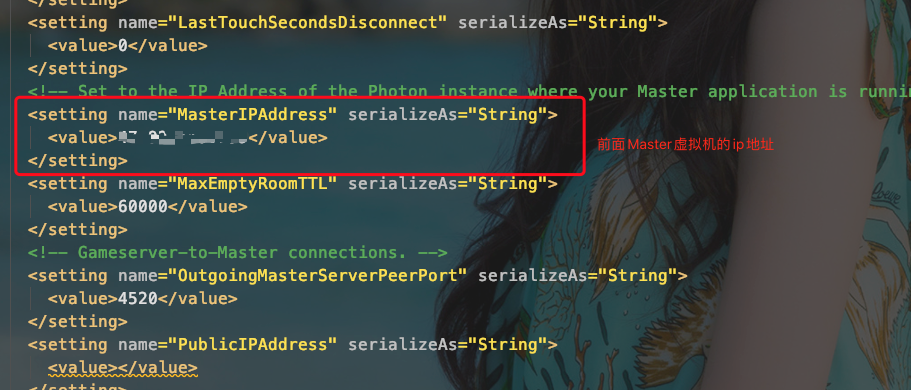
修改GameServerSetting项中的 MasterIPAddress 一项。
总体配置
<?xml version="1.0"?>

<configuration>

  <configSections>

    <sectionGroup name="applicationSettings" type="System.Configuration.ApplicationSettingsGroup, System, Version=2.0.0.0, Culture=neutral, PublicKeyToken=b77a5c561934e089">

      <section name="Photon.LoadBalancing.Common.CommonSettings" type="System.Configuration.ClientSettingsSection, System, Version=2.0.0.0, Culture=neutral, PublicKeyToken=b77a5c561934e089"

              requirePermission="false" />

      <section name="Photon.LoadBalancing.GameServer.GameServerSettings" type="System.Configuration.ClientSettingsSection, System, Version=2.0.0.0, Culture=neutral, PublicKeyToken=b77a5c561934e089"

               requirePermission="false" />

      <section name="Photon.LoadBalancing.MasterServer.MasterServerSettings"

               type="System.Configuration.ClientSettingsSection, System, Version=2.0.0.0, Culture=neutral, PublicKeyToken=b77a5c561934e089"

               requirePermission="false" />

      <section name="Photon.Common.Authentication.Settings"

           type="System.Configuration.ClientSettingsSection, System, Version=2.0.0.0, Culture=neutral, PublicKeyToken=b77a5c561934e089"

           requirePermission="false" />

    </sectionGroup>

    <section name="Photon" type="Photon.SocketServer.Diagnostics.Configuration.PhotonSettings, Photon.SocketServer" />

    <section name="PluginSettings" type="Photon.Hive.Configuration.PluginSettings, PhotonHive" />

    <section name="WebRpcSettings" type="Photon.Hive.WebRpc.Configuration.WebRpcSettings, PhotonHive" />

    <section name="AuthSettings" type="Photon.Common.Authentication.Configuration.Auth.AuthSettings, Photon.Common" />

  </configSections>

  <applicationSettings>

    <Photon.LoadBalancing.Common.CommonSettings>

      <setting name="NodesFileName" serializeAs="String">

        <value>Nodes.txt</value>

      </setting>

      <setting name="NodesFilePath" serializeAs="String">

        <value>..\..\</value>

      </setting>

      <setting name="EnablePerformanceCounters" serializeAs="String">

        <value>True</value>

      </setting>

    </Photon.LoadBalancing.Common.CommonSettings>

    <Photon.Common.Authentication.Settings>

      <setting name="AuthCacheUpdateInterval" serializeAs="String">

        <value>300</value>

      </setting>

      <setting name="AuthTokenKey" serializeAs="String">

        <value>76B2814E-2A50-4E29-838A-20411D335FC9</value>

      </setting>

      <setting name="AuthTokenExpiration" serializeAs="String">

        <value>10000</value>

      </setting>

      <!-- Custom Authentication Queue Settings -->

      <setting name="MaxConcurrentRequests" serializeAs="String">

        <value>50</value>

      </setting>

      <setting name="MaxQueuedRequests" serializeAs="String">

        <value>5000</value>

      </setting>

      <setting name="MaxErrorRequests" serializeAs="String">

        <value>10</value>

      </setting>

      <setting name="MaxTimedOutRequests" serializeAs="String">

        <value>10</value>

      </setting>

      <setting name="HttpRequestTimeoutMS" serializeAs="String">

        <value>30000</value>

      </setting>

      <setting name="ReconnectIntervalS" serializeAs="String">

        <value>60</value>

      </setting>

      <setting name="QueueTimeoutS" serializeAs="String">

        <value>20</value>

      </setting>

      <setting name="MaxBackoffTimeInMiliseconds" serializeAs="String">

        <value>10000</value>

      </setting>

    </Photon.Common.Authentication.Settings>

    <Photon.LoadBalancing.GameServer.GameServerSettings>

      <setting name="AppStatsPublishInterval" serializeAs="String">

        <value>1000</value>

      </setting>

      <!-- GameServer-to-Master connections. -->

      <setting name="ConnectReytryInterval" serializeAs="String">

        <value>15</value>

      </setting>

      <setting name="EnableNamedPipe" serializeAs="String">

        <value>False</value>

      </setting>

      <!-- Path for Client-to-Gameserver HTTP connections -->

      <setting name="GamingHttpPath" serializeAs="String">

        <value>photon/g</value>

      </setting>

      <!-- Client-to-Gameserver HTTP connections. Needs to match the RHTTPListener in PhotonServer.config -->

      <setting name="GamingHttpPort" serializeAs="String">

        <value>80</value>

      </setting>

      <!-- Client-to-Gameserver HTTPS connections. Needs to match the RHTTPListener in PhotonServer.config -->

      <setting name="GamingHttpsPort" serializeAs="String">

        <value>443</value>

      </setting>

      <!-- Client-to-Gameserver Secure WebSocket connections. Needs to match the secure WebSocketListener in PhotonServer.config -->

      <setting name="GamingSecureWebSocketPort" serializeAs="String">

        <value>19091</value>

      </setting>

      <!-- Client-to-Gameserver TCP connections. Needs to match the TCPListener in PhotonServer.config -->

      <setting name="GamingTcpPort" serializeAs="String">

        <value>4531</value>

      </setting>

      <!-- Client-to-Gameserver UDP connections. Needs to match the UDPListener in PhotonServer.config -->

      <setting name="GamingUdpPort" serializeAs="String">

        <value>5056</value>

      </setting>

      <!-- Client-to-Gameserver WebSocket connections. Needs to match the WebSocketListener in PhotonServer.config -->

      <setting name="GamingWebSocketPort" serializeAs="String">

        <value>9091</value>

      </setting>

      <setting name="HttpQueueMaxErrors" serializeAs="String">

        <value>30</value>

      </setting>

      <setting name="HttpQueueMaxTimeouts" serializeAs="String">

        <value>30</value>

      </setting>

        <setting name="HttpQueueRequestTimeout" serializeAs="String">

            <value>30000</value>

        </setting>

        <setting name="HttpQueueMaxBackoffTime" serializeAs="String">

            <value>10000</value>

        </setting>

        <setting name="HttpQueueMaxQueuedRequests" serializeAs="String">

            <value>5000</value>

        </setting>

        <setting name="HttpQueueQueueTimeout" serializeAs="String">

            <value>90000</value>

        </setting>

        <setting name="HttpQueueReconnectInterval" serializeAs="String">

            <value>60000</value>

        </setting>

        <setting name="HttpQueueMaxConcurrentRequests" serializeAs="String">

            <value>1</value>

        </setting>

        <setting name="LastTouchCheckIntervalSeconds" serializeAs="String">

        <value>60</value>

      </setting>

      <setting name="LastTouchSecondsDisconnect" serializeAs="String">

        <value>0</value>

      </setting>

      <!-- Set to the IP Address of the Photon instance where your Master application is running. -->

      <setting name="MasterIPAddress" serializeAs="String">

        <value>15.24.15.114</value>

      </setting>

      <setting name="MaxEmptyRoomTTL" serializeAs="String">

        <value>60000</value>

      </setting>

      <!-- Gameserver-to-Master connections. -->

      <setting name="OutgoingMasterServerPeerPort" serializeAs="String">

        <value>4520</value>

      </setting>

      <setting name="PublicIPAddress" serializeAs="String">

        <value></value>

      </setting>

      <setting name="PublicIPAddressIPv6" serializeAs="String">

        <value></value>

      </setting>

      <!-- the hostname for this gameserver. Required for HTTP & websocket connections. Change it to a useful entry, like hostname.mydomain.com, for a production scenario. -->

      <setting name="PublicHostName" serializeAs="String">

        <!--<value>%COMPUTERNAME%.mydomain.com</value>-->

        <value>localhost</value>

      </setting>

      <!-- The domain name for this gameserver. Required for websocket connections and needs to match the certificate for secure websocket / https connections.

           For example:  mydomain.com -->

      <setting name="PublicDomainName" serializeAs="String">

        <value />

      </setting>

      <setting name="RelayPortHttp" serializeAs="String">

        <value>0</value>

      </setting>

      <setting name="RelayPortSecureWebSocket" serializeAs="String">

        <value>0</value>

      </setting>

      <setting name="RelayPortTcp" serializeAs="String">

        <value>0</value>

      </setting>

      <setting name="RelayPortUdp" serializeAs="String">

        <value>0</value>

      </setting>

      <setting name="RelayPortWebSocket" serializeAs="String">

        <value>0</value>

      </setting>

      <setting name="ServerStateFile" serializeAs="String">

        <value>ServerState.txt</value>

      </setting>

      <setting name="WorkloadConfigFile" serializeAs="String">

        <value>Workload.config</value>

      </setting>

    </Photon.LoadBalancing.GameServer.GameServerSettings>

  </applicationSettings>

  <Photon>

    <CounterPublisher enabled="True" updateInterval="1">

      <Sender

        endpoint="udp://255.255.255.255:40001"

        protocol="PhotonBinary"

        initialDelay="10"

        sendInterval="10" />

    </CounterPublisher>

  </Photon>

  <!-- Enable webhooks plugin by setting Enabled to "true" -->

  <PluginSettings Enabled="false">

    <Plugins>

      <Plugin

              Name="WebHooksPlugin1.2"

              Version=""

              AssemblyName="PhotonHive.WebhooksPlugin1.2.dll"

              Type="Photon.Hive.Plugin.WebHooks.PluginFactory"

              BaseUrl="http://photon-photon-pluginsdk-v1.webscript.io"

              IsPersistent="true"

              HasErrorInfo="true"

              PathClose="GameClose"

              PathCreate="GameCreate"

              PathEvent="GameEvent"

              PathGameProperties="GameProperties"

              PathJoin="GameJoin"

              PathLeave="GameLeave"

              PathLoad="GameCreate" />

    </Plugins>

  </PluginSettings>

  <!-- Enable webRPCs by setting Enabled to "true" -->

  <WebRpcSettings Enabled="false">

    <BaseUrl Value="http://photon-photon-pluginsdk-v1.webscript.io" />

  </WebRpcSettings>

  <!-- Enable Custom Authentication by setting Enabled to "true" -->

  <AuthSettings Enabled="false" ClientAuthenticationAllowAnonymous="true">

    <AuthProviders>

      <AuthProvider Name="Custom"

                    AuthenticationType="0"

                    AuthUrl="http://photon.webscript.io/auth-demo"

                    secret="customauthsecret" />

      <AuthProvider Name="Facebook"

                    AuthenticationType="2"

                    AuthUrl=""

                    secret="Val1"

                    appid="Val2" />

    </AuthProviders>

  </AuthSettings>

  <startup>

    <supportedRuntime version="v4.0" sku=".NETFramework,Version=v4.0" />

  </startup>

</configuration>
(3)修改服务器启动配置 /deploy/bin_Win64/PhotonServer.config 。删除跟Master修改配置
<?xml version="1.0" encoding="Windows-1252"?>

<!--

    (c) 2015 by Exit Games GmbH, http://www.exitgames.com

    Photon server configuration file.

    For details see the photon-config.pdf.

    This file contains two configurations:

        "LoadBalancing"

                Loadbalanced setup for local development: A Master-server and a game-server.

                Starts the apps: Game, Master, CounterPublisher

                Listens: udp-port 5055, tcp-port: 4530, 843 and 943

-->

<Configuration>

    <!-- Multiple instances are supported. Each instance has its own node in the config file. -->

    <LoadBalancing

        MaxMessageSize="512000"

        MaxQueuedDataPerPeer="512000"

        PerPeerMaxReliableDataInTransit="51200"

        PerPeerTransmitRateLimitKBSec="256"

        PerPeerTransmitRatePeriodMilliseconds="200"

        MinimumTimeout="5000"

        MaximumTimeout="30000"

        DisplayName="GameLoab (MyCloud)">

        <!-- 0.0.0.0 opens listeners on all available IPs. Machines with multiple IPs should define the correct one here. -->

        <!-- Port 5055 is Photon's default for UDP connections. -->

        <UDPListeners>

            <UDPListener

                IPAddress="0.0.0.0"

                Port="5056"

                OverrideApplication="Game">

            </UDPListener>

        </UDPListeners>

        <!-- 0.0.0.0 opens listeners on all available IPs. Machines with multiple IPs should define the correct one here. -->

        <TCPListeners>

            <!-- TCP listener for Game clients on Master application -->

            <TCPListener

                IPAddress="0.0.0.0"

                Port="4531"

                OverrideApplication="Game"

                PolicyFile="Policy\assets\socket-policy.xml"

                InactivityTimeout="10000">

            </TCPListener>

            <!-- DON'T EDIT THIS. TCP listener for GameServers on Master application -->

            <TCPListener

                IPAddress="0.0.0.0"

                Port="4520">

            </TCPListener>

        </TCPListeners>

        <!-- Policy request listener for Unity and Flash (port 843) and Silverlight (port 943)  -->

        <PolicyFileListeners>

          <!-- multiple Listeners allowed for different ports -->

          <PolicyFileListener

            IPAddress="0.0.0.0"

            Port="843"

            PolicyFile="Policy\assets\socket-policy.xml">

          </PolicyFileListener>

          <PolicyFileListener

            IPAddress="0.0.0.0"

            Port="943"

            PolicyFile="Policy\assets\socket-policy-silverlight.xml">

          </PolicyFileListener>

        </PolicyFileListeners>

        <!-- WebSocket (and Flash-Fallback) compatible listener -->

        <WebSocketListeners>

            <WebSocketListener

                IPAddress="0.0.0.0"

                Port="9091"

                DisableNagle="true"

                InactivityTimeout="10000"

                OverrideApplication="Game">

            </WebSocketListener>

        </WebSocketListeners>

        <!-- Defines the Photon Runtime Assembly to use. -->

        <Runtime

            Assembly="PhotonHostRuntime, Culture=neutral"

            Type="PhotonHostRuntime.PhotonDomainManager"

            UnhandledExceptionPolicy="Ignore">

        </Runtime>

        <!-- Defines which applications are loaded on start and which of them is used by default. Make sure the default application is defined. -->

        <!-- Application-folders must be located in the same folder as the bin_win32 folders. The BaseDirectory must include a "bin" folder. -->

        <Applications Default="Game">

            <Application

                Name="Game"

                BaseDirectory="LoadBalancing\GameServer"

                Assembly="Photon.LoadBalancing"

                Type="Photon.LoadBalancing.GameServer.GameApplication"

                ForceAutoRestart="true"

                WatchFiles="dll;config"

                ExcludeFiles="log4net.config">

            </Application>

            <!-- CounterPublisher Application -->

            <Application

                Name="CounterPublisher"

                BaseDirectory="CounterPublisher"

                Assembly="CounterPublisher"

                Type="Photon.CounterPublisher.Application"

                ForceAutoRestart="true"

                WatchFiles="dll;config"

                ExcludeFiles="log4net.config">

            </Application>

        </Applications>

    </LoadBalancing>

</Configuration>
(4) 启动服务
三、第3台虚拟机跟第二台虚拟机配置一样
四、测试。在第一天MasterServer虚拟机中直接用服务器自带的测试工具。

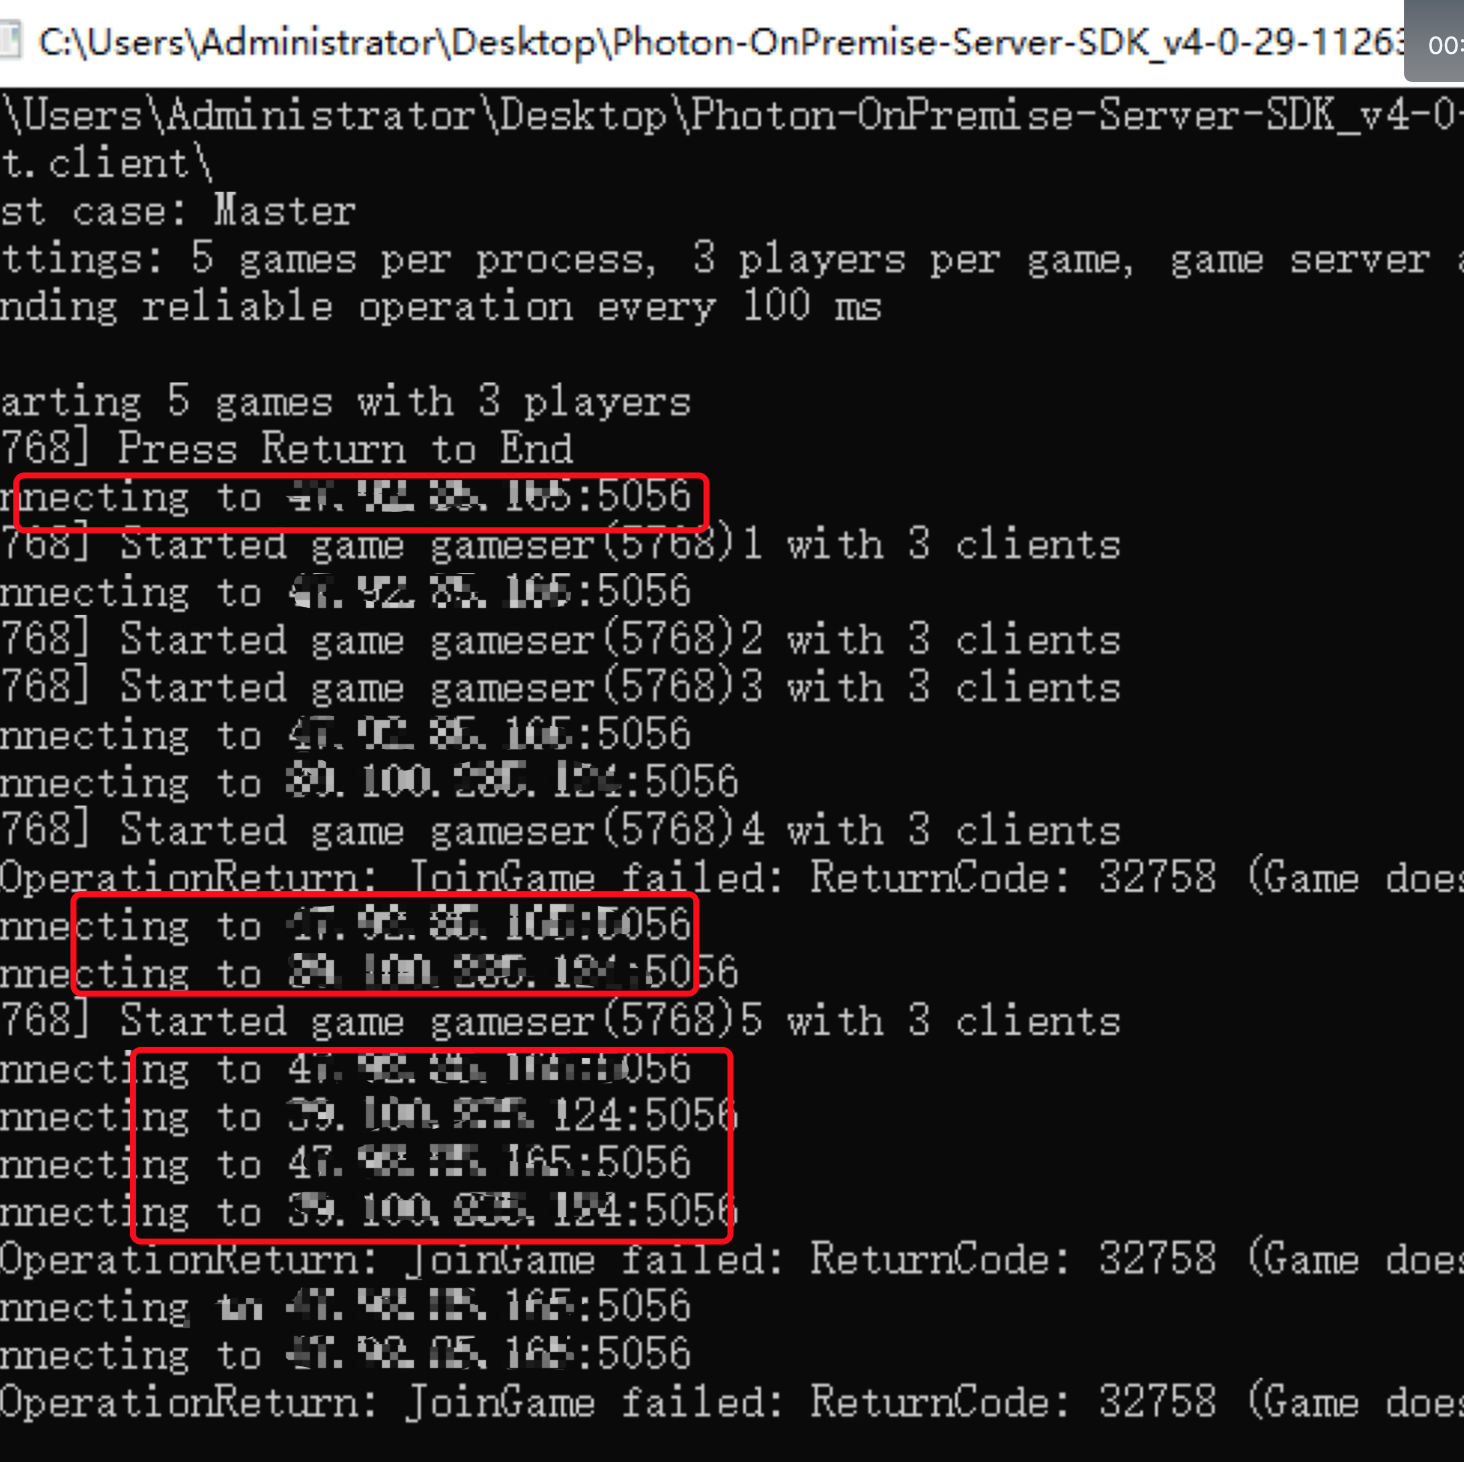
测试发现MasterServer服务器已经能够连上另外两个GameServer服务器了。(这里conneting ip 就是另外两台GameServer服务器的Ip地址).
查看文档: https://doc.photonengine.com/en-us/server/current/applications/loadbalancing/application
https://gitchat.csdn.net/columnTopic/5a39d5a575e5a577886d6c20
Photon Server LoadBalancing搭建的更多相关文章
- Photon Server伺服务器在LoadBalancing的基础上扩展登陆服务
一,如何创建一个Photon Server服务 参见此博客 快速了解和使用Photon Server 二, 让LoadBalancing与自己的服务一起启动 原Photonserver.config文 ...
- 看过自会理解, Photon Server 常见概念分析.
http://stackoverflow.com/questions/10823915/photon-server-newbie-questions/11653419#11653419 Channel ...
- Photon Server初识(四) --- 部署自己的服务Photon Server
准备工作: 1.一台 window 虚拟机(本机是window也行) 2.下载SDK : https://www.photonengine.com/zh-CN/sdks#server 一:SDK介绍 ...
- Windows Server 2003搭建邮件服务器
Windows Server 2003搭建邮件服务器 由于Windows Server 2003默认是没有安装我们搭建邮件服务器所需要的POP3和SMTP服务的,因此需要我们自己来安装.方法如下: 1 ...
- Ubuntu server下搭建Maven私服Nexus
Ubuntu server下搭建Maven私服Nexus Maven私服Nexus的作用,主要是为了节省资源,在内部作为maven开发资源共享服务器来使用. 1.下载 通过root用户进去Ubuntu ...
- 使用FileZilla Server轻松搭建个人FTP服务器
Linux平台下快速搭建FTP服务器 服务器FTP Server环境搭建 针对以上遇到的问题的解决方案如下: 1)如何上传文件到云服务器上 关于这个问题,我首先想到的是使用FileZ ...
- Windows Server 2008搭建域控制器《转载51CTO.com》
Windows Server 2008搭建域控制器 引入 在小型网络中,管理员通常独立管理每一台计算机,如最为常用的用户管理.但当网络规模扩大到一定程度后,如超过 10 台计算机,而每台计算机上有 1 ...
- 使用IIS Server Farms搭建应用服务负载均衡
当公司的业务扩大, 伴随着大量的请求,应用服务器的承受能力已经不能满足不断增长的业务需求,使用IIS Server Farms搭建应负载均衡的方式,把请求分发给不同的应用服务器进行处理,这个时候就降低 ...
- 【阿里云】在 Windows Server 2016 下使用 FileZilla Server 安装搭建 FTP 服务
Windows Server 2016 下使用 FileZilla Server 安装搭建 FTP 服务 一.安装 Filezilla Server 下载最新版本的 Filezilla Server ...
随机推荐
- Linux 修改文件夹的用户组权限
将ubsadm文件夹所属用户修改为userschown -R ubsadm:users /home/ubsadm 此命令将用户123的用户组改为rootusermod -g 123 root
- Multiline f-strings
多行字符串使用fstring需要注意每行都要加fstring >>> name = "Eric" >>> profession = " ...
- Leetcode题目300.最长上升子序列(动态规划-中等)
题目描述: 给定一个无序的整数数组,找到其中最长上升子序列的长度. 示例: 输入: [10,9,2,5,3,7,101,18] 输出: 4 解释: 最长的上升子序列是 [2,3,7,101],它的长度 ...
- 黑马vue---59-60、组件中的data和methods
黑马vue---59-60.组件中的data和methods 一.总结 一句话总结: 1. 组件可以有自己的 data 数据 2. 组件的 data 和 实例的 data 有点不一样,实例中的 dat ...
- 安装Mysql-5.7.13脚本
安装Mysql-5.7.13,此脚本最后会查找到临时密码,后面登进数据库中更改密码 [root@ZHONG-LONG javascripts]# vim -mysql.sh #!/bin/bash # ...
- 安装jdk1.8.0_11环境脚本
安装jdk1.8.0_11的脚本,具体的版本可在脚本中调整,发现最后的重置环境变量没生效,还得再终端界面source /etc/profile [root@ZFVM-APP-- ~]# vim jdk ...
- git 新建仓库第一次提交
1 . git init //初始化仓库,在初始化的目录中会出现.git的文件夹 2. git add .(文件name) //添加文件到本地仓 3. git commit -m "fi ...
- python笔记2小数据池,深浅copy,文件操作及函数初级
小数据池就是在内存中已经开辟了一些特定的数据,经一些变量名直接指向这个内存,多个变量间公用一个内存的数据. int: -5 ~ 256 范围之内 str: 满足一定得规则的字符串. 小数据池: 1,节 ...
- Java同步数据结构之PriorityBlockingQueue
前言 接下来继续BlockingQueue的另一个实现,优先级阻塞队列PriorityBlockingQueue.PriorityBlockingQueue是一个无限容量的阻塞队列,由于容量是无限的所 ...
- SQL-W3School-高级:SQL CREATE TABLE 语句
ylbtech-SQL-W3School-高级:SQL CREATE TABLE 语句 1.返回顶部 1. CREATE TABLE 语句 CREATE TABLE 语句用于创建数据库中的表. SQL ...