微信小程序 拖动图片一边进行截取
简单实现一个画布截取图片的功能
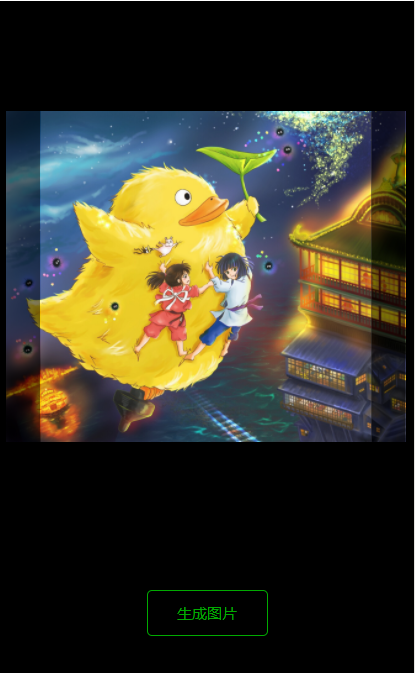
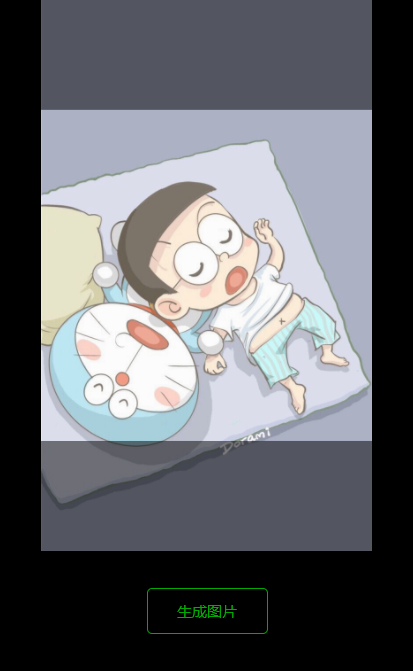
原始图片超出指定尺寸,会进行隐藏,利用短边的宽度截取长边的宽度,拖动生成指定内容的图片
横图


竖图


var box_width = 600; //截取框尺寸

var box_height = 600;

var tran_left = 0; //保存图片偏移值,默认不偏移

var tran_top = 0;

var window_width = 750; //最外层宽度、高度

var window_height = 1000;

var rpx = 0; //单位换算

Page({

  /**

   * 页面的初始数据

   */

  data: {

    show_canvas: false

  },

  /**

   * 生命周期函数--监听页面加载

   */

  onLoad: function(options) {

    var that = this;

    wx.getSystemInfo({

      success: function(res) {

        rpx = (750 / res.windowWidth).toFixed(2)

        that.setData({

          bottom_height: res.windowHeight * rpx - 1000,

          height: res.windowHeight * rpx

        })

        that.clipImg();

      },

    })

  },

  clipImg() {

    var that = this;

    wx.chooseImage({

      count: 1,

      success: function(res) {

        var img = res.tempFilePaths[0]

        wx.getImageInfo({

          src: img,

          success(res) {

            // console.log(res)

            var img_width = res.width * rpx, //转成rpx单位

              img_height = res.height * rpx,

              img_left = 0, //图片左偏移

              img_top = 0, //图片上偏移

              clip_top = 0, //截取框上偏移

              clip_left = 0; //截取框左偏移

            var mask_width, mask_height, mask_top, mask_left; //图片遮罩层

            var rate = (img_width / img_height).toFixed(2); //判断图片类型

            if (rate >= 1) { //横图

              img_width = box_height * rate;

              img_height = box_height;

              img_left = 0;

              img_top = 0;

              clip_top = (window_height - box_height) / 2;

              clip_left = (window_width - box_width) / 2;

              mask_width = (img_width - 600) / 2;

              mask_height = 600;

              mask_left = (window_width - img_width) / 2;

              mask_top = clip_top;

            } else { //竖图

              img_height = box_width / rate;

              img_width = box_width;

              img_left = 0;

              img_top = 0;

              clip_top = (window_height - box_height) / 2;

              clip_left = (window_width - box_width) / 2;

              mask_width = 600;

              mask_height = (img_height - 600) / 2;

              mask_left = clip_left;

              mask_top = (window_height - img_height) / 2;

            }

            that.setData({

              img_width: img_width,

              img_height: img_height,

              img_left: img_left,

              img_top: img_top,

              clip_top: clip_top,

              clip_left: clip_left,

              rate: rate,

              img: img,

              mask_width: mask_width,

              mask_height: mask_height,

              mask_top: mask_top,

              mask_left: mask_left

            })

          }

        })

      },

    })

  },

  start(e) {

    this.pageX = e.touches[0].pageX;

    this.pageY = e.touches[0].pageY;

  },

  move(e) {

    var pageX = e.touches[0].pageX;

    var pageY = e.touches[0].pageY;

    var moveX = (pageX - this.pageX) * rpx + tran_left; //tran_left先为图片初始偏移值,后为图片挪动偏移值

    var moveY = (pageY - this.pageY) * rpx + tran_top;

    var rate = this.data.rate;

    if (rate >= 1) {

      if (moveX > this.data.mask_width) { //超出,取最小值

        this.setData({

          img_left: this.data.mask_width

        })

        return;

      }

      if (moveX < -this.data.mask_width) { //超出,取最大值

        this.setData({

          img_left: -this.data.mask_width

        })

        return;

      }

      this.setData({

        img_left: moveX,

      })

    } else {

      if (moveY > this.data.mask_height) {

        this.setData({

          img_top: this.data.mask_height

        })

        return;

      }

      if (moveY < -this.data.mask_height) {

        this.setData({

          img_top: -this.data.mask_height

        })

        return;

      }

      this.setData({

        img_top: moveY

      })

    }

  },

  end(e) {

    tran_left = this.data.img_left; //偏移值重新赋值

    tran_top = this.data.img_top;

  },

  create() {

    var that = this;

    var ctx = wx.createCanvasContext('myCanvas');

    ctx.drawImage(that.data.img, 0, 0, that.data.img_width / rpx, that.data.img_height / rpx);

    ctx.draw(false, function() {

      var rate = that.data.rate;

      var x, y;

      if (rate >= 1) {

        x = (that.data.mask_width - that.data.img_left) / rpx; //x轴偏移的值

        y = 0;

      } else {

        x = 0;

        y = (that.data.mask_height - that.data.img_top) / rpx; //y轴偏移的值

      }

      wx.canvasToTempFilePath({

        canvasId: 'myCanvas',

        x: x,

        y: y,

        width: 600 / rpx,

        height: 600 / rpx,

        destWidth: 600 * 2 / rpx, //画布生成图片有点模糊,可以把像素密度*2或者截取框尺寸调大点

        destHeight: 600 * 2 / rpx,

        quality: 1,

        success(res) {

          console.log(res)

          that.setData({

            img: res.tempFilePath,

            show_canvas: true

          })

        },

        fail(res) {

          console.log(res);

        }

      })

    })

  },

  previewImg() {

    wx.previewImage({

      urls: [this.data.img],

    })

  }

})
<view class='box'>

  <view class='top'>

    <view class='img_box' style='width:{{img_width}}rpx;height:{{img_height}}rpx;left:{{mask_left}}rpx;top:{{mask_top}}rpx' wx:if='{{!show_canvas}}'>

      <image class='img' src='{{img}}' style='width:{{img_width}}rpx;height:{{img_height}}rpx;left:{{img_left}}rpx;top:{{img_top}}rpx'></image>

      <view class='img_mask {{rate>=1?"row":""}}' style='width:{{img_width}}rpx;height:{{img_height}}rpx;left:{{mask_left}}rpx;top:{{mask_top}}rpx' bindtouchstart='start' bindtouchmove='move' bindtouchend='end'>

        <view class='img_mask_top' style='width:{{mask_width}}rpx;height:{{mask_height}}rpx;'></view>

        <view style='width:600rpx;height:600rpx;'></view>

        <view class='img_mask_bottom' style='width:{{mask_width}}rpx;height:{{mask_height}}rpx;'></view>

      </view>

    </view>

    <view class='clip_box' style='left:{{clip_left}}rpx;top:{{clip_top}}rpx' bindtouchstart='start' bindtouchmove='move' bindtouchend='end'></view>

  </view>

  <view class='btn' style='height:{{bottom_height}}rpx'>

    <view bindtap='create'>生成图片</view>

  </view>

</view>

<canvas canvas-id='myCanvas' class='canvas' style='width:{{img_width}}rpx;height:{{img_height}}rpx;left:-{{height}}rpx;top:0'>

</canvas>

<image class='preview_img {{show_canvas?"img_show":""}}' src='{{img}}' style='width:600rpx;height:600rpx;left:{{clip_left}}rpx;top:{{clip_top}}rpx' bindtap='previewImg' wx:if='{{show_canvas}}'></image>
.box {

  width: 750rpx;

  height: 100vh;

  background: rgba(0, 0, 0, 1);

  position: relative;

  left:;

  top:;

}

.top {

  height: 1000rpx;

}

.img_box {

  position: absolute;

  overflow: hidden;

}

.img {

  position: absolute;

}

.img_mask {

  position: fixed;

  z-index:;

}

.row {

  display: flex;

}

.img_mask_top, .img_mask_bottom {

  background: rgba(0, 0, 0, 0.5);

}

.clip_box {

  width: 600rpx;

  height: 600rpx;

  box-sizing: border-box;

  background: rgba(225, 225, 225, 0.1);

  position: fixed;

  z-index:;

}

.btn {

  width: 750rpx;

  background: #000;

  display: flex;

  justify-content: center;

  align-items: center;

  font-size: 28rpx;

  position: fixed;

  z-index:;

}

.btn>view {

  width: 216rpx;

  height: 80rpx;

  border: 2rpx solid #01aa01;

  color: #01aa01;

  border-radius: 10rpx;

  display: flex;

  justify-content: center;

  align-items: center;

}

.canvas {

  position: absolute;

}

.preview_img {

  position: fixed;

  z-index: -1;

}

.img_show {

  z-index:;

}
微信小程序 拖动图片一边进行截取的更多相关文章
- 微信小程序裁剪图片成圆形
代码地址如下:http://www.demodashi.com/demo/14453.html 前言 最近在开发小程序,产品经理提了一个需求,要求微信小程序换头像,用户剪裁图片必须是圆形,也在gith ...
- 微信小程序实现图片是上传、预览功能
本文实例讲述了微信小程序实现图片上传.删除和预览功能的方法,分享给大家供大家参考,具体如下: 这里主要介绍一下微信小程序的图片上传图片删除和图片预览 1.可以调用相机也可以从本地相册选择 2.本地实现 ...
- 微信小程序天坑--图片汉字命名
图片用汉字命名的,在开发者工具中是显示的,但是,在真机的微信中,是不会显示的. 大写的尴尬,微信小程序开发者工具对于做微信的UI来说,就是一个天坑,在电脑上漂漂亮亮的,到手机上各种意想不到的情况.
- [转]微信小程序实现图片上传功能
本文转自:http://blog.csdn.net/feter1992/article/details/77877659 前端: 微信开发者工具 后端:.Net 服务器:阿里云 这里介绍微信小程序如何 ...
- 微信小程序 base64 图片 canvas 画布 drawImage 实现
在微信小程序中 canvas drawImage API 传入的第一个参数是 imageResource 图片资源路径,这个参数通常由从相册选择图片 wx.chooseImage 或 wx.getIm ...
- 微信小程序之图片base64解码
不知道大家在做微信小程序的时候遇到base64解码的问题,我之前在做微信小程序的时候遇到base64解析图片一直有问题,所以在这里把遇到的问题和解决方案在这里记录一下: 在平时的项目中我们是直接用ba ...
- nodeJs实现微信小程序的图片上传
今天我来介绍一下nodejs如何实现保存微信小程序传过来的图片及其返回 首先wx.uploadFile绝大部分时候是配合wx.chooseImage一起出现的,毕竟选择好了图片,再统一上传是实现用户图 ...
- 微信小程序的图片懒加载
在普通的web页面当中,我们都知道图片懒加载可以提升浏览器的加载速度.原理是图片用空或者占位图片进行显示,当屏幕移动到图片位置的时候,再把图片的地址换成它的地址.那么,在小程序当中呢,最近老大让看一下 ...
- 微信小程序实现图片上传功能
前端: 微信开发者工具 后端:.Net 服务器:阿里云 这里介绍微信小程序如何实现上传图片到自己的服务器上 前端代码 data: { productInfo: {} }, //添加Banner bin ...
随机推荐
- 网球pt站 T3nnis 情况说明
网球收藏爱好者们一定知道这个站,网球界的海德堡. 但想进的人发现没什么办法.满世界的找门路.那我说一下具体的情况吧. ************************************ 更新:现 ...
- Jenkins 改成中文语言显示
到系统管理 插件管理中下载如下插件接口 Localization: Chinese (Simplified) 搜索的时候用ctrl+f 进行搜索,不要用Jenkins下面下的filter 只有 ...
- canvas 水波纹
<!DOCTYPE html> <html> <head> <title>水波背景</title> <meta charset=&qu ...
- Vuex状态管理模式
Store:类似容器,包含应用的大部分状态,一个页面只能有一个store,状态存储是响应式的 State : 包含所有应用级别状态的对象 Getters : 在组件内部获取store中状态的函数 Mu ...
- LOB
一,LOB介绍 1,概念 LOB 是指用来存储大对象的数据类型,一般说LOB只是泛指,具体有BLOB,CLOB,NCLOB,BFILE. 根据你数据库的设置,一个LOB可以存储的最大大小从8TB到 ...
- NGS概念大科普(转)
NGS又称为下一代测序技术,高通量测序技术 以高输出量和高解析度为主要特色,能一次并行对几十万到几百万条DNA分子进行序列读取,在提供丰富的遗传学信息的同时,还可大大降低测序费用.缩短测序时间的测序技 ...
- oracle 12 c 创建表空间,用户名,及表
-----------------------------------------12C start------------------------------------------- -- 创 ...
- ashx导出dataTable为Excel
一,datatable导出Excel,用户可以选择路径,方法如下: /// <summary> /// DataTable导出到Excel /// </summary> /// ...
- css3选择器和伪类
元素选择子: * 任何元素 E 与E标签结合的任何元素 E F E的所有派生标签中,有F标签的元素 E > F 或者 E/F E的所有直接的拥有F标签的子类 E + F 所有具有F标签的元素,紧 ...
- git reset 和 git revert 使用区别
git reset 用于回退代码,但是git pull后会和远程分支保持一致,所以无法修改远程代码 git revert可以撤销代码,撤销后直接git push ,可以修改远程分支的代码
