厉害—Ansible管理windows集群
最近公司新项目需要安装400+windows server 2012系统的工作站,想着怎么能像linux下运用ansible批量管理,linux就很简单了有ssh服务
但是下却没这么简单,但还是有办法那就是Powershell。
Ansible可用于管理Windows集群,不过管理节点需要部署在Linux机器上,而且需要预装python winrm模块。
同时,Windows机器上的powershell版本需要满足3.0+,且Management Framework也需要满足3.0+版本。
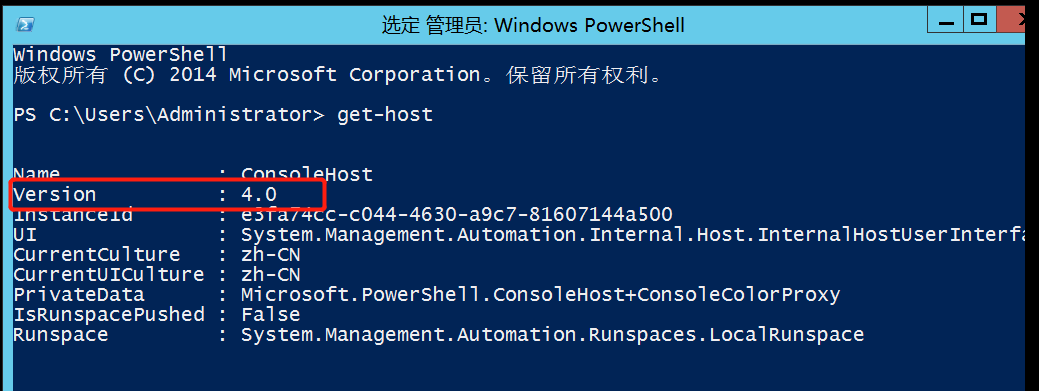
一、首先在Powershell窗口执行get-host命令查看版本
二、配置winrm服务
Windows上winrm服务默认是未启用的,使用如下命令可以查看状态。
winrm enumerate winrm/config/listener
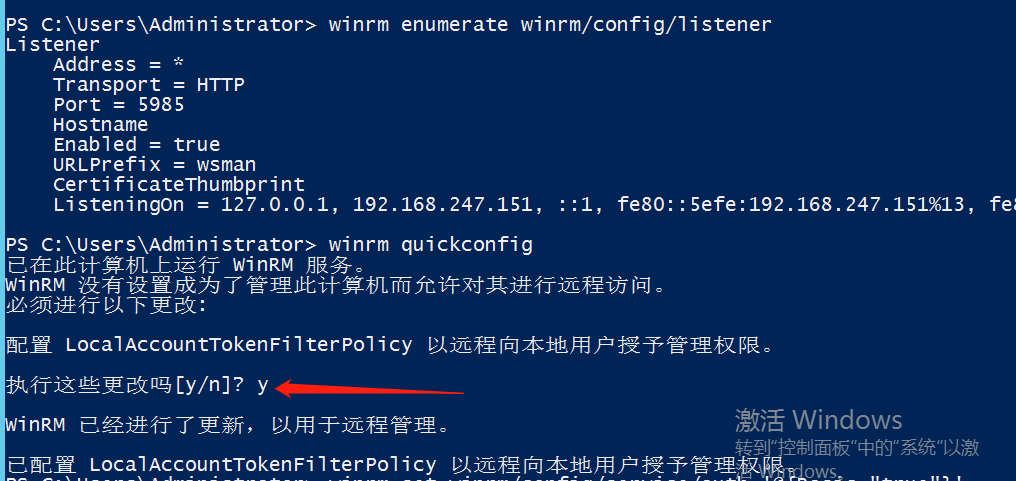
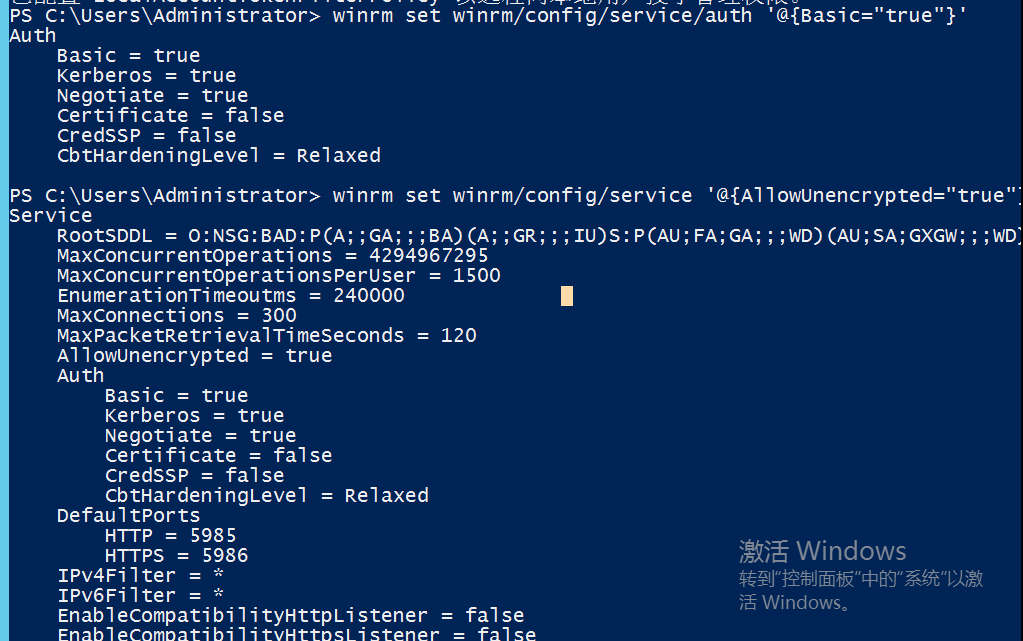
使用如下命令配置winrm服务
winrm quickconfig

winrm set winrm/config/service/auth '@{Basic="true"}'

winrm set winrm/config/service '@{AllowUnencrypted="true"}'
至此,windows主机的配置就完成了,接下来我们配置linux管理节点进行验证。
三、Linux管理节点配置
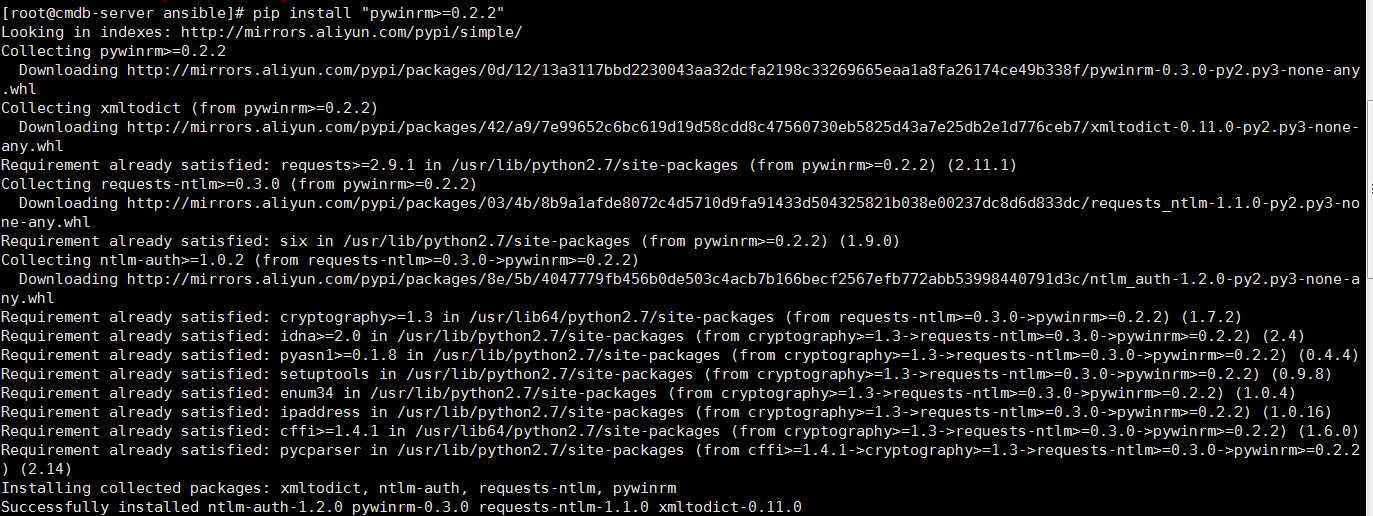
1.然后需要使用pip安装pywinrm模块。如果没有安装pip,则先参考python分类博文安装并配置pip。
[root@cmdb-server ansible]# pip install "pywinrm>=0.2.2"
2.配置hosts文件
[wind]

192.168.247.151 ansible_ssh_user="Administrator" ansible_ssh_pass="NPS#2018" ansible_ssh_port=5985 ansible_connection="winrm" ansible_winrm_server_cert_validation=ignore
3.然后使用如下命令进行验证,我们看到,此时可以使用win_ping模块连到之前配置的windows主机上了。
[root@cmdb-server ansible]# ansible wind -m win_ping

192.168.247.151 | SUCCESS => {

    "changed": false,

    "ping": "pong"

}
4.远程推送文件
[root@cmdb-server ansible]# ansible wind -m win_copy -a 'src=/etc/ansible/PreventCopy.jar dest=C:\'

192.168.247.151 | SUCCESS => {

    "changed": true,

    "checksum": "c3da689273ec80f8072573b73dd87d3bc68e0395",

    "dest": "'C:\\PreventCopy.jar'",

    "operation": "file_copy",

    "original_basename": "PreventCopy.jar",

    "size": 62463090,

    "src": "/etc/ansible/PreventCopy.jar"

}
5.删除远程文件
[root@cmdb-server ansible]# ansible wind -m win_file -a "path=C:\PreventCopy.jar state=absent"

192.168.247.151 | SUCCESS => {

    "changed": true

}
更多模块及详细功能介绍:https://docs.ansible.com/ansible/latest/modules/list_of_windows_modules.html除win开头的模块外,scripts,raw,slurp,setup模块在Windows 下也可正常使用。
Windows下可用模块虽不及Linux丰富,但基础功能均包括在内,以下几个模块为常用模块:

win_acl (E) —设置文件/目录属主属组权限;

win_copy—拷贝文件到远程Windows主机;

win_file —创建,删除文件或目录;

win_lineinfile—匹配替换文件内容;

win_package (E) —安装/卸载本地或网络软件包;

win_ping —Windows系统下的ping模块,常用来测试主机是否存活;

win_service—管理Windows Services服务;

win_user —管理Windows本地用户。

window的通信检测为:ansible testwin -m win_ping

复制文件到window:

ansible windows -m win_copy -a "src=/etc/passwd dest=E:filepasswd"

删除文件:

ansible windows -m win_file -a "path=E:filepasswd state=absent"

新增用户:

ansible windows -m win_user -a "name=stanley password=magedu@123 groups=Administrators"

重启服务:

ansible windows -m win_service -a "name=spooler state=restarted"

获取window主机信息:

ansible windows -m setup

执行ps脚本:

ansible windows -m script -a "E://test.ps1"

获取IP地址:

ansible windows -m win_command -a "ipconfig"

查看文件状态:

ansible windows -m win_stat -a "path='C://Windows/win.ini'"

移动文件:

ansible windows -m raw -a "cmd /c 'move /y d:\issue c:\issue'"

创建文件夹:

ansible windows -m raw -a "mkdir d:\tst"

重启:

ansible windows -m win_reboot

结束程序:

ansible windows-m raw -a "taskkill /F /IM QQ.exe /T"

如果window主机传回来的中文是乱码,则修改ansible控制机上的python编码:

sed -i "s#tdout_buffer.append(stdout)#tdout_buffer.append(stdout.decode('gbk').encode('utf-8'))#g" /usr/lib/python2.6/site-packages/winrm/protocol.py

sed -i "s#stderr_buffer.append(stderr)#stderr_buffer.append(stderr.decode('gbk').encode('utf-8'))#g" /usr/lib/python2.6/site-packages/winrm/protocol.py

指定配置文件获取win网卡信息

ansible -i win_hosts windows -m raw -a "ipconfig"

使用默认的配置文件获取网卡信息

ansible windows -m raw -a "ipconfig"

拷贝文件到远程Windows主机

ansible windows -m win_copy -a 'src=/etc/passwd dest=F:\file\passwd'

ansible windows -m win_copy -a "src=/usr/local/src/PayChannels20.35.zip dest=D:\Tomcat8630\webapps\PayChannels20.35.zip"

ansible windows -m win_copy -a "src=/usr/local/src/SupplierPay.zip dest=D:\SupplierPay.zip

将.zip解压到远程Windows主机,远程主机上必须存在需要解压的源文件

ansible windows -m win_unzip -a"creates=no src=D:\Tomcat8620\webapps\PayChannels-8630.zip dest=D:\Tomcat8620\webapps"

解压到D盘:ansible windows -m win_unzip -a"creates=no src=D:\SupplierPay.zip dest=D:"

重启远程windows主机的服务

ansible windows -m win_service -a "name=Tomcat8630 state=restarted"

重启node.js(.bat命令)

ansible windows -m win_command -a "chdir=D:\SupplierPay .\http_restart.bat"

执行win_command模块命令

启动redis

ansible windows -m win_command -a "chdir=D:\Redis server-start.bat "

ansible win -m win_command -a "chdir=C:\ a.bat "

ps:"chdir=C:\ a.bat " 之前有空格

删除文件或者目录

ansible windows -m win_file -a "dest=D:\Tomcat8630\log\ state=absent"

ansible windows -m win_file -a "dest=D:\Tomcat8630\logs\ state=absent"

创建用户

ansible windows -m win_user -a "name=aa passwd=123456"

创建一个名叫user1的管理员用户,要求能够远程访问

ansible windows -m win_user -a "name=user1 password=123 groups='Administrators,Remote Desktop Users'"

重启的第一种方式

ansible windows -m win_shell -a "shutdown -r -t 1"

重启的第二种方式

ansible windows -m win_reboot

获取ip地址

ansible windows -m raw -a "ipconfig"

获取身份

ansible windows -m win_command -a "whoami"

移动文件

ansible windows -m raw -a "cmd /c 'move /y D:\Ansible\product\DBFPlus.exe D:\Ansible\back\'"

移动文件目标端也需要制定到文件,而不能只制定到所在目录位置

ansible windows -m raw -a "cmd /c 'move /y D:\Ansible\product D:\Ansible\back'"

移动文件夹源端和目标端目录都不能带反斜杠/。且将源的整个目录移到目的端目录里。

创建文件夹

ansible windows -m raw -a "md d:\Ansible\justin"

删除文件或目录

ansible windows -m win_file -a "path=d:\Ansible\justin state=absent"

结束某程序

ansible windows -m raw -a "taskkill /F /IM snmp.exe /T"

文件传输

ansible windows -m win_copy -a 'src=/app/svn/127_Client/118919/zjcfg.zip dest=D:\soft\'

目标路径不能含关键词ansible,否则提示无效路径,源使用反斜杠结果将递归传输目录下所有文件,源不一反斜杠结尾将整个目录传输到目标目录下。
厉害—Ansible管理windows集群的更多相关文章
- [转帖]Ansible管理windows集群
Ansible管理windows集群 http://www.cnblogs.com/Dev0ps/p/10026908.html 写的挺好的 我关注点还是不够好呢 最近公司新项目需要安装400+win ...
- 使用Chef管理windows集群
但凡服务器上了一定规模(百台以上),普通的ssh登录管理的模式就越来越举步维艰.试想Linux发布了一个高危漏洞的补丁,你要把手下成百上千台机器都更新该补丁,如果没有一种自动化方式,那么至少要耗上大半 ...
- 使用Chef管理windows集群 | 运维自动化工具
但凡服务器上了一定规模(百台以上),普通的ssh登录管理的模式就越来越举步维艰.试想Linux发布了一个高危漏洞的补丁,你要把手下成百上千台机器都更新该补丁,如果没有一种自动化方式,那么至少要耗上大半 ...
- 如何在本地数据中心安装Service Fabric for Windows集群
概述 首先本文只是对官方文档(中文,英文)的一个提炼,详细的安装说明还请仔细阅读官方文档. 虽然Service Fabric的官方名称往往被加上Azure,但是实际上(估计很多人不知道)Service ...
- windows集群简单介绍
windows集群简单介绍仔细看过以前网友发表的一些文章,总觉得对windows集群没有详细介绍,我也是借花献佛,引用了一些技术性文档.目前应用最为广泛的集群计算技术可以分为三大类:高可用性集群技术. ...
- 将自己写的windows服务加入到windows集群中
最近发现windows集群能进行很多自定义,比如在集群中加入自己编写的服务. 能自定义的可不少,截个图: 本次演示中,只想用“通用服务”这个类型. 先列下步骤 编写一个记录时间的Windows服务,这 ...
- 使用Cloudera部署,管理Hadoop集群
Hadoop系列之(三):使用Cloudera部署,管理Hadoop集群 http://www.cnblogs.com/ee900222/p/hadoop_3.html Hadoop系列之(一):Ha ...
- VLAN 模式下的 OpenStack 管理 vSphere 集群方案
本文不合适转载,只用于自我学习. 关于为什么要用OpenStack 管理 vSphere 集群,原因可以有很多,特别是一些传统企业,VMware 的使用还是很普遍的,用 OpenStack 纳管至少会 ...
- 《Apache kafka实战》读书笔记-管理Kafka集群安全之ACL篇
<Apache kafka实战>读书笔记-管理Kafka集群安全之ACL篇 作者:尹正杰 版权声明:原创作品,谢绝转载!否则将追究法律责任. 想必大家能看到这篇博客的小伙伴,估计你对kaf ...
随机推荐
- fiddler 抓取 htts 失败
1.清除C:\Users\Administrator\AppData\Roaming\Microsoft\Crypto\RSA 目录下所有文件(首次安装fiddler请忽略) 2.清除电脑上的根证书, ...
- 使用Jsoup实现java爬虫(非原创)
1,查看页面源代码,使用css或者JQuery选择器方式或元素节点选择 例如: 或者写成:Elements elements1 = Jsoup.connect("http://jb.999a ...
- Largest Rectangle in a Histogram [POJ2559] [单调栈]
题意一个围挡由n个宽度为1的长方形挡板下端对齐后得到,每个长方形挡板的高度为hi.我们把其抽象成一个图形,问这个图形中包含的面积最大的长方形是多大? 输入多行数据,每行第一个为n,后面n个数,代表hi ...
- centos7安装tomcat8.5
1.下载 tomcat Linux 版本 tomcat 官网下载地址:http://tomcat.apache.org/download-80.cgi 百度云盘链接:链接: https://pan.b ...
- JavaScript前端开发案例教程第二章练习
一.打印金字塔: 这是各种语言学习之处都要做的一道题,最近在重新学习js,看到了这个题,做一下记录. 1 <script type="text/javascript"> ...
- RHEL系统初始化步骤
1.配置网络 ##初始化网络(可在虚拟网络编辑器查看自己的网段) ##方法一:静态初始化 read -p "输入你当前Linux的IP地址:" ip ETH=` ifconfig ...
- Visual Studio(VS)秘钥集合
Visual Studio 2019 Pro :NYWVH-HT4XC-R2WYW-9Y3CM-X4V3Y
- 使用ANY和ALL条件
在比较运算符中,可以出现ALL和ANY,表示“全部”和“任一”,但是ALL和ANY不能单独使用,需要配合单行比较操作符>.>=.<.<=一起使用.其中: > ANY : ...
- web端本地与服务端时间校验
当前校验逻辑: 本地和服务端的时间校验绑定在一个通用请求上,这个请求每七分钟会到服务端请求一次,本地拿到服务器时间后,计算请求服务器来回的时间,最后得出与服务器时间的差值,然后每次new Date() ...
- 错误:Java HotSpot(TM) 64-Bit Server VM warning: Insufficient space for shared memory file
Java HotSpot(TM) 64-Bit Server VM warning: Insufficient space for shared memory file: /tmp/hsperfdat ...