
spring boot: 用redis的消息订阅功能更新应用内的caffeine本地缓存(spring boot 2.3.2)
一,为什么要更新caffeine缓存?
1,caffeine缓存的优点和缺点
生产环境中,caffeine缓存是我们在应用中使用的本地缓存,
它的优势在于存在于应用内,访问速度最快,通常都不到1ms就能做出响应,
缺点在于不方便管理,因为存在于多台负载均衡的web服务器上,
很难象管理redis缓存一样对它做出更新、删除。
2,通常我们会把caffeine缓存的时间设置为5分钟或10分钟,
但当有大型促销活动开始时,如果缓存还没过期,
则web服务显示的数据不会立刻得到更新,
我们如何更新多台web服务器的的应用内缓存?
使用redis的消息订阅是解决方法之一,
我们从后台发送一条消息到redis,
订阅了redis的web服务收到消息可以对缓存进行处理,
这样实现对多台web服务器上的缓存的更新
3, 生产环境中通常会使用多级缓存,
我们在更新caffeine缓存时,
也不要去访问数据库,避免导致对数据库的并发访问,
而是更新完redis后,
本地缓存从redis获取数据,
而几百几千数量级的并发访问对于redis来说压力很小
说明:刘宏缔的架构森林是一个专注架构的博客,地址:https://www.cnblogs.com/architectforest
对应的源码可以访问这里获取: https://github.com/liuhongdi/
说明:作者:刘宏缔 邮箱: 371125307@qq.com
二,演示项目的相关信息
1,项目地址
https://github.com/liuhongdi/redispubsub
2,项目功能说明:
web服务通过订阅redis的消息,
实现对缓存的更新/删除/清除
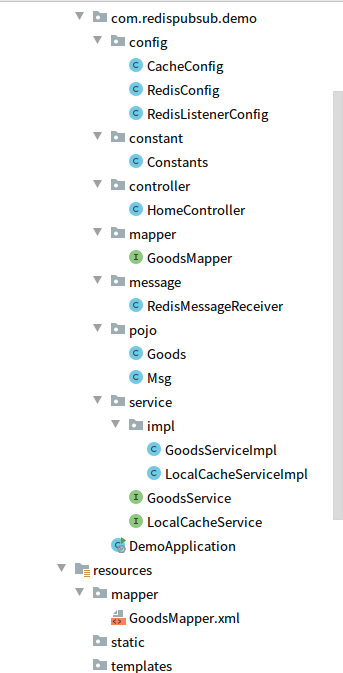
3,项目结构:如图:
三,配置文件说明
1,pom.xml
        <!--redis begin-->

        <dependency>

            <groupId>org.springframework.boot</groupId>

            <artifactId>spring-boot-starter-data-redis</artifactId>

        </dependency>

        <dependency>

            <groupId>org.apache.commons</groupId>

            <artifactId>commons-pool2</artifactId>

        </dependency>

        <dependency>

            <groupId>com.fasterxml.jackson.core</groupId>

            <artifactId>jackson-core</artifactId>

            <version>2.11.1</version>

        </dependency>

        <dependency>

            <groupId>com.fasterxml.jackson.core</groupId>

            <artifactId>jackson-databind</artifactId>

            <version>2.11.1</version>

        </dependency>

        <!--redis   end-->

        <!-- fastjson begin-->

        <dependency>

            <groupId>com.alibaba</groupId>

            <artifactId>fastjson</artifactId>

            <version>1.2.73</version>

        </dependency>

        <!-- fastjson   end-->

        <!--local cache begin-->

        <dependency>

            <groupId>org.springframework.boot</groupId>

            <artifactId>spring-boot-starter-cache</artifactId>

        </dependency>

        <dependency>

            <groupId>com.github.ben-manes.caffeine</groupId>

            <artifactId>caffeine</artifactId>

            <version>2.8.5</version>

        </dependency>

        <!--local cache   end-->

        <!--mybatis begin-->

        <dependency>

            <groupId>org.mybatis.spring.boot</groupId>

            <artifactId>mybatis-spring-boot-starter</artifactId>

            <version>2.1.3</version>

        </dependency>

        <!--mybatis end-->

        <!--mysql begin-->

        <dependency>

            <groupId>mysql</groupId>

            <artifactId>mysql-connector-java</artifactId>

            <scope>runtime</scope>

        </dependency>

        <!--mysql end-->
2,application.properties
#error

server.error.include-stacktrace=always

#errorlog

logging.level.org.springframework.web=trace

#redis1

spring.redis1.host=127.0.0.1

spring.redis1.port=6379

spring.redis1.password=lhddemo

spring.redis1.database=0

spring.redis1.lettuce.pool.max-active=32

spring.redis1.lettuce.pool.max-wait=300

spring.redis1.lettuce.pool.max-idle=16

spring.redis1.lettuce.pool.min-idle=8

spring.redis1.enabled=1

#mysql

spring.datasource.url=jdbc:mysql://localhost:3306/store?characterEncoding=utf8&useSSL=false

spring.datasource.username=root

spring.datasource.password=lhddemo

spring.datasource.driver-class-name=com.mysql.cj.jdbc.Driver

#mybatis

mybatis.mapper-locations=classpath:/mapper/*Mapper.xml

mybatis.type-aliases-package=com.example.demo.mapper

mybatis.configuration.log-impl=org.apache.ibatis.logging.stdout.StdOutImpl

#profile

spring.profiles.active=cacheenable
3,goods数据表的建表sql:
CREATE TABLE `goods` (

 `goodsId` int(11) NOT NULL AUTO_INCREMENT COMMENT 'id',

 `goodsName` varchar(500) CHARACTER SET utf8mb4 COLLATE utf8mb4_0900_ai_ci NOT NULL DEFAULT '' COMMENT 'name',

 `subject` varchar(200) NOT NULL DEFAULT '' COMMENT '标题',

 `price` decimal(15,2) NOT NULL DEFAULT '0.00' COMMENT '价格',

 `stock` int(11) NOT NULL DEFAULT '0' COMMENT 'stock',

 PRIMARY KEY (`goodsId`)

) ENGINE=InnoDB AUTO_INCREMENT=0 DEFAULT CHARSET=utf8mb4 COLLATE=utf8mb4_0900_ai_ci COMMENT='商品表'
四,java代码说明
1,CacheConfig.java
@Profile("cacheenable")   //prod这个profile时缓存才生效

@Configuration

@EnableCaching //开启缓存

public class CacheConfig {

    public static final int DEFAULT_MAXSIZE = 10000;

    public static final int DEFAULT_TTL = 600;

    private SimpleCacheManager cacheManager = new SimpleCacheManager();

    //定义cache名称、超时时长(秒)、最大容量

    public enum CacheEnum{

        goods(60,1000),       //有效期600秒, 最大容量1000

        homePage(7200,1000),  //有效期2个小时 , 最大容量1000

        ;

        CacheEnum(int ttl, int maxSize) {

            this.ttl = ttl;

            this.maxSize = maxSize;

        }

        private int maxSize=DEFAULT_MAXSIZE;    //最大數量

        private int ttl=DEFAULT_TTL;        //过期时间(秒)

        public int getMaxSize() {

            return maxSize;

        }

        public int getTtl() {

            return ttl;

        }

    }

    //创建基于Caffeine的Cache Manager

    @Bean

    @Primary

    public CacheManager caffeineCacheManager() {

        ArrayList<CaffeineCache> caches = new ArrayList<CaffeineCache>();

        for(CacheEnum c : CacheEnum.values()){

            caches.add(new CaffeineCache(c.name(),

                    Caffeine.newBuilder().recordStats()

                            .expireAfterWrite(c.getTtl(), TimeUnit.SECONDS)

                            .maximumSize(c.getMaxSize()).build())

            );

        }

        cacheManager.setCaches(caches);

        return cacheManager;

    }

    @Bean

    public CacheManager getCacheManager() {

        return cacheManager;

    }

}
说明:创建了两个缓存 goods,homePage
2,RedisConfig.java
@Configuration

public class RedisConfig {

    @Bean

    @Primary

    public LettuceConnectionFactory redis1LettuceConnectionFactory(RedisStandaloneConfiguration redis1RedisConfig,

                                                                    GenericObjectPoolConfig redis1PoolConfig) {

        LettuceClientConfiguration clientConfig =

                LettucePoolingClientConfiguration.builder().commandTimeout(Duration.ofMillis(100))

                        .poolConfig(redis1PoolConfig).build();

        return new LettuceConnectionFactory(redis1RedisConfig, clientConfig);

    }

    @Bean

    public RedisTemplate redis1Template(

            @Qualifier("redis1LettuceConnectionFactory") LettuceConnectionFactory redis1LettuceConnectionFactory) {

        StringRedisTemplate redisTemplate = new StringRedisTemplate();

        //使用Jackson2JsonRedisSerializer来序列化和反序列化redis的value值

        redisTemplate.setKeySerializer(new StringRedisSerializer());

        redisTemplate.setValueSerializer(new GenericJackson2JsonRedisSerializer());

        //使用StringRedisSerializer来序列化和反序列化redis的key值

        redisTemplate.setHashKeySerializer(new StringRedisSerializer());

        redisTemplate.setHashValueSerializer(new GenericJackson2JsonRedisSerializer());

        //开启事务

        redisTemplate.setEnableTransactionSupport(true);

        redisTemplate.setConnectionFactory(redis1LettuceConnectionFactory);

        redisTemplate.afterPropertiesSet();

        return redisTemplate;

    }

    @Configuration

    public static class Redis1Config {

        @Value("${spring.redis1.host}")

        private String host;

        @Value("${spring.redis1.port}")

        private Integer port;

        @Value("${spring.redis1.password}")

        private String password;

        @Value("${spring.redis1.database}")

        private Integer database;

        @Value("${spring.redis1.lettuce.pool.max-active}")

        private Integer maxActive;

        @Value("${spring.redis1.lettuce.pool.max-idle}")

        private Integer maxIdle;

        @Value("${spring.redis1.lettuce.pool.max-wait}")

        private Long maxWait;

        @Value("${spring.redis1.lettuce.pool.min-idle}")

        private Integer minIdle;

        @Bean

        public GenericObjectPoolConfig redis1PoolConfig() {

            GenericObjectPoolConfig config = new GenericObjectPoolConfig();

            config.setMaxTotal(maxActive);

            config.setMaxIdle(maxIdle);

            config.setMinIdle(minIdle);

            config.setMaxWaitMillis(maxWait);

            return config;

        }

        @Bean

        public RedisStandaloneConfiguration redis1RedisConfig() {

            RedisStandaloneConfiguration config = new RedisStandaloneConfiguration();

            config.setHostName(host);

            config.setPassword(RedisPassword.of(password));

            config.setPort(port);

            config.setDatabase(database);

            return config;

        }

    }

}
实现到redis的访问连接配置
3,RedisListenerConfig.java
@Configuration

public class RedisListenerConfig {

    //创建两个消息监听器MessageListener

    @Bean

    RedisMessageListenerContainer container(RedisConnectionFactory connectionFactory,

                                            MessageListenerAdapter listenerAdapter) {

        RedisMessageListenerContainer container = new RedisMessageListenerContainer();

        container.setConnectionFactory(connectionFactory);

        container.addMessageListener(listenerAdapter, new PatternTopic(Constants.CHANNEL_GOODS));

        container.addMessageListener(listenerAdapter, new PatternTopic(Constants.CHANNEL_HOME));

        return container;

    }

    //指定接收消息的类名和方法名

    @Bean

    MessageListenerAdapter listenerAdapter(RedisMessageReceiver messageReceiver) {

        System.out.println("listenerAdapter");

        return new MessageListenerAdapter(messageReceiver, "onReceiveMessage");

    }

    //指定StringRedisTemplate的生成

    @Bean

    StringRedisTemplate stringRedisTemplate(RedisConnectionFactory connectionFactory) {

        return new StringRedisTemplate(connectionFactory);

    }

}
创建RedisMessageListenerContainer,创建两个消息队列的监听
4,RedisMessageReceiver.java
@Component

public class RedisMessageReceiver {

    @Resource

    private LocalCacheService localCacheService;

    //收到消息后进行处理

    public void onReceiveMessage(String message,String channel) {

        message=message.replace("\\\"","\"");

        message=message.replace("\"{","{");

        message=message.replace("}\"","}");

        Msg msg = JSON.parseObject(message, Msg.class);

        System.out.println(channel+":消息:"+msg.getMsgType()+";content:"+msg.getContent());

        if (channel.equals(Constants.CHANNEL_GOODS)) {

            if (msg.getMsgType().equals("deleteall")) {

                localCacheService.deleteGoodsCacheAll();

            } else if (msg.getMsgType().equals("delete") || msg.getMsgType().equals("update")) {

                String goodslist = msg.getContent();

                String[] strArr = goodslist.split(",");

                System.out.println(strArr);

                for (int i = 0; i < strArr.length; ++i){

                    Long goodsId = Long.parseLong(strArr[i]);

                    if (msg.getMsgType().equals("update")) {

                        localCacheService.updateGoodsCache(goodsId);

                    } else if (msg.getMsgType().equals("delete")) {

                        localCacheService.deleteGoodsCache(goodsId);

                    }

                }

            }

        }

    }

}
说明:收到消息后,根据消息内容进行处理,
我们收到的针对商品缓存的消息有三类:deleteall,update,delete
分别调用三个不同的处理方法
5,LocalCacheServiceImpl.java
@Service

public class LocalCacheServiceImpl implements LocalCacheService {

    @Resource

    private RedisTemplate redis1Template;

    //更新缓存

    @CachePut(value = "goods", key="#goodsId")

    @Override

    public Goods updateGoodsCache(Long goodsId){

        System.out.println("get data from redis");

        Goods goodsr = (Goods) redis1Template.opsForValue().get("goods_"+String.valueOf(goodsId));

        return goodsr;

    }

    //删除缓存

    @CacheEvict(value = "goods" ,key = "#goodsId")

    @Override

    public void deleteGoodsCache(Long goodsId) {

        System.out.println("删除缓存 ");

    }

    //清除缓存

    @CacheEvict(value = "goods", allEntries=true)

    @Override

    public void deleteGoodsCacheAll() {

        System.out.println("已删除全部缓存 ");

    }

}
说明:实现了对缓存的处理
6,HomeController.java
@RestController

@RequestMapping("/home")

public class HomeController {

    @Resource

    private RedisTemplate redis1Template;

    @Resource

    private GoodsService goodsService;

    @Resource

    private CacheManager getCacheManager;

    //发清空缓存的消息

    @GetMapping("/deleteall")

    public String deleteall(){

        String ret = "清除缓存的消息已发出";

        //删除id为4的商品的缓存

        Msg msg_del = new Msg();

        msg_del.setMsgType("deleteall");

        msg_del.setContent("");

        redis1Template.convertAndSend("goodsCache",JSON.toJSONString(msg_del));

        return ret;

    }

    //发更新缓存和删除缓存的消息

    @GetMapping("/update")

    public String update(){

           String ret = "";

           int goodsId = 3;

            //更新redis

           System.out.println("get data from redis");

           String key = "goods_"+String.valueOf(goodsId);

           Goods goodsr = (Goods)redis1Template.opsForValue().get(key);

           ret = "更新前:<br/>"+goodsr.toString()+"<br/>";

           String now = new SimpleDateFormat("yyyy-MM-dd HH:mm:ss.sss").format(System.currentTimeMillis());

           goodsr.setGoodsName("更新后的商品名,更新时间:"+now);

           redis1Template.opsForValue().set(key,goodsr);

           Goods goodsr2 = (Goods)redis1Template.opsForValue().get(key);

           ret += "更新后:<br/>"+goodsr2.toString()+"<br/>";

            //发布消息,接收者更新本地cache

            Msg msg_up = new Msg();

            msg_up.setMsgType("update");

            msg_up.setContent("3,5");

        redis1Template.convertAndSend("goodsCache",JSON.toJSONString(msg_up));

        //删除id为4的商品的缓存

            Msg msg_del = new Msg();

            msg_del.setMsgType("delete");

            msg_del.setContent("4");

        redis1Template.convertAndSend("goodsCache",JSON.toJSONString(msg_del));

        return ret;

    }

    //商品详情 参数:商品id

    @Cacheable(value = "goods", key="#goodsId",sync = true)

    @GetMapping("/goodsget")

    @ResponseBody

    public Goods goodsInfo(@RequestParam(value="goodsid",required = true,defaultValue = "0") Long goodsId) {

        Goods goods = goodsService.getOneGoodsById(goodsId);

        return goods;

    }

    //统计,如果是生产环境,需要加密才允许访问

    @GetMapping("/stats")

    @ResponseBody

    public Object stats() {

        CaffeineCache caffeine = (CaffeineCache)getCacheManager.getCache("goods");

        Cache goods = caffeine.getNativeCache();

        String statsInfo="cache名字:goods<br/>";

        Long size = goods.estimatedSize();

        statsInfo += "size:"+size+"<br/>";

        ConcurrentMap map= goods.asMap();

        statsInfo += "map keys:<br/>";

        for(Object key : map.keySet()) {

            statsInfo += "key:"+key.toString()+";value:"+map.get(key)+"<br/>";

        }

        statsInfo += "统计信息:"+goods.stats().toString();

        return statsInfo;

    }

}
说明:更新/删除/清空缓存的操作 我们都是通过发送redis消息实现,
在生产环境中,这些功能需要放到管理后台
五,测试效果
1,生成缓存:
分别访问:
http://127.0.0.1:8080/home/goodsget?goodsid=3
http://127.0.0.1:8080/home/goodsget?goodsid=4
http://127.0.0.1:8080/home/goodsget?goodsid=5
使商品id分别为 3/4/5的这三件商品生成caffeine缓存
查看效果:访问:
http://127.0.0.1:8080/home/stats
可以看到缓存的数据:
cache名字:goods

size:3

map keys:

key:3;value: Goods:goodsId=3 goodsName=100分电动牙刷 subject=好用到让你爱上刷牙 price=59.00 stock=15

key:4;value: Goods:goodsId=4 goodsName=蜂蜜牛奶手工皂 subject=深入滋养,肌肤细腻嫩滑 price=70.00 stock=33

key:5;value: Goods:goodsId=5 goodsName=紫光筷子筒 subject=紫光智护,干爽防潮更健康 price=189.00 stock=20

统计信息:CacheStats{hitCount=3, missCount=6, loadSuccessCount=6, loadFailureCount=0, totalLoadTime=624491686, evictionCount=3, evictionWeight=3}
2,更新缓存:访问:
http://127.0.0.1:8080/home/update
我们在这个update方法中实现了两项功能:
更新了缓存中商品id为3的商品的名字
删除了缓存中商品id为4的对象
查看效果:,访问:
http://127.0.0.1:8080/home/stats
返回:
cache名字:goods

size:2

map keys:

key:3;value: Goods:goodsId=3 goodsName=更新后的商品名,更新时间:2020-08-06 15:21:49.049 subject=好用到让你爱上刷牙 price=59.00 stock=15

key:5;value: Goods:goodsId=5 goodsName=紫光筷子筒 subject=紫光智护,干爽防潮更健康 price=189.00 stock=20

统计信息:CacheStats{hitCount=1, missCount=3, loadSuccessCount=3, loadFailureCount=0, totalLoadTime=169516569, evictionCount=0, evictionWeight=0}
可以看到缓存中商品id为3的对象商品名被更新,
商品id为4的对象已被删除
3,清除缓存:
访问:
http://127.0.0.1:8080/home/deleteall
查看效果:访问:
http://127.0.0.1:8080/home/stats
返回:
cache名字:goods

size:0

map keys:

统计信息:CacheStats{hitCount=1, missCount=3, loadSuccessCount=3, loadFailureCount=0, totalLoadTime=169516569, evictionCount=0, evictionWeight=0}
可以看到缓存名为goods的缓存中的对象已被清空
六,查看spring boot版本
  .   ____          _            __ _ _

 /\\ / ___'_ __ _ _(_)_ __  __ _ \ \ \ \

( ( )\___ | '_ | '_| | '_ \/ _` | \ \ \ \

 \\/  ___)| |_)| | | | | || (_| |  ) ) ) )

  '  |____| .__|_| |_|_| |_\__, | / / / /

 =========|_|==============|___/=/_/_/_/

 :: Spring Boot ::        (v2.3.2.RELEASE)
spring boot: 用redis的消息订阅功能更新应用内的caffeine本地缓存(spring boot 2.3.2)的更多相关文章
- 【spring boot】【redis】spring boot 集成redis的发布订阅机制
一.简单介绍 1.redis的发布订阅功能,很简单. 消息发布者和消息订阅者互相不认得,也不关心对方有谁. 消息发布者,将消息发送给频道(channel). 然后是由 频道(channel)将消息发送 ...
- 【springboot】【redis】springboot+redis实现发布订阅功能,实现redis的消息队列的功能
springboot+redis实现发布订阅功能,实现redis的消息队列的功能 参考:https://www.cnblogs.com/cx987514451/p/9529611.html 思考一个问 ...
- 基于redis的消息订阅与发布
Redis 的 SUBSCRIBE 命令可以让客户端订阅任意数量的频道, 每当有新信息发送到被订阅的频道时, 信息就会被发送给所有订阅指定频道的客户端. 作为例子, 下图展示了频道 channel1 ...
- Redis的消息订阅及发布及事务机制
Redis的消息订阅及发布及事务机制 订阅发布 SUBSCRIBE PUBLISH 订阅消息队列及发布消息. # 首先要打开redis-cli shell窗口 一个用于消息发布 一个用于消息订阅 # ...
- Spring Boot 2.x基础教程:使用Redis的发布订阅功能
通过前面一篇集中式缓存的使用教程,我们已经了解了Redis的核心功能:作为K.V存储的高性能缓存. 接下来我们会分几篇来继续讲讲Redis的一些其他强大用法!如果你对此感兴趣,一定要关注收藏我哦! 发 ...
- Spring Boot使用Redis进行消息的发布订阅
今天来学习如何利用Spring Data对Redis的支持来实现消息的发布订阅机制.发布订阅是一种典型的异步通信模型,可以让消息的发布者和订阅者充分解耦.在我们的例子中,我们将使用StringRedi ...
- spring boot 使用redis进行发布订阅
异步消息的方式有很多,这篇博客介绍如何使用redis进行发布订阅, 完成这个示例只需要三个文件 1.redis消息监听配置 @Configuration public class RedisListe ...
- [SpingBoot guides系列翻译]Redis的消息订阅发布
Redis的消息 部分参考链接 原文 CountDownLatch 概述 目的 这节讲的是用Redis来实现消息的发布和订阅,这里会使用Spring Data Redis来完成. 这里会用到两个东西, ...
- Java实现Redis的消息订阅和发布
1. 首先需要一个消息监听器类 package com.sogou.baike.testimport.testSubscribe; import redis.clients.jedis.JedisP ...
随机推荐
- python基础:异常捕捉
一.异常 python在程序运行过程中,可能会出现一些错误和异常,导致程序停止运行.我们可以通过捕捉异常,并对异常进行处理,使得程序可以正常运行 异常有很多类型,可以根据类型挨个捕捉.也可统一捕获: ...
- selenium做UI自动化时,模拟鼠标各种操作的ActionChains的用法
1.selenium做自动化的时候,需要模拟鼠标进行单击.双击.右键.拖拽等操作,selenium提供了ActionChains类来进行处理. 2.执行原理:当你调用ActionChains的方法时, ...
- [LeetCode]534. 游戏玩法分析 III(Mysql)
题目 Table: Activity +--------------+---------+ | Column Name | Type | +--------------+---------+ | pl ...
- [LeetCode]Sql系列4
##题目1 626. 换座位 小美是一所中学的信息科技老师,她有一张 seat 座位表,平时用来储存学生名字和与他们相对应的座位 id. 其中纵列的 id 是连续递增的 小美想改变相邻俩学生的座位. ...
- CentOS 7使用PuppeteerSharp无头浏览器注意事项
环境: CentOS 7.6.1810 .net core 3.1 PuppeteerSharp 2.0.0 1.如网络部稳定可以提前下载需要的chromium 下载地址:https://storag ...
- matlab数字图像处理-给图片加入可视水印信息
将文件夹路径改成了我想要存放代码的文件夹下 然后也是在网上百度,找到了一个代码,敲着模仿了一个 自己建立了一个脚本文件 >>edit test1 然后在脚本中添加 %读取待嵌入水印的图像和 ...
- 1.8HDFS细节
- 龙芯3a4000办公机安装软件及美化记录
1.硬件平台: CPU:龙芯3a4000 Linux内核版本:4.19.90-1.lns7.2.mips64el 操作系统:Debian 10(buster) 使用过龙芯3a3000和3a4000两款 ...
- dubbo学习(五)注册中心zookeeper
初识zookeeper 下载地址:https://archive.apache.org/dist/zookeeper/ 详细的ZooKeeper教程戳这里~ PS: 建议目前选择3.4的稳定版本进行使 ...
- 《Java从入门到失业》第四章:类和对象(4.6):类路径
4.6类路径 4.6.1什么是类路径 前面我们讨论过包,知道字节码文件最终都会被放到和包名相匹配的树状结构子目录中.例如上一节的例子: 其实类还有一种存放方式,就是可以归档到一个jar文件中,jar文 ...