Spring基于XML的IOC环境搭建及入门
一、使用Maven构建Java项目
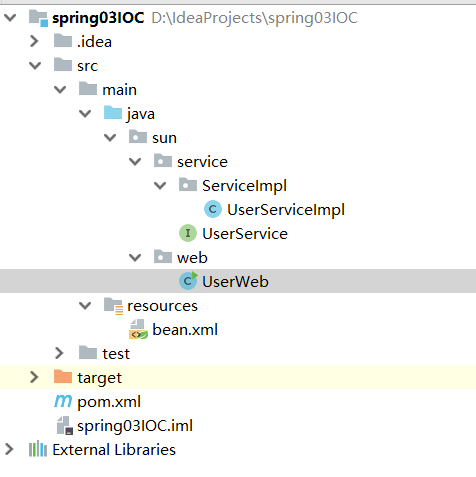
* 项目目录结构
1、 在sun.service包下创建UserDao接口和接口实现类:
UserDao接口:


package sun.service;

/**

 * @Classname UserService

 * @Description TODO

 * @Date 2020/9/15 14:51

 * @Created by Administrator

 */

public interface UserService {

    void saveUser();

}
UserDao接口
UserDao接口实现类:
package sun.service.ServiceImpl;

import org.springframework.context.ApplicationContext;

import org.springframework.context.support.ClassPathXmlApplicationContext;

import sun.service.UserService;

/**

 * @Classname UserServiceImpl

 * @Description TODO

 * @Date 2020/9/15 14:52

 * @Created by Administrator

 */

public class UserServiceImpl implements UserService {

    public void saveUser() {

        System.out.println("service saveUser方法执行了...");

    }

}
2、在sun.web包下创建UserWeb类模拟Servlet:
UserWeb类:
package sun.web; import org.springframework.context.ApplicationContext;
import org.springframework.context.support.ClassPathXmlApplicationContext;
import sun.service.ServiceImpl.UserServiceImpl;
import sun.service.UserService; /**
* @Classname UserWeb
* @Description TODO
* @Date 2020/9/15 14:54
* @Created by Administrator
*/
public class UserWeb {
public static void main(String[] args) {
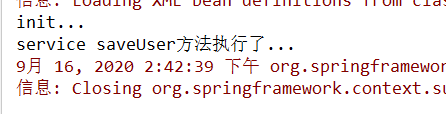
// 1 获取核心容器对象
ApplicationContext ac=new ClassPathXmlApplicationContext("bean.xml");
// 2 根据id获取bean对象
UserService userService = ac.getBean("userService", UserService.class);
userService.saveUser();
}
}
在main方法中通过 ApplicationContext ac=new ClassPathXmlApplicationContext("bean.xml") 读取bean.xml配置文件获取Spring核心容器对象。
再通过 UserService userService = ac.getBean("userService", UserService.class) 根据传入的id字符串获取该id对应的class类的对象。
3、在resource目录下创建bean.xml配置文件:
<?xml version="1.0" encoding="UTF-8"?>

<beans xmlns="http://www.springframework.org/schema/beans"

       xmlns:xsi="http://www.w3.org/2001/XMLSchema-instance"

       xsi:schemaLocation="http://www.springframework.org/schema/beans

        http://www.springframework.org/schema/beans/spring-beans.xsd">

    <bean id="userService" class="sun.service.ServiceImpl.UserServiceImpl"></bean>

</beans>
4、在pom.xml配置文件中添加jar包坐标:
<?xml version="1.0" encoding="UTF-8"?>

<project xmlns="http://maven.apache.org/POM/4.0.0"

         xmlns:xsi="http://www.w3.org/2001/XMLSchema-instance"

         xsi:schemaLocation="http://maven.apache.org/POM/4.0.0 http://maven.apache.org/xsd/maven-4.0.0.xsd">

    <modelVersion>4.0.0</modelVersion>

    <groupId>sun</groupId>

    <artifactId>spring03IOC</artifactId>

    <version>1.0-SNAPSHOT</version>

    <packaging>jar</packaging>

    <dependencies>

        <dependency>

            <groupId>org.springframework</groupId>

            <artifactId>spring-context</artifactId>

            <version>5.0.2.RELEASE</version>

        </dependency>

    </dependencies>

</project>
二、ApplicationContext相关
1、ApplicationContext三个常用实现类:
1、ClassPathXmlApplicationContext:
  它可以加载类路径下的配置文件,要求配置文件必须在类路径下。不在的话,加载不了。(更常用)

2、FileSystemXmlApplicationContext:
  它可以加载磁盘任意路径下的配置文件(必须有访问权限)

3、AnnotationConfigApplicationContext:
  它是用于读取注解创建容器。
2、ApplicationContext和BeanFactory接口区别:
1、ApplicationContext(单例对象适用 )

    它在构建核心容器时,创建对象采取的策略是采用立即加载的方式。也就是说,只要一读取完配置文件马上就创建配置文件中配置的对象。


  ApplicationContext ac=new ClassPathXmlApplicationContext("bean.xml");

  UserService userService = ac.getBean("userService", UserService.class);

  userService.saveUser();

2、BeanFactory(多例对象适用 )

    它在构建核心容器时,创建对象采取的策略是采用延迟加载的方式。也就是说,什么时候根据id获取对象了,什么时候才真正的创建对象。

  Resource resource = new ClassPathResource("bean.xml");

  BeanFactory factory = new XmlBeanFactory(resource);

  UserService as  = (UserService)factory.getBean("userService");

  System.out.println(as);
三、Spring的bean相关
1、Spring中bean细节之创建Bean对象的三种方式
1)使用默认构造方法创建
在Spring的配置文件中使用bean标签,配以id和class属性之后,且没有其他属性和标签时,采用的就是默认构造函数创建bean对象,此时如果类中没有默认构造函数,则对象无法创建。
bean.xml
<?xml version="1.0" encoding="UTF-8"?>

<beans xmlns="http://www.springframework.org/schema/beans"

       xmlns:xsi="http://www.w3.org/2001/XMLSchema-instance"

       xsi:schemaLocation="http://www.springframework.org/schema/beans

        http://www.springframework.org/schema/beans/spring-beans.xsd">

    <bean id="userService" class="sun.service.ServiceImpl.UserServiceImpl"></bean>

</beans>
2)使用工厂类的普通方法创建对象(使用某个类中的方法创建对象,并存入Spring容器)
bean.xml
<?xml version="1.0" encoding="UTF-8"?>

<beans xmlns="http://www.springframework.org/schema/beans"

       xmlns:xsi="http://www.w3.org/2001/XMLSchema-instance"

       xsi:schemaLocation="http://www.springframework.org/schema/beans

        http://www.springframework.org/schema/beans/spring-beans.xsd">

    <bean id="instance" class="sun.factory.InstanceFactory"></bean>

    <bean id="userServiceMethod" factory-bean="instance" factory-method="getObj"></bean>

</beans>
3)使用工厂类中的静态方法创建对象(使用某个类中的静态方法创建对象,并存入Spring容器)
bean.xml
<?xml version="1.0" encoding="UTF-8"?>

<beans xmlns="http://www.springframework.org/schema/beans"

       xmlns:xsi="http://www.w3.org/2001/XMLSchema-instance"

       xsi:schemaLocation="http://www.springframework.org/schema/beans

        http://www.springframework.org/schema/beans/spring-beans.xsd">

    <bean id="userServiceStatic" class="sun.factory.StaticFactory" factory-method="getObj"></bean>

</beans>
2、Spring中bean的作用范围
bean标签的scope属性:

            作用:用于指定bean的作用范围

            取值: 常用的就是单例的和多例的

                singleton:单例的(默认值)

                prototype:多例的

                request:作用于web应用的请求范围

                session:作用于web应用的会话范围

                global-session:作用于集群环境的会话范围(全局会话范围),当不是集群环境时,它就是session
bean.xml
<?xml version="1.0" encoding="UTF-8"?>

<beans xmlns="http://www.springframework.org/schema/beans"

       xmlns:xsi="http://www.w3.org/2001/XMLSchema-instance"

       xsi:schemaLocation="http://www.springframework.org/schema/beans

        http://www.springframework.org/schema/beans/spring-beans.xsd">

    <bean id="userService" class="sun.service.ServiceImpl.UserServiceImpl" scope="prototype"></bean>

</beans>
3、Bean对象的生命周期
单例对象

                出生:当容器创建时对象出生

                活着:只要容器还在,对象一直活着

                死亡:容器销毁,对象消亡

                总结:单例对象的生命周期和容器相同

多例对象

                出生:当我们使用对象时spring框架为我们创建

                活着:对象只要是在使用过程中就一直活着。

                死亡:当对象长时间不用,且没有别的对象引用时,由Java的垃圾回收器回收
UserServiceImpl类:
package sun.service.ServiceImpl;

import org.springframework.context.ApplicationContext;

import org.springframework.context.support.ClassPathXmlApplicationContext;

import sun.service.UserService;

/**

 * @Classname UserServiceImpl

 * @Description TODO

 * @Date 2020/9/15 14:52

 * @Created by Administrator

 */

public class UserServiceImpl implements UserService {

    public void init(){

        System.out.println("init...");

    }

    public void saveUser() {

        System.out.println("service saveUser方法执行了...");

    }

    public void destory(){

        System.out.println("destory...");

    }

}
UserWeb类:
package sun.web;

import org.springframework.context.ApplicationContext;

import org.springframework.context.support.ClassPathXmlApplicationContext;

import sun.service.ServiceImpl.UserServiceImpl;

import sun.service.UserService;

/**

 * @Classname UserWeb

 * @Description TODO

 * @Date 2020/9/15 14:54

 * @Created by Administrator

 */

public class UserWeb {

    public static void main(String[] args) {

        // 1 获取核心容器对象

        ClassPathXmlApplicationContext ac=new ClassPathXmlApplicationContext("bean.xml");

        // 2 根据id获取bean对象

        UserService userService = ac.getBean("userService", UserService.class);

        userService.saveUser();

        ac.close();

    }

}
1)当bean.xml中配置的是单例模式时:
<?xml version="1.0" encoding="UTF-8"?>

<beans xmlns="http://www.springframework.org/schema/beans"

       xmlns:xsi="http://www.w3.org/2001/XMLSchema-instance"

       xsi:schemaLocation="http://www.springframework.org/schema/beans

        http://www.springframework.org/schema/beans/spring-beans.xsd">

    <bean id="userService" class="sun.service.ServiceImpl.UserServiceImpl" init-method="init" destroy-method="destory"

          scope="singleton"></bean>

</beans>
此时运行UserWeb中的main方法:

2)当bean.xml中配置的是多例模式时:
<?xml version="1.0" encoding="UTF-8"?>

<beans xmlns="http://www.springframework.org/schema/beans"

       xmlns:xsi="http://www.w3.org/2001/XMLSchema-instance"

       xsi:schemaLocation="http://www.springframework.org/schema/beans

        http://www.springframework.org/schema/beans/spring-beans.xsd">

    <bean id="userService" class="sun.service.ServiceImpl.UserServiceImpl" init-method="init" destroy-method="destory"

          scope="prototype"></bean>

</beans>
此时运行UserWeb中的main方法:
四、Spring中的依赖注入
依赖注入:

  Dependency Injection

IOC的作用:

  降低程序间的耦合(依赖关系)

依赖关系的管理:

  以后都交给spring来维护

在当前类需要用到其他类的对象,由spring为我们提供,我们只需要在配置文件中说明

依赖关系的维护:

  就称之为依赖注入。

依赖注入:

  能注入的数据:有三类

    基本类型和String

    其他bean类型(在配置文件中或者注解配置过的bean)

    复杂类型/集合类型

  注入的方式:有三种

    第一种:使用构造函数提供

    第二种:使用set方法提供

    第三种:使用注解提供(明天的内容)
1、使用构造函数注入
构造函数注入:

        使用的标签:constructor-arg

        标签出现的位置:bean标签的内部

        标签中的属性

            type:用于指定要注入的数据的数据类型,该数据类型也是构造函数中某个或某些参数的类型

            index:用于指定要注入的数据给构造函数中指定索引位置的参数赋值。索引的位置是从0开始

            name:用于指定给构造函数中指定名称的参数赋值                                        常用的

            =============以上三个用于指定给构造函数中哪个参数赋值===============================

            value:用于提供基本类型和String类型的数据

            ref:用于指定其他的bean类型数据。它指的就是在spring的Ioc核心容器中出现过的bean对象
bean实体类:
package sun.service.ServiceImpl;

import org.springframework.context.ApplicationContext;

import org.springframework.context.support.ClassPathXmlApplicationContext;

import sun.service.UserService;

import java.util.Date;

/**

 * @Classname UserServiceImpl

 * @Description TODO

 * @Date 2020/9/15 14:52

 * @Created by Administrator

 */

public class UserServiceImpl implements UserService {

    private String name;

    private Integer age;

    private Date birthday;

    public UserServiceImpl(String name, Integer age, Date birthday) {

        this.name = name;

        this.age = age;

        this.birthday = birthday;

    }

    public void saveUser() {

        System.out.println("service saveUser方法执行了...");

    }

    @Override

    public String toString() {

        return "UserServiceImpl{" +

                "name='" + name + '\'' +

                ", age=" + age +

                ", birthday=" + birthday +

                '}';

    }

}
bean.xml中的配置:
<?xml version="1.0" encoding="UTF-8"?>

<beans xmlns="http://www.springframework.org/schema/beans"

       xmlns:xsi="http://www.w3.org/2001/XMLSchema-instance"

       xsi:schemaLocation="http://www.springframework.org/schema/beans

        http://www.springframework.org/schema/beans/spring-beans.xsd">

    <bean id="userService" class="sun.service.ServiceImpl.UserServiceImpl">

        <constructor-arg name="name" value="kelvin"></constructor-arg>

        <constructor-arg name="age" value="23"></constructor-arg>

        <constructor-arg name="birthday" ref="time"></constructor-arg>

    </bean>

    <bean id="time" class="java.util.Date"></bean>

</beans>
优势:

  在获取bean对象时,注入数据是必须的操作,否则对象无法创建成功。

弊端:

  改变了bean对象的实例化方式,使我们在创建对象时,如果用不到这些数据,也必须提供。
2、set方法注入(更常用的方式)
 涉及的标签:property

        出现的位置:bean标签的内部

        标签的属性

            name:用于指定注入时所调用的set方法名称

            value:用于提供基本类型和String类型的数据

            ref:用于指定其他的bean类型数据。它指的就是在spring的Ioc核心容器中出现过的bean对象
bean实体类:
package sun.service.ServiceImpl;

import sun.service.UserService;

import java.util.Date;

/**

 * @Classname UserServiceImpl

 * @Description TODO

 * @Date 2020/9/15 14:52

 * @Created by Administrator

 */

public class UserServiceImpl2 implements UserService {

    private String name;

    private Integer age;

    private Date birthday;

    public void setName(String name) {

        this.name = name;

    }

    public void setAge(Integer age) {

        this.age = age;

    }

    public void setBirthday(Date birthday) {

        this.birthday = birthday;

    }

    public void saveUser() {

        System.out.println("service saveUser方法执行了...");

    }

    @Override

    public String toString() {

        return "UserServiceImpl{" +

                "name='" + name + '\'' +

                ", age=" + age +

                ", birthday=" + birthday +

                '}';

    }

}
bean.xml中的配置:
<?xml version="1.0" encoding="UTF-8"?>

<beans xmlns="http://www.springframework.org/schema/beans"

       xmlns:xsi="http://www.w3.org/2001/XMLSchema-instance"

       xsi:schemaLocation="http://www.springframework.org/schema/beans

        http://www.springframework.org/schema/beans/spring-beans.xsd">

    <bean id="time" class="java.util.Date"></bean>

    <bean id="userService2" class="sun.service.ServiceImpl.UserServiceImpl2">

        <property name="name" value="jack"></property>

        <property name="age" value="23"></property>

        <property name="birthday" ref="time"></property>

    </bean>

</beans>
优势:

    创建对象时没有明确的限制,可以直接使用默认构造函数

弊端:

    如果有某个成员必须有值,则获取对象是有可能set方法没有执行。
* 注入集合数据(可采用构造注入或set注入完成)
复杂类型的注入/集合类型的注入

        用于给List结构集合注入的标签:

            list array set

        用于个Map结构集合注入的标签:

            map  props

        结构相同,标签可以互换
bean实体类:
package sun.service.ServiceImpl;

import sun.service.UserService;

import java.util.*;

/**

 * @Classname UserServiceImpl

 * @Description TODO

 * @Date 2020/9/15 14:52

 * @Created by Administrator

 */

public class UserServiceImpl3 implements UserService {

    private String[] strings;

    private List<String> list;

    private Set<String> set;

    private Map<String,Integer> map;

    private Properties prop;

    public void setStrings(String[] strings) {

        this.strings = strings;

    }

    public void setList(List<String> list) {

        this.list = list;

    }

    public void setSet(Set<String> set) {

        this.set = set;

    }

    public void setMap(Map<String, Integer> map) {

        this.map = map;

    }

    public void setProp(Properties prop) {

        this.prop = prop;

    }

    public String[] getStrings() {

        return strings;

    }

    public List<String> getList() {

        return list;

    }

    public Set<String> getSet() {

        return set;

    }

    public Map<String, Integer> getMap() {

        return map;

    }

    public Properties getProp() {

        return prop;

    }

    public void saveUser() {

        System.out.println("service saveUser方法执行了...");

        System.out.println(Arrays.toString(strings));

        System.out.println(this.list);

        System.out.println(this.set);

        System.out.println(this.map);

        System.out.println(this.prop);

    }

}
bean.xml
<?xml version="1.0" encoding="UTF-8"?>

<beans xmlns="http://www.springframework.org/schema/beans"

       xmlns:xsi="http://www.w3.org/2001/XMLSchema-instance"

       xsi:schemaLocation="http://www.springframework.org/schema/beans

        http://www.springframework.org/schema/beans/spring-beans.xsd">

    <bean id="userService3" class="sun.service.ServiceImpl.UserServiceImpl3">

        <property name="strings">

            <array>

                <value>kelvin</value>

                <value>jack</value>

                <value>tony</value>

            </array>

        </property>

        <property name="set">

            <set>

                <value>kelvin</value>

                <value>jack</value>

                <value>tony</value>

            </set>

        </property>

        <property name="list">

            <list>

                <value>kelvin</value>

                <value>jack</value>

                <value>tony</value>

            </list>

        </property>

        <property name="map">

            <map>

                <entry key="kelvin" value="23"></entry>

                <entry key="jack" value="21"></entry>

                <entry key="tony">

                    <value>46</value>

                </entry>

            </map>

        </property>

        <property name="prop">

            <props>

                <prop key="kelvin">23</prop>

                <prop key="jack">45</prop>

                <prop key="tony">32</prop>

            </props>

        </property>

    </bean>

</beans>
Spring基于XML的IOC环境搭建及入门的更多相关文章
- 阶段3 2.Spring_03.Spring的 IOC 和 DI_3 spring基于XML的IOC环境搭建和入门
创建新项目 修改为jar包的方式 把上一个工程内的代码 java下的com复制过来 由于配置文件没有,所以一运行就会报错 factory文件夹整个删除 dao的实现类 这里删除 测试类保留这两行代码 ...
- spring基于xml的IOC环境搭建和入门
配置pom.xml的依赖 <packaging>jar</packaging> <dependencies> <dependency> <grou ...
- Spring基于XML的IoC
Maven导入Spring依赖 <dependency> <groupId>org.springframework</groupId> <artifactId ...
- Spring 框架的概述以及Spring中基于XML的IOC配置
Spring 框架的概述以及Spring中基于XML的IOC配置 一.简介 Spring的两大核心:IOC(DI)与AOP,IOC是反转控制,DI依赖注入 特点:轻量级.依赖注入.面向切面编程.容器. ...
- 01Spring基于xml的IOC配置--入门
01Spring基于xml的IOC配置 1.创建一个普通的maven工程 1.1 选择maven,不用骨架,点击下一步. 1.2 填写GroupId.ArtifactId.Version.填完点击下一 ...
- Ubuntu 基于Docker的TensorFlow 环境搭建
基于Docker的TensorFlow 环境搭建 基于(ubuntu 16.04LTS/ubuntu 14.04LTS) 一.docker环境安装 1)更新.安装依赖包 sudo apt-get up ...
- EOS Dapp开发(1)-基于Docker的开发环境搭建
随着EOS主网的上线,相信基于EOS的Dapp开发会越来越多,查阅了很多资料相关的开发资料都不是很多,只能自己摸索,按照网上仅有的几篇教程,先git clonehttps://github.com/E ...
- 基于Python的Appium环境搭建合集
自动化一直是测试圈中的热聊,也是大家追求的技术方向.在测试中,往往回归测试也是测试人员的“痛点”.对于迭代慢.变更少的功能,就能用上自动化来替代人工回归,减轻工作量. 问题 在分享环境搭建之前,先抛出 ...
- spring基于xml的声明式事务控制配置步骤
<?xml version="1.0" encoding="UTF-8"?> <beans xmlns="http://www.sp ...
随机推荐
- C# IObservable与IObserver观察者模式
C#中提供了IObservable<T>接口和IObserver<T>接口来实现观察者模式,IObservable<T>相当于Subject(主题)接口,下面我们就 ...
- tar.gz文件的压缩与解压
1 解压".xz" xz -d your_file_name.tar.xz 注:运行上述命令后your_file_name.tar.xz会被删除 2 解包".tar&qu ...
- day35:线程队列&进程池和线程池&回调函数&协程
目录 1.线程队列 2.进程池和线程池 3.回调函数 4.协程:线程的具体实现 5.利用协程爬取数据 线程队列 1.线程队列的基本方法 put 存 get 取 put_nowait 存,超出了队列长度 ...
- 如何选择一台适合Java开发的电脑
前言 最近在群里有同学求推荐Java开发用的电脑,所以胖哥就出个简单的专题,用我贫瘠的电脑知识来帮助大家选择适合开发的电脑配置.因为家里的主机已经带不动两个 IDEA 了,更别提开个 Docker 啥 ...
- linux,运维,部署 相关
基础 linux基础命令 linux基础 部署 docker
- Public-Key Cryptosystems Based on Composite Degree Residuosity Classes
郑重声明:原文参见标题,如有侵权,请联系作者,将会撤销发布! 以下是对本文关键部分的摘抄翻译,详情请参见原文. 论文未全部翻译 Abstract. 本文研究了一个新的计算问题,即合数剩余阶问题(Com ...
- KNN手写数字识别
import numpy as np import matplotlib .pyplot as plt from sklearn.neighbors import KNeighborsClassifi ...
- SPSSAU数据分析思维培养系列3:分析思路
本文章为SPSSAU数据分析思维培养的第3期文章. 上文讲解如何选择正确的分析方法,除了有正确的分析方法外,还需要把分析方法进行灵活运用.拿到一份数据,应该如何进行分析,总共有几个步骤,第一步第二步应 ...
- Linux图形界面安装Oracle11G(Centos7)
以Centos7为列 创建运行Oracle数据库的系统用户和用户组 #切换root用户 [px@localhost /]$ su - root [px@localhost /]$ su - root ...
- tp5下的文件上传与下载类
class FieldInterfun extends Controller { /** * [upload 上传文件] * @param [type] $file [description] * @ ...