
spring 5.x 系列第13篇 —— 整合RabbitMQ (xml配置方式)
一、说明
1.1 项目结构说明
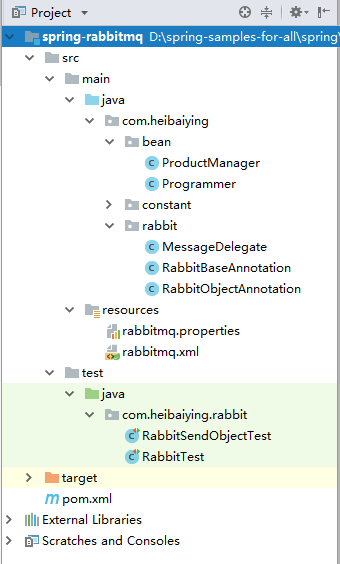
本用例关于rabbitmq的整合提供简单消息发送和对象消费发送两种情况下的sample。
rabbitBaseAnnotation.java中声明了topic类型的交换机、持久化队列、及其绑定关系,用于测试说明topic交换机路由键的绑定规则。
rabbitObjectAnnotation.java中声明了direct类型的交换机,持久化队列,及其绑定关系,用于示例对象消息的传输。
注:关于rabbitmq安装、交换机、队列、死信队列等基本概念可以参考我的手记《RabbitMQ实战指南》读书笔记,里面有详细的配图说明。
1.2 依赖说明
除了spring的基本依赖外,需要导入spring rabbitmq 整合依赖
 <!--spring rabbitmq 整合依赖-->
<dependency>
    <groupId>org.springframework.amqp</groupId>
    <artifactId>spring-rabbit</artifactId>
    <version>2.1.2.RELEASE</version>
</dependency>
<!--rabbitmq 传输对象序列化依赖了这个包-->
<dependency>
    <groupId>com.fasterxml.jackson.core</groupId>
    <artifactId>jackson-databind</artifactId>
    <version>2.9.8</version>
</dependency>
二、spring rabbit 基本配置
rabbitmq.addresses=localhost:5672
rabbitmq.username=guest
rabbitmq.password=guest
# 虚拟主机,可以类比为命名空间 默认为/  必须先用图形界面或者管控台添加 程序不会自动创建且会抛出异常
rabbitmq.virtualhost=/
<?xml version="1.0" encoding="UTF-8"?>
<beans xmlns="http://www.springframework.org/schema/beans"
       xmlns:xsi="http://www.w3.org/2001/XMLSchema-instance"
       xmlns:context="http://www.springframework.org/schema/context"
       xmlns:rabbit="http://www.springframework.org/schema/rabbit"
       xsi:schemaLocation=
               "http://www.springframework.org/schema/context
          http://www.springframework.org/schema/context/spring-context.xsd
          http://www.springframework.org/schema/beans
          http://www.springframework.org/schema/beans/spring-beans.xsd
          http://www.springframework.org/schema/rabbit
          http://www.springframework.org/schema/rabbit/spring-rabbit.xsd">

    <context:property-placeholder location="rabbitmq.properties"/>

    <!--声明连接工厂-->
    <rabbit:connection-factory id="connectionFactory"
                               addresses="${rabbitmq.addresses}"
                               username="${rabbitmq.username}"
                               password="${rabbitmq.password}"
                               virtual-host="${rabbitmq.virtualhost}"/>

    <!--创建一个管理器(org.springframework.amqp.rabbit.core.RabbitAdmin),用于管理交换,队列和绑定。
    auto-startup 指定是否自动声明上下文中的队列,交换和绑定, 默认值为true。-->
    <rabbit:admin connection-factory="connectionFactory" auto-startup="true"/>

    <!--声明 template 的时候需要声明id 不然会抛出异常-->
    <rabbit:template id="rabbitTemplate" connection-factory="connectionFactory"/>

    <!--可以在xml采用如下方式声明交换机、队列、绑定管理 但是建议使用代码方式声明 方法更加灵活且可以采用链调用-->
    <rabbit:queue name="remoting.queue"/>

    <rabbit:direct-exchange name="remoting.exchange">
        <rabbit:bindings>
            <rabbit:binding queue="remoting.queue" key="remoting.binding"/>
        </rabbit:bindings>
    </rabbit:direct-exchange>

    <!--扫描rabbit包 自动声明交换器、队列、绑定关系-->
    <context:component-scan base-package="com.heibaiying.rabbit"/>

</beans>
三、简单消费的发送
3.1 声明交换机、队列、绑定关系和消费者监听器
import com.rabbitmq.client.Channel;
import org.springframework.amqp.core.*;
import org.springframework.amqp.rabbit.connection.ConnectionFactory;
import org.springframework.amqp.rabbit.listener.SimpleMessageListenerContainer;
import org.springframework.amqp.rabbit.listener.api.ChannelAwareMessageListener;
import org.springframework.context.annotation.Bean;
import org.springframework.context.annotation.Configuration;

/**
 * @author : heibaiying
 * @description : 声明队列、交换机、绑定关系、和队列消息监听
 */

@Configuration
public class RabbitBaseAnnotation {

    @Bean
    public TopicExchange exchange() {
        // 创建一个持久化的交换机
        return new TopicExchange("topic01", true, false);
    }

    @Bean
    public Queue firstQueue() {
        // 创建一个持久化的队列1
        return new Queue("FirstQueue", true);
    }

    @Bean
    public Queue secondQueue() {
        // 创建一个持久化的队列2
        return new Queue("SecondQueue", true);
    }

    /**
     * BindingKey 中可以存在两种特殊的字符串“#”和“*”,其中“*”用于匹配一个单词,“#”用于匹配零个或者多个单词
     * 这里我们声明三个绑定关系用于测试topic这种类型交换器
     */
    @Bean
    public Binding orange() {
        return BindingBuilder.bind(firstQueue()).to(exchange()).with("*.orange.*");
    }

    @Bean
    public Binding rabbit() {
        return BindingBuilder.bind(secondQueue()).to(exchange()).with("*.*.rabbit");
    }

    @Bean
    public Binding lazy() {
        return BindingBuilder.bind(secondQueue()).to(exchange()).with("lazy.#");
    }

    /*创建队列1消费者监听*/
    @Bean
    public SimpleMessageListenerContainer firstQueueLister(ConnectionFactory connectionFactory) {

        SimpleMessageListenerContainer container = new SimpleMessageListenerContainer(connectionFactory);
        // 设置监听的队列
        container.setQueues(firstQueue());
        // 指定要创建的并发使用者数。
        container.setConcurrentConsumers(1);
        // 设置消费者数量的上限
        container.setMaxConcurrentConsumers(5);
        // 设置是否自动签收消费 为保证消费被成功消费,建议手工签收
        container.setAcknowledgeMode(AcknowledgeMode.MANUAL);
        container.setMessageListener(new ChannelAwareMessageListener() {
            @Override
            public void onMessage(Message message, Channel channel) throws Exception {
                // 可以在这个地方得到消息额外属性
                MessageProperties properties = message.getMessageProperties();
                //得到消息体内容
                byte[] body = message.getBody();
                System.out.println(firstQueue().getName() + "收到消息:" + new String(body));
                /*
                 * DeliveryTag 是一个单调递增的整数
                 * 第二个参数 代表是否一次签收多条,如果设置为true,则所有DeliveryTag小于该DeliveryTag的消息都会被签收
                 */
                channel.basicAck(properties.getDeliveryTag(), false);
            }
        });
        return container;
    }

    /*创建队列2消费者监听*/
    @Bean
    public SimpleMessageListenerContainer secondQueueLister(ConnectionFactory connectionFactory) {

        SimpleMessageListenerContainer container = new SimpleMessageListenerContainer(connectionFactory);
        container.setQueues(secondQueue());
        container.setMessageListener(new ChannelAwareMessageListener() {
            @Override
            public void onMessage(Message message, Channel channel) throws Exception {
                byte[] body = message.getBody();
                System.out.println(secondQueue().getName() + "收到消息:" + new String(body));
            }
        });
        return container;
    }

}
3.2 测试简单消息的发送
/**
 * @author : heibaiying
 * @description : 传输简单字符串
 */

@RunWith(SpringRunner.class)
@ContextConfiguration(locations = "classpath:rabbitmq.xml")
public class RabbitTest {

    @Autowired
    private RabbitTemplate rabbitTemplate;

    @Test
    public void sendMessage() {
        MessageProperties properties = new MessageProperties();

        String allReceived = "我的路由键 quick.orange.rabbit 符合queue1 和 queue2 的要求,我应该被两个监听器接收到";
        Message message1 = new Message(allReceived.getBytes(), properties);
        rabbitTemplate.send("topic01", "quick.orange.rabbit", message1);

        String firstReceived = "我的路由键 quick.orange.fox 只符合queue1 的要求,只能被queue 1 接收到";
        Message message2 = new Message(firstReceived.getBytes(), properties);
        rabbitTemplate.send("topic01", "quick.orange.fox", message2);

        String secondReceived = "我的路由键 lazy.brown.fox 只符合queue2 的要求,只能被queue 2 接收到";
        Message message3 = new Message(secondReceived.getBytes(), properties);
        rabbitTemplate.send("topic01", "lazy.brown.fox", message3);

        String notReceived = "我的路由键 quick.brown.fox 不符合 topic1 任何绑定队列的要求,你将看不到我";
        Message message4 = new Message(notReceived.getBytes(), properties);
        rabbitTemplate.send("topic01", "quick.brown.fox", message4);
    }
}
结果:
  SecondQueue收到消息:我的路由键 quick.orange.rabbit 符合queue1 和 queue2 的要求,我应该被两个监听器接收到
  FirstQueue收到消息:我的路由键 quick.orange.rabbit 符合queue1 和 queue2 的要求,我应该被两个监听器接收到
  FirstQueue收到消息:我的路由键 quick.orange.fox 只符合queue1 的要求,只能被queue 1 接收到
  SecondQueue收到消息:我的路由键 lazy.brown.fox 只符合queue2 的要求,只能被queue 2 接收到
四、传输对象
4.1 创建消息的委托处理器
这里为了增强用例的实用性,我们创建的处理器的handleMessage方法是一个重载方法,对于同一个队列的监听,不仅可以传输对象消息,同时针对不同的对象类型调用不同的处理方法。
/**
 * @author : heibaiying
 * @description :消息委派处理类
 */
public class MessageDelegate {

    public void handleMessage(ProductManager manager) {
        System.out.println("收到一个产品经理" + manager);
    }

    public void handleMessage(Programmer programmer) {
        System.out.println("收到一个程序员" + programmer);
    }

}
4.2 声明交换机、队列、绑定关系和消费者监听器
/**
 * @author : heibaiying
 * @description : 声明队列、交换机、绑定关系、用于测试对象的消息传递
 */

@Configuration
public class RabbitObjectAnnotation {

    @Bean
    public DirectExchange objectTopic() {
        // 创建一个持久化的交换机
        return new DirectExchange("objectTopic", true, false);
    }

    @Bean
    public Queue objectQueue() {
        // 创建一个持久化的队列
        return new Queue("objectQueue", true);
    }

    @Bean
    public Binding binding() {
        return BindingBuilder.bind(objectQueue()).to(objectTopic()).with("object");
    }

    /*创建队列消费者监听*/
    @Bean
    public SimpleMessageListenerContainer objectQueueLister(ConnectionFactory connectionFactory) {

        SimpleMessageListenerContainer container = new SimpleMessageListenerContainer(connectionFactory);
        // 设置监听的队列
        container.setQueues(objectQueue());
        // 将监听到的消息委派给实际的处理类
        MessageListenerAdapter adapter = new MessageListenerAdapter(new MessageDelegate());
        // 指定由哪个方法来处理消息 默认就是handleMessage
        adapter.setDefaultListenerMethod("handleMessage");

        // 消息转换
        Jackson2JsonMessageConverter jackson2JsonMessageConverter = new Jackson2JsonMessageConverter();
        DefaultJackson2JavaTypeMapper javaTypeMapper = new DefaultJackson2JavaTypeMapper();

        Map<String, Class<?>> idClassMapping = new HashMap<>();
        // 针对不同的消息体调用不同的重载方法
        idClassMapping.put(Type.MANAGER, com.heibaiying.bean.ProductManager.class);
        idClassMapping.put(Type.PROGRAMMER, com.heibaiying.bean.Programmer.class);

        javaTypeMapper.setIdClassMapping(idClassMapping);

        jackson2JsonMessageConverter.setJavaTypeMapper(javaTypeMapper);
        adapter.setMessageConverter(jackson2JsonMessageConverter);
        container.setMessageListener(adapter);
        return container;
    }

}
4.3 测试对象消息的发送
@RunWith(SpringRunner.class)
@ContextConfiguration(locations = "classpath:rabbitmq.xml")
public class RabbitSendObjectTest {

    @Autowired
    private RabbitTemplate rabbitTemplate;

    @Test
    public void sendProgrammer() throws JsonProcessingException {
        MessageProperties messageProperties = new MessageProperties();
        //必须设置 contentType为 application/json
        messageProperties.setContentType("application/json");
        // 必须指定类型
        messageProperties.getHeaders().put("__TypeId__", Type.PROGRAMMER);
        Programmer programmer = new Programmer("xiaoming", 34, 52200.21f, new Date());
        // 序列化与反序列化都使用的Jackson
        ObjectMapper mapper = new ObjectMapper();
        String programmerJson = mapper.writeValueAsString(programmer);
        Message message = new Message(programmerJson.getBytes(), messageProperties);
        rabbitTemplate.send("objectTopic", "object", message);
    }

    @Test
    public void sendProductManager() throws JsonProcessingException {
        MessageProperties messageProperties = new MessageProperties();
        messageProperties.setContentType("application/json");
        messageProperties.getHeaders().put("__TypeId__", Type.MANAGER);
        ProductManager manager = new ProductManager("xiaohong", 21, new Date());
        ObjectMapper mapper = new ObjectMapper();
        String managerJson = mapper.writeValueAsString(manager);
        Message message = new Message(managerJson.getBytes(), messageProperties);
        rabbitTemplate.send("objectTopic", "object", message);
    }
}
附:源码Gitub地址:https://github.com/heibaiying/spring-samples-for-all
spring 5.x 系列第13篇 —— 整合RabbitMQ (xml配置方式)的更多相关文章
- spring 5.x 系列第15篇 —— 整合dubbo (xml配置方式)
文章目录 一. 项目结构说明 二.项目依赖 三.公共模块(dubbo-common) 四. 服务提供者(dubbo-provider) 4.1 productService是服务的提供者( 商品数据用 ...
- spring 5.x 系列第14篇 —— 整合RabbitMQ (代码配置方式)
源码Gitub地址:https://github.com/heibaiying/spring-samples-for-all 一.说明 1.1 项目结构说明 本用例关于rabbitmq的整合提供简单消 ...
- spring 5.x 系列第11篇 —— 整合memcached (xml配置方式)
文章目录 一.说明 1.1 XMemcached客户端说明 1.2 项目结构说明 1.3 依赖说明 二.spring 整合 memcached 2.1 单机配置 2.2 集群配置 2.3 存储基本类型 ...
- spring 5.x 系列第9篇 —— 整合mongodb (xml配置方式)
源码Gitub地址:https://github.com/heibaiying/spring-samples-for-all 一.说明 1.1 项目结构说明 配置文件位于resources下,项目以单 ...
- spring 5.x 系列第17篇 —— 整合websocket (xml配置方式)
源码Gitub地址:https://github.com/heibaiying/spring-samples-for-all 一.说明 1.1 项目结构说明 项目模拟一个简单的群聊功能,为区分不同的聊 ...
- spring 5.x 系列第1篇 —— springmvc基础 (xml配置方式)
文章目录 一.搭建hello spring工程 1.1 项目搭建 1.2 相关配置讲解 二.配置自定义拦截器 三.全局异常处理 四.参数绑定 4.1 参数绑定 4.2 关于日期格式转换的三种方法 五. ...
- spring 5.x 系列第16篇 —— 整合dubbo (代码配置方式)
文章目录 一. 项目结构说明 二.项目依赖 三.公共模块(dubbo-ano-common) 四. 服务提供者(dubbo-ano-provider) 4.1 提供方配置 4.2 使用注解@Servi ...
- spring 5.x 系列第12篇 —— 整合memcached (代码配置方式)
文章目录 一.说明 1.1 XMemcached客户端说明 1.2 项目结构说明 1.3 依赖说明 二.spring 整合 memcached 2.1 单机配置 2.2 集群配置 2.3 存储基本类型 ...
- spring 5.x 系列第10篇 —— 整合mongodb (代码配置方式)
源码Gitub地址:https://github.com/heibaiying/spring-samples-for-all 一.说明 1.1 项目结构说明 配置文件位于com.heibaiying. ...
随机推荐
- 代码首要的目标应该是“解决问题”(包括“没有 bug”),其次的目标才是“简单优雅”。
什么是现实理想主义者 曾经有人看了我的文章,以为我是一个“理想主义者”,来找我聊天.他说:“你知道吗,我跟你一样喜欢简单优雅的代码.上次我在某公司工作,看到他们的代码乱得不成样子,二话没说给他们重写了 ...
- Qt使用预编译头文件Using Precompiled Headers(提升10倍以上)
预编译头文件是被很多编译器用来编译稳定的代码以及将编译好的稳定代码存储在二进制文件中用于提升编译性能.在随后的编译中,编译器将加载存储状态继续编译指定的文件.每一个随后的编译将更快,因为稳定的代码不需 ...
- 使用Struts2的iterator标签遍历复杂Map种类
1.建一个Webproject.加入Struts2支持. 2.创建两个实体类: a). Mother(母亲)的Java类. package struts.map.entity; import java ...
- <PC>HP网络共享并创建一个热点问题
郁闷了一年多 你不能使用本地连接的开放热点 网上说的网卡驱动程序,系统设置等.,我们解决不了 原本BIOS节能设置错误 导致在连续主动对自己的有线无线功能被禁用 该LAN\WLAN Switchin ...
- cocos2d-x 显示触摸操作(单击显示效果浪潮,对于视频演示)-绩效转型
http://blog.csdn.net/hitwhylz/article/details/26042751 首先是显示触摸操作. 在文章最后.对性能进行一些提升改造. 由于要演示我们的作品.使用试玩 ...
- gtest写了第一个测试用例错误和结算过程
安装好gtest后,编写第一个測试案例test_main.cpp #include <iostream> #include <gtest/gtest.h> using name ...
- sql like N'%...%' 在C#里的写法
StringBuilder sb = new StringBuilder(); List<SqlParameter> parameters =new List<SqlParamete ...
- DataContext和ItemSource
一对多的关系DataContext为上下文,绑定数据源ItemSource取上下文中的某属性,会一级一级往上找属性 一般ItemSource的绑定,绑定到Grid/DataGrid一类容器上,底下的控 ...
- CefSharp For WPF响应页面点击事件
初始化 <!--浏览器--> <cefSharpWPF:ChromiumWebBrowser Name="webBrowser" Grid.Row="0 ...
- EF学习目录
EF EF性能优化 EF延迟加载LazyLoading EF相关报错 EF 事务 Entity相互关系 Entity种类(动态代理) DbContext Entity States Code Firs ...