Spring Boot 2 读取配置文件
开发环境:IntelliJ IDEA 2019.2.2
Spring Boot版本:2.1.8
新建一个名称为demo的Spring Boot项目。
一、默认配置文件
Spring Boot会读取名称application.properties(yml)的配置文件。
如果有多个同名文件,默认情况下,按照下面顺序读取:
(1)项目根目录的config目录
(2)项目根目录
(3)项目classpath下的config目录
(4)项目classpath根目录
如果同一个配置项出现在多份配置文件中,后面读取的值不会覆盖前面的。
测试:
在项目的4个位置各建立application.properties,内容如下:
(1)config/application.properties
test = config/application.properties

test1 = test1
(2)application.properties
test = application.properties

test2 = test2
(3)src/main/resources/config/application.properties
test = src/main/resources/config/application.properties

test3 = test3
(4)src/main/resources/application.properties
test = src/main/resources/application.properties

test4 = test4
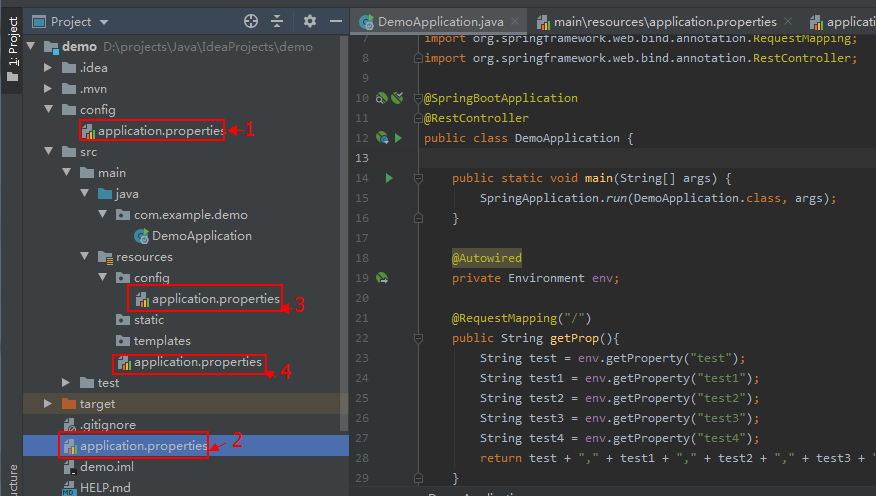
修改默认生成的启动类 DemoApplication.java 代码:
package com.example.demo;

import org.springframework.beans.factory.annotation.Autowired;

import org.springframework.boot.SpringApplication;

import org.springframework.boot.autoconfigure.SpringBootApplication;

import org.springframework.core.env.Environment;

import org.springframework.web.bind.annotation.RequestMapping;

import org.springframework.web.bind.annotation.RestController;

@SpringBootApplication

@RestController

public class DemoApplication {

    public static void main(String[] args) {

        SpringApplication.run(DemoApplication.class, args);

    }

    @Autowired

    private Environment env;

    @RequestMapping("/")

    public String getProp(){

        String test = env.getProperty("test");

        String test1 = env.getProperty("test1");

        String test2 = env.getProperty("test2");

        String test3 = env.getProperty("test3");

        String test4 = env.getProperty("test4");

        return test + "," + test1 + "," + test2 + "," + test3 + "," + test4;

    }

}
访问 http://localhost:8080/
输出:config/application.properties,test1,test2,test3,test4
二、指定配置文件
读取指定的配置文件,不使用默认的application.properties。
测试:
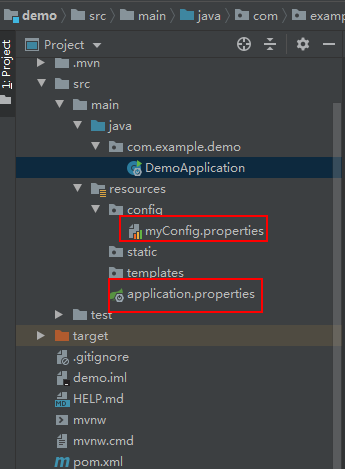
(1)src/main/resources/application.properties 内容:
test1 = application.properties
(2)在项目的src/main/resources新建目录config,新建配置文件myConfig.properties,内容:
test2= myConfig.properties
修改默认生成的启动类 DemoApplication.java 代码:
package com.example.demo;

import org.springframework.beans.factory.annotation.Autowired;

import org.springframework.boot.SpringApplication;

import org.springframework.boot.autoconfigure.SpringBootApplication;

import org.springframework.boot.builder.SpringApplicationBuilder;

import org.springframework.core.env.Environment;

import org.springframework.web.bind.annotation.RequestMapping;

import org.springframework.web.bind.annotation.RestController;

@SpringBootApplication

@RestController

public class DemoApplication {

    public static void main(String[] args) {

        //SpringApplication.run(DemoApplication.class, args);

        new SpringApplicationBuilder(DemoApplication.class).properties(

                "spring.config.location=classpath:/config/myConfig.properties"

        ).run(args);

    }

    @Autowired

    private Environment env;

    @RequestMapping("/")

    public String getProp(){

        String test1 = env.getProperty("test1");

        String test2 = env.getProperty("test2");

        return test1 + "," + test2;

    }

}
访问 http://localhost:8080/
输出:null,myConfig.properties
可见application.properties已读取不到,成功读取到配置文件myConfig.properties。
也可以使用spring.config.name指定配置文件的名称,如下面代码指定了myConfig,Spring Boot会到classpath下寻找myConfig.properties(yml)。
    public static void main(String[] args) {

        //SpringApplication.run(DemoApplication.class, args);

        /*new SpringApplicationBuilder(DemoApplication.class).properties(

                "spring.config.location=classpath:/config/myConfig.properties"

        ).run(args);*/

        new SpringApplicationBuilder(DemoApplication.class).properties(

                "spring.config.name=myConfig").run(args);

    }
三、使用profile指定配置
使用profile可以根据特定的环境来激活不同的配置。
src/main/resources/application.yml 内容如下:
spring:

  profiles: mysql

jdbc:

  driver:

    com.mysql.jdbc.Driver

---

spring:

  profiles: oracle

jdbc:

  driver:

    oracle.jdbc.driver.OracleDriver
修改默认生成的启动类 DemoApplication.java 代码:
package com.example.demo;

import org.springframework.beans.factory.annotation.Autowired;

import org.springframework.boot.SpringApplication;

import org.springframework.boot.autoconfigure.SpringBootApplication;

import org.springframework.boot.builder.SpringApplicationBuilder;

import org.springframework.core.env.Environment;

import org.springframework.web.bind.annotation.RequestMapping;

import org.springframework.web.bind.annotation.RestController;

import java.util.Scanner;

@SpringBootApplication

@RestController

public class DemoApplication {

    public static void main(String[] args) {

        //SpringApplication.run(DemoApplication.class, args);

        Scanner scan = new Scanner(System.in);

        String profile = scan.nextLine();

        new SpringApplicationBuilder(DemoApplication.class).properties(

                "spring.config.location=classpath:/application.yml"

        ).profiles(profile).run(args);

    }

    @Autowired

    private Environment env;

    @RequestMapping("/")

    public String getProp(){

        String res = env.getProperty("jdbc.driver");

        return res;

    }

}
在IDEA中点击Run按钮后,在控制台先敲回车再输入oracle,
访问 http://localhost:8080/ 输出:oracle.jdbc.driver.OracleDriver
重新Run,在控制台先敲回车再输入mysql,
访问 http://localhost:8080/ 输出:com.mysql.jdbc.Driver
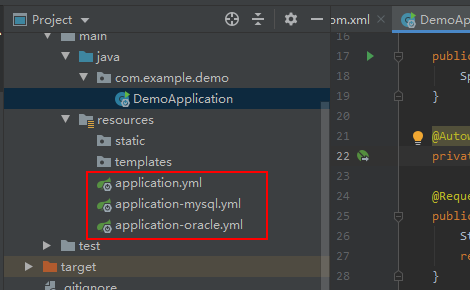
还可以通过不同配置文件的名称来设置profile,创建下面3个文件。
(1)src/main/resources/application.yml 内容:
spring:

  profiles:

    active: oracle
(2)src/main/resources/application-mysql.yml 内容:
jdbc:

  driver:

    com.mysql.jdbc.Driver
(3)src/main/resources/application-oracle.yml 内容:
jdbc:

  driver:

    oracle.jdbc.driver.OracleDriver
修改默认生成的启动类 DemoApplication.java 代码:
package com.example.demo;

import org.springframework.beans.factory.annotation.Autowired;

import org.springframework.boot.SpringApplication;

import org.springframework.boot.autoconfigure.SpringBootApplication;

import org.springframework.boot.builder.SpringApplicationBuilder;

import org.springframework.core.env.Environment;

import org.springframework.web.bind.annotation.RequestMapping;

import org.springframework.web.bind.annotation.RestController;

import java.util.Scanner;

@SpringBootApplication

@RestController

public class DemoApplication {

    public static void main(String[] args) {

        SpringApplication.run(DemoApplication.class, args);

    }

    @Autowired

    private Environment env;

    @RequestMapping("/")

    public String getProp(){

        String res = env.getProperty("jdbc.driver");

        return res;

    }

}
访问 http://localhost:8080/ 输出:oracle.jdbc.driver.OracleDriver
Spring Boot 2 读取配置文件的更多相关文章
- 【转】spring boot mybatis 读取配置文件
spring boot mybatis 配置整理 一.加载mybatis的配置 1.手写配置,写死在代码里 import java.io.IOException; import java.util.P ...
- spring boot中读取配置文件的两种方式
application.properties test.name=测试 test.url=www.test.com 1.@Value注解 在controller里可以这样直接调用 @Value(&qu ...
- spring boot 项目从配置文件中读取maven 的pom.xml 文件标签的内容。
需求: 将pom.xml 文件中的版本号读取到配置文件并打印到日志中. 第一步: 在pom.xml 中添加以下标签. 第二步: 将version 标签的值读取到配置文件中 这里使用 @@ 而不是 ...
- spring boot 无法读取application.properties问题
spring boot 无法读取application.properties问题 https://bbs.csdn.net/topics/392374488 Spring Boot 之注解@Compo ...
- # spring boot + mybatis 读取数据库
spring boot + mybatis 读取数据库 创建数据库 use testdb; drop table if exists t_city; create table t_city( id i ...
- Spring Boot 的核心配置文件有哪几个?它们的区别是什么?
Spring Boot 的核心配置文件是 application 和 bootstrap 配置文件.application 配置文件这个容易理解,主要用于 Spring Boot 项目的自动化配置.b ...
- Spring Boot的properties配置文件读取
我在自己写点东西玩的时候需要读配置文件,又不想引包,于是打算扣点Spring Boot读取配置文件的代码出来,当然只是读配置文件没必要这么麻烦,不过反正闲着也是闲着,扣着玩了.具体启动过程以前的博客写 ...
- 解决Spring boot中读取属性配置文件出现中文乱码的问题
问题描述: 在配置文件application.properties中写了 server.port=8081 server.servlet.context-path=/boy name=张三 age=2 ...
- Spring Boot 获取yaml配置文件信息
Spring boot 项目启动过程中: org.springframework.boot.SpringApplication#prepareEnvironment 当程序步入listeners.en ...
随机推荐
- Xshell 连接 VirtualBox
VirtualBox设置端口转发 Xshell 新建会话 连接成功
- CentOS自行编译升级Git
上一篇升级Git的方式是通过更改yum的源,然后通过yum来安装,那么对于喜欢折腾的人来说,怎么通过Git的源代码自行安装呢? 我安装的是CentOS-7-x86_64-1908,自带的git是1.8 ...
- 计算属性computed
computed 在Vue中有多种方法为视图设置值: 1.使用指令直接将数据值绑定到视图 2.使用简单的表达式对内容进行简单的转换 3.使用过滤器对内容进行简单的转换 除此之外,我们还可以使用计算属性 ...
- numpy输出有省略号的问题
发现很多文章都说加一句 np.set_printoptions(threshold="nan") 或者 np.set_printoptions(threshold=np.nan) ...
- Leetcode92: Reverse Linked List II 翻转链表问题
问题描述 给定一个链表,要求翻转其中从m到n位上的节点,返回新的头结点. Example Input: 1->2->3->4->5->NULL, m = 2, n = 4 ...
- 从一个OutOfMemoryError 学会了分析Java内存泄漏问题
以前都是好好的,最近出现了 oom. 问题 开始是: java.lang.OutOfMemoryError: Java heap space -- :: --- [nio--exec-] c.e.p. ...
- Eigen对齐(加速)方案
Eigen库为了使用指令集(如SSE等)加速方案,通常采用字节对齐的方案.如果使用C++的标准库,如Vector,Map等,需要使用如下方案 std::map<int, Eigen::Vecto ...
- AES加密原理和AOE工程实践
在AI业务的开发的过程中,我们常常需要对模型文件进行加密.我们从以下几个方面来说一说AES的加密原理以及AOE里的工程实践. 常见的加密算法 AOE对模型加密需求的思考 AES的加密原理 AOE工程实 ...
- 【JS档案揭秘】第三集 深入最底层探秘原型链
关于这部分我看过大量的文章,数不胜数,包括阮一峰的继承三部曲,还有各种慕课的视频教程,网上无数继承方法的对比.也对很多概念存在长期错误的理解.今天做一个正确的总结,用来给原型链和继承这块知识画上句号, ...
- iOS引导页(开局滚动效果)
参考链接1:https://jingyan.baidu.com/article/4dc40848a341dfc8d846f152.html 参考链接2:https://www.cnblogs.com/ ...