
maven环境搭建教程
1.下载和解压
访问 maven.apache.org .点击download
下载对应系统的文件,window下载bin的zip文件.
maven需要java1.7jdk支持,如果jdk没有安装好,那么也是不能使用的.
下载好了之后解压到任意地方.
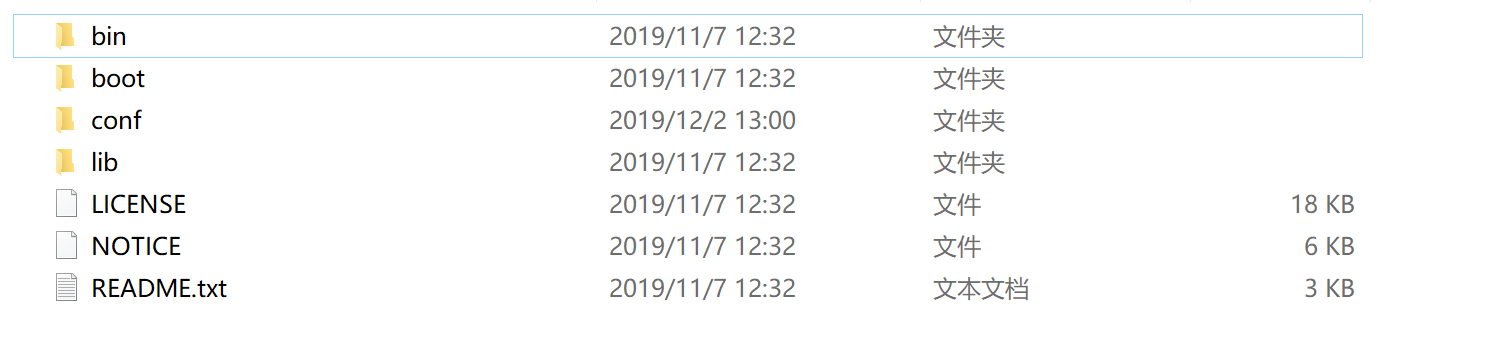
打开文件夹,可以看到bin,boot,conf,lib文件夹,其中比较重要的是conf文件夹里面的 settings.xml文件
2.配置系统环境
右键我的电脑->属性->高级系统设置->环境变量
如果是自己电脑新建系统变量
如果不希望影响该电脑的其他用户,新建用户变量.
新建变量名 M2_HOME ,变量值:解压出的bin文件夹所在的目录
然后找到Path变量,点击编辑,在后面添加 %M2_HOME%\bin,
如果是win10看到会是一个表格,这样直接添加就行,如果是win7,结尾需要加上;号.
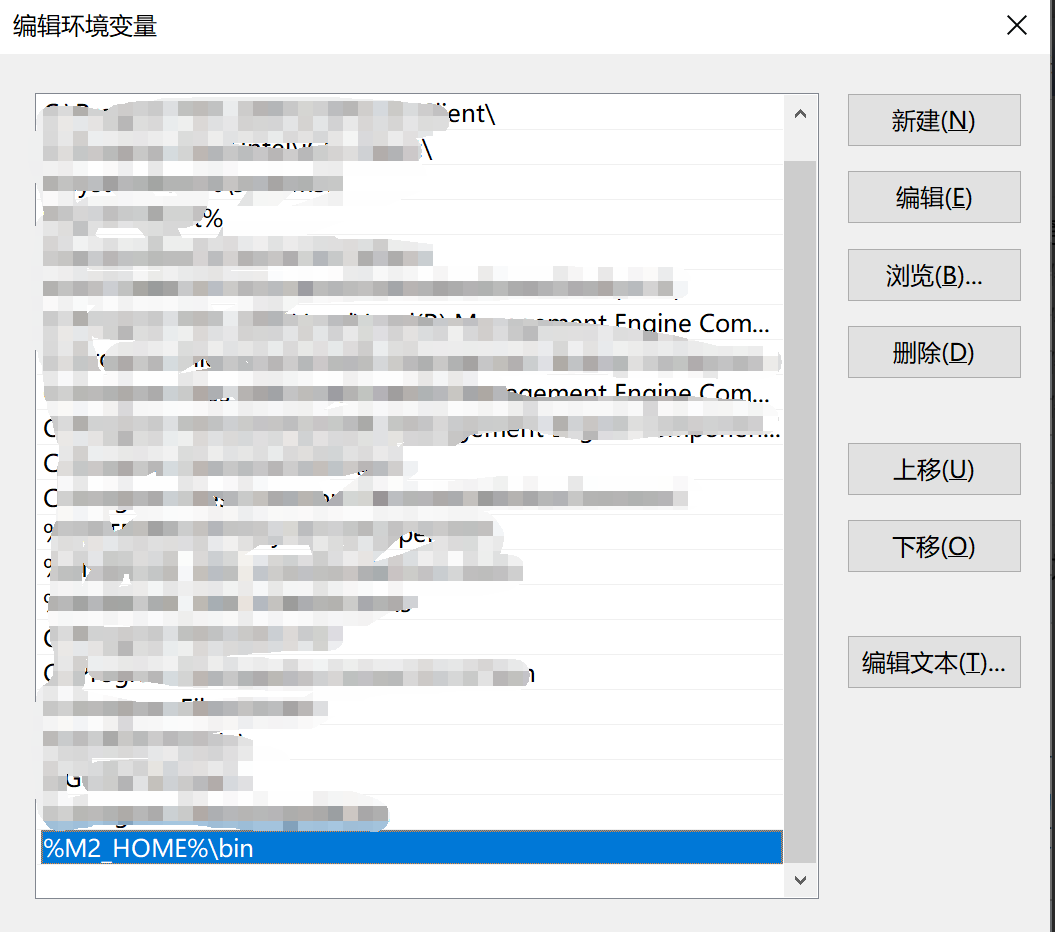
修改好了之后确定即可.
3.测试以及修改镜像源
打开cmd 输入 mvn -version,可能会比较慢.

看到这样即可.
接下来我们要修改镜像源,我们选用阿里的镜像源.
进入apache-maven文件夹,进入conf文件夹,用记事本打开settings.xml文件.
默认的镜像源是注释了的,现在添加新的镜像源.
<mirror>

      <id>alimaven</id>

      <name>aliyun maven</name>

          <url>http://maven.aliyun.com/nexus/content/groups/public/</url>

      <mirrorOf>central</mirrorOf>

</mirror>
如果你不知道怎么添加,那么新建一个xml文件,填入:
<?xml version="1.0" encoding="UTF-8"?>

<!--

Licensed to the Apache Software Foundation (ASF) under one

or more contributor license agreements.  See the NOTICE file

distributed with this work for additional information

regarding copyright ownership.  The ASF licenses this file

to you under the Apache License, Version 2.0 (the

"License"); you may not use this file except in compliance

with the License.  You may obtain a copy of the License at

    http://www.apache.org/licenses/LICENSE-2.0

Unless required by applicable law or agreed to in writing,

software distributed under the License is distributed on an

"AS IS" BASIS, WITHOUT WARRANTIES OR CONDITIONS OF ANY

KIND, either express or implied.  See the License for the

specific language governing permissions and limitations

under the License.

-->

<!--

 | This is the configuration file for Maven. It can be specified at two levels:

 |

 |  . User Level. This settings.xml file provides configuration for a single user,

 |                 and is normally provided in ${user.home}/.m2/settings.xml.

 |

 |                 NOTE: This location can be overridden with the CLI option:

 |

 |                 -s /path/to/user/settings.xml

 |

 |  . Global Level. This settings.xml file provides configuration for all Maven

 |                 users on a machine (assuming they're all using the same Maven

 |                 installation). It's normally provided in

 |                 ${maven.conf}/settings.xml.

 |

 |                 NOTE: This location can be overridden with the CLI option:

 |

 |                 -gs /path/to/global/settings.xml

 |

 | The sections in this sample file are intended to give you a running start at

 | getting the most out of your Maven installation. Where appropriate, the default

 | values (values used when the setting is not specified) are provided.

 |

 |-->

<settings xmlns="http://maven.apache.org/SETTINGS/1.0.0"

          xmlns:xsi="http://www.w3.org/2001/XMLSchema-instance"

          xsi:schemaLocation="http://maven.apache.org/SETTINGS/1.0.0 http://maven.apache.org/xsd/settings-1.0.0.xsd">

  <!-- localRepository

   | The path to the local repository maven will use to store artifacts.

   |

   | Default: ${user.home}/.m2/repository

  <localRepository>/path/to/local/repo</localRepository>

  -->

  <!-- interactiveMode

   | This will determine whether maven prompts you when it needs input. If set to false,

   | maven will use a sensible default value, perhaps based on some other setting, for

   | the parameter in question.

   |

   | Default: true

  <interactiveMode>true</interactiveMode>

  -->

  <!-- offline

   | Determines whether maven should attempt to connect to the network when executing a build.

   | This will have an effect on artifact downloads, artifact deployment, and others.

   |

   | Default: false

  <offline>false</offline>

  -->

  <!-- pluginGroups

   | This is a list of additional group identifiers that will be searched when resolving plugins by their prefix, i.e.

   | when invoking a command line like "mvn prefix:goal". Maven will automatically add the group identifiers

   | "org.apache.maven.plugins" and "org.codehaus.mojo" if these are not already contained in the list.

   |-->

  <pluginGroups>

    <!-- pluginGroup

     | Specifies a further group identifier to use for plugin lookup.

    <pluginGroup>com.your.plugins</pluginGroup>

    -->

  </pluginGroups>

  <!-- proxies

   | This is a list of proxies which can be used on this machine to connect to the network.

   | Unless otherwise specified (by system property or command-line switch), the first proxy

   | specification in this list marked as active will be used.

   |-->

  <proxies>

    <!-- proxy

     | Specification for one proxy, to be used in connecting to the network.

     |

    <proxy>

      <id>optional</id>

      <active>true</active>

      <protocol>http</protocol>

      <username>proxyuser</username>

      <password>proxypass</password>

      <host>proxy.host.net</host>

      <port></port>

      <nonProxyHosts>local.net|some.host.com</nonProxyHosts>

    </proxy>

    -->

  </proxies>

  <!-- servers

   | This is a list of authentication profiles, keyed by the server-id used within the system.

   | Authentication profiles can be used whenever maven must make a connection to a remote server.

   |-->

  <servers>

    <!-- server

     | Specifies the authentication information to use when connecting to a particular server, identified by

     | a unique name within the system (referred to by the 'id' attribute below).

     |

     | NOTE: You should either specify username/password OR privateKey/passphrase, since these pairings are

     |       used together.

     |

    <server>

      <id>deploymentRepo</id>

      <username>repouser</username>

      <password>repopwd</password>

    </server>

    -->

    <!-- Another sample, using keys to authenticate.

    <server>

      <id>siteServer</id>

      <privateKey>/path/to/private/key</privateKey>

      <passphrase>optional; leave empty if not used.</passphrase>

    </server>

    -->

  </servers>

  <!-- mirrors

   | This is a list of mirrors to be used in downloading artifacts from remote repositories.

   |

   | It works like this: a POM may declare a repository to use in resolving certain artifacts.

   | However, this repository may have problems with heavy traffic at times, so people have mirrored

   | it to several places.

   |

   | That repository definition will have a unique id, so we can create a mirror reference for that

   | repository, to be used as an alternate download site. The mirror site will be the preferred

   | server for that repository.

   |-->

  <mirrors>

    <!-- mirror

     | Specifies a repository mirror site to use instead of a given repository. The repository that

     | this mirror serves has an ID that matches the mirrorOf element of this mirror. IDs are used

     | for inheritance and direct lookup purposes, and must be unique across the set of mirrors.

     |

    <mirror>

      <id>mirrorId</id>

      <mirrorOf>repositoryId</mirrorOf>

      <name>Human Readable Name for this Mirror.</name>

      <url>http://my.repository.com/repo/path</url>

    </mirror>

     -->

    <mirror>

      <id>alimaven</id>

      <name>aliyun maven</name>

          <url>http://maven.aliyun.com/nexus/content/groups/public/</url>

      <mirrorOf>central</mirrorOf>

    </mirror>

  </mirrors>

  <!-- profiles

   | This is a list of profiles which can be activated in a variety of ways, and which can modify

   | the build process. Profiles provided in the settings.xml are intended to provide local machine-

   | specific paths and repository locations which allow the build to work in the local environment.

   |

   | For example, if you have an integration testing plugin - like cactus - that needs to know where

   | your Tomcat instance is installed, you can provide a variable here such that the variable is

   | dereferenced during the build process to configure the cactus plugin.

   |

   | As noted above, profiles can be activated in a variety of ways. One way - the activeProfiles

   | section of this document (settings.xml) - will be discussed later. Another way essentially

   | relies on the detection of a system property, either matching a particular value for the property,

   | or merely testing its existence. Profiles can also be activated by JDK version prefix, where a

   | value of '1.4' might activate a profile when the build is executed on a JDK version of '1.4.2_07'.

   | Finally, the list of active profiles can be specified directly from the command line.

   |

   | NOTE: For profiles defined in the settings.xml, you are restricted to specifying only artifact

   |       repositories, plugin repositories, and free-form properties to be used as configuration

   |       variables for plugins in the POM.

   |

   |-->

  <profiles>

    <!-- profile

     | Specifies a set of introductions to the build process, to be activated using one or more of the

     | mechanisms described above. For inheritance purposes, and to activate profiles via <activatedProfiles/>

     | or the command line, profiles have to have an ID that is unique.

     |

     | An encouraged best practice for profile identification is to use a consistent naming convention

     | for profiles, such as 'env-dev', 'env-test', 'env-production', 'user-jdcasey', 'user-brett', etc.

     | This will make it more intuitive to understand what the set of introduced profiles is attempting

     | to accomplish, particularly when you only have a list of profile id's for debug.

     |

     | This profile example uses the JDK version to trigger activation, and provides a JDK-specific repo.

    <profile>

      <id>jdk-1.4</id>

      <activation>

        <jdk>1.4</jdk>

      </activation>

      <repositories>

        <repository>

          <id>jdk14</id>

          <name>Repository for JDK 1.4 builds</name>

          <url>http://www.myhost.com/maven/jdk14</url>

          <layout>default</layout>

          <snapshotPolicy>always</snapshotPolicy>

        </repository>

      </repositories>

    </profile>

    -->

    <!--

     | Here is another profile, activated by the system property 'target-env' with a value of 'dev',

     | which provides a specific path to the Tomcat instance. To use this, your plugin configuration

     | might hypothetically look like:

     |

     | ...

     | <plugin>

     |   <groupId>org.myco.myplugins</groupId>

     |   <artifactId>myplugin</artifactId>

     |

     |   <configuration>

     |     <tomcatLocation>${tomcatPath}</tomcatLocation>

     |   </configuration>

     | </plugin>

     | ...

     |

     | NOTE: If you just wanted to inject this configuration whenever someone set 'target-env' to

     |       anything, you could just leave off the <value/> inside the activation-property.

     |

    <profile>

      <id>env-dev</id>

      <activation>

        <property>

          <name>target-env</name>

          <value>dev</value>

        </property>

      </activation>

      <properties>

        <tomcatPath>/path/to/tomcat/instance</tomcatPath>

      </properties>

    </profile>

    -->

  </profiles>

  <!-- activeProfiles

   | List of profiles that are active for all builds.

   |

  <activeProfiles>

    <activeProfile>alwaysActiveProfile</activeProfile>

    <activeProfile>anotherAlwaysActiveProfile</activeProfile>

  </activeProfiles>

  -->

</settings>
然后conf中的settrings.xml替换即可.
可能有的同学修改了但是没有权限保存,这样的话,也可以通过复制上面的代码然后替换也可以修改.
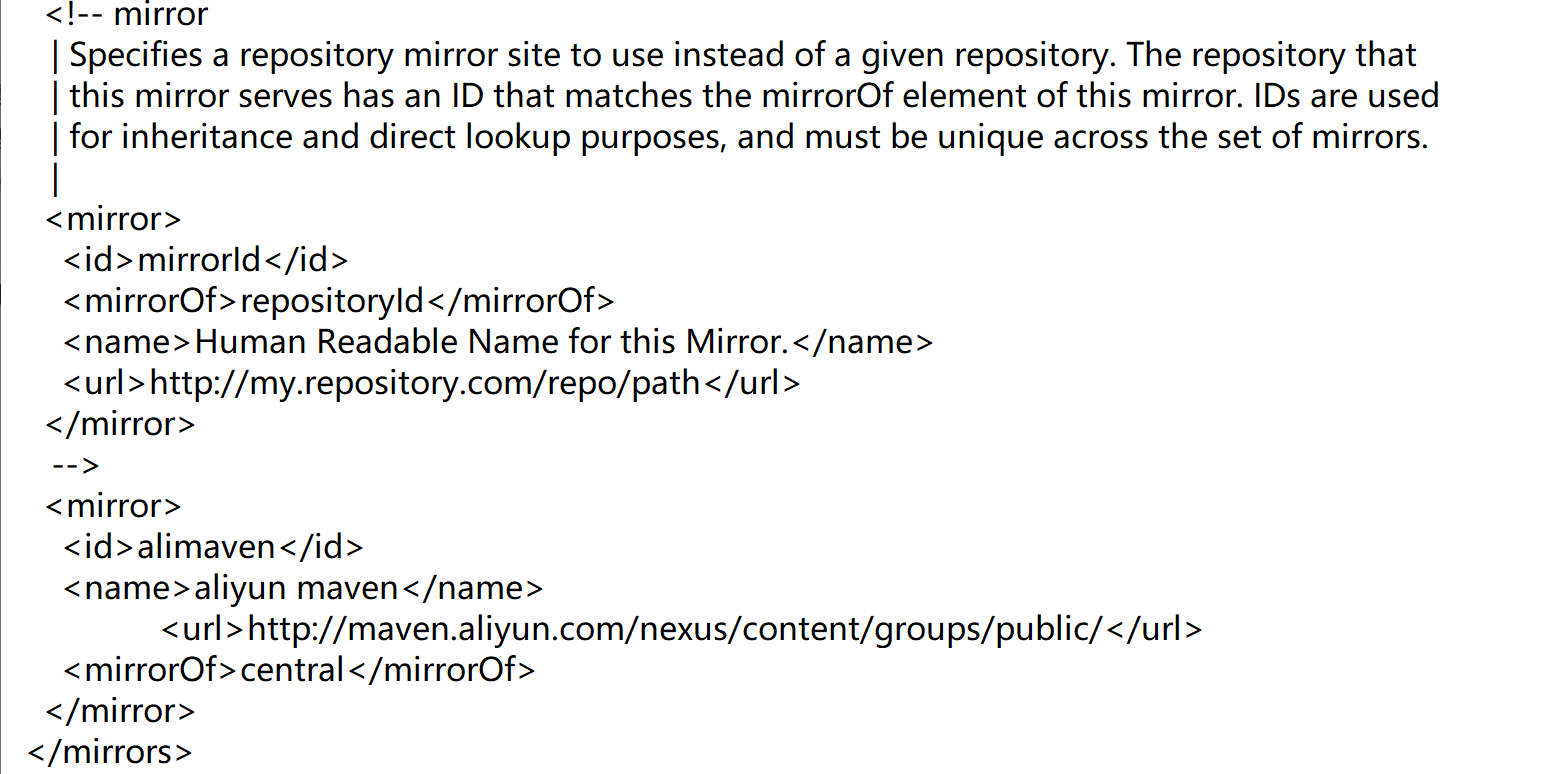
千万不要写到注释里面去了.
maven环境搭建教程的更多相关文章
- Ubuntu 开发环境搭建教程
Ubuntu 开发环境搭建教程 本文原始地址:https://sitoi.cn/posts/18425.html 更新 sudo apt upgrade sudo apt update 生成本机密钥 ...
- Windows Server 2003 IIS6.0+PHP5(FastCGI)+MySQL5环境搭建教程
准备篇 一.环境说明: 操作系统:Windows Server 2003 SP2 32位 PHP版本:php 5.3.14(我用的php 5.3.10安装版) MySQL版本:MySQL5.5.25 ...
- maven 环境搭建
1.maven环境搭建 1)下载maven,http://maven.apache.org/download.cgi,到本地解压,然后配置环境变量 MAVEN_HOME:D:\software\apa ...
- Windows Server 2012 R2 IIS8.5+PHP(FastCGI)+MySQL环境搭建教程
原文地址:http://www.osyunwei.com/archives/7378.html 搬运是为了自己找资料方便. 准备篇 一.环境说明: 操作系统:Windows Server 2012 R ...
- Windows Server 2012 R2 IIS8.5+PHP(FastCGI)+MySQL环境搭建教程
准备篇 一.环境说明: 操作系统:Windows Server 2012 R2 PHP版本:php 5.5.8 MySQL版本:MySQL5.6.15 二.相关软件下载: 1.PHP下载地址: htt ...
- LAMP环境搭建教程
原文:LAMP环境搭建教程 学习PHP脚本编程语言之前,必须先搭建并熟悉开发环境,开发环境有很多种,例如LAMP.WAMP.MAMP等.这里我介绍一下LAMP环境的搭建,即Linux.Apache.M ...
- Win2012 R2 IIS8.5+PHP(FastCGI)+MySQL运行环境搭建教程
这篇文章主要介绍了Win2012 R2 IIS8.5+PHP(FastCGI)+MySQL运行环境搭建教程,需要的朋友可以参考下 准备篇 一.环境说明: 操作系统:Windows Server 201 ...
- Win2008 R2 IIS7.5+PHP5(FastCGI)+MySQL5环境搭建教程
现在很多朋友想尝试win2008 r2来跑web服务器,跟win2003相比界面差别有点大,有些人可能不太习惯,不过以后是趋势啊,这里简单分享下,方便需要的朋友 准备篇 一.环境说明: 操作系统:Wi ...
- 虚拟机IOS开发环境搭建教程
来源:http://www.cnblogs.com/xiaoyaoju/archive/2013/05/21/3091171.html 安装条件: 硬件:一台拥有支持虚拟技术的64位双核处理器和2GB ...
随机推荐
- GoLand——配置goproxy.io代理
前言 由于众所周知的原因,也为了更好的下载go的包,所以找到了goproxy 配置 ctrl+alt+s->Go->Go Modules(vgo)->设置proxy为https:// ...
- C#线程池 ThreadPool
什么是线程池 大家都知道,我们在打开一个应用的时候,操作系统是要做很多的事情的,动态链接.装载.分配虚拟空间.等等等等,其实一个应用的打开同时也伴随着一个进程的建立. 进程的建立是需要时间的,在进程上 ...
- AndroidStudio中Flutter打包APK
1.生成签名文件 在打包之前我们需要一个签名文件,证明文件的唯一性. keytool -genkey -v -keystore F:\APP\sign.jks -keyalg RSA -keysize ...
- Python爬虫进阶 | 异步协程
一.背景 之前爬虫使用的是requests+多线程/多进程,后来随着前几天的深入了解,才发现,对于爬虫来说,真正的瓶颈并不是CPU的处理速度,而是对于网页抓取时候的往返时间,因为如果采用request ...
- WinDbg常用命令系列---!teb
!teb 简介 !teb扩展显示线程环境块(teb)中信息的格式化视图. 使用形式 !teb [TEB-Address] 参数 TEB-Address 要检查其TEB的线程的十六进制地址.(这不是从线 ...
- 关于新版本cube.js 集成preosto 的一个说明
实际上cubejs cli 是可以使用的,只是官方文档对于dbtype 说明的问题 使用如下命令我们可以创建prestodb 的基本项目 cubejs create -d prestodb myd ...
- check_monitor
#! /bin/bash # 声明agent配置文件路径 CONF=/etc/sdata/zabbix/zabbix_agentd.conf #CONF=/tmp/zabbix_agentd.conf ...
- 开源项目 11 Ionic Zip
using Ionic.Zip; using System; using System.Collections.Generic; using System.IO; using System.Linq; ...
- 开源项目 01 HtmlAgilityPack
using HtmlAgilityPack; using System; using System.Collections.Generic; using System.Linq; using Syst ...
- 14-ESP8266 SDK开发基础入门篇--上位机串口控制 Wi-Fi输出PWM的占空比,调节LED亮度,8266程序编写
https://www.cnblogs.com/yangfengwu/p/11102026.html 首先规定下协议 ,CRC16就不加了哈,最后我会附上CRC16的计算程序,大家有兴趣自己加上 上 ...