
Spring Security OAuth2.0 - AuthorizationServer和ResourceServer分离
《Spring Security实现OAuth2.0授权服务 - 基础版》和《Spring Security实现OAuth2.0授权服务 - 进阶版》两篇文章中介绍如何搭建OAuth2.0授权服务器和资源服务器。
本文将继续优化,将授权服务器和资源服务器分离,部署在不同的服务器上面。
一、简要说明
Spring Security OAuth2.0既可以把授权服务器(AuthorizationServer)和资源服务器(ResourceServer)配置在一个应用中,也可以分开配置。
授权服务器负责用户登录、授权、token验证等。
资源服务器负责提供受保护资源,只是需要到授权服务器进行token验证。
在此部分,将介绍以下内容:
- 如何将AuthorizationServer和ResourceServer分开配置,各司其职。
- 使用postman替换curl命令作为接口调用的工具。
- 依赖、实体类、工具类、DAO、Service、授权页、登录页等内容与上一部分没有区别,不再赘述,只记录需要修改的内容。
二、AuthorizationServer配置
在上一部分的代码(Spring Security实现OAuth2.0进阶)中抽取以下内容:
- 实体类。
- 登录页和授权页。
- DAO和Service层。
- Mybatis配置、Security配置和AuthorizationServerConfigurer配置。
需要修改一部分代码。
1、修改AuthorizationServerConfigurer配置
重写configure(AuthorizationServerSecurityConfigurer)方法,配置前来验证token的client需要拥有ROLE_TRUSTED_CLIENT角色。
 @Configuration

 public class Oauth2AuthorizationServerConfiguration extends

         AuthorizationServerConfigurerAdapter {

     @Autowired

     private UserDetailsService userDetailsService;

     @Autowired

     private DataSource dataSource;

     @Override

     public void configure(AuthorizationServerSecurityConfigurer security)

             throws Exception {

         // 配置前来验证token的client需要拥有的角色

         security.checkTokenAccess("hasAuthority('ROLE_TRUSTED_CLIENT')");

     }

     @Override

     public void configure(ClientDetailsServiceConfigurer clients)

             throws Exception {

         // 不变

     }

     @Override

     public void configure(AuthorizationServerEndpointsConfigurer endpoints)

             throws Exception {

         // 不变

     }

 }
2、修改启动类
启动类删除@EnableResourceServer注解。
 @SpringBootApplication

 @EnableAuthorizationServer

 @MapperScan("org.net5ijy.oauth2.repository")

 public class Oauth2AuthorizationServer {

     public static void main(String[] args) {

         // args = new String[] { "--debug" };

         SpringApplication.run(Oauth2AuthorizationServer.class, args);

     }

 }
三、ResourceServer配置
在上一部分的代码(Spring Security实现OAuth2.0进阶)中抽取以下内容:
- 响应工具类
- 受保护资源controller
1、配置Spring Security
 @EnableWebSecurity

 public class SecurityConfiguration extends WebSecurityConfigurerAdapter {

     @Override

     protected void configure(HttpSecurity http) throws Exception {

         http.authorizeRequests().antMatchers("/order/**").authenticated();

         // 禁用CSRF

         http.csrf().disable();

     }

 }
2、配置ResourceServerConfigurer
需要配置一个受信任的client到授权服务器验证token令牌。
 @Configuration

 public class Oauth2ResourceServerConfiguration extends ResourceServerConfigurerAdapter {

     private static final String URL = "http://localhost:7002/oauth/check_token";

     @Override

     public void configure(ResourceServerSecurityConfigurer resources)

             throws Exception {

         RemoteTokenServices tokenService = new RemoteTokenServices();

         tokenService.setCheckTokenEndpointUrl(URL);

         tokenService.setClientId("net5ijy");

         tokenService.setClientSecret("12345678");

         resources.tokenServices(tokenService);

     }

 }
3、修改启动类
启动类删除@EnableAuthorizationServer注解。
 @SpringBootApplication

 @EnableResourceServer

 public class Oauth2ResourceServer {

     public static void main(String[] args) {

         SpringApplication.run(Oauth2ResourceServer.class, args);

     }

 }
四、测试授权码模式
首先启动授权服务器,再启动资源服务器。
1、获取authorization_code授权码
使用浏览器访问:
http://localhost:7002/oauth/authorize?response_type=code&client_id=tencent&redirect_uri=http://localhost:8080&scope=all
地址
http://localhost:7002/oauth/authorize
参数
|
response_type |
code |
|
client_id |
根据实际的client-id填写,此处写tencent |
|
redirect_uri |
生成code后的回调地址,http://localhost:8080 |
|
scope |
权限范围 |
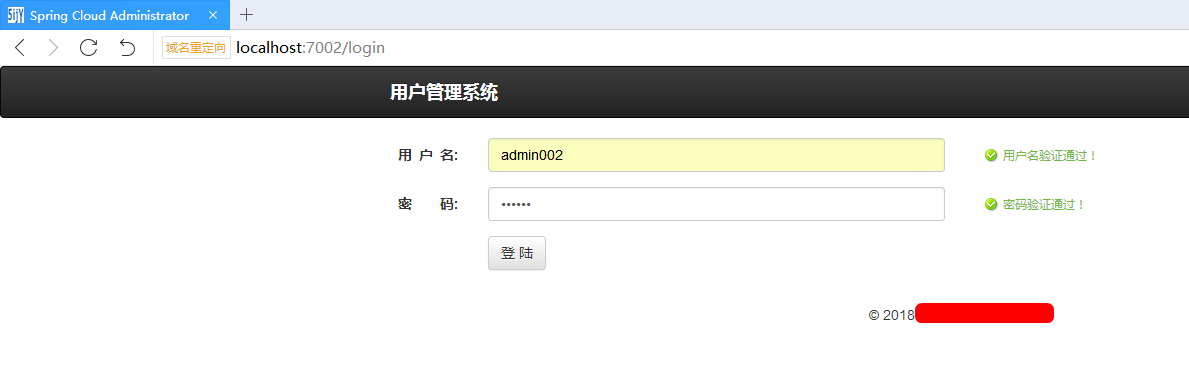
登录,admin002和123456
允许授权
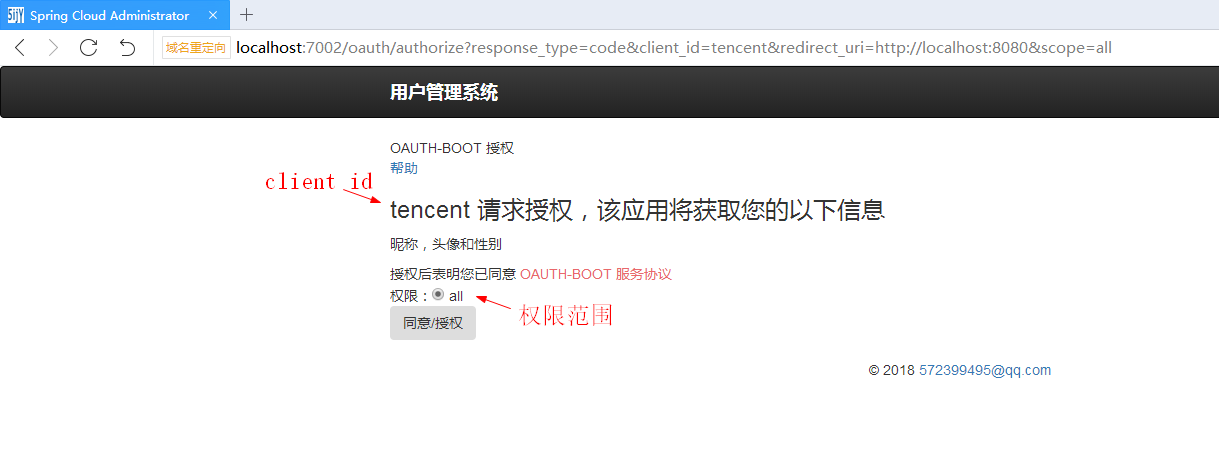
看到浏览器重定向到了http://localhost:8080并携带了code参数,这个code就是授权服务器生成的授权码

2、获取token令牌
地址
http://localhost:7002/oauth/token
参数
|
grant_type |
授权码模式,写authorization_code |
|
scope |
权限范围 |
|
redirect_uri |
回调地址,http://localhost:8080需要urlencode |
|
code |
就是上一步生成的授权码 |
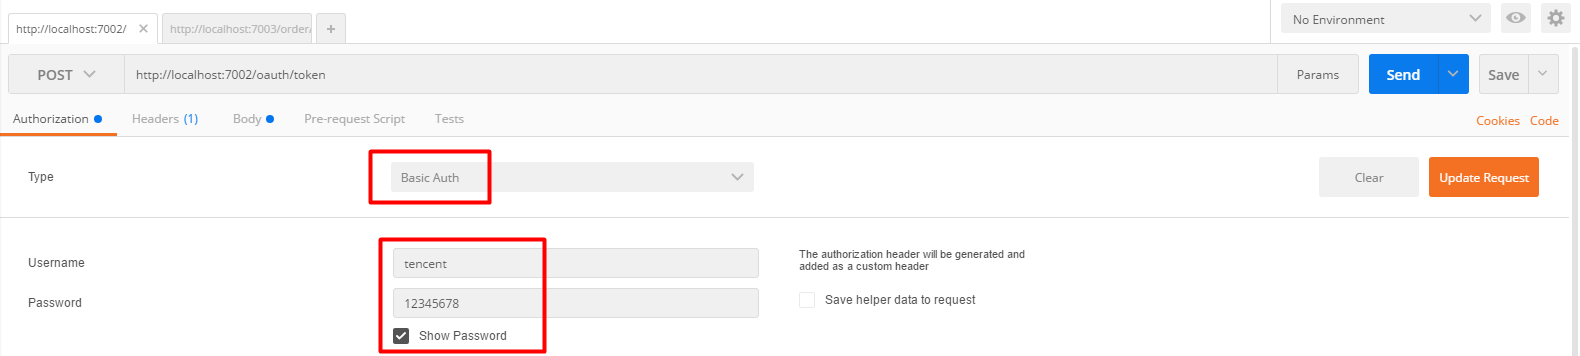
使用postman获取token令牌。
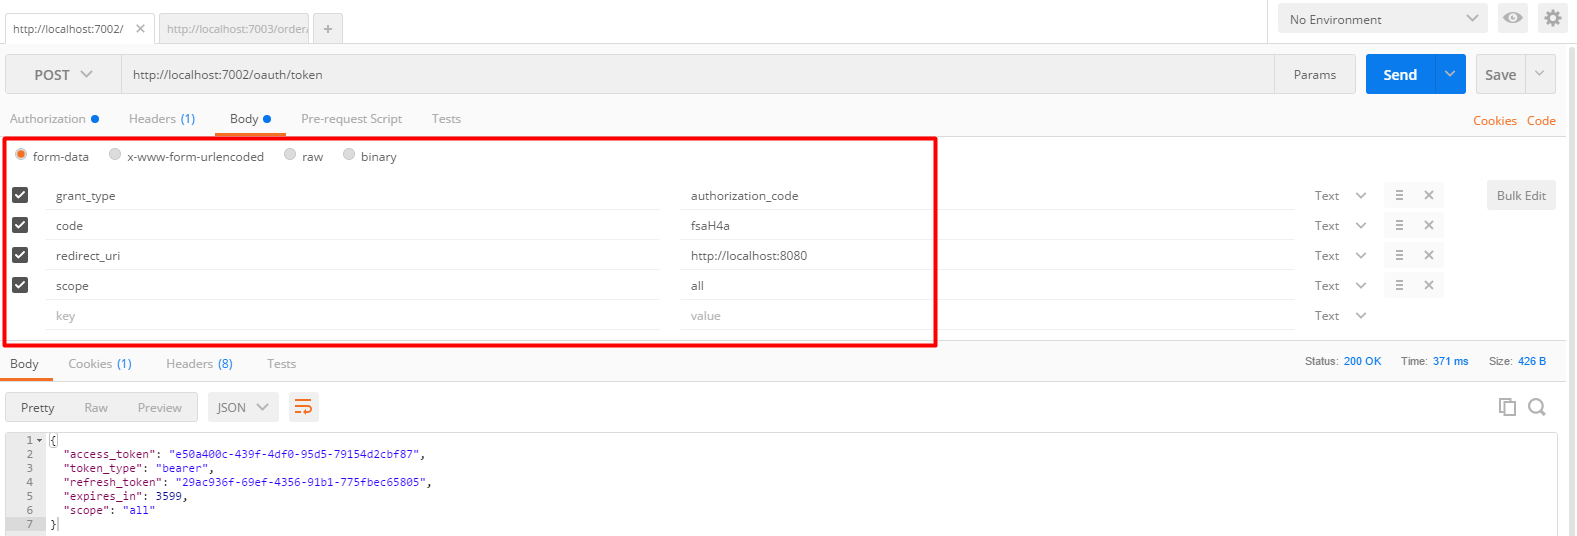
返回值
 {

     "access_token": "e50a400c-439f-4df0-95d5-79154d2cbf87",

     "token_type": "bearer",

     "refresh_token": "29ac936f-69ef-4356-91b1-775fbec65805",

     "expires_in": 3599,

     "scope": "all"

 }
这样就获取到了token令牌,该token的访问权限范围是all权限,在1小时后失效。
3、使用token访问资源
http://localhost:7003/order/demo?access_token=e50a400c-439f-4df0-95d5-79154d2cbf87

五、Github源码下载
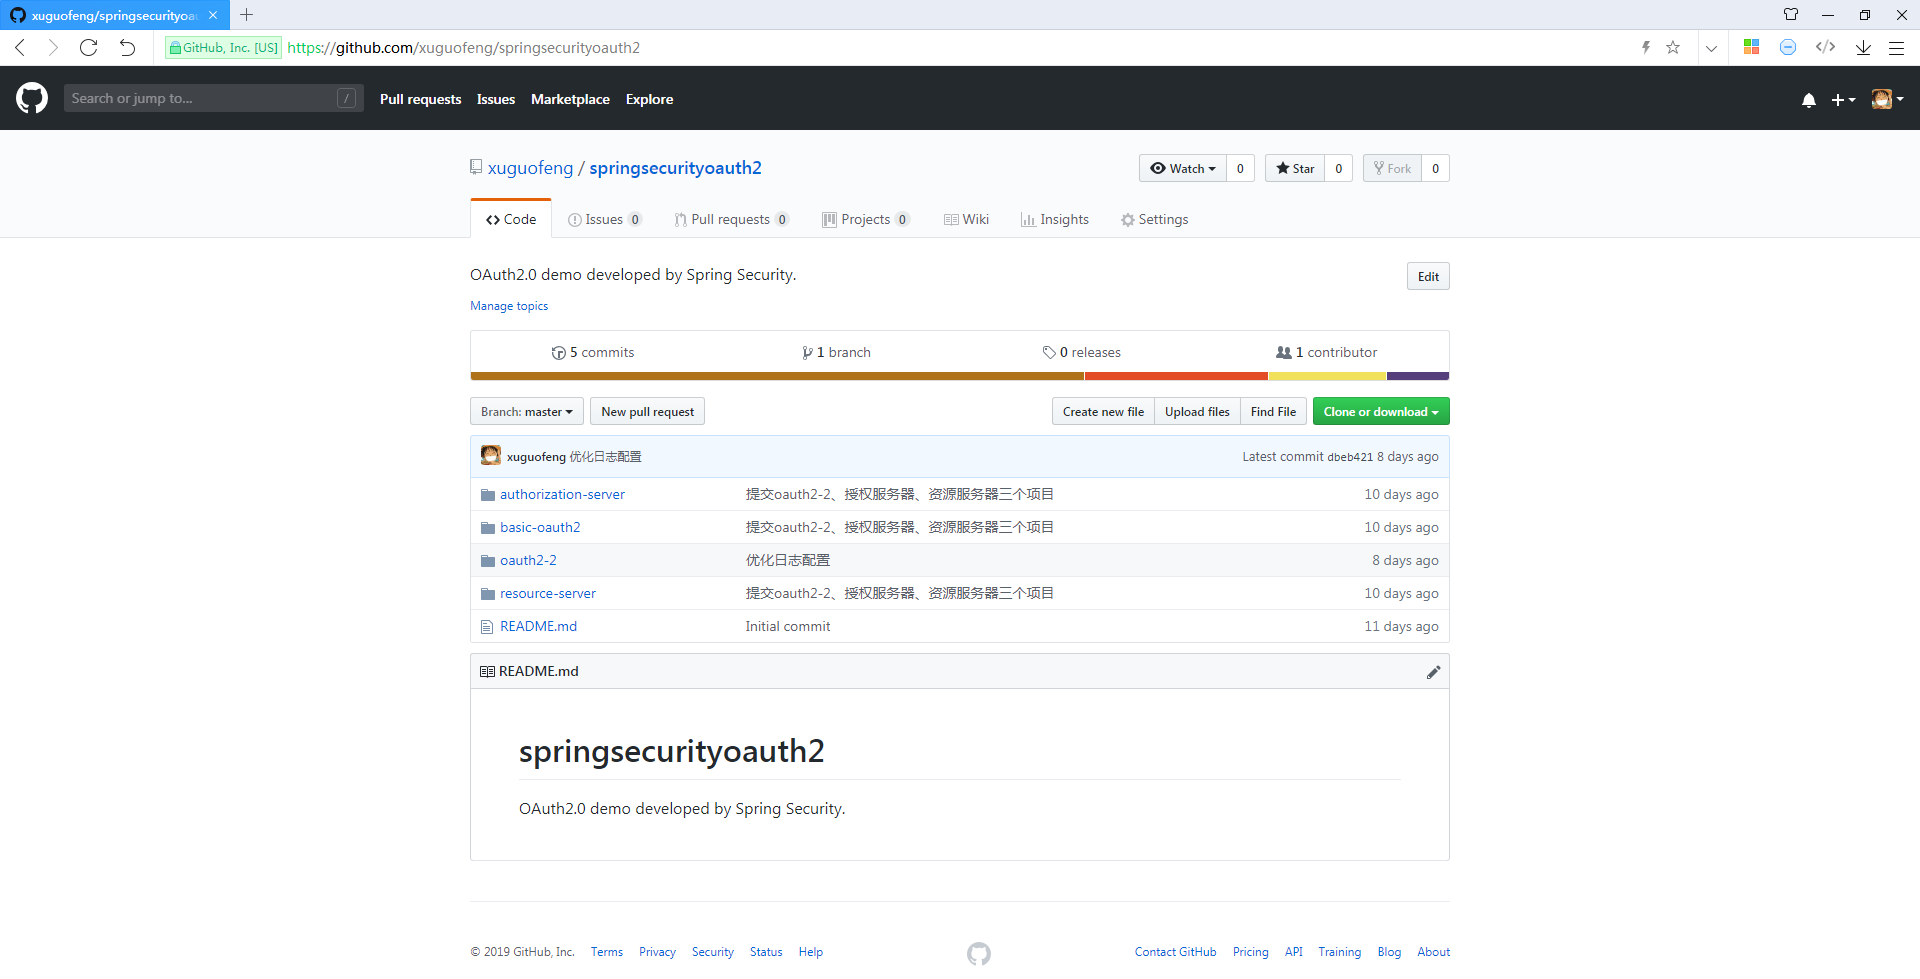
https://github.com/xuguofeng/springsecurityoauth2
Spring Security OAuth2.0 - AuthorizationServer和ResourceServer分离的更多相关文章
- Spring Security OAuth2.0认证授权六:前后端分离下的登录授权
历史文章 Spring Security OAuth2.0认证授权一:框架搭建和认证测试 Spring Security OAuth2.0认证授权二:搭建资源服务 Spring Security OA ...
- springboot+spring security +oauth2.0 demo搭建(password模式)(认证授权端与资源服务端分离的形式)
项目security_simple(认证授权项目) 1.新建springboot项目 这儿选择springboot版本我选择的是2.0.6 点击finish后完成项目的创建 2.引入maven依赖 ...
- 【OAuth2.0】Spring Security OAuth2.0篇之初识
不吐不快 因为项目需求开始接触OAuth2.0授权协议.断断续续接触了有两周左右的时间.不得不吐槽的,依然是自己的学习习惯问题,总是着急想了解一切,习惯性地钻牛角尖去理解小的细节,而不是从宏观上去掌握 ...
- 基于spring boot2.0+spring security +oauth2.0+ jwt微服务架构
github地址:https://github.com/hankuikuide/microservice-spring-security-oauth2 项目介绍 该项目是一个演示项目,主要演示了,基于 ...
- Spring Security OAuth2.0认证授权二:搭建资源服务
在上一篇文章[Spring Security OAuth2.0认证授权一:框架搭建和认证测试](https://www.cnblogs.com/kuangdaoyizhimei/p/14250374. ...
- Spring Security OAuth2.0认证授权四:分布式系统认证授权
Spring Security OAuth2.0认证授权系列文章 Spring Security OAuth2.0认证授权一:框架搭建和认证测试 Spring Security OAuth2.0认证授 ...
- Spring Security OAuth2.0认证授权三:使用JWT令牌
Spring Security OAuth2.0系列文章: Spring Security OAuth2.0认证授权一:框架搭建和认证测试 Spring Security OAuth2.0认证授权二: ...
- Spring Security OAuth2.0认证授权五:用户信息扩展到jwt
历史文章 Spring Security OAuth2.0认证授权一:框架搭建和认证测试 Spring Security OAuth2.0认证授权二:搭建资源服务 Spring Security OA ...
- spring security oauth2 jwt 认证和资源分离的配置文件(java类配置版)
最近再学习spring security oauth2.下载了官方的例子sparklr2和tonr2进行学习.但是例子里包含的东西太多,不知道最简单最主要的配置有哪些.所以决定自己尝试搭建简单版本的例 ...
随机推荐
- Nginx 反向代理功能-动静分离
Nginx 反向代理功能-动静分离 作者:尹正杰 版权声明:原创作品,谢绝转载!否则将追究法律责任.
- Leetcode79 Word Search
题目描述 Given a 2D board and a word, find if the word exists in the grid. The word can be constructed f ...
- 移动端好用的下拉加载上拉刷新插件 dropload插件
入了很多下拉加载上拉刷新的插件,但是感觉都不好用,知道最近遇到这款dropload的插件,瞬间打开新世界的大门啊,无卡顿简单易用可配置 <!doctype html> <html&g ...
- python中的__init__(self)是什么意思呢
python中的__init__(self)是什么意思呢 init(self)这个时类的初始化函数 1 2 3 4 class Obj: def init(self): print 1 obj = O ...
- 10 使用 OpenCV、Kafka 和 Spark 技术进行视频流分析
问题引起 基于分布式计算框架Spark的室内防盗预警系统 首先用摄像头录一段视频,存在电脑里,下载一个ffmpeg的软件对视频进行处理,处理成一张张图片,然后通过hadoop里边的一个文件系统叫做hd ...
- 可怕的Full GC (转自Hbase不睡觉书)
PS:之前做项目的时候,需要做个复杂的查询,大量的查询总是导致hbase集群奔溃,最后定位到时full GC的原因. 以下转自<Hbase不睡觉书>-------------------- ...
- day 19
If you think you can, you can. And if you think you can't, you're right.
- Elasticsearch的null values
很多时候,我们需要面临null值的烦扰,查询es时传入null值是要查询出null的数据还是不查这个field呢,稍有不慎就会引发新的bug,这的确是个问题! null_value 意味着无法索引或搜 ...
- pyinstaller 如何引入Pycharm项目中的第三方库
使用Pycharm作为IDE的项目,引用的第三方库一般放在项目所在目录的venv\Lib\site-packages下,因此可使用以下语句引入第三方库 pyinstaller -p venv\Lib\ ...
- HP Client Security Manager
HP Client Security Manager - SP77916 操作系统:windows 10 64位 HP Client Security Manager - SP77916.ex ...