
Android——微信界面(简易版)
前面我们简单的介绍了一下android的五大布局,那么现在我们来实践一下,写一个简单的微信界面
首先,我们新建一个weixin.xml的linnerlayout布局
我们日常使用的微信,从简单的方面来说我可一分成三个内容,头部标签栏,中间显示信息栏,还有一个底部。那么我们就按照这个来先建一个页面

 1 <?xml version="1.0" encoding="utf-8"?>

 2 <LinearLayout xmlns:android="http://schemas.android.com/apk/res/android"

 3     android:layout_width="match_parent"

 4     android:layout_height="match_parent"

 5     android:orientation="vertical" >

 6     <!-- head -->

 7     <LinearLayout

 8         android:layout_width="match_parent"

 9         android:layout_height="wrap_content" >

10     </LinearLayout>

11

12     <!-- 中间 -->

13     <LinearLayout

14         android:layout_width="match_parent"

15         android:layout_height="wrap_content"

16     </LinearLayout>

17

18     <!-- 底部 -->

19     <LinearLayout

20         android:layout_width="match_parent"

21         android:layout_height="wrap_content" >

22     </LinearLayout>

23

24 </LinearLayout>
效果如下:
这是完成后的显示
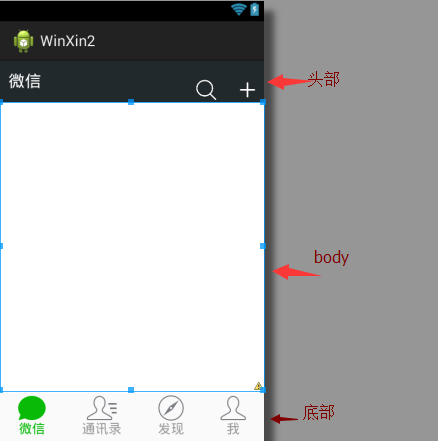
那么要怎么实现到这个效果,
1.先创建一个标题栏的layout文件
 1 <?xml version="1.0" encoding="utf-8"?>

 2 <LinearLayout xmlns:android="http://schemas.android.com/apk/res/android"

 3     android:layout_width="match_parent"

 4     android:layout_height="50dp"

 5     android:orientation="horizontal"

 6     android:background="#21292c">

 7

 8     <TextView

 9         android:id="@+id/textView1"

10         android:layout_width="wrap_content"

11         android:layout_height="wrap_content"

12         android:text="@string/weixin"

13         android:textColor="#ffffff"

14         android:textSize="20sp"

15         android:layout_gravity="center"

16         android:padding="10dp"/>

17

18     <TextView

19         android:layout_width="wrap_content"

20         android:layout_marginTop="20dp"

21         android:layout_height="30dp"

22         android:layout_weight="1"

23         android:gravity="bottom" />

24

25     <LinearLayout

26         android:layout_width="wrap_content"

27         android:layout_height="match_parent"

28         android:gravity="bottom">

29

30         <ImageView

31             android:id="@+id/imageView2"

32             android:layout_width="40dp"

33             android:layout_height="30dp"

34             android:src="@drawable/fdj"

35             android:layout_marginRight="10dp"/>

36

37         <ImageView

38             android:id="@+id/imageView1"

39             android:layout_width="40dp"

40             android:layout_height="30dp"

41             android:src="@drawable/barbuttonicon_add" />

42

43     </LinearLayout>

44

45 </LinearLayout>
然后我们在创建一个底部的文件的
 1 <?xml version="1.0" encoding="utf-8"?>

 2 <LinearLayout xmlns:android="http://schemas.android.com/apk/res/android"

 3     android:layout_width="match_parent"

 4     android:layout_height="match_parent"

 5     android:orientation="horizontal" >

 6

 7     <RadioGroup

 8         android:id="@+id/radioGroup1"

 9         android:layout_width="match_parent"

10         android:layout_height="60dp"

11         android:orientation="horizontal"

12         android:background="@drawable/group_buton_nomal"

13         android:gravity="center">

14

15         <RadioButton

16             android:id="@+id/radio0"

17             android:layout_width="wrap_content"

18             android:layout_height="wrap_content"

19             android:checked="true"

20             android:text="@string/weixin"

21                style="@style/radioStyle"

22                android:drawableTop="@drawable/tab_weixin"/>

23

24         <RadioButton

25             android:id="@+id/radio1"

26             android:layout_width="wrap_content"

27             android:layout_height="wrap_content"

28             android:text="@string/addressList"

29                style="@style/radioStyle"

30                android:drawableTop="@drawable/tab_address"/>

31

32         <RadioButton

33             android:id="@+id/radio2"

34             android:layout_width="wrap_content"

35             android:layout_height="wrap_content"

36             android:text="@string/find"

37                style="@style/radioStyle"

38                android:drawableTop="@drawable/tab_find"/>

39

40          <RadioButton

41             android:id="@+id/radio3"

42             android:layout_width="wrap_content"

43             android:layout_height="wrap_content"

44             android:text="@string/set"

45                style="@style/radioStyle"

46                android:drawableTop="@drawable/tab_set"/>

47     </RadioGroup>

48

49 </LinearLayout>
底部文件采用的是单选按钮组,这里我就不过多解释了,跟HTML的单选按钮类似
上面的用到的style是自己设计的一个按钮样式,放在style.xml的文件里,具体代码如下
1 <style name="radioStyle">

2         <item name="android:button">@null</item>

3         <item name="android:layout_weight">1</item>

4         <item name="android:gravity">center</item>

5         <item name="android:textColor">@drawable/text_color</item>

6     </style>
为了让让底部的显示效果更加的接近我们日常使用的微信,我们对按钮做了一个判断,就是使用selector(不懂的请看下一章)
代码如下:
1 <?xml version="1.0" encoding="utf-8"?>

2 <selector xmlns:android="http://schemas.android.com/apk/res/android" >

3     <item android:state_checked="true"

4         android:drawable="@drawable/tabbar_contacts_hl"></item>

5     <item

6         android:drawable="@drawable/tabbar_contacts"></item>

7

8 </selector>
就是通过焦点是否在该按钮上,在的化显示有颜色的图片,不在的化显示没颜色的。对其他桑按钮同样的操作,代码一样,只是把图片换一下就OK了。
还有文字也进行了相同的操作
1 <?xml version="1.0" encoding="utf-8"?>

2 <selector xmlns:android="http://schemas.android.com/apk/res/android" >

3     <item android:state_checked="true"

4         android:drawable="@drawable/tabbar_contacts_hl"></item>

5     <item

6         android:drawable="@drawable/tabbar_contacts"></item>

7

8 </selector>
好了,一切准备,就绪,我们只需要将一切和起来就可以了。我们可以在weixin.xml通过include的标签把这些包含进来
<?xml version="1.0" encoding="utf-8"?>

<LinearLayout xmlns:android="http://schemas.android.com/apk/res/android"

    android:layout_width="match_parent"

    android:layout_height="match_parent"

    android:orientation="vertical" >

    <!-- head -->

    <LinearLayout

        android:layout_width="match_parent"

        android:layout_height="wrap_content" >

        <include layout="@layout/head"/>

    </LinearLayout>

    <!-- 中间 -->

    <LinearLayout

        android:layout_width="match_parent"

        android:layout_height="wrap_content"

        android:layout_weight="1">

    </LinearLayout>

    <!-- 底部 -->

    <LinearLayout

        android:layout_width="match_parent"

        android:layout_height="wrap_content" >

        <include layout="@layout/bottom"/>

    </LinearLayout>

</LinearLayout>
这样一个简单的微信界面就准备h好了
但是你运行的时候是不是觉得不对劲,跟我们的实际用的微信不一样,那是因为多了一个系统默认的标题栏,我们把他去掉就可以了。
在AndroidManifest.xml的作一下的修改即可

那样一个见到你微信布局就完成了.
Android——微信界面(简易版)的更多相关文章
- Android微信支付V3版
由于公司需求做微信APP支付,在集成过程中也遇到各种问题,比如说签名错误,body编码必须为UTF-8.APP端无法调用支付页面直接到支付结果页面.结果为null,code=-1等等: 1.签名错误问 ...
- Android学习之简易版的新闻应用
•准备工作 新建一个项目,命名为 FragmentBestProject,并选择 Empty Activity: 并将项目的模式结构改为 Project 模式: •进入主题 首先,准备好一个新闻实体类 ...
- Android学习之路——简易版微信为例(三)
最近好久没有更新博文,一则是因为公司最近比较忙,另外自己在Android学习过程和简易版微信的开发过程中碰到了一些绊脚石,所以最近一直在学习充电中.下面来列举一下自己所走过的弯路: (1)本来打算前端 ...
- Android学习之路——简易版微信为例(二)
1 概述 从这篇博文开始,正式进入简易版微信的开发.深入学习前,想谈谈个人对Android程序开发一些理解,不一定正确,只是自己的一点想法.Android程序开发不像我们在大学时候写C控制台程序那样, ...
- Android学习之路——简易版微信为例(一)
这是“Android学习之路”系列文章的开篇,可能会让大家有些失望——这篇文章中我们不介绍简易版微信的实现(不过不是标题党哦,我会在后续博文中一步步实现这个应用程序的).这里主要是和广大园友们聊聊一个 ...
- python简易版微信或QQ轰炸
在讲解代码之前我们先来回忆一下,平时我们发送消息时,先打开微信或QQ的界面,在信息栏中输入你要发送的内容在点击发送或通过快捷键发送.如果要发送表情时,先打开微信或QQ的界面,在点击表情包中你要发送 ...
- android微信聊天记录导出到电脑【微信安卓版技巧】
微信,对它又爱又恨!爱的是微信能替代很多手机通话短信,恨的是有些较早前的手机不能友好支持,比如ytkah之前用的i8000,挺上手的,就是没办法装微信,当时工作需要必须用微信,只好忍痛割爱买了个and ...
- Android菜鸟成长记8 -- 布局实践(微信界面的编写)
前面我们简单的介绍了一下android的五大布局,那么现在我们来实践一下,写一个简单的微信界面 首先,我们新建一个weixin.xml的linnerlayout布局 我们日常使用的微信,从简单的方面来 ...
- 【转】android 欢迎界面翻页成效,仿微信第一次登陆介绍翻页界面
android 欢迎界面翻页效果,仿微信第一次登陆介绍翻页界面 本实例做的相对比较简单主要是对翻页控件的使用,有时候想要做一些功能是主要是先了解下是否有现成的控件可以使用,做起来比较简单不用费太大的劲 ...
随机推荐
- 网络拥塞控制与NS2仿真
准备工作: 1. 安装virtual box 虚拟机,并安装虚拟机增强功能,并配制共享文件夹. 共享文件夹自动挂载后的路径为/media/sf_xxx文件夹,xxx为所起的文件名. 解决virtual ...
- SNF开发平台WinForm之三-开发-单表选择控件创建-SNF快速开发平台3.3-Spring.Net.Framework
3.1运行效果: 3.2开发实现: 3.2.1 这个开发与第一个开发操作步骤是一致的,不同之处就是在生成完代码之后,留下如下圈红程序,其它删除. 第一个开发地址:开发-单表表格编辑管理页面 http: ...
- 在android中如何通过点击edittext之外的部分使软键盘隐藏
我们知道在android中点击edittext框就会自动弹出软键盘,那怎么通过点击edittext之外的部分使软键盘隐藏呢?(微信聊天时的输入框就是这个效果,这个给用户的体验还是很不错的) 首先我们要 ...
- IOS学习之路七(使用 Operation 异步运行任务)
在 application delegate 头文件(.h)中声明一个 operation 队列和两个 invocation operations: #import <UIKit/UIKit.h ...
- git回滚到上一版本
git reset --hard HEAD~1
- ionic+angular+cordova 安卓环境搭建
1.java环境配置 下载java jdk 百度搜索java jdk安装完后在cmd窗口输入Java -version 显示以下即为安装成功.然后把java jdk配置到环境变量. (1)选择[新建系 ...
- C++中指针和引用的区别
①指针可以为空,引用不能为空: ②指针可以被赋值,引用必须在声明时赋值,之后不能被赋值: ③指针可以指向堆中空间,引用不能指向堆中空间,如int &p=new int; 会编译出错.
- python第三方模块精选
python不但有着强大丰富的“内置电池”,同样的,第三方模块也是非常的多.目前收集了requests.paramiko.pymsql,以后会陆续添加: 一.requests Python标准库中提供 ...
- JS魔法堂:doctype我们应该了解的基础知识
一.前言 什么是doctype?其实我们一直使用,却很少停下来看清楚它到底是什么,对网页有什么作用.本篇将和大家一起探讨那个默默无闻的doctype吧! 二.什么是doctype doctype或DT ...
- IOS开发UI基础UITextFidle相关属性
UITextFidle相关属性 • enablesReturnKeyAutomatically默认为No,如果设置为Yes,文本框中没有输入任何字符的话,右下角的返回按钮是disabled的. ...